Biology LibreTexts

8.4: Materials and Procedures

  • Page ID
    40200
  • \( \newcommand{\vecs}[1]{\overset { \scriptstyle \rightharpoonup} {\mathbf{#1}} } \)

    \( \newcommand{\vecd}[1]{\overset{-\!-\!\rightharpoonup}{\vphantom{a}\smash {#1}}} \)

    \( \newcommand{\id}{\mathrm{id}}\) \( \newcommand{\Span}{\mathrm{span}}\)

    ( \newcommand{\kernel}{\mathrm{null}\,}\) \( \newcommand{\range}{\mathrm{range}\,}\)

    \( \newcommand{\RealPart}{\mathrm{Re}}\) \( \newcommand{\ImaginaryPart}{\mathrm{Im}}\)

    \( \newcommand{\Argument}{\mathrm{Arg}}\) \( \newcommand{\norm}[1]{\| #1 \|}\)

    \( \newcommand{\inner}[2]{\langle #1, #2 \rangle}\)

    \( \newcommand{\Span}{\mathrm{span}}\)

    \( \newcommand{\id}{\mathrm{id}}\)

    \( \newcommand{\Span}{\mathrm{span}}\)

    \( \newcommand{\kernel}{\mathrm{null}\,}\)

    \( \newcommand{\range}{\mathrm{range}\,}\)

    \( \newcommand{\RealPart}{\mathrm{Re}}\)

    \( \newcommand{\ImaginaryPart}{\mathrm{Im}}\)

    \( \newcommand{\Argument}{\mathrm{Arg}}\)

    \( \newcommand{\norm}[1]{\| #1 \|}\)

    \( \newcommand{\inner}[2]{\langle #1, #2 \rangle}\)

    \( \newcommand{\Span}{\mathrm{span}}\) \( \newcommand{\AA}{\unicode[.8,0]{x212B}}\)

    \( \newcommand{\vectorA}[1]{\vec{#1}}      % arrow\)

    \( \newcommand{\vectorAt}[1]{\vec{\text{#1}}}      % arrow\)

    \( \newcommand{\vectorB}[1]{\overset { \scriptstyle \rightharpoonup} {\mathbf{#1}} } \)

    \( \newcommand{\vectorC}[1]{\textbf{#1}} \)

    \( \newcommand{\vectorD}[1]{\overrightarrow{#1}} \)

    \( \newcommand{\vectorDt}[1]{\overrightarrow{\text{#1}}} \)

    \( \newcommand{\vectE}[1]{\overset{-\!-\!\rightharpoonup}{\vphantom{a}\smash{\mathbf {#1}}}} \)

    \( \newcommand{\vecs}[1]{\overset { \scriptstyle \rightharpoonup} {\mathbf{#1}} } \)

    \( \newcommand{\vecd}[1]{\overset{-\!-\!\rightharpoonup}{\vphantom{a}\smash {#1}}} \)

    \(\newcommand{\avec}{\mathbf a}\) \(\newcommand{\bvec}{\mathbf b}\) \(\newcommand{\cvec}{\mathbf c}\) \(\newcommand{\dvec}{\mathbf d}\) \(\newcommand{\dtil}{\widetilde{\mathbf d}}\) \(\newcommand{\evec}{\mathbf e}\) \(\newcommand{\fvec}{\mathbf f}\) \(\newcommand{\nvec}{\mathbf n}\) \(\newcommand{\pvec}{\mathbf p}\) \(\newcommand{\qvec}{\mathbf q}\) \(\newcommand{\svec}{\mathbf s}\) \(\newcommand{\tvec}{\mathbf t}\) \(\newcommand{\uvec}{\mathbf u}\) \(\newcommand{\vvec}{\mathbf v}\) \(\newcommand{\wvec}{\mathbf w}\) \(\newcommand{\xvec}{\mathbf x}\) \(\newcommand{\yvec}{\mathbf y}\) \(\newcommand{\zvec}{\mathbf z}\) \(\newcommand{\rvec}{\mathbf r}\) \(\newcommand{\mvec}{\mathbf m}\) \(\newcommand{\zerovec}{\mathbf 0}\) \(\newcommand{\onevec}{\mathbf 1}\) \(\newcommand{\real}{\mathbb R}\) \(\newcommand{\twovec}[2]{\left[\begin{array}{r}#1 \\ #2 \end{array}\right]}\) \(\newcommand{\ctwovec}[2]{\left[\begin{array}{c}#1 \\ #2 \end{array}\right]}\) \(\newcommand{\threevec}[3]{\left[\begin{array}{r}#1 \\ #2 \\ #3 \end{array}\right]}\) \(\newcommand{\cthreevec}[3]{\left[\begin{array}{c}#1 \\ #2 \\ #3 \end{array}\right]}\) \(\newcommand{\fourvec}[4]{\left[\begin{array}{r}#1 \\ #2 \\ #3 \\ #4 \end{array}\right]}\) \(\newcommand{\cfourvec}[4]{\left[\begin{array}{c}#1 \\ #2 \\ #3 \\ #4 \end{array}\right]}\) \(\newcommand{\fivevec}[5]{\left[\begin{array}{r}#1 \\ #2 \\ #3 \\ #4 \\ #5 \\ \end{array}\right]}\) \(\newcommand{\cfivevec}[5]{\left[\begin{array}{c}#1 \\ #2 \\ #3 \\ #4 \\ #5 \\ \end{array}\right]}\) \(\newcommand{\mattwo}[4]{\left[\begin{array}{rr}#1 \amp #2 \\ #3 \amp #4 \\ \end{array}\right]}\) \(\newcommand{\laspan}[1]{\text{Span}\{#1\}}\) \(\newcommand{\bcal}{\cal B}\) \(\newcommand{\ccal}{\cal C}\) \(\newcommand{\scal}{\cal S}\) \(\newcommand{\wcal}{\cal W}\) \(\newcommand{\ecal}{\cal E}\) \(\newcommand{\coords}[2]{\left\{#1\right\}_{#2}}\) \(\newcommand{\gray}[1]{\color{gray}{#1}}\) \(\newcommand{\lgray}[1]{\color{lightgray}{#1}}\) \(\newcommand{\rank}{\operatorname{rank}}\) \(\newcommand{\row}{\text{Row}}\) \(\newcommand{\col}{\text{Col}}\) \(\renewcommand{\row}{\text{Row}}\) \(\newcommand{\nul}{\text{Nul}}\) \(\newcommand{\var}{\text{Var}}\) \(\newcommand{\corr}{\text{corr}}\) \(\newcommand{\len}[1]{\left|#1\right|}\) \(\newcommand{\bbar}{\overline{\bvec}}\) \(\newcommand{\bhat}{\widehat{\bvec}}\) \(\newcommand{\bperp}{\bvec^\perp}\) \(\newcommand{\xhat}{\widehat{\xvec}}\) \(\newcommand{\vhat}{\widehat{\vvec}}\) \(\newcommand{\uhat}{\widehat{\uvec}}\) \(\newcommand{\what}{\widehat{\wvec}}\) \(\newcommand{\Sighat}{\widehat{\Sigma}}\) \(\newcommand{\lt}{<}\) \(\newcommand{\gt}{>}\) \(\newcommand{\amp}{&}\) \(\definecolor{fillinmathshade}{gray}{0.9}\)

    Materials

    • Tryptic Soy Agar plates (TSA plates)
    • Tryptic Soy Broth tubes (TSB)
    • Tryptic Soy Agar slants (TSA slants)
    • Bacterial Cultures
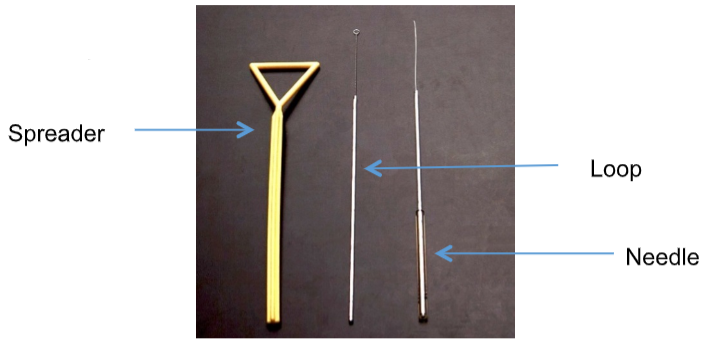
    • Loop
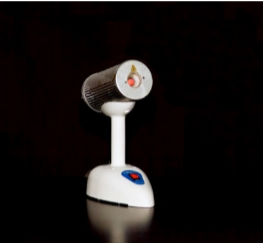
    • Incinerator
    clipboard_e80ead45cd0dc14f4924118cffeaacd8a.png
    Figure \(\PageIndex{1}\): Inoculation Instruments
    clipboard_e15e2aababb30c6bb814c9d144fd5b9e5.png
    Figure \(\PageIndex{2}\): Incinerator

    Procedures

    Prepare your work area by sanitizing the lab bench, plug in and turn on your incinerator, gather materials and with your group organize the work to be done. Make sure that everyone in your group works together to stay organized and informed. Though you may split up some of the workload, everyone is accountable and must know how to do each technique, procedure, etc.

    1. Transfer techniques from one tube to another:
      1. Broth culture to a new broth:
        • Hold loop like a pencil

        • Sterilize loop in incinerator for 5-10 seconds (look at the loop in the incinerator for it to become red-hot), insert the full length of the wire into the incinerator.

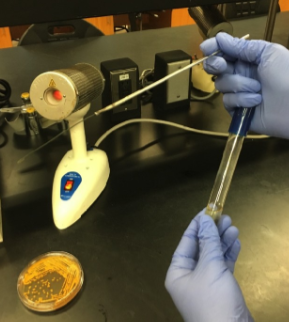
        • While loop is cooling and still holding it like a pencil, remove the cap by gently pulling the tube while holding the cap by curving your pinky finger around it. See Fig. 6.

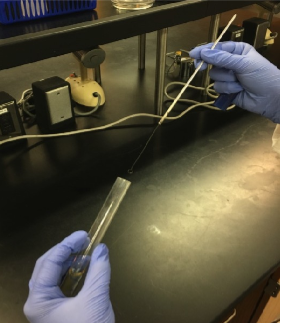
        • Insert the loop into the test tube; do not touch the lip of the tube with the loop or your fingers. Fig. 7. Dip the loop into the liquid and withdraw it from the tube.

        • Insert the loop into a new tube, twist the loop gently and withdraw it from the tube.

        • Sterilize the loop in the incinerator.
    clipboard_e144192134be6c105d5a6a1286cdd136b.png
    Figure \(\PageIndex{3}\): Open test tube

    clipboard_e481367425ef4e5cae4ef859251e5903a.png
    Figure \(\PageIndex{4}\): Inserting the loop into a broth or slant
    1. Broth to slant
      • Hold loop like a pencil
      • Sterilize loop in incinerator for 5-10 seconds (look at the loop in the incinerator for it to become red-hot), insert the full length of the wire into the incinerator.
      • While loop is cooling and still holding it like a pencil, remove the cap by gently pulling the tube while holding the cap by curving your pinky finger around it. See Figure \(\PageIndex{3}\).
      • Insert the loop into the test tube; do not touch the lip of the tube with the loop or your fingers. Dip the loop into the liquid and withdraw it from the tube.
      • Insert the loop into a slant. Inoculate the slant by placing the loop on the surface of the slant, at the bottom, and draw the loop up the surface of the slant; withdraw the loop from the tube.
      • Sterilize the loop in the incinerator.
    2. Agar plate (solid media) to a broth or slant
      • Hold loop like a pencil
      • Sterilize loop in incinerator for 5-10 seconds (look at the loop in the incinerator for it to become red-hot), insert the full length of the wire into the incinerator.
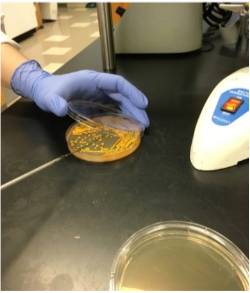
      • Let the loop cool for a few seconds. Still holding it like a pencil, remove the lid of the plate while keeping it over the plate. The most common way of doing this is to “clamshell” the lid by opening it at an angle of the plate. See Figure \(\PageIndex{5}\).
      • Insert the loop into the plate and “pick” a colony. This means, lightly touch a colony of bacteria to get a small amount on the loop. You should NOT see a big glob of bacteria on the loop. You should be barely able to see any material on the loop—trust us, there will be plenty of bacteria on your loop.
      • Inoculate a slant or broth.
      • Sterilize the loop in the incinerator.
    clipboard_e53b005ac9a59daa436d8f9b21c3453f2.png
    Figure \(\PageIndex{5}\): Copy and Paste Caption here
    1. Broth or slant to an agar plate (streak plate)
      • Hold loop like a pencil
      • Sterilize loop in incinerator for 5-10 seconds (look at the loop in the incinerator for it to become red-hot), insert the full length of the wire into the incinerator.
      • While loop is cooling and still holding it like a pencil, remove the cap by gently pulling the tube while holding the cap by curving your pinky finger around it. See Figure \(\PageIndex{3}\).
      • Insert the loop into the test tube; do not touch the lip of the tube with the loop or your fingers. Dip the loop into the broth, or pick a colony from a slant and withdraw it from the tube.
      • Clamshell the agar plate and inoculate by performing a streak plate, Figures 8.1.1 and 8.1.2.
      • Sterilize the loop in the incinerator.
    1. Perform an isolation streak from a mixed culture
      1. Each group inoculates the 2 organisms, E. coli and Sarcina aurantiaca onto
        • 1 TSA plate (Quadrant Streak Plate Method)
        • 1 TSA slant
        • 1 TSB (5mL)
      2. Mix the cultures (make 1 test tube of mixed culture per group):
        • To the Sarcina aurantiaca culture test tube add 0.5ml E. coli using the sterile transfer pipette.
        • Mix the culture well.
        • Put the transfer pipette into the small red biohazard bag on your benchtop.
      3. Each student will then streak a TSA plate from the mixed culture using the quadrant streak method, Figure 8.1.1.

    Results

    After you retrieve your streak plate the next day from the incubator, draw what it looks like below. Indicate differences in colonies.

    clipboard_efa48b4dd8604adb248e84644bc0ec584.png

    Contributors and Attributions


    This page titled 8.4: Materials and Procedures is shared under a CC BY license and was authored, remixed, and/or curated by Kelly C. Burke.

    • Was this article helpful?