1.15: SDS-PAGE
- Page ID
- 36757
\( \newcommand{\vecs}[1]{\overset { \scriptstyle \rightharpoonup} {\mathbf{#1}} } \)
\( \newcommand{\vecd}[1]{\overset{-\!-\!\rightharpoonup}{\vphantom{a}\smash {#1}}} \)
\( \newcommand{\dsum}{\displaystyle\sum\limits} \)
\( \newcommand{\dint}{\displaystyle\int\limits} \)
\( \newcommand{\dlim}{\displaystyle\lim\limits} \)
\( \newcommand{\id}{\mathrm{id}}\) \( \newcommand{\Span}{\mathrm{span}}\)
( \newcommand{\kernel}{\mathrm{null}\,}\) \( \newcommand{\range}{\mathrm{range}\,}\)
\( \newcommand{\RealPart}{\mathrm{Re}}\) \( \newcommand{\ImaginaryPart}{\mathrm{Im}}\)
\( \newcommand{\Argument}{\mathrm{Arg}}\) \( \newcommand{\norm}[1]{\| #1 \|}\)
\( \newcommand{\inner}[2]{\langle #1, #2 \rangle}\)
\( \newcommand{\Span}{\mathrm{span}}\)
\( \newcommand{\id}{\mathrm{id}}\)
\( \newcommand{\Span}{\mathrm{span}}\)
\( \newcommand{\kernel}{\mathrm{null}\,}\)
\( \newcommand{\range}{\mathrm{range}\,}\)
\( \newcommand{\RealPart}{\mathrm{Re}}\)
\( \newcommand{\ImaginaryPart}{\mathrm{Im}}\)
\( \newcommand{\Argument}{\mathrm{Arg}}\)
\( \newcommand{\norm}[1]{\| #1 \|}\)
\( \newcommand{\inner}[2]{\langle #1, #2 \rangle}\)
\( \newcommand{\Span}{\mathrm{span}}\) \( \newcommand{\AA}{\unicode[.8,0]{x212B}}\)
\( \newcommand{\vectorA}[1]{\vec{#1}} % arrow\)
\( \newcommand{\vectorAt}[1]{\vec{\text{#1}}} % arrow\)
\( \newcommand{\vectorB}[1]{\overset { \scriptstyle \rightharpoonup} {\mathbf{#1}} } \)
\( \newcommand{\vectorC}[1]{\textbf{#1}} \)
\( \newcommand{\vectorD}[1]{\overrightarrow{#1}} \)
\( \newcommand{\vectorDt}[1]{\overrightarrow{\text{#1}}} \)
\( \newcommand{\vectE}[1]{\overset{-\!-\!\rightharpoonup}{\vphantom{a}\smash{\mathbf {#1}}}} \)
\( \newcommand{\vecs}[1]{\overset { \scriptstyle \rightharpoonup} {\mathbf{#1}} } \)
\(\newcommand{\longvect}{\overrightarrow}\)
\( \newcommand{\vecd}[1]{\overset{-\!-\!\rightharpoonup}{\vphantom{a}\smash {#1}}} \)
\(\newcommand{\avec}{\mathbf a}\) \(\newcommand{\bvec}{\mathbf b}\) \(\newcommand{\cvec}{\mathbf c}\) \(\newcommand{\dvec}{\mathbf d}\) \(\newcommand{\dtil}{\widetilde{\mathbf d}}\) \(\newcommand{\evec}{\mathbf e}\) \(\newcommand{\fvec}{\mathbf f}\) \(\newcommand{\nvec}{\mathbf n}\) \(\newcommand{\pvec}{\mathbf p}\) \(\newcommand{\qvec}{\mathbf q}\) \(\newcommand{\svec}{\mathbf s}\) \(\newcommand{\tvec}{\mathbf t}\) \(\newcommand{\uvec}{\mathbf u}\) \(\newcommand{\vvec}{\mathbf v}\) \(\newcommand{\wvec}{\mathbf w}\) \(\newcommand{\xvec}{\mathbf x}\) \(\newcommand{\yvec}{\mathbf y}\) \(\newcommand{\zvec}{\mathbf z}\) \(\newcommand{\rvec}{\mathbf r}\) \(\newcommand{\mvec}{\mathbf m}\) \(\newcommand{\zerovec}{\mathbf 0}\) \(\newcommand{\onevec}{\mathbf 1}\) \(\newcommand{\real}{\mathbb R}\) \(\newcommand{\twovec}[2]{\left[\begin{array}{r}#1 \\ #2 \end{array}\right]}\) \(\newcommand{\ctwovec}[2]{\left[\begin{array}{c}#1 \\ #2 \end{array}\right]}\) \(\newcommand{\threevec}[3]{\left[\begin{array}{r}#1 \\ #2 \\ #3 \end{array}\right]}\) \(\newcommand{\cthreevec}[3]{\left[\begin{array}{c}#1 \\ #2 \\ #3 \end{array}\right]}\) \(\newcommand{\fourvec}[4]{\left[\begin{array}{r}#1 \\ #2 \\ #3 \\ #4 \end{array}\right]}\) \(\newcommand{\cfourvec}[4]{\left[\begin{array}{c}#1 \\ #2 \\ #3 \\ #4 \end{array}\right]}\) \(\newcommand{\fivevec}[5]{\left[\begin{array}{r}#1 \\ #2 \\ #3 \\ #4 \\ #5 \\ \end{array}\right]}\) \(\newcommand{\cfivevec}[5]{\left[\begin{array}{c}#1 \\ #2 \\ #3 \\ #4 \\ #5 \\ \end{array}\right]}\) \(\newcommand{\mattwo}[4]{\left[\begin{array}{rr}#1 \amp #2 \\ #3 \amp #4 \\ \end{array}\right]}\) \(\newcommand{\laspan}[1]{\text{Span}\{#1\}}\) \(\newcommand{\bcal}{\cal B}\) \(\newcommand{\ccal}{\cal C}\) \(\newcommand{\scal}{\cal S}\) \(\newcommand{\wcal}{\cal W}\) \(\newcommand{\ecal}{\cal E}\) \(\newcommand{\coords}[2]{\left\{#1\right\}_{#2}}\) \(\newcommand{\gray}[1]{\color{gray}{#1}}\) \(\newcommand{\lgray}[1]{\color{lightgray}{#1}}\) \(\newcommand{\rank}{\operatorname{rank}}\) \(\newcommand{\row}{\text{Row}}\) \(\newcommand{\col}{\text{Col}}\) \(\renewcommand{\row}{\text{Row}}\) \(\newcommand{\nul}{\text{Nul}}\) \(\newcommand{\var}{\text{Var}}\) \(\newcommand{\corr}{\text{corr}}\) \(\newcommand{\len}[1]{\left|#1\right|}\) \(\newcommand{\bbar}{\overline{\bvec}}\) \(\newcommand{\bhat}{\widehat{\bvec}}\) \(\newcommand{\bperp}{\bvec^\perp}\) \(\newcommand{\xhat}{\widehat{\xvec}}\) \(\newcommand{\vhat}{\widehat{\vvec}}\) \(\newcommand{\uhat}{\widehat{\uvec}}\) \(\newcommand{\what}{\widehat{\wvec}}\) \(\newcommand{\Sighat}{\widehat{\Sigma}}\) \(\newcommand{\lt}{<}\) \(\newcommand{\gt}{>}\) \(\newcommand{\amp}{&}\) \(\definecolor{fillinmathshade}{gray}{0.9}\)Learning Objectives
Goals:
- Prepare protein samples from transformed bacterial cells and perform a PAGE.
- Analyze PAGE products and identify proteins by molecular weight.
Student Learning Outcomes:
Upon completion of this lab, students will be able to:
- Explain how SDS-PAGE works.
- Run and analyze the results of a SDS-PAGE.
Introduction
Polyacrylamide Gel Electrophoresis
Polyacrylamide gel electrophoresis (PAGE) is probably the most common analytical technique used to separate and characterize proteins. A solution of acrylamide and bisacrylamide is polymerized. Acrylamide alone forms linear polymers. The bisacrylamide introduces crosslinks between polyacrylamide chains. The 'pore size' is determined by the ratio of acrylamide to bisacrylamide, and by the concentration of acrylamide. A high ratio of bisacrylamide to acrylamide and a high acrylamide concentration cause low electrophoretic mobility. Polymerization of acrylamide and bisacrylamide monomers is induced by ammonium persulfate (APS), which spontaneously decomposes to form free radicals. TEMED, a free radical stabilizer, is generally included to promote polymerization.
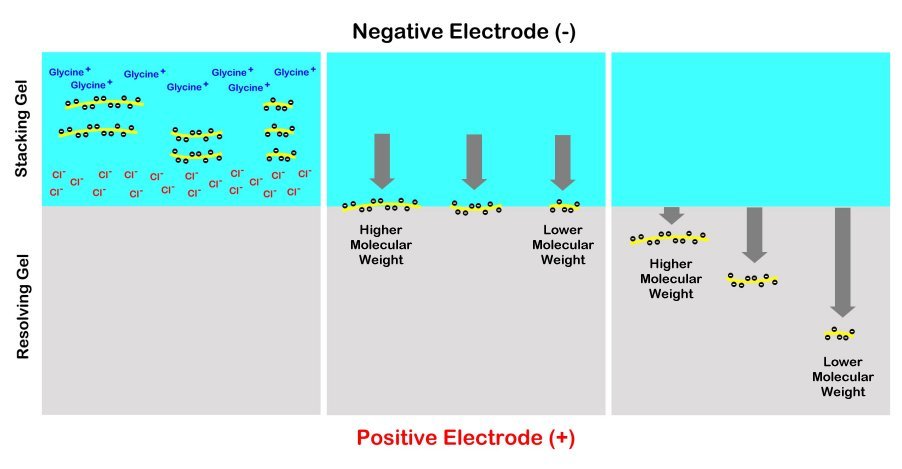
The gels are usually prepared with the top portion of the gel under the sample wells made less dense than the remainder of the gel below that is intentionally made denser. The top portion is referred to as the “stacking gel” and the lower portion is termed the “running gel” or “separating gel”. The purpose of the stacking gel is to concentrate all of the different sized proteins into a compact horizontal zone by sandwiching them between a gradient of glycine molecules above and chloride ions below. This way most of the proteins will enter the denser resolving gel simultaneously before they begin to migrate downwards at different rates based on their size. This way, the bands are much clearer and better separated for visualization and analysis. Without the stacking gel, the proteins will produce a long smear through the resolving gel instead of tight distinct bands for us to analyze.

SDS-PAGE
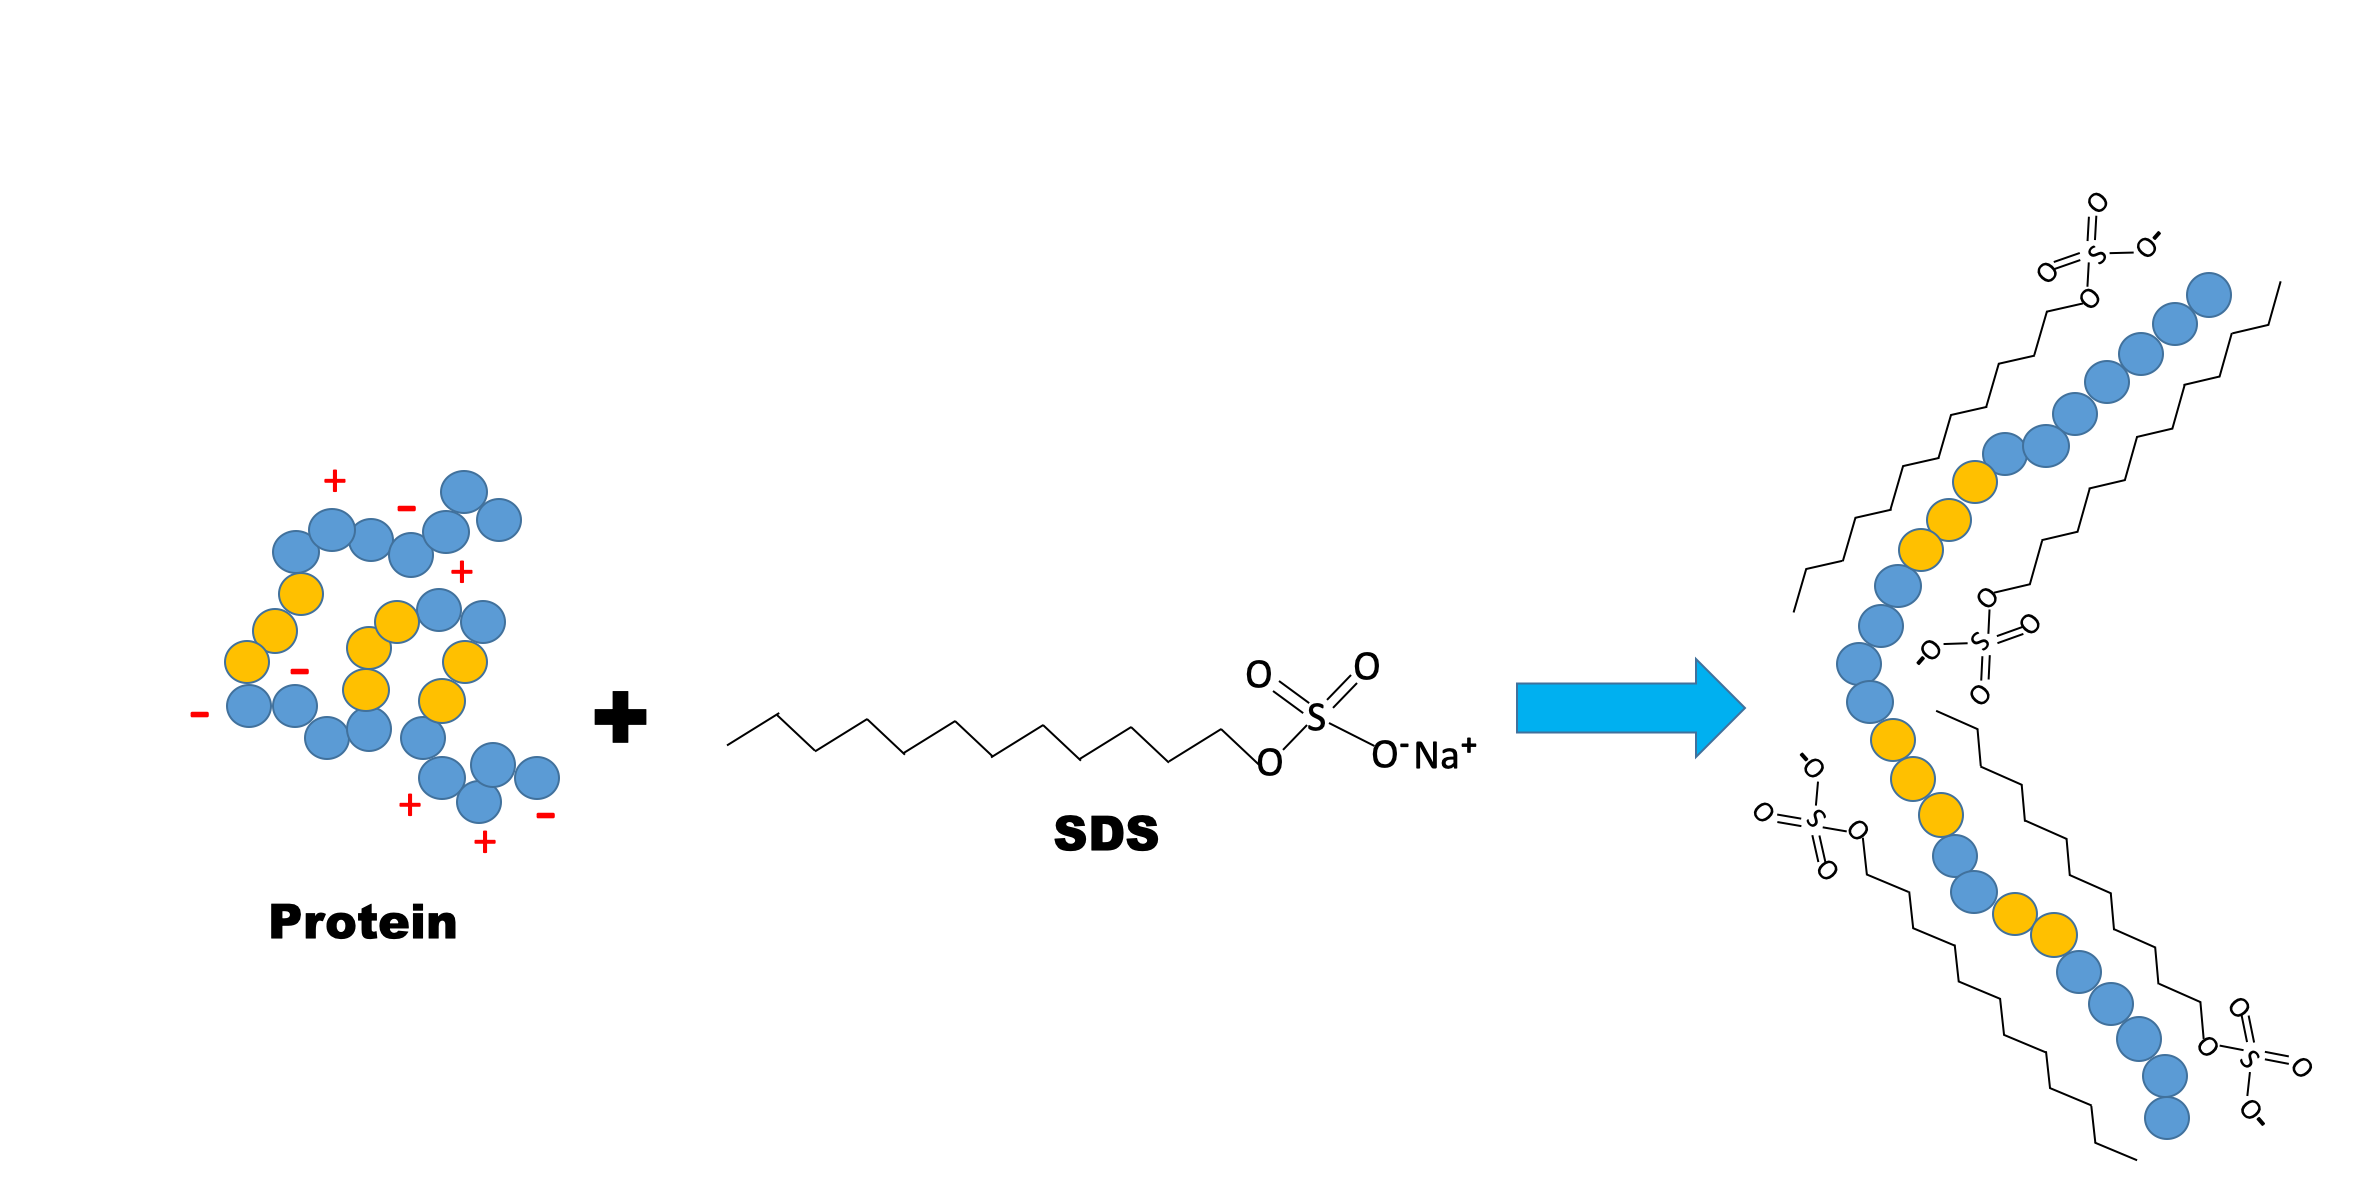
Sodium dodecyl sulfate (SDS) is an amphipathic detergent. It has an anionic head group and a lipophilic tail. It binds non-covalently to proteins, where roughly one SDS molecule is attracted to every two amino acids. SDS causes proteins to denature and disassociate from each other (excluding covalent cross-linking) and essentially unravel into linear molecules. It also confers negative charge. In the presence of SDS, the intrinsic charge of a protein is masked. During SDS-PAGE, all proteins migrate towards the anode (the positively charged electrode). SDS-treated proteins have very similar charge-to-mass ratios, and similar shapes. During PAGE, the rate of migration of SDS-treated proteins is effectively determined by their unfolded length, which is related to their molecular weight.

Part I: SDS-PAGE
Materials
- Vertical gel electrophoresis chambers and gel cassette assembly (Bio-Rad Mini PROTEAN)
- Tris/Glycine/SDS Running Buffer
- Power supply
- Bio-Rad 10% precast polyacrylamide Mini PROTEAN TGX stain-free gels (8.6 X 6.7 cm)
- Gel loading guide
- Micropipettes with gel loading tips
- Protein samples
- Bio-Rad 2X Laemmli Sample Buffer (contains SDS and either sucrose or glycerol)
and 2-Mercaptoethanol (reduces disulfide bonds, disrupts protein cross-links)
and loading dye - Prestained protein molecular weight standards (already prepared in sample buffer)
Procedure
Sample Preparation
- Be sure to wear gloves.
- Prepare a hot water bath (100°C). Place some water in a 600 mL or larger beaker and microwave or leave on a hot plate to boil. (This can take 15 minutes or more.)
- Combine 10 µL of each protein sample with 20 µL of Laemmli sample buffer/Loading Dye in labeled screw-top microcentrifuge tubes.
- Boil the samples for no more than 5 minutes to fully denature the proteins.
- After boiling, leave the sample tubes at room temperature until ready to load onto the gel.
Preparation of the Gel and Electrophoresis Chamber
- Be sure to wear gloves.
- Remove the pre-cast gel from the packaging. Carefully remove the green strip from the bottom of the gel.
- Open the two green side clamps on the vertical gel cassette assembly.
- Place the pre-cast gel on one side of the cassette and use the clear buffer dam on the other side of the cassette. Then carefully close the green side clamps.
- Insert the cassette into the vertical gel chamber matching the color of the electrodes (red and black) with the color guides at the sides of the chamber.
- Fill the inside of the cassette with 1X Tris Glycine SDS PAGE buffer until the wells are submerged.
- Fill the bottom of the vertical gel chamber with 1X Tris Glycine SDS PAGE buffer up to the mark on the side for 1 to 2 gels.
Loading the samples into the Gel
- Place the yellow gel loading guide on the top of the cassette.
- Using gel loading tips, micropipette 10 µL of prepared protein MW standard into the first (#1), fifth (#5) and last (#10) lanes
- Using gel loading tips, micropipette 10 µL of each protein sample into each of the remaining wells (2-4; 6-9) of the gel. Note which sample is in which lane in your notebook.
Electrophoresis
- Place the lid on the vertical gel chamber
- Insert the red and black wires into the correct matching colored terminals on the power supply
- Plug in the power supply and turn on the power switch
- Select “Constant Voltage” and then adjust the voltage to 300 volts
- Press the run button
- Set a timer for 10 minutes
- If the smallest band of the protein marker has traveled down to 1 cm from the bottom edge of the gel, turn off the power and stop the run, otherwise continue the run until this is the case
- Unplug the power supply and wires from gel chamber
- Disassemble gel chamber and carefully remove gel
- Pour used buffer into a used buffer container – Do not pour down the sink!
- The gel can now be imaged on a gel documentation camera system or it has to go through stain/destain.
Study Questions
- What is SDS and why is it added to a protein sample prior to running a PAGE?
- Why is the protein heated for 5 minutes before being loaded into a gel?
- Which electrode does a protein run toward in a SDS-PAGE and why?
- What is the difference between a stacking gel and a separating gel?
- Given a gel, be able to analyze it using the molecular weight standard?


