
1.1: Lab Safety and Laboratory Notebook
- Page ID
- 36743
\( \newcommand{\vecs}[1]{\overset { \scriptstyle \rightharpoonup} {\mathbf{#1}} } \)
\( \newcommand{\vecd}[1]{\overset{-\!-\!\rightharpoonup}{\vphantom{a}\smash {#1}}} \)
\( \newcommand{\id}{\mathrm{id}}\) \( \newcommand{\Span}{\mathrm{span}}\)
( \newcommand{\kernel}{\mathrm{null}\,}\) \( \newcommand{\range}{\mathrm{range}\,}\)
\( \newcommand{\RealPart}{\mathrm{Re}}\) \( \newcommand{\ImaginaryPart}{\mathrm{Im}}\)
\( \newcommand{\Argument}{\mathrm{Arg}}\) \( \newcommand{\norm}[1]{\| #1 \|}\)
\( \newcommand{\inner}[2]{\langle #1, #2 \rangle}\)
\( \newcommand{\Span}{\mathrm{span}}\)
\( \newcommand{\id}{\mathrm{id}}\)
\( \newcommand{\Span}{\mathrm{span}}\)
\( \newcommand{\kernel}{\mathrm{null}\,}\)
\( \newcommand{\range}{\mathrm{range}\,}\)
\( \newcommand{\RealPart}{\mathrm{Re}}\)
\( \newcommand{\ImaginaryPart}{\mathrm{Im}}\)
\( \newcommand{\Argument}{\mathrm{Arg}}\)
\( \newcommand{\norm}[1]{\| #1 \|}\)
\( \newcommand{\inner}[2]{\langle #1, #2 \rangle}\)
\( \newcommand{\Span}{\mathrm{span}}\) \( \newcommand{\AA}{\unicode[.8,0]{x212B}}\)
\( \newcommand{\vectorA}[1]{\vec{#1}} % arrow\)
\( \newcommand{\vectorAt}[1]{\vec{\text{#1}}} % arrow\)
\( \newcommand{\vectorB}[1]{\overset { \scriptstyle \rightharpoonup} {\mathbf{#1}} } \)
\( \newcommand{\vectorC}[1]{\textbf{#1}} \)
\( \newcommand{\vectorD}[1]{\overrightarrow{#1}} \)
\( \newcommand{\vectorDt}[1]{\overrightarrow{\text{#1}}} \)
\( \newcommand{\vectE}[1]{\overset{-\!-\!\rightharpoonup}{\vphantom{a}\smash{\mathbf {#1}}}} \)
\( \newcommand{\vecs}[1]{\overset { \scriptstyle \rightharpoonup} {\mathbf{#1}} } \)
\( \newcommand{\vecd}[1]{\overset{-\!-\!\rightharpoonup}{\vphantom{a}\smash {#1}}} \)
\(\newcommand{\avec}{\mathbf a}\) \(\newcommand{\bvec}{\mathbf b}\) \(\newcommand{\cvec}{\mathbf c}\) \(\newcommand{\dvec}{\mathbf d}\) \(\newcommand{\dtil}{\widetilde{\mathbf d}}\) \(\newcommand{\evec}{\mathbf e}\) \(\newcommand{\fvec}{\mathbf f}\) \(\newcommand{\nvec}{\mathbf n}\) \(\newcommand{\pvec}{\mathbf p}\) \(\newcommand{\qvec}{\mathbf q}\) \(\newcommand{\svec}{\mathbf s}\) \(\newcommand{\tvec}{\mathbf t}\) \(\newcommand{\uvec}{\mathbf u}\) \(\newcommand{\vvec}{\mathbf v}\) \(\newcommand{\wvec}{\mathbf w}\) \(\newcommand{\xvec}{\mathbf x}\) \(\newcommand{\yvec}{\mathbf y}\) \(\newcommand{\zvec}{\mathbf z}\) \(\newcommand{\rvec}{\mathbf r}\) \(\newcommand{\mvec}{\mathbf m}\) \(\newcommand{\zerovec}{\mathbf 0}\) \(\newcommand{\onevec}{\mathbf 1}\) \(\newcommand{\real}{\mathbb R}\) \(\newcommand{\twovec}[2]{\left[\begin{array}{r}#1 \\ #2 \end{array}\right]}\) \(\newcommand{\ctwovec}[2]{\left[\begin{array}{c}#1 \\ #2 \end{array}\right]}\) \(\newcommand{\threevec}[3]{\left[\begin{array}{r}#1 \\ #2 \\ #3 \end{array}\right]}\) \(\newcommand{\cthreevec}[3]{\left[\begin{array}{c}#1 \\ #2 \\ #3 \end{array}\right]}\) \(\newcommand{\fourvec}[4]{\left[\begin{array}{r}#1 \\ #2 \\ #3 \\ #4 \end{array}\right]}\) \(\newcommand{\cfourvec}[4]{\left[\begin{array}{c}#1 \\ #2 \\ #3 \\ #4 \end{array}\right]}\) \(\newcommand{\fivevec}[5]{\left[\begin{array}{r}#1 \\ #2 \\ #3 \\ #4 \\ #5 \\ \end{array}\right]}\) \(\newcommand{\cfivevec}[5]{\left[\begin{array}{c}#1 \\ #2 \\ #3 \\ #4 \\ #5 \\ \end{array}\right]}\) \(\newcommand{\mattwo}[4]{\left[\begin{array}{rr}#1 \amp #2 \\ #3 \amp #4 \\ \end{array}\right]}\) \(\newcommand{\laspan}[1]{\text{Span}\{#1\}}\) \(\newcommand{\bcal}{\cal B}\) \(\newcommand{\ccal}{\cal C}\) \(\newcommand{\scal}{\cal S}\) \(\newcommand{\wcal}{\cal W}\) \(\newcommand{\ecal}{\cal E}\) \(\newcommand{\coords}[2]{\left\{#1\right\}_{#2}}\) \(\newcommand{\gray}[1]{\color{gray}{#1}}\) \(\newcommand{\lgray}[1]{\color{lightgray}{#1}}\) \(\newcommand{\rank}{\operatorname{rank}}\) \(\newcommand{\row}{\text{Row}}\) \(\newcommand{\col}{\text{Col}}\) \(\renewcommand{\row}{\text{Row}}\) \(\newcommand{\nul}{\text{Nul}}\) \(\newcommand{\var}{\text{Var}}\) \(\newcommand{\corr}{\text{corr}}\) \(\newcommand{\len}[1]{\left|#1\right|}\) \(\newcommand{\bbar}{\overline{\bvec}}\) \(\newcommand{\bhat}{\widehat{\bvec}}\) \(\newcommand{\bperp}{\bvec^\perp}\) \(\newcommand{\xhat}{\widehat{\xvec}}\) \(\newcommand{\vhat}{\widehat{\vvec}}\) \(\newcommand{\uhat}{\widehat{\uvec}}\) \(\newcommand{\what}{\widehat{\wvec}}\) \(\newcommand{\Sighat}{\widehat{\Sigma}}\) \(\newcommand{\lt}{<}\) \(\newcommand{\gt}{>}\) \(\newcommand{\amp}{&}\) \(\definecolor{fillinmathshade}{gray}{0.9}\)Learning Objectives
Goals:
- Understand the importance of a well-kept notebook.
- Learn how to enter information and maintain a legal scientific notebook.
- Familiarize students with basic safety rules.
- Allow students to become familiar with the safety equipment in the laboratory.
Student Learning Outcomes::
Upon completion of this lab, students will be able to:
- Record information into a notebook in a legally acceptable format.
- Format a table of contents.
- Make appropriate corrections to their notebook.
- Engage in good laboratory practices.
- Properly use Personal Protective Equipment (PPE).
- Identify the location and proper use of emergency equipment.
- Recognize the meaning of common laboratory safety signs.
- Interpret data on the safety diamond.
Introduction
Regardless if you work at a biotechnology company or in an academic research lab, keeping a lab notebook is a requirement. The Food and Drug Administration’s (FDA) handbook states, "if it isn't written down, it wasn't done." The lab notebook is considered a legal document and can be used in court to settle patent disputes or to report a specialist’s finding in paternity suits or criminal cases. Often times, the lab notebook is used as a starting point for other scientists who work in the lab. Lab notebooks are always maintained for the following reasons:
- To record the steps an individual has carried out and to document their observations
- To establish ownership in case of a patent dispute or other legal issues
- To establish guidelines used to evaluate the process in which a product was made and to evaluate the product itself
- To follow the production of a product through the manufacturing process
- To create a contract between a company and consumers and/or between a company and regulatory agencies
- To demonstrate a procedure was done correctly
- To develop, follow, and evaluate standard operating procedures (SOP)
Without documentation, even quality work is worthless. In the event of an experiment failing, the documentation allows for a scientist to review their protocol and make adjustments for future experiments. As stated above, in industry, lab notebooks are legal documents. They are used to determine product quality, patent rights, and liability. Notebooks are always treated as if they will be used in court because the consequences of not doing so could be devastating to a company.
Part I: Setting Up a Legal Scientific Notebook
A notebook should contain what equipment and materials were used and what steps were followed to show that the equipment and materials were validated before use. In case of an audit by government regulatory agencies, a company must be able to produce documentation that proves that they are following Good Manufacturing Practices (GMPs). If they find that a notebook was missing information or was not legible, then the company may be fined or held liable for damages in a product lawsuit. The importance of a well-kept notebook cannot be emphasized enough.
Guidelines for Setting Up a Legal Scientific Notebook
*For the purpose of this course, pages suitable for a lab notebook are included in the appendix. Your instructor may direct you to print a specific number of pages and bind them with staples along the long left edge to serve as a low-cost substitute for an official bound notebook.
- Obtain a bound notebook, such as a composition book. Spiral notebooks are not acceptable.
- Use only blue or black pen to make entries. NO PENCIL ALLOWED.
- Label the outside of your notebook with the information:

Figure 1. Lab notebook cover setup: Row 1: Name, Row 2: Intro to Biotech Lab, Row 3: Professor's Name, Row 4: Semester/Year. - Make pages 1-4 the Table of Contents. Write “Table of Contents” at the top of each of these pages. Record the title of each lab or entry and the page number for each.
- Each page in the notebook must be numbered. Number each page of the notebook in the upper corner with the first page of the notebook being “page 1.” The back of the first page will be “page 2” and so on.
- Record the date of each entry at the top of each page.
- Sign and date the bottom of each page.
- For each experiment (or activity) that you perform, you should include the purpose for the experiment, the materials and methods you use, any data tables, figures or graphs properly labeled with a title, and a conclusion.
- Do not erase errors. Just draw a single line through an erroneous entry, then add your initials. Enter the correct entry nearby.
- Never leave blank spaces. Draw a diagonal line through all open or blank space.
- If an entry continues on a different page, include “go to page ____” on the bottom right hand of the page to let the reader know where the rest of the information is located.
- Graphs and other small sheets of paper can be pasted into the notebook using a glue stick.
- Always include enough details for someone else to successfully duplicate the work you have recorded.
- Label all figures, tables and calculations. Figures should be labeled on the bottom left and tables are labeled on the top left.
- Never remove pages from your notebook.
Activity: Analysis of Sample Lab Notebook Entries
- Using blue or black pen complete steps A-E of the “guidelines for setting up a legal scientific notebook.”
- Enter a title in your lab notebook page (and in Table of Contents) as “Analysis of Sample Lab Notebook Entries.”
- Label the top of page 5 Lab A: Analysis of Sample Lab Notebook Entries.
- Each student should obtain a copy of the “Sample student notebook entries.”
- Review each of the three samples by yourself. You may choose to use the notebook scoring rubric provided in the appendix of this manual. Once you have reviewed the entries you can discuss your opinions with your group members. Make a list of what the student did well and what the student could have improved upon.
- Draw 3 tables into your notebook, one for each student entry you will be evaluating.
Score: ____ / 10 pt
|
What did student do well? |
Improvements Needed? |
|---|---|
- If you were grading these lab entries, what categories/criteria would you use to assign points? If you were the grader, what overall score (out of 10 points) would you assign the samples?
Part II: Lab Safety
Introduction
Laboratory safety involves all the measures taken by the laboratory worker, laboratory owner, institution and regulatory agencies to eliminate potential harm to human health and well-being. Although steps are taken to reduce risks in the workplace, safety is a matter of personal responsibility. A biotechnology lab may have several safety hazards that must be known and understood by all students or employees working in the lab. It is the responsibility of each person in the lab to know and follow basic laboratory safety rules, to understand how to safely operate equipment, understand the hazards of materials they are working with and to work to reduce potential risks. In the event of an accident, it is critical to know the location and use of emergency equipment. Having this knowledge should help to prevent accidents and minimize damage that might occur in the event of an accident.
A. Laboratory Safety Equipment
Draw Table 2 in your lab notebook. Fill in the location of the following lab safety items:
|
Safety Equipment |
Location |
|---|---|
|
Telephone and Campus Emergency Number |
|
|
Fire Alarm |
|
|
Fire Extinguisher |
|
|
Eye Wash |
|
|
Shower |
|
|
Glass Waste Container |
|
|
Biohazard Waste Container |
|
|
Lab Coats |
|
|
Goggles |
|
|
Gloves |
|
|
Disinfectant |
|
|
First Aid Kit |
|
|
Broom and Dust Pan |
|
|
Emergency Class Evacuation site |
Laboratory Safety Guidelines and Contract
General Rules
- No guests are allowed in the lab.
- Know emergency procedures, use and location of emergency equipment (emergency exits, fire extinguishers, fire blanket, eye wash station, first aid kit, and broken glass container).
- In case of fire, evacuate the room and assemble outside the building.
- Report all accidents, no matter how insignificant they appear, to a laboratory supervisor
- Be aware of your surroundings and potential dangers created by others.
Personal Protection
- Do not smoke, eat, drink, chew gum, or apply cosmetics in a laboratory.
- Wear protective clothing such as long pants, closed-toe shoes, a lab coat, and goggles.
- Tie long hair up or behind the shoulders. Do not wear long, dangling jewelry or scarfs.
- Dispose of gloves in the laboratory trash. Do not wear lab coats and gloves into public areas. You will need to dispose of gloves and take off your lab coat before leaving the lab.
- Cover cuts or scrapes with a sterile, waterproof bandage before entering a lab.
- Wash skin immediately and thoroughly if contaminated by chemicals or microorganisms.
- Wash your hands regularly, with soap and water, especially after working with bacteria.
- If you are pregnant or ill, please let your lab instructor know immediately.
- Let your lab instructor know before leaving the classroom.
Handling Chemicals
- Keep all containers capped with the appropriate lid. Clearly label items produced in the lab.
- If a chemical is splashed into the eyes or skin, flush for 15 minutes.
- Clean up spills and broken glass immediately. Use broom and dustpan to pick up broken glass.
- Keep chemicals away from direct heat or sunlight. Keep containers of alcohol, acetone, and other flammable liquids away from flames.
- Read labels carefully. Be aware of hazardous chemicals and precautions for safe use.
- Follow instructions about proper disposal of lab reagents.
Handling Equipment
- Keep your work area clean and clutter-free.
- Be aware of your potential impact on others.
- Notify lab supervisor of malfunctioning equipment.
- If you do not know how to use an instrument or equipment, then do not touch it.
- Do not use laboratory equipment without first receiving instruction in its use.
- Keep balances clean and dry, always use weigh paper/boats.
- Never leave heat sources unattended. Be careful when using hot plates or burners. Note that there is often no visible flame, glow or sign that objects are hot.
I have read the lab safety guidelines, found all lab safety equipment, and understand the procedure about emergency class evacuation. I will conduct myself in a safe and conscientious manner and take proper care in the use of all lab equipment.
Signature _______________________________________________ Date ______________________
B. Lab Safety Video
- While watching the lab safety video, take notes on as many safety hazards as you notice.
- When the video is over, discuss the hazards you observed with your group and what can be done to work safely using good laboratory practices.
- Make Table 3 in your notebook and organize your observations.
|
Laboratory Hazard Observed |
Correction/Good Laboratory Practices (GLP) |
|---|---|
C. Chemical Hazards Labeling Activity
Hazard Communication Standard (HCS)
A quick assessment of a chemical’s hazards is visible on its container on a Hazard Communication Standard (HCS) label. HCS labeling does not replace the more detailed Safety Data Sheet (SDS) but rather gives the following information in brief:
- Name, Address, and Phone Number of Responsible Party (i.e., the manufacturer or distributor)
- Chemical Identification - chemical name and code or batch number that matches the information found in Section 1 of the chemical's SDS
- Signal Word - "DANGER" for more severe hazards or "WARNING" for less severe hazards
- Hazard Statements - a brief description of the hazard(s)
- Precautionary Statements (optional) - prevention, response, storage, and disposal
- Hazard Category Numbers 1-4 (optional) - "1" for the most severe hazard to "4" for the least severe
- Pictograms
Pictograms are red-bordered, diamond shapes that frame a black graphic on a white background, and these symbols depict the type of hazard(s). HCS labels are required by the Occupation Safety and Health Administration (OSHA) and are standardized, having been adopted from the Globally Harmonized System of Classification and Labeling of Chemicals (GHS) set by the United Nations.
|
Pictogram |
Hazard Class |
Hazard Type |
Example Signal Word & Hazard Statement |
|---|---|---|---|
|
|
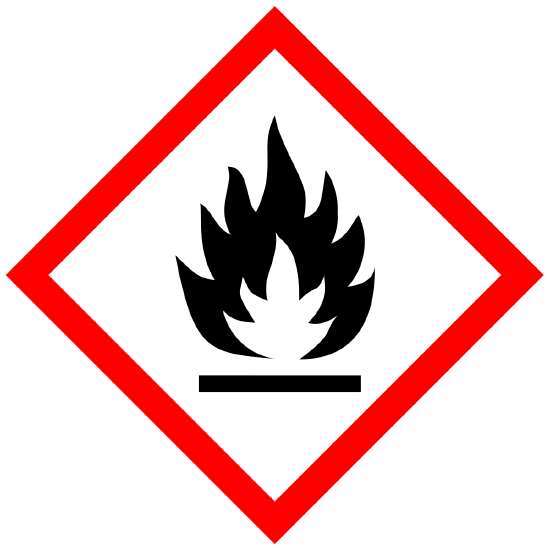
Flammables Self-Reactives Self-Heating Pyrophorics Emits Flammable Gas Organic Peroxides |
Physical |
DANGER Heating may cause a fire |
|
|
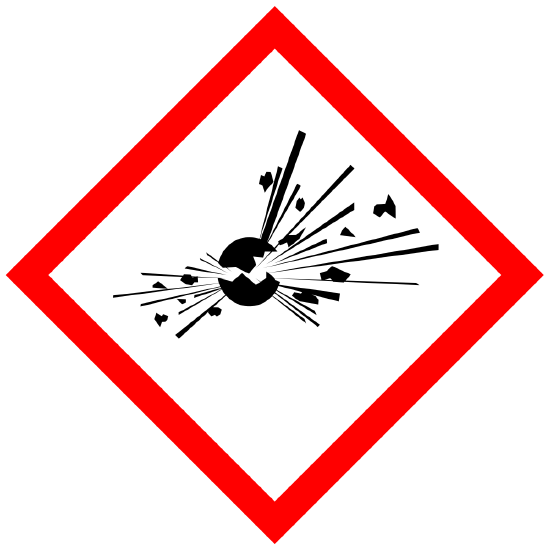
Explosives Self-Reactives Organic Peroxides |
Physical |
WARNING Fire or projection hazard |
|
|
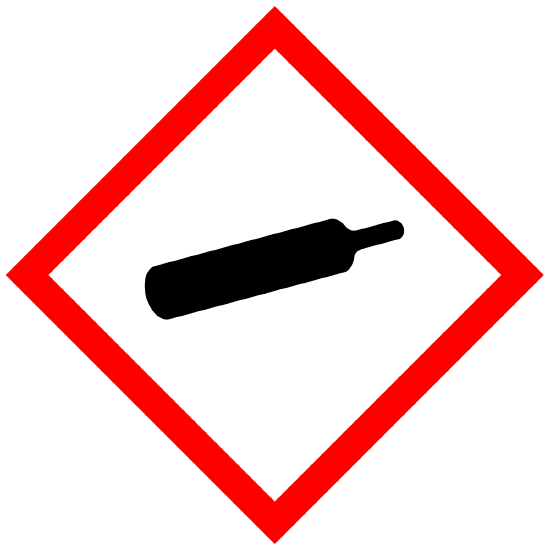
Gases Under Pressure |
Physical |
WARNING Contains gas under pressure; may explode if heated |
|
|
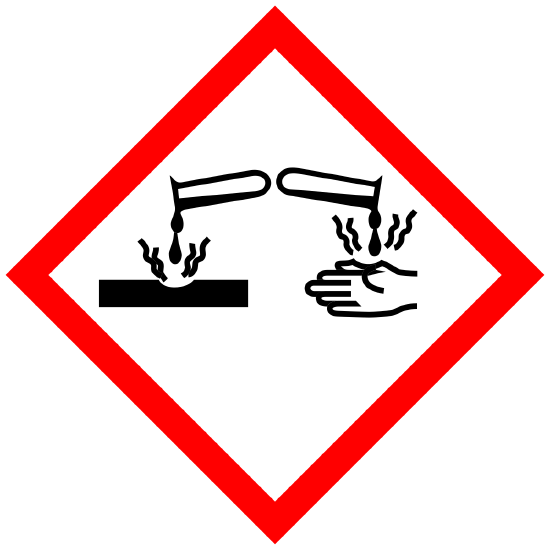
Corrosive to Metals Corrosive Skin Corrosion/Burns Eye Damage |
Physical |
DANGER Causes severe skin burns and eye damage |
|
|
Oxidizer (gases) Oxidizers (solid or liquid) |
Physical |
WARNING May intensify fire; oxidizer |
|
|
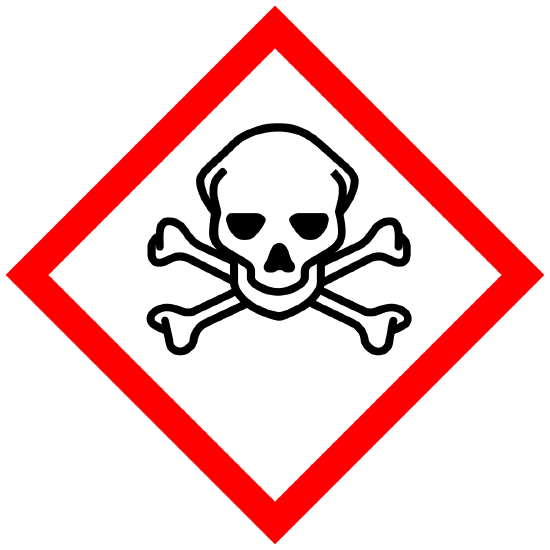
Acute Toxicity (fatal or toxic) |
Health |
DANGER Fatal if swallowed |
|
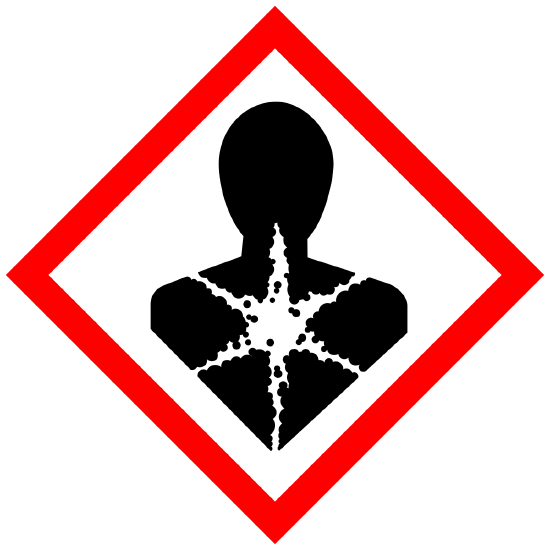
|
Carcinogen Mutagenicity Respiratory Sensitizer Reproductive Toxicity Target Organ Toxicity Aspiration Toxicity |
Health |
DANGER May cause cancer |
|
|
Irritant (skin and eyes) Dermal Sensitizer Acute Toxicity (harmful) Narcotic Effects Respiratory Tract Irritation Hazardous to Ozone Layer (optional) |
Health |
WARNING Causes skin irritation |
|
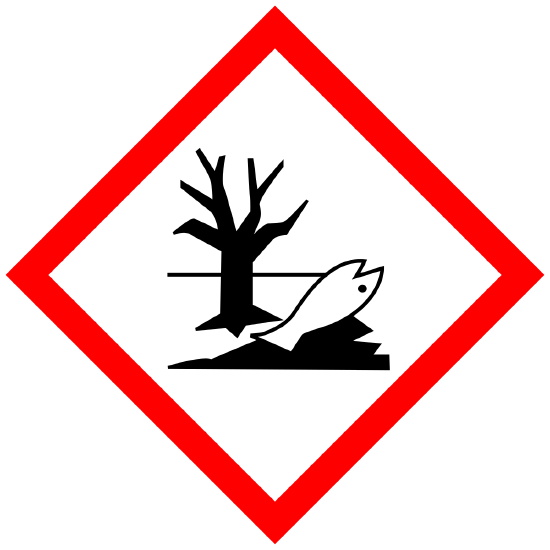
|
(optional label) Environmental Toxicity Aquatic Toxicity |
Environment. |
WARNING Toxic to aquatic life |


Procedure
- Walk around the room and locate two items that display the Hazard Communication Standard label.
- Draw a sketch of the pictogram in your lab notebook and carefully copy the chemical identification information of the reagent that it is describing.
- Write down the label's signal word and any hazard statements, and comment on the characteristics and hazards of the two items.
Chemical Hazards and Waste Disposal
Laboratory waste must be disposed of safely and appropriately. Labs must be aware of the school, state and federal guidelines for waste disposal. Many chemicals can NOT be poured down the sink. Be sure you know which chemicals are hazardous, require special storage and must be placed into properly labeled waste containers kept in fume hoods until sent to the proper hazardous waste disposal. Know which materials are considered biohazards and the proper area or container to place them so they can be autoclaved.
|
Type of Waste |
Definition |
Required Treatment |
|---|---|---|
|
Chemical Waste |
Any solid, liquid, or gaseous material generated in the laboratory that poses a danger to human health or the environment. |
This will vary depending on the chemical. The institution you are in will have specific requirements to meet regulatory code. The aim is to reduce hazards and minimize environmental impact. Follow your instructor’s directions. |
|
Solid Biohazardous Waste |
Materials such as pipettes, petri dishes, or other culture flasks disposable or glass that do not contain liquid but were in contact with cultures of cells or human or animal-derived materials. |
Disposable waste is placed in red biohazard bags. Treat and replace bags when they are halfway full. Reusable glass materials must be placed in autoclavable trays. To treat waste, the autoclave must be properly loaded and set for a minimum temperature of 121°C (250°F) for 60 minutes at 15 psi. Autoclave tape must be placed on the bag or tray to indicate it has passed through the cycle. Material should be autoclaved as soon as possible, but at a maximum of 7 days after it is generated |
|
Liquid Biohazardous Waste |
Broth cultures or cell culture media or contaminated liquid media. |
Decontaminate using 10% bleach solution for a minimum 2 hours contact time. Dispose down the drain with water. Alternatively, racks of used culture tubes can be autoclaved using the same temperature and time indicated above but set for a slow exhaust liquid setting. Use autoclave tape as above. Treat waste as soon as possible but not longer than 7 days post generation. |
|
Sharps Waste |
Any object that is capable of piercing or damaging human skin that is contaminated with chemical, or biohazardous waste e.g., scalpels, blades, needles, broken glass, etc. |
Place in the marked sharps container. Remember that broken glass that is not contaminated will have a separate disposal container within the laboratory. |
D. National Fire Protection Association (NFPA) Hazard Rating System
The National Fire Protection Association (NFPA) Hazard Rating System was designed for emergency workers such as fire responders to be able to swiftly get basic information about the hazards of a chemical from a simple label. The diamond-shaped label is divided into four color-coded squares, and inside each square is printed a ratings code or number from 0-4, with "0" as the least severe hazard to "4" as the most severe.
Inside the red square, the number indicates the flammability rating; blue indicates the health hazard rating; yellow indicates the chemical's instability; and the white square indicates any special hazards.

PROCEDURE
- Walk around the room and find a label with the NFPA safety diamond. Read the explanations in the table above. Write down the chemical name and draw its NFPA diamond.
- Think of a chemical used in a lab or find a second container without an NFPA label already affixed and then write down its name. Use an internet or in-class resource to draw that chemical's NFPA ratings.
- Compare the NFPA 704 label with OSHA's Hazard Communication label from the previous activity. How are they the same? How do they differ? What are the pros and cons of each type of label?
E. Safety Data Sheets (SDS)
A Safety Data Sheet (previously called Material Safety Data Sheet) for each chemical is required by the Occupational Safety and Health Administration (OSHA). Sections 1-8 contain information about the identification, hazards, composition, safe handling practices, and emergency control measures. Sections 9 through 11 and 16 contain technical and scientific information, such as physical and chemical properties, stability and reactivity, toxicology, and exposure control.
Draw table 1.3 in your lab notebook and answer the following.
Using the SDS for sodium hydroxide provided to your group, determine what should be done in the event that the reagent: a) got on your skin b) splashed into your eyes c) was inhaled
|
Adverse Event |
Response |
|---|---|
|
a) NaOH in eyes |
|
|
b) NaOH on skin |
|
|
c) NaOH inhaled |
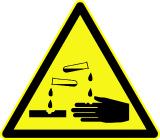
F. Science Laboratory Safety Signs
|
|
|
|
|
|
|
|
|
|
|
|
|
|
|
|
|
|
|
|
|
|
|
|
|
|
|
|
|
|


Study Questions
- Review lab safety signs and know their meanings.
- What are the types of PPE required in a laboratory?
- How should you dispose of glass waste?
- How should you dispose of biohazard waste?
- What should you do if a chemical gets in eyes?
- Given a laboratory hazard, be able to describe the correction of GLP needed in the lab.
- What do the 4 diamonds in the NFPA represent?
- Why must a scientist keep a lab notebook?
- In industry, a lab notebook is a legal document. What can it be used to determine?
- What is GMP?
- What are the Do’s and Don’ts of keeping a legal notebook?
Puzzle: Lab Safety and Lab Notebooks
|
Terms Alkaline, Biohazardous, Broom, Contents, Corrosive, Diamond, Flammability, Four, Glass, |
|
ACROSS |
DOWN |
|---|---|
|
1. broken test tubes and beakers should be placed in the ___ waste container 7. hazard that the yellow color on the NFPA sign indicates 8. governmental agency that regulates chemical safety data sheets 9. broken test tubes/beakers should be swept with a ___ and dust pan 10. COR on the NFPA sign 12. instrument used to write in a scientific lab notebook 13. used razors, scalpels and needles should be placed in the ___ waste container 14. SOP stands for Standard _____ Procedures 15. rating number for the most dangerous hazards in the NFPA sign 16. ALK on the NFPA sign 17. GLP stands for Good ____ Practices 18. GMP stands for Good ____ Practices 19. hazard that the blue color on the NFPA sign indicates |
2. the lab notebook is considered a ___ document and can be used in court 3. abbreviation for Personal Protective Equipment 4. shape of sign that lists the chemical ratings from the National Fire Protection Association 5. hazard that the white color on the NFPA sign indicates 6. table found at the front of a scientific lab notebook 9. type of waste containing recombinant DNA and tissue culture dishes 11. OX on the NFPA sign 15. hazard that the red color on the NFPA sign indicates |
Image Attributions:
- Flammable substances sign via Wikimedia Commons; public domain
- Explosive substances sign via Wikimedia Commons; public domain
- Gas pressure hazards sign via Wikimedia Commons; public domain
- Corrosive substances sign via Wikimedia Commons; public domain
- Oxidizing substances sign via Wikimedia Commons; public domain
- Toxic substances sign via Wikimedia Commons; public domain
- Health hazard sign via Wikimedia Commons; public domain
- Hazardous substances sign via Wikimedia Commons; public domain
- Environmental hazard sign via Wikimedia Commons; public domain
- Eyewash sign via Wikimedia Commons; public domain
- Emergency shower sign via Wikimedia Commons; public domain
- Fire blanket sign via Wikimedia Commons; public domain
- Fire extinguisher sign via Wikimedia Commons; public domain
- Ionizing Radiation sign via Wikimedia Commons; public domain
- Laser Radiation sign via Wikimedia Commons; public domain
- Explosive substances sign via Wikimedia Commons; public domain
- High Voltage sign via Wikimedia Commons; public domain
- No eating or drinking sign via Wikimedia Commons; public domain
- Nonpotable water sign via Wikimedia Commons; public domain
- Do not enter sign via Wikimedia Commons; public domain
- No smoking sign via Wikimedia Commons; public domain
- Corrosive Substances sign via Wikimedia Commons; public domain
- Poisonous substances sign via Wikimedia Commons; public domain
- Oxidizing material sign via Wikimedia Commons; public domain
- Highly flammable substances sign via Wikimedia Commons; public domain
- Emergency call button sign via Wikimedia Commons; public domain
- First Aid sign via Wikimedia Commons; public domain
- Automated heart defibrillator sign via Wikimedia Commons; public domain
- Ionizing radiation sign via Wikimedia Commons; public domain
- Use protective eyewear sign via Wikimedia Commons; public domain
- Use protective handwear sign via Wikimedia Commons; public domain
- NFPA 704 warning sign sign via Wikimedia Commons; public domain
- Health Hazard sign via Wikimedia Commons; public domain