
1.2: Metrics and Measurements
- Page ID
- 36744
\( \newcommand{\vecs}[1]{\overset { \scriptstyle \rightharpoonup} {\mathbf{#1}} } \)
\( \newcommand{\vecd}[1]{\overset{-\!-\!\rightharpoonup}{\vphantom{a}\smash {#1}}} \)
\( \newcommand{\dsum}{\displaystyle\sum\limits} \)
\( \newcommand{\dint}{\displaystyle\int\limits} \)
\( \newcommand{\dlim}{\displaystyle\lim\limits} \)
\( \newcommand{\id}{\mathrm{id}}\) \( \newcommand{\Span}{\mathrm{span}}\)
( \newcommand{\kernel}{\mathrm{null}\,}\) \( \newcommand{\range}{\mathrm{range}\,}\)
\( \newcommand{\RealPart}{\mathrm{Re}}\) \( \newcommand{\ImaginaryPart}{\mathrm{Im}}\)
\( \newcommand{\Argument}{\mathrm{Arg}}\) \( \newcommand{\norm}[1]{\| #1 \|}\)
\( \newcommand{\inner}[2]{\langle #1, #2 \rangle}\)
\( \newcommand{\Span}{\mathrm{span}}\)
\( \newcommand{\id}{\mathrm{id}}\)
\( \newcommand{\Span}{\mathrm{span}}\)
\( \newcommand{\kernel}{\mathrm{null}\,}\)
\( \newcommand{\range}{\mathrm{range}\,}\)
\( \newcommand{\RealPart}{\mathrm{Re}}\)
\( \newcommand{\ImaginaryPart}{\mathrm{Im}}\)
\( \newcommand{\Argument}{\mathrm{Arg}}\)
\( \newcommand{\norm}[1]{\| #1 \|}\)
\( \newcommand{\inner}[2]{\langle #1, #2 \rangle}\)
\( \newcommand{\Span}{\mathrm{span}}\) \( \newcommand{\AA}{\unicode[.8,0]{x212B}}\)
\( \newcommand{\vectorA}[1]{\vec{#1}} % arrow\)
\( \newcommand{\vectorAt}[1]{\vec{\text{#1}}} % arrow\)
\( \newcommand{\vectorB}[1]{\overset { \scriptstyle \rightharpoonup} {\mathbf{#1}} } \)
\( \newcommand{\vectorC}[1]{\textbf{#1}} \)
\( \newcommand{\vectorD}[1]{\overrightarrow{#1}} \)
\( \newcommand{\vectorDt}[1]{\overrightarrow{\text{#1}}} \)
\( \newcommand{\vectE}[1]{\overset{-\!-\!\rightharpoonup}{\vphantom{a}\smash{\mathbf {#1}}}} \)
\( \newcommand{\vecs}[1]{\overset { \scriptstyle \rightharpoonup} {\mathbf{#1}} } \)
\(\newcommand{\longvect}{\overrightarrow}\)
\( \newcommand{\vecd}[1]{\overset{-\!-\!\rightharpoonup}{\vphantom{a}\smash {#1}}} \)
\(\newcommand{\avec}{\mathbf a}\) \(\newcommand{\bvec}{\mathbf b}\) \(\newcommand{\cvec}{\mathbf c}\) \(\newcommand{\dvec}{\mathbf d}\) \(\newcommand{\dtil}{\widetilde{\mathbf d}}\) \(\newcommand{\evec}{\mathbf e}\) \(\newcommand{\fvec}{\mathbf f}\) \(\newcommand{\nvec}{\mathbf n}\) \(\newcommand{\pvec}{\mathbf p}\) \(\newcommand{\qvec}{\mathbf q}\) \(\newcommand{\svec}{\mathbf s}\) \(\newcommand{\tvec}{\mathbf t}\) \(\newcommand{\uvec}{\mathbf u}\) \(\newcommand{\vvec}{\mathbf v}\) \(\newcommand{\wvec}{\mathbf w}\) \(\newcommand{\xvec}{\mathbf x}\) \(\newcommand{\yvec}{\mathbf y}\) \(\newcommand{\zvec}{\mathbf z}\) \(\newcommand{\rvec}{\mathbf r}\) \(\newcommand{\mvec}{\mathbf m}\) \(\newcommand{\zerovec}{\mathbf 0}\) \(\newcommand{\onevec}{\mathbf 1}\) \(\newcommand{\real}{\mathbb R}\) \(\newcommand{\twovec}[2]{\left[\begin{array}{r}#1 \\ #2 \end{array}\right]}\) \(\newcommand{\ctwovec}[2]{\left[\begin{array}{c}#1 \\ #2 \end{array}\right]}\) \(\newcommand{\threevec}[3]{\left[\begin{array}{r}#1 \\ #2 \\ #3 \end{array}\right]}\) \(\newcommand{\cthreevec}[3]{\left[\begin{array}{c}#1 \\ #2 \\ #3 \end{array}\right]}\) \(\newcommand{\fourvec}[4]{\left[\begin{array}{r}#1 \\ #2 \\ #3 \\ #4 \end{array}\right]}\) \(\newcommand{\cfourvec}[4]{\left[\begin{array}{c}#1 \\ #2 \\ #3 \\ #4 \end{array}\right]}\) \(\newcommand{\fivevec}[5]{\left[\begin{array}{r}#1 \\ #2 \\ #3 \\ #4 \\ #5 \\ \end{array}\right]}\) \(\newcommand{\cfivevec}[5]{\left[\begin{array}{c}#1 \\ #2 \\ #3 \\ #4 \\ #5 \\ \end{array}\right]}\) \(\newcommand{\mattwo}[4]{\left[\begin{array}{rr}#1 \amp #2 \\ #3 \amp #4 \\ \end{array}\right]}\) \(\newcommand{\laspan}[1]{\text{Span}\{#1\}}\) \(\newcommand{\bcal}{\cal B}\) \(\newcommand{\ccal}{\cal C}\) \(\newcommand{\scal}{\cal S}\) \(\newcommand{\wcal}{\cal W}\) \(\newcommand{\ecal}{\cal E}\) \(\newcommand{\coords}[2]{\left\{#1\right\}_{#2}}\) \(\newcommand{\gray}[1]{\color{gray}{#1}}\) \(\newcommand{\lgray}[1]{\color{lightgray}{#1}}\) \(\newcommand{\rank}{\operatorname{rank}}\) \(\newcommand{\row}{\text{Row}}\) \(\newcommand{\col}{\text{Col}}\) \(\renewcommand{\row}{\text{Row}}\) \(\newcommand{\nul}{\text{Nul}}\) \(\newcommand{\var}{\text{Var}}\) \(\newcommand{\corr}{\text{corr}}\) \(\newcommand{\len}[1]{\left|#1\right|}\) \(\newcommand{\bbar}{\overline{\bvec}}\) \(\newcommand{\bhat}{\widehat{\bvec}}\) \(\newcommand{\bperp}{\bvec^\perp}\) \(\newcommand{\xhat}{\widehat{\xvec}}\) \(\newcommand{\vhat}{\widehat{\vvec}}\) \(\newcommand{\uhat}{\widehat{\uvec}}\) \(\newcommand{\what}{\widehat{\wvec}}\) \(\newcommand{\Sighat}{\widehat{\Sigma}}\) \(\newcommand{\lt}{<}\) \(\newcommand{\gt}{>}\) \(\newcommand{\amp}{&}\) \(\definecolor{fillinmathshade}{gray}{0.9}\)Learning Objectives
Goals:
- Review the metric system.
- Learn to convert between metric units.
- Use various instruments found in the biotechnology lab.
- Measure mass and volume with precision and accuracy.
- Pipet with precision and accuracy.
- Learn how to use a micropipette to measure very small volumes.
Student Learning Outcomes:
Upon completion of this lab, students will be able to:
- Convert between metric units for mass, volume and size.
- Use a gram balance to obtain the mass of an object.
- Make accurate and precise measurements with a graduated cylinder and serological pipette.
- Calculate percent error for a given measurement.
- Read, set, and operate a micropipette.
- Determine which pipette should be used to measure a specific volume.
- Determine how accurately you can measure with each micropipette.
Part 1: Metrics
Introduction to Metrics
Working in a biotechnology lab requires knowledge of the metric system. The metric system uses standardized units of measurement for length, mass, and volume, ensuring measurements are reproducible and easily made. Appropriate instruments are used to make these measurements. For example, balances measure mass in grams and graduated cylinders measure volume in milliliters.
The metric system has base measurements. The meter is used to measure distances; the liter measures volume; and the gram measures mass. A measurement must always consist of a number and a unit, for example, 2 m, conveys the length is twice that of the base unit of length, the meter. The abbreviations are permitted when expressing measurements. The metric system allows for easy conversion between units as everything is base 10. This means you will either multiply or divide by ten as you convert from one unit to another. For example, one decameter is 10 times larger than a meter. Therefore, you need 10 meters to equal a decameter. A kilometer is 1000 times larger than a meter. Therefore, you need 1000 m to equal one kilometer.
Base Units of Measure
- Length: meter (m)
- Mass: gram (g)
- Volume: liter (L)
- Time: seconds (s)
- Temperature: Celsius (C)
| Prefix | Unit | Multiplier | Scientific Notation |
|---|---|---|---|
|
Kilo- |
k |
1,000 |
\(10^3\) |
|
Hecto- |
h |
100 |
\(10^2\) |
|
Deca- |
da |
10 |
\(10^1\) |
|
One |
base (m, L, g) |
1 |
10 |
|
Deci- |
d |
0.1 = \(1/10\) |
\(10^{-1}\) |
|
Centi- |
c |
0.01 = \(1/100\) |
\(10^{-2}\) |
|
Milli- |
m |
0.001 = \(1/1,000\) |
\(10^{-3}\) |
|
Micro- |
µ |
0.000001 = \(1/1,000,000\) |
\(10^{-6}\) |
Converting Metric Units
Memorize the table above and know how to use metric prefixes. You can use the helpful mnemonic below.
| Mnemonic |
King |
Henry |
Does |
Usually |
Drink |
Chocolate |
Milk |
|
|---|---|---|---|---|---|---|---|---|
| Prefix |
Kilo- |
Hecto- |
Deca- |
Base units |
Deci- |
Centi- |
Milli- |
Micro |
| unit |
k |
h |
da |
m, L, g |
d |
c |
m |
µ |
When you are converting a smaller unit to a larger unit, you move the decimal point to the left the appropriate number of steps. Keep in mind each time you move the decimal point you are dividing by 10.
When you are converting from a larger unit to a smaller, you will move the decimal point to the right. This means each time you move the decimal point you are multiplying by 10.
Steps for Converting Metric Units
- Write down the number you are converting for example (100 cm). Then right in the decimal point. It is always right after the ones place to the right of the number.
100 = 100 - If you want to convert 100 cm to meters (m) you would now look at your chart and determine how many “steps” you have to move the decimal to the right or left. From centimeter to meter you have to take 2 steps to the left. That means you must move your decimal 2 places to the left.
100. cm = 1.00 meters
Metric Conversion Practice
Using the steps above, complete the following problems in your lab notebook.
- 50 mm = X cm
- 50 cm = X km
- 700 mL = X L
- 30 m = X µm
- 3 dm = X m
- 15 kg = X cg
- 55 L = X mL
- 52 mg = X µg
Part 2: Measuring Using the Metric System
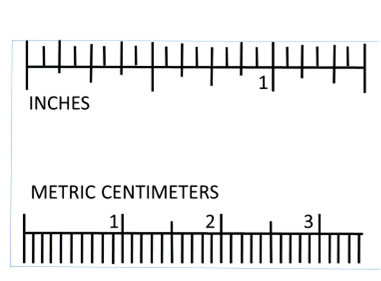
A. Taking Linear Measurements with a Ruler
Linear measurements in science are in metric units. The basic unit is the meter (m). The rulers you will be using today are centimeter (cm) rulers. There are 100 cm in a meter. If you look at the ruler, you will see 10 hatch marks between each centimeter marking. Each hatch mark represents a millimeter (mm). There are 10 millimeters in a centimeter.
Materials
- 5-6 washers of various sizes
- Centimeter ruler
Procedure
- Obtain 5 washers from your instructor.
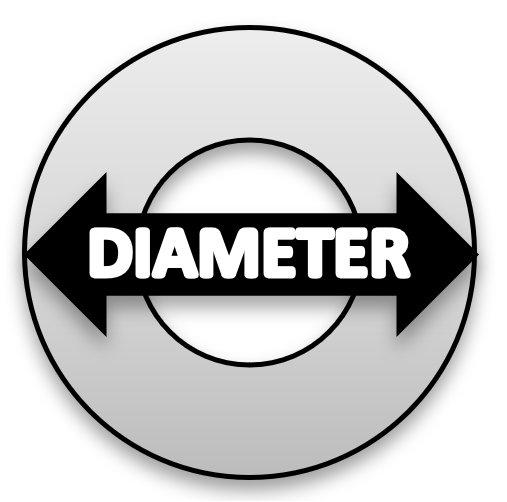
- Order the washers on a piece of paper from the smallest diameter to the largest, labeling them #1-5.
- Using a centimeter ruler, record the diameter of each washer in centimeters. See Figure 2 for and image on how to measure the diameter.
- Record your results in Table 1.
- Convert all your washer diameter measurements to millimeters and meters. Record in Table 1.
- Keep your washers in order as you will be using them later.
Results
Draw the following table in your lab notebook including the title of the table.
|
Washer # |
Diameter of Washer (cm) |
Diameter of Washer (m) |
Diameter of Washer (mm) |
|---|---|---|---|
|
1 |
|||
|
2 |
|||
|
3 |
|||
|
4 |
|||
|
5 |
B. Taking Mass Measurements with an Electronic Balance
Weight measurements in science are also in metric units. The basic unit is the gram (g). The electronic balances you will be using today are gram balances. The model you will be using will accurately measure to 0.01 gram. There are 1000 grams in a kilogram. One of the most common units used is the milligram (mg). There are 1000 milligrams in a gram. If you need a very small amount of something, you measure it in micrograms (µg). There are \(10^6\) µg in a gram. Some conversions are indicated below:
- 1000 g = 1 kg
- 1 g = 1000 mg
- 1 g = 1,000,000 µg (106 µg)
- 1 mg= 1000 µg
Materials
- 5 washers of various sizes that were previously measured.
- Gram balance
Procedure
- Press the on button and wait for the balance to display zeros on screen.
- If the screen doesn’t display zeros, press the “zero” or “tare” button.
- Once the machine displays zeros (0.00 g), place your washer on the center of the platform.
- Wait for the scale to achieve a stable reading (numbers are not fluctuating).
- Record your mass in grams in Table 2 for each washer starting from smallest to largest.
Results
- Draw the following table in your lab manual including the title.
- Record your results in grams (g) and then convert those masses to kg and mgs.
|
Washer # |
Diameter of Washer (cm) |
Diameter of Washer (m) |
Diameter of Washer (mm) |
|---|---|---|---|
|
1 |
|||
|
2 |
|||
|
3 |
|||
|
4 |
|||
|
5 |
C. Volumetric Measurements
The metric unit for volume is the LITER (L). There are 1000 milliliters (mL) in one liter. Another common unit in volume is the microliter (µL). There are 106 µL in one liter and 1000 µL in one milliliter. Some common conversions are shown below:
- 1 L = 1000 mL
- 1 L = 1,000,000 µL (106 µL)
- 1 ml= 1000 µL
You will need to become familiar with the different types of instrumentation and glassware that you will be using throughout this semester. Today, we will focus on glassware and devices that measure larger volumes of liquid. You will also determine when a particular device is appropriate to use based on the volume that you are dispensing. The types of measuring devices are very different if you want to measure and dispense a liter vs. a milliliter!
Graduated Cylinder
You will use this to dispense large volumes that are more than 10 mL. You will be using various size graduated cylinders, ranging from 20mL – 2000 mL (2L), in this class.
Serological Pipet
These pipettes accurately dispense volumes of 1mL to 10mL and can be used for volumes up to 50 mL. You will be using mostly 5mL and 10mL serological pipettes in this class.
Materials
- 1 - 50 ml beaker
- Squirt bottle with diH20
- 1 - 50 ml graduated cylinder
- 1 - gram scale
- 1 - 5 ml serological pipette
- 1 pipette pump or electronic pipet aide
Procedure
Graduated Cylinder Measurements
- Draw a table 3 in your lab manual as shown on the following page.
- Obtain a 50 mL beaker. Weigh and record the weight in grams on Table 3 under “Weight of container”. This is the container you will use to weigh your water. It is not what you will use to measure in this experiment.
- The target amount of water you will be measuring using a graduated cylinder is 42 mL. This has been recorded in Table 3.
- Using a squirt bottle, squirt 42 mL of water into a graduated cylinder. Be sure to read from the bottom of the meniscus.
- Pour the 42 mL from the graduated cylinder into the weighed beaker.
- Weigh the beaker with the water and record on Table 3 under “weight of container and water.”
- Determine the weight of the water and record as “weight of water only”.
- Convert this weight to mL. Water has a density of 1g/mL. Because water has a density of 1g/mL, then the number g=mLs (50ml=50g) Record this number as “actual volume dispensed”.
- Determine the % error for each of your measurements as follows:
∖ [ " id="MathJax-Element-5-Frame" role="presentation" style="position:relative;" tabindex="0">