2: Aseptic Transfers
- Page ID
- 3252
\( \newcommand{\vecs}[1]{\overset { \scriptstyle \rightharpoonup} {\mathbf{#1}} } \)
\( \newcommand{\vecd}[1]{\overset{-\!-\!\rightharpoonup}{\vphantom{a}\smash {#1}}} \)
\( \newcommand{\dsum}{\displaystyle\sum\limits} \)
\( \newcommand{\dint}{\displaystyle\int\limits} \)
\( \newcommand{\dlim}{\displaystyle\lim\limits} \)
\( \newcommand{\id}{\mathrm{id}}\) \( \newcommand{\Span}{\mathrm{span}}\)
( \newcommand{\kernel}{\mathrm{null}\,}\) \( \newcommand{\range}{\mathrm{range}\,}\)
\( \newcommand{\RealPart}{\mathrm{Re}}\) \( \newcommand{\ImaginaryPart}{\mathrm{Im}}\)
\( \newcommand{\Argument}{\mathrm{Arg}}\) \( \newcommand{\norm}[1]{\| #1 \|}\)
\( \newcommand{\inner}[2]{\langle #1, #2 \rangle}\)
\( \newcommand{\Span}{\mathrm{span}}\)
\( \newcommand{\id}{\mathrm{id}}\)
\( \newcommand{\Span}{\mathrm{span}}\)
\( \newcommand{\kernel}{\mathrm{null}\,}\)
\( \newcommand{\range}{\mathrm{range}\,}\)
\( \newcommand{\RealPart}{\mathrm{Re}}\)
\( \newcommand{\ImaginaryPart}{\mathrm{Im}}\)
\( \newcommand{\Argument}{\mathrm{Arg}}\)
\( \newcommand{\norm}[1]{\| #1 \|}\)
\( \newcommand{\inner}[2]{\langle #1, #2 \rangle}\)
\( \newcommand{\Span}{\mathrm{span}}\) \( \newcommand{\AA}{\unicode[.8,0]{x212B}}\)
\( \newcommand{\vectorA}[1]{\vec{#1}} % arrow\)
\( \newcommand{\vectorAt}[1]{\vec{\text{#1}}} % arrow\)
\( \newcommand{\vectorB}[1]{\overset { \scriptstyle \rightharpoonup} {\mathbf{#1}} } \)
\( \newcommand{\vectorC}[1]{\textbf{#1}} \)
\( \newcommand{\vectorD}[1]{\overrightarrow{#1}} \)
\( \newcommand{\vectorDt}[1]{\overrightarrow{\text{#1}}} \)
\( \newcommand{\vectE}[1]{\overset{-\!-\!\rightharpoonup}{\vphantom{a}\smash{\mathbf {#1}}}} \)
\( \newcommand{\vecs}[1]{\overset { \scriptstyle \rightharpoonup} {\mathbf{#1}} } \)
\(\newcommand{\longvect}{\overrightarrow}\)
\( \newcommand{\vecd}[1]{\overset{-\!-\!\rightharpoonup}{\vphantom{a}\smash {#1}}} \)
\(\newcommand{\avec}{\mathbf a}\) \(\newcommand{\bvec}{\mathbf b}\) \(\newcommand{\cvec}{\mathbf c}\) \(\newcommand{\dvec}{\mathbf d}\) \(\newcommand{\dtil}{\widetilde{\mathbf d}}\) \(\newcommand{\evec}{\mathbf e}\) \(\newcommand{\fvec}{\mathbf f}\) \(\newcommand{\nvec}{\mathbf n}\) \(\newcommand{\pvec}{\mathbf p}\) \(\newcommand{\qvec}{\mathbf q}\) \(\newcommand{\svec}{\mathbf s}\) \(\newcommand{\tvec}{\mathbf t}\) \(\newcommand{\uvec}{\mathbf u}\) \(\newcommand{\vvec}{\mathbf v}\) \(\newcommand{\wvec}{\mathbf w}\) \(\newcommand{\xvec}{\mathbf x}\) \(\newcommand{\yvec}{\mathbf y}\) \(\newcommand{\zvec}{\mathbf z}\) \(\newcommand{\rvec}{\mathbf r}\) \(\newcommand{\mvec}{\mathbf m}\) \(\newcommand{\zerovec}{\mathbf 0}\) \(\newcommand{\onevec}{\mathbf 1}\) \(\newcommand{\real}{\mathbb R}\) \(\newcommand{\twovec}[2]{\left[\begin{array}{r}#1 \\ #2 \end{array}\right]}\) \(\newcommand{\ctwovec}[2]{\left[\begin{array}{c}#1 \\ #2 \end{array}\right]}\) \(\newcommand{\threevec}[3]{\left[\begin{array}{r}#1 \\ #2 \\ #3 \end{array}\right]}\) \(\newcommand{\cthreevec}[3]{\left[\begin{array}{c}#1 \\ #2 \\ #3 \end{array}\right]}\) \(\newcommand{\fourvec}[4]{\left[\begin{array}{r}#1 \\ #2 \\ #3 \\ #4 \end{array}\right]}\) \(\newcommand{\cfourvec}[4]{\left[\begin{array}{c}#1 \\ #2 \\ #3 \\ #4 \end{array}\right]}\) \(\newcommand{\fivevec}[5]{\left[\begin{array}{r}#1 \\ #2 \\ #3 \\ #4 \\ #5 \\ \end{array}\right]}\) \(\newcommand{\cfivevec}[5]{\left[\begin{array}{c}#1 \\ #2 \\ #3 \\ #4 \\ #5 \\ \end{array}\right]}\) \(\newcommand{\mattwo}[4]{\left[\begin{array}{rr}#1 \amp #2 \\ #3 \amp #4 \\ \end{array}\right]}\) \(\newcommand{\laspan}[1]{\text{Span}\{#1\}}\) \(\newcommand{\bcal}{\cal B}\) \(\newcommand{\ccal}{\cal C}\) \(\newcommand{\scal}{\cal S}\) \(\newcommand{\wcal}{\cal W}\) \(\newcommand{\ecal}{\cal E}\) \(\newcommand{\coords}[2]{\left\{#1\right\}_{#2}}\) \(\newcommand{\gray}[1]{\color{gray}{#1}}\) \(\newcommand{\lgray}[1]{\color{lightgray}{#1}}\) \(\newcommand{\rank}{\operatorname{rank}}\) \(\newcommand{\row}{\text{Row}}\) \(\newcommand{\col}{\text{Col}}\) \(\renewcommand{\row}{\text{Row}}\) \(\newcommand{\nul}{\text{Nul}}\) \(\newcommand{\var}{\text{Var}}\) \(\newcommand{\corr}{\text{corr}}\) \(\newcommand{\len}[1]{\left|#1\right|}\) \(\newcommand{\bbar}{\overline{\bvec}}\) \(\newcommand{\bhat}{\widehat{\bvec}}\) \(\newcommand{\bperp}{\bvec^\perp}\) \(\newcommand{\xhat}{\widehat{\xvec}}\) \(\newcommand{\vhat}{\widehat{\vvec}}\) \(\newcommand{\uhat}{\widehat{\uvec}}\) \(\newcommand{\what}{\widehat{\wvec}}\) \(\newcommand{\Sighat}{\widehat{\Sigma}}\) \(\newcommand{\lt}{<}\) \(\newcommand{\gt}{>}\) \(\newcommand{\amp}{&}\) \(\definecolor{fillinmathshade}{gray}{0.9}\)Learning Objectives
- Subculture bacteria in/on sterile media of various forms.
- Eliminate potential contamination of bacterial cultures by using aseptic technique.
- Practice hand coordination required in good transfer techniques.
- Practice hand coordination required in good transfer techniques.
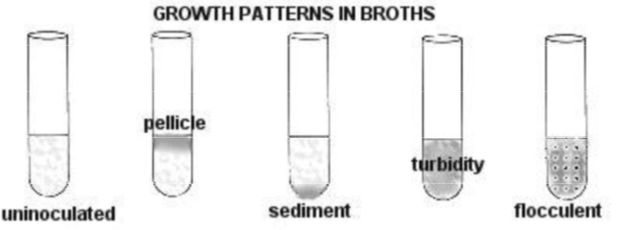
- Identify different ways by which bacteria grow in culture—in agar deeps, on agar slants, on agar plates, in broths.
- Streak out cultures for isolation and identify colonies.
GENERAL GUIDELINES & REMINDERS
SAFETY
- NO EATING OR DRINKING IN THE LAB!
- Wash your hands with soap both BEFORE and AFTER lab, and, in addition, when you have a spill. Be sure to have nonessential materials (the ONLY essential thing is the lab handouts and a notebook to write in) off of the table.
- ALWAYS disinfect the tables BEFORE and AFTER lab.
- ALWAYS check agar plates carefully to make sure that there are no mold or bacterial contaminants on the plate: if so, discard the plate in the autoclave bag. Do the same with any tubed media that you pick up: if contaminated, discard the tube in the discard racks.
- If there is a spill:
o Tell your instructor about it.
o Flood the area of the spill with disinfectant and leave on for 10 minutes before using paper towels to soak up.
- The gas should be turned all of the way on, so that the level is parallel with the rubber tubing.
- THE LAST PERSON ON THE TABLE CHECKS TO MAKE SURE THAT ALL 4 GAS JETS ARE OFF!
INOCULATION, INCUBATION AND LABELING OF CULTURES
- You always pick up your microorganisms as a set for your table, sharing them between the table members, and replace them in the biosafety hood.
- Keep test tube caps and petri dish covers on media to reduce contamination (matters not whether it is sterile media or already cultured).
- If you see water running on the agar plate, you can do 2 things:
o Place the agar plate upside down in the 37C incubator with the top cracked until dry.
o Get another agar plate.
- Place test tubes in racks when working at your table: never lay the tubes down—they leak.
- Heat the entire piece of metal of the inoculation instrument in the flame: it should be RED HOT. Be sure to COOL your inoculation instrument before picking the inoculum.
- Use an inoculating needle for agar deeps and an inoculating loop for agar plates and broths.
- ALWAYS use the proper aseptic technique when transferring cultures from one medium to another.
- Be sure to put any extra media tubes BACK into the racks if unused: Replace agar plates back into bags if not used.
- Label all test tubes and petri plates with your name (initials), your table #, date, exercise #, and name of organism.
- Use masking tape to mark on for the tubes: You can use tape or mark directly on the plates.
DISPOSAL OF CULTURES
- Do not dump ANY microbial suspension down the drain - only on the discard cart.
- REMOVE ALL labels from test tubes when putting them on the discard cart.
- Tubes for disposal go inn test tube racks at disposal area in corner of the lab.
- Agar plates for disposal go into the red biohazard autoclave bag on the floor below the tubes.
Note
All agar plates are incubated UPSIDE DOWN (exceptions will be pointed out occasionally).
WHY?
- It reduces bacterial contamination since the bacteria, even if they get into the plate in between the lid and bottom, would have to go UP to get to the agar.
- It reduces the possibility of water condensation that may be on the lid dropping onto the agar, causing fluid to run across the agar medium.
By now you know what media is:
Definition: Media
Media is the nutrient-rich material that provides food to the microbes.
There are 3 forms of media:
- An agar medium contains agar (1.5-2%) as a solidifying agent---isolation and purification.
- A broth medium has no agar: it is for fast, luxuriant growth.
- A semi-solid has a reduced percentage of agar, and, therefore, has qualities of both types.
In addition to nutrients and growth factors, and perhaps agar, there are additives such as NaCl salt, pH buffers, and pH indicators that allow biochemical reactions to be identified.
In this exercise you will learn how to subculture bacteria, using a variety of culture media as your inocula sources and as your new culture media. Different species of bacteria will be used so that you can become familiar with different growth patterns. You will also have a mixed culture with 2 species in order to learn how to best separate and isolate bacterial species.
MATERIALS NEEDED
- set of cultures for the table
- a TSA (trypticase soy agar) slant culture of Bacillus subtilis
- a TSB (trypticase soy broth) culture of Staph epidermidis
- a TSA plate culture of E. coli
- a culture of E. coli and Staphylococcus mixed together
- sterile media: (per person)
- 3 TSB
- 2 TSA slants
- 2 TSA plates
THE PROCEDURES
Note
The procedures below are to be carried out individually
Skills
THE TRANSFERS YOU WILL BE DOING IN LAB:
- Use an inoculating loop for the agar plate and the broth media.
- Subculture a broth culture of Staph epidermidis onto a TSA slant
- Subculture a slant culture of Bacillus subtilus into TSB.
- Subculture TSA plate culture of E. coli into TSB, a TSA slant, and a TSA plate.
- Subculture a mix of E. coli and Staphylococcus in TSB and on a TSA plate
Note
Your instructor will show you how to perform these procedures, but here is a brief description of the methods you will use.
ASEPTIC TECHNIQUE
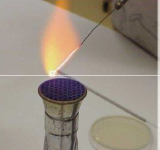
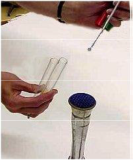
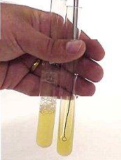
Fig. 1 Fig. 2 Fig.3
- Have both the culture that you are taking the inoculum from and the new, sterile medium in front of you. Be sure that the new medium is already labeled so you do not confuse the various cultures.
- Pick up both tubes in the hand not using the inoculation instrument
- Heat the inoculating wire of the loop until red-hot (Fig. 1), and be sure that the ENTIRE wire is sterilized. You are now ready to pick the inoculum from the bacterial culture.
- Keeping the sterile inoculation instrument in your hand, remove both tube caps with your little finger.
- Run the tops of the tubes through the heat to create an updraft (taking air contaminants AWAY from the tube entrance). (Fig. 2)
- Go into the tube to take your inoculum and QUICKLY place the inoculum into the new medium tube. (Fig. 3)
- Sterilize the tops of the tubes again (to eliminate potential air contamination again) and replace the caps.
- Incubate the plates and tubes in the 30 degree C incubator. Look at the section below in INTERPRETION to read your tube results
TAKING THE INOCULUM
FROM A BROTH CULTURE:
The inoculum is obtained by first shaking the culture a bit, and then going into the broth with the loop. A film of broth culture can be seen across the loop as you remove it from the tube.
FROM AN AGAR SLANT CULTURE:
The inoculum is picked off of the top of the slant, like a scraping motion.
FROM AN AGAR PLATE CULTURE:
The plate cultures have isolated colonies of bacteria growing on them. Pick only one colony or a bit of a colony, if big, with your loop. Lift the lid of the plate just a bit, in order to get your inoculating loop into it: DO NOT TAKE THE ENTIRE LID OFF.
INOCULATING THE NEW MEDIUM
TO A BROTH CULTURE:
The inoculum is just knocked around in the broth, and against the sides of the tube in the broth.
TO AN AGAR SLANT CULTURE:
Place the loop with the bacteria into the slant tube, all the way down to the bottom of the slant. There are 2 ways to inoculate the slant:
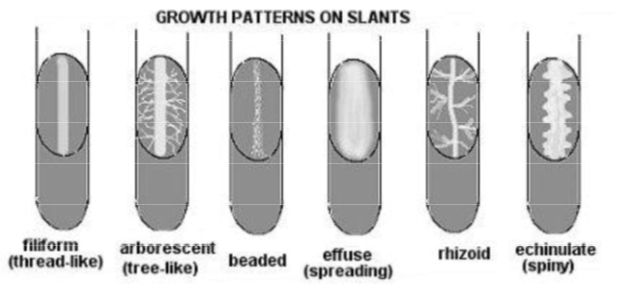
- If your goal is to identify the type of growth pattern, then just bring the loop straight up the slant.
- If your goal is to have a luxuriant culture, inoculate in a zig-zag pattern, starting at the bottom of the slant. This increases the surface area of the culture.
TO AN AGAR PLATE CULTURE:
see directions below on streak technique
TO AN AGAR DEEP:
Use the needle to inoculate the deeps or semi-solid agars. Stab the inoculum down to the bottom of the deep in a clean, straight stroke.
STREAKING AN AGAR PLATE
Until you become well-acquainted with this procedure, you might want to draw the 3 sections that you will streak inside of (Fig. 4), on the back (bottom of plate containing agar medium) with a sharpie pen (Fig. 5). Keep in mind that you flame your inoculating loop between each section streaked.
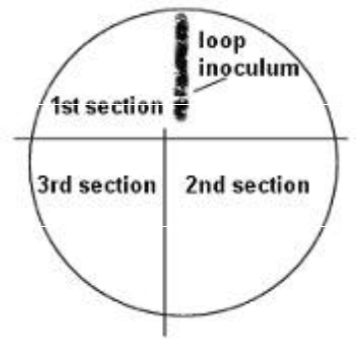
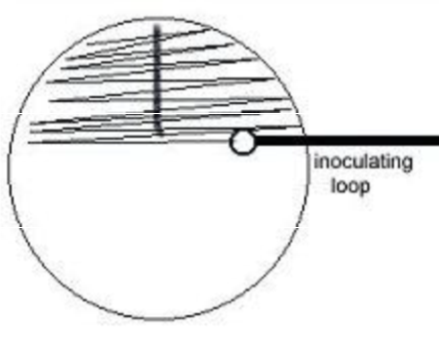
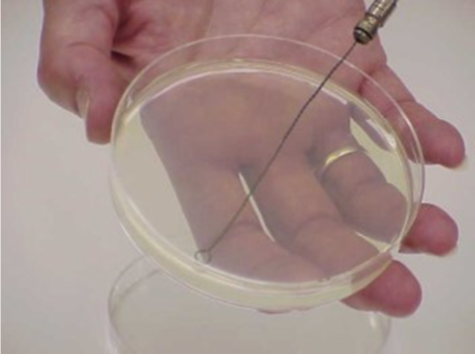
Fig. 4 Fig. 5 Fig. 6
- Pick up a loopful of your inoculum from either a broth or an agar culture. Using a sterile agar medium plate (lift the lid just enough to insert the loop), streak a vertical line straight down. (Fig. 6)
- When streaking the agar, keep the loop horizontal and only streak the surface of the agar: DO NOT DIG INTO THE AGAR.
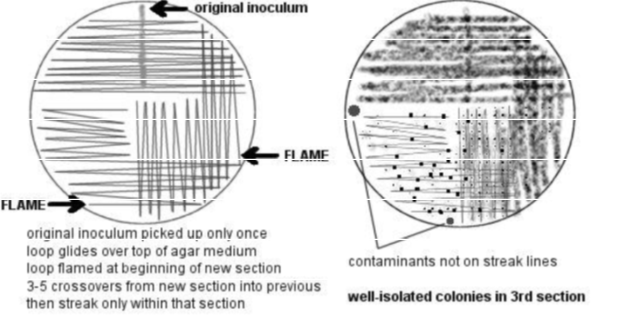
- Move the loop in a zig-zag pattern across the agar until 1/3 of the plate is covered, finishing the first section.
- Sterilize the loop in the flame and let it cool before continuing to spread the bacteria. You can do this by 1) sticking the hot loop in the agar at the edge of the agar away from the bacteria, or 2) just holding the loop for a few seconds while it cools.
- Rotate the plate about 90 degrees and spread the bacteria from the first streak into a second area using the same zig-zag spread technique.
- Sterilize the loop again. Rotate the plate about 90 degrees and spread the bacteria from the second streak into the 3rd area in the same pattern.
- Sterilize the loop again. Replace the lid and invert the plate. Incubate the plate.
INTERPRETATION OF RESULTS
AFTER INCUBATION, check the growth patterns of all tubes and plates.
GROWTH PATTERN ON AN ISOLATION STREAK PLATE
You should see bacterial cells growing along streak lines and in isolated areas.
QUESTIONS
- Why streak from the bottom of the agar slant medium up to the top in a straight line, rather than a back and forth wavy inoculation from side-to-side on the slant?
- Of what use is it to know what kind of growth pattern on an agar slant or a broth medium an organism has?
- Why do you cross over back the 2nd streak section back into the 1st section, and from the 3rd section back across the 2nd section?
- Why use a streak plate to grow a bacterium rather than an agar medium slant or a broth medium?


