

1.10: Meiosis and Gametogenesis
- Page ID
- 222596

\( \newcommand{\vecs}[1]{\overset { \scriptstyle \rightharpoonup} {\mathbf{#1}} } \)
\( \newcommand{\vecd}[1]{\overset{-\!-\!\rightharpoonup}{\vphantom{a}\smash {#1}}} \)
\( \newcommand{\dsum}{\displaystyle\sum\limits} \)
\( \newcommand{\dint}{\displaystyle\int\limits} \)
\( \newcommand{\dlim}{\displaystyle\lim\limits} \)
\( \newcommand{\id}{\mathrm{id}}\) \( \newcommand{\Span}{\mathrm{span}}\)
( \newcommand{\kernel}{\mathrm{null}\,}\) \( \newcommand{\range}{\mathrm{range}\,}\)
\( \newcommand{\RealPart}{\mathrm{Re}}\) \( \newcommand{\ImaginaryPart}{\mathrm{Im}}\)
\( \newcommand{\Argument}{\mathrm{Arg}}\) \( \newcommand{\norm}[1]{\| #1 \|}\)
\( \newcommand{\inner}[2]{\langle #1, #2 \rangle}\)
\( \newcommand{\Span}{\mathrm{span}}\)
\( \newcommand{\id}{\mathrm{id}}\)
\( \newcommand{\Span}{\mathrm{span}}\)
\( \newcommand{\kernel}{\mathrm{null}\,}\)
\( \newcommand{\range}{\mathrm{range}\,}\)
\( \newcommand{\RealPart}{\mathrm{Re}}\)
\( \newcommand{\ImaginaryPart}{\mathrm{Im}}\)
\( \newcommand{\Argument}{\mathrm{Arg}}\)
\( \newcommand{\norm}[1]{\| #1 \|}\)
\( \newcommand{\inner}[2]{\langle #1, #2 \rangle}\)
\( \newcommand{\Span}{\mathrm{span}}\) \( \newcommand{\AA}{\unicode[.8,0]{x212B}}\)
\( \newcommand{\vectorA}[1]{\vec{#1}} % arrow\)
\( \newcommand{\vectorAt}[1]{\vec{\text{#1}}} % arrow\)
\( \newcommand{\vectorB}[1]{\overset { \scriptstyle \rightharpoonup} {\mathbf{#1}} } \)
\( \newcommand{\vectorC}[1]{\textbf{#1}} \)
\( \newcommand{\vectorD}[1]{\overrightarrow{#1}} \)
\( \newcommand{\vectorDt}[1]{\overrightarrow{\text{#1}}} \)
\( \newcommand{\vectE}[1]{\overset{-\!-\!\rightharpoonup}{\vphantom{a}\smash{\mathbf {#1}}}} \)
\( \newcommand{\vecs}[1]{\overset { \scriptstyle \rightharpoonup} {\mathbf{#1}} } \)
\(\newcommand{\longvect}{\overrightarrow}\)
\( \newcommand{\vecd}[1]{\overset{-\!-\!\rightharpoonup}{\vphantom{a}\smash {#1}}} \)
\(\newcommand{\ket}[1]{\left| #1 \right>}\)
\(\newcommand{\bra}[1]{\left< #1 \right|}\)
\(\newcommand{\braket}[2]{\left< #1 \vphantom{#2} \right| \left. #2 \vphantom{#1} \right>}\)
\(\newcommand{\braopket}[3]{\left< #1 \vphantom{#2}\vphantom{#3} \right| #2 \vphantom{#1}\vphantom{#3} \left| #3 \vphantom{#1}\vphantom{#2} \right>}\)
\(\newcommand{\qmvec}[1]{\mathbf{\vec{#1}}}\)
\(\newcommand{\op}[1]{\hat{\mathbf{#1}}}\)
\(\newcommand{\expect}[1]{\langle #1 \rangle}\)
\(\newcommand{\dfn}[1]{\emph{\textbf{#1}}}\)
In the previous laboratory exercise, you examined mitosis, the process of cell division used for growth, repair, and replacement of cells. Mitosis produces two genetically identical daughter cells and helps multicellular organisms maintain their tissues throughout life.
In this laboratory, you will investigate meiosis, a different type of cell division found in organisms that reproduce sexually. Meiosis produces haploid cells containing half the chromosome number of the original cell. In animals, these cells develop into gametes, such as sperm and eggs. In plants, meiosis produces spores that develop into structures that later produce gametes. During meiosis, chromosomes are shuffled and recombined, creating genetic variation among offspring.
In this exercise, you will compare mitosis and meiosis, model the process of meiosis using chromosome beads, explore how independent assortment and crossing over increase genetic variation, and observe cells undergoing meiosis in the lily anther.
Comparing Mitosis and Meiosis:
In both meiosis and mitosis, the original parent cell is a diploid cell. Remember, this means the cell has two copies of each chromosome. Meiosis and mitosis are both nuclear divisions that result in new daughter cells. However, the two processes have significant differences. Using the diagram of mitosis and meiosis below, fill out the chart below comparing the two forms of nuclear division.
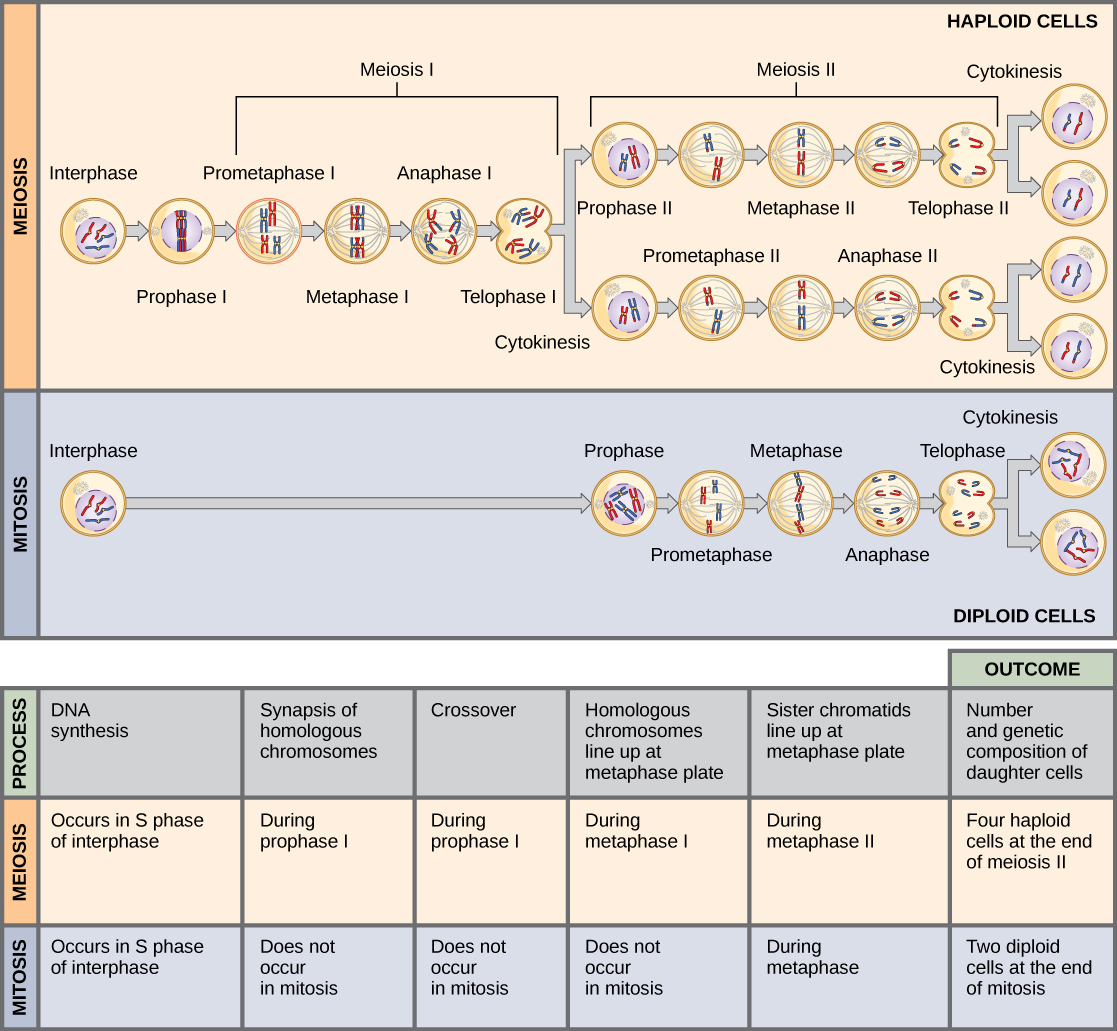
| Mitosis (begins with a single cell) |
Meiosis (begins with a single cell) |
|
|---|---|---|
| # Chromosomes in parent cells | ||
| # DNA replications | ||
| # Nuclear divisions | ||
| # Daughter cells produced | ||
| Purpose |
Part 1: Meiosis Bead Simulation
Materials:
- 12 magnets (=centromeres)
- 48 beads of one color
- 48 beads of another color
Procedure:
- Set up half of the beads exactly as follows, representing genes on the chromosome of a hypothetical critter. We will assume that the critter is diploid (2N) and has three different chromosomes. Because the critter has two copies of each of the three chromosomes, the diploid number is 6 (2 × 3 = 6).
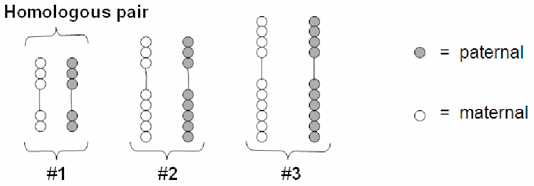
This is what your critter’s chromosomes look like in the unreplicated form. Note that there are six chromosomes here consisting of three homologous pairs. Each chromosome pair consists of a maternal and paternal version of the chromosome. The maternal and paternal versions are represented by the respective bead color.
- Replicate your chromosomes! Make enough copies of each chromosome to represent both paternal and maternal chromosomes in a replicated form, as shown below. Note that the sister chromatids are identical in color. Be sure you can identify the sister chromatids, chromosomes, and the difference between a replicated and non-replicated form.

3. Using your maternal and paternal sets of replicated chromosomes and this lab (or the text) as a reference, practice the process of meiosis until you are very comfortable with it. Each person in the group should practice the entire process.
Part 1: Simulate crossing over by exchanging beads on non-identical sister chromatids as illustrated below. Do this for all the three chromosome pairs.

Do NOT proceed until until your instructor directs you to do so.
Part 2: Independent Assortment
There are two possible ways pairs of homologs (also known as tetrads) can line up on the metaphase plate during Metaphase I. This possible number of alignments equals 2n, where n is the number of chromosomes per set. In humans, n=23, so there are 223 possible ways the homologous pairs can line up on the metaphase plate!
Procedure:
- Use the beads from the last simulation. This time, demonstrate the principle of independent assortment by determining how many different gametes you can form with three homologous pairs.
- Use the chromosomes to demonstrate 4 possible ways chromosomes can line up on the metaphase plate.
- Using simple chromosome drawings like those demonstrated by your instructor, draw a picture of each possible way of lining up. Use different colors to represent maternal and paternal chromosomes.
- Then draw a picture of each possible gamete formed when the chromosomes line up like that.

Lab Questions:
- How many possible gametes can be formed following meiosis (excluding crossing over events) from an original cell that contains a diploid number of six (2n = 6)? [The number of possible gametes = 2n where n is the number of chromosomes per set.]
- How many possible gametes can be formed following meiosis (excluding crossing over events) from an original cell that contains a diploid number of 46 (2n = 46)?
- Explain why crossing over can result in a much larger number of possible gamete types than independent assortment alone.
- Based upon the processes of independent assortment, crossing over, and random fertilization, what is one important difference you would expect to see between a sexually reproducing population of organisms and an asexually reproducing population of organisms?
Part 3: Gametogenesis in the Lily Anther
The formation of gametes, or gametogenesis, is the first stage in sexual reproduction. In single-celled organisms, e.g., many Protista, the vegetative cell acts as a gamete. In more complex organisms specialized regions of the organism are responsible for creating gametes.
In flowering plants, meiosis occurs in specialized reproductive structures. Female reproductive cells develop within the ovary, while male reproductive cells develop within the pollen sacs (microsporangia) of the anther. In this exercise, you will examine meiosis in the lily anther, a tissue that contains many cells undergoing division at the same time. Because the cells do not separate after each division, the stages of meiosis are relatively easy to observe.


Stages of Meiosis in the Lily Anther
|
Prophase I |
Metaphase I |
Anaphase 1 |
Telophase 1 |
|
|
|
|
|
|
Homologues pair |
Homologues line up |
Homologues separate |
Nuclear membrane reforms |


|
Prophase II |
Metaphase II |
Anaphase II |
Telophase II |
|
|
|
|
|
|
Chromosomes condense |
Replicated chromosomes line up |
Sister chromatids separate |
Nuclear membrane reforms |


Attribution: Lily anther meiosis photographs courtesy of Dr. Derek Zelmer (University of South Carolina Aiken), used with permission.
Procedure:
- Examine prepared slides of lily anther microsporangium under low power (10X). Note the bilobed structure. Immature gametes undergoing meiosis are found in the center of each lobe.
- With the 40X objective (400X magnification), find one or two cells in each stage of meiosis and draw one in the provided space below. Use the photographs above to identify the stages. Remember that if you see two cells together, the cells are in meiosis II.


Prophase I Metaphase I


Anaphase I Telophase I
Prophase II Metaphase II
Anaphase II Telophase II
Licensing and Attributions
Adapted from Biology Labs. Authored by: Wendy Riggs. Provided by: College of the Redwoods. Located at: http://www.redwoods.edu. License: CC BY: Attribution
CC licensed content, Original
- Biology Labs. Authored by: Wendy Riggs. Provided by: College of the Redwoods. Located at: http://www.redwoods.edu. License: CC BY: Attribution
- Mitosis v. Meiosis. Provided by: OpenStax. Located at: http://cnx.org/contents/b3c1e1d2-839c-42b0-a314-e119a8aafbdd@8.55:33/Concepts-of-Biology#fs-idm44820720. License: CC BY: Attribution
Module 8: Meiosis and Gametogenesis is shared under a CC BY license and was authored, remixed, and/or curated by LibreTexts.