
1.21: BioFuel Project
- Page ID
- 36763
\( \newcommand{\vecs}[1]{\overset { \scriptstyle \rightharpoonup} {\mathbf{#1}} } \)
\( \newcommand{\vecd}[1]{\overset{-\!-\!\rightharpoonup}{\vphantom{a}\smash {#1}}} \)
\( \newcommand{\dsum}{\displaystyle\sum\limits} \)
\( \newcommand{\dint}{\displaystyle\int\limits} \)
\( \newcommand{\dlim}{\displaystyle\lim\limits} \)
\( \newcommand{\id}{\mathrm{id}}\) \( \newcommand{\Span}{\mathrm{span}}\)
( \newcommand{\kernel}{\mathrm{null}\,}\) \( \newcommand{\range}{\mathrm{range}\,}\)
\( \newcommand{\RealPart}{\mathrm{Re}}\) \( \newcommand{\ImaginaryPart}{\mathrm{Im}}\)
\( \newcommand{\Argument}{\mathrm{Arg}}\) \( \newcommand{\norm}[1]{\| #1 \|}\)
\( \newcommand{\inner}[2]{\langle #1, #2 \rangle}\)
\( \newcommand{\Span}{\mathrm{span}}\)
\( \newcommand{\id}{\mathrm{id}}\)
\( \newcommand{\Span}{\mathrm{span}}\)
\( \newcommand{\kernel}{\mathrm{null}\,}\)
\( \newcommand{\range}{\mathrm{range}\,}\)
\( \newcommand{\RealPart}{\mathrm{Re}}\)
\( \newcommand{\ImaginaryPart}{\mathrm{Im}}\)
\( \newcommand{\Argument}{\mathrm{Arg}}\)
\( \newcommand{\norm}[1]{\| #1 \|}\)
\( \newcommand{\inner}[2]{\langle #1, #2 \rangle}\)
\( \newcommand{\Span}{\mathrm{span}}\) \( \newcommand{\AA}{\unicode[.8,0]{x212B}}\)
\( \newcommand{\vectorA}[1]{\vec{#1}} % arrow\)
\( \newcommand{\vectorAt}[1]{\vec{\text{#1}}} % arrow\)
\( \newcommand{\vectorB}[1]{\overset { \scriptstyle \rightharpoonup} {\mathbf{#1}} } \)
\( \newcommand{\vectorC}[1]{\textbf{#1}} \)
\( \newcommand{\vectorD}[1]{\overrightarrow{#1}} \)
\( \newcommand{\vectorDt}[1]{\overrightarrow{\text{#1}}} \)
\( \newcommand{\vectE}[1]{\overset{-\!-\!\rightharpoonup}{\vphantom{a}\smash{\mathbf {#1}}}} \)
\( \newcommand{\vecs}[1]{\overset { \scriptstyle \rightharpoonup} {\mathbf{#1}} } \)
\(\newcommand{\longvect}{\overrightarrow}\)
\( \newcommand{\vecd}[1]{\overset{-\!-\!\rightharpoonup}{\vphantom{a}\smash {#1}}} \)
\(\newcommand{\avec}{\mathbf a}\) \(\newcommand{\bvec}{\mathbf b}\) \(\newcommand{\cvec}{\mathbf c}\) \(\newcommand{\dvec}{\mathbf d}\) \(\newcommand{\dtil}{\widetilde{\mathbf d}}\) \(\newcommand{\evec}{\mathbf e}\) \(\newcommand{\fvec}{\mathbf f}\) \(\newcommand{\nvec}{\mathbf n}\) \(\newcommand{\pvec}{\mathbf p}\) \(\newcommand{\qvec}{\mathbf q}\) \(\newcommand{\svec}{\mathbf s}\) \(\newcommand{\tvec}{\mathbf t}\) \(\newcommand{\uvec}{\mathbf u}\) \(\newcommand{\vvec}{\mathbf v}\) \(\newcommand{\wvec}{\mathbf w}\) \(\newcommand{\xvec}{\mathbf x}\) \(\newcommand{\yvec}{\mathbf y}\) \(\newcommand{\zvec}{\mathbf z}\) \(\newcommand{\rvec}{\mathbf r}\) \(\newcommand{\mvec}{\mathbf m}\) \(\newcommand{\zerovec}{\mathbf 0}\) \(\newcommand{\onevec}{\mathbf 1}\) \(\newcommand{\real}{\mathbb R}\) \(\newcommand{\twovec}[2]{\left[\begin{array}{r}#1 \\ #2 \end{array}\right]}\) \(\newcommand{\ctwovec}[2]{\left[\begin{array}{c}#1 \\ #2 \end{array}\right]}\) \(\newcommand{\threevec}[3]{\left[\begin{array}{r}#1 \\ #2 \\ #3 \end{array}\right]}\) \(\newcommand{\cthreevec}[3]{\left[\begin{array}{c}#1 \\ #2 \\ #3 \end{array}\right]}\) \(\newcommand{\fourvec}[4]{\left[\begin{array}{r}#1 \\ #2 \\ #3 \\ #4 \end{array}\right]}\) \(\newcommand{\cfourvec}[4]{\left[\begin{array}{c}#1 \\ #2 \\ #3 \\ #4 \end{array}\right]}\) \(\newcommand{\fivevec}[5]{\left[\begin{array}{r}#1 \\ #2 \\ #3 \\ #4 \\ #5 \\ \end{array}\right]}\) \(\newcommand{\cfivevec}[5]{\left[\begin{array}{c}#1 \\ #2 \\ #3 \\ #4 \\ #5 \\ \end{array}\right]}\) \(\newcommand{\mattwo}[4]{\left[\begin{array}{rr}#1 \amp #2 \\ #3 \amp #4 \\ \end{array}\right]}\) \(\newcommand{\laspan}[1]{\text{Span}\{#1\}}\) \(\newcommand{\bcal}{\cal B}\) \(\newcommand{\ccal}{\cal C}\) \(\newcommand{\scal}{\cal S}\) \(\newcommand{\wcal}{\cal W}\) \(\newcommand{\ecal}{\cal E}\) \(\newcommand{\coords}[2]{\left\{#1\right\}_{#2}}\) \(\newcommand{\gray}[1]{\color{gray}{#1}}\) \(\newcommand{\lgray}[1]{\color{lightgray}{#1}}\) \(\newcommand{\rank}{\operatorname{rank}}\) \(\newcommand{\row}{\text{Row}}\) \(\newcommand{\col}{\text{Col}}\) \(\renewcommand{\row}{\text{Row}}\) \(\newcommand{\nul}{\text{Nul}}\) \(\newcommand{\var}{\text{Var}}\) \(\newcommand{\corr}{\text{corr}}\) \(\newcommand{\len}[1]{\left|#1\right|}\) \(\newcommand{\bbar}{\overline{\bvec}}\) \(\newcommand{\bhat}{\widehat{\bvec}}\) \(\newcommand{\bperp}{\bvec^\perp}\) \(\newcommand{\xhat}{\widehat{\xvec}}\) \(\newcommand{\vhat}{\widehat{\vvec}}\) \(\newcommand{\uhat}{\widehat{\uvec}}\) \(\newcommand{\what}{\widehat{\wvec}}\) \(\newcommand{\Sighat}{\widehat{\Sigma}}\) \(\newcommand{\lt}{<}\) \(\newcommand{\gt}{>}\) \(\newcommand{\amp}{&}\) \(\definecolor{fillinmathshade}{gray}{0.9}\)Goals
- Convert cellulose biomass to usable biofuel.
Student Learning Outcomes
- Test predictions about how variables such as biomass type or grinding affect conversion into sugars and ethanol.
- Trace the transformation of cellulose into glucose and then ethanol.
- Infer the action of cellulase enzymes on cellulose based upon sugar readings.
- Measure the conversion of sugars to ethanol using ethanol sensors.
- Use sugar and ethanol readings to evaluate initial predictions and draw conclusions about the effects of treatment variables.
Introduction
Biomass is any organic material that comes from organisms, such as plants. Plant biomass contains energy that can be used for food or fuel depending on what part of the plant is used. Cellulosic biomass is the part of the plant that most people cannot digest such as tough fibrous or woody grass, leaves, stems, flowers, corn stalks, wood, or paper products. Although cellulosic biomass cannot be used for food, it contains a large amount of energy that can be used as fuel for transportation. Cellulosic biomass, also referred to as cellulose, is the primary component of plant cell walls. Without cellulose, plants would not be able to stand upright. Cellulose is one of the most abundant molecules on Earth and represents a huge potential pool of renewable energy if we can find a way to easily convert it into transportation fuel.
In this lab, you will investigate the challenge of converting cellulosic biomass into ethanol. You will use some of the same strategies used by scientists and engineers in biotechnology companies. The process involves three key steps: Pretreatment, hydrolysis (enzymatic digestion) and fermentation.
Biofuel Pipeline Overview
The process outlined below provides an overview of the steps and describes the chemical changes occurring as cellulosic biomass is converted to sugar and then ethanol. We call this a “biofuel production pipeline” because the products generated from one step are used in the next step until ethanol is produced.
In the pretreatment stage, the goal is to loosen the cell wall structure so that the cellulose is exposed. Plant cell walls are made up of three primary components: cellulose, hemicellulose, and lignin. These molecules must be separated so that enzymes can reach the cellulose. Heating and grinding are effective pretreatment methods.
Cellulose is actually made up of long chains (polymers) of glucose molecules. In the hydrolysis stage, the goal is to break the long cellulose molecules down into individual glucose molecules. Special enzymes called cellulases are able to cut up the cellulose strands into glucose. Glucose is a simple sugar that can be used as food by many organisms.
In the final step of the pipeline, yeast is added to the enzymatically digested biomass mixture. Without oxygen, yeast consumes the glucose and produces ethanol through a process called fermentation. The yeast used in this process is the same single-celled organisms used to bake bread or brew beer.
The process outlined below provides an overview of the steps and describes the chemical changes occurring as cellulosic biomass is converted to sugar and then ethanol. We call this a “biofuel production pipeline” because the products generated from one step are used in the next step until ethanol is produced.
In the pretreatment stage, the goal is to loosen the cell wall structure so that the cellulose is exposed. Plant cell walls are made up of three primary components: cellulose, hemicellulose, and lignin. These molecules must be separated so that enzymes can reach the cellulose. Heating and grinding are effective pretreatment methods.
Cellulose is actually made up of long chains (polymers) of glucose molecules. In the hydrolysis stage, the goal is to break the long cellulose molecules down into individual glucose molecules. Special enzymes called cellulases are able to cut up the cellulose strands into glucose. Glucose is a simple sugar that can be used as food by many organisms.
In this investigation, you and your research team will pick a cellulosic biomass sample to first convert into sugars, and then into ethanol through the process described above. You will track the conversion process by measuring sugar (glucose) and ethanol levels at key stages. The data you and your classmates collect will help you determine which biomass sources and pretreatment methods are most effective for producing sugars and ethanol and develop explanations for why some samples produce more sugar and ethanol than others.
Part 1: Prelab Work
Before the Lab
The goal of this lab is to convert a cellulosic biomass sample into sugar and then ethanol. Your lab group should select a biomass sample and cutting/grinding treatment that you think will effectively produce ethanol. Your group will prepare both an experimental and a control treatment to evaluate the effects of the enzyme on the production of sugar and ethanol.
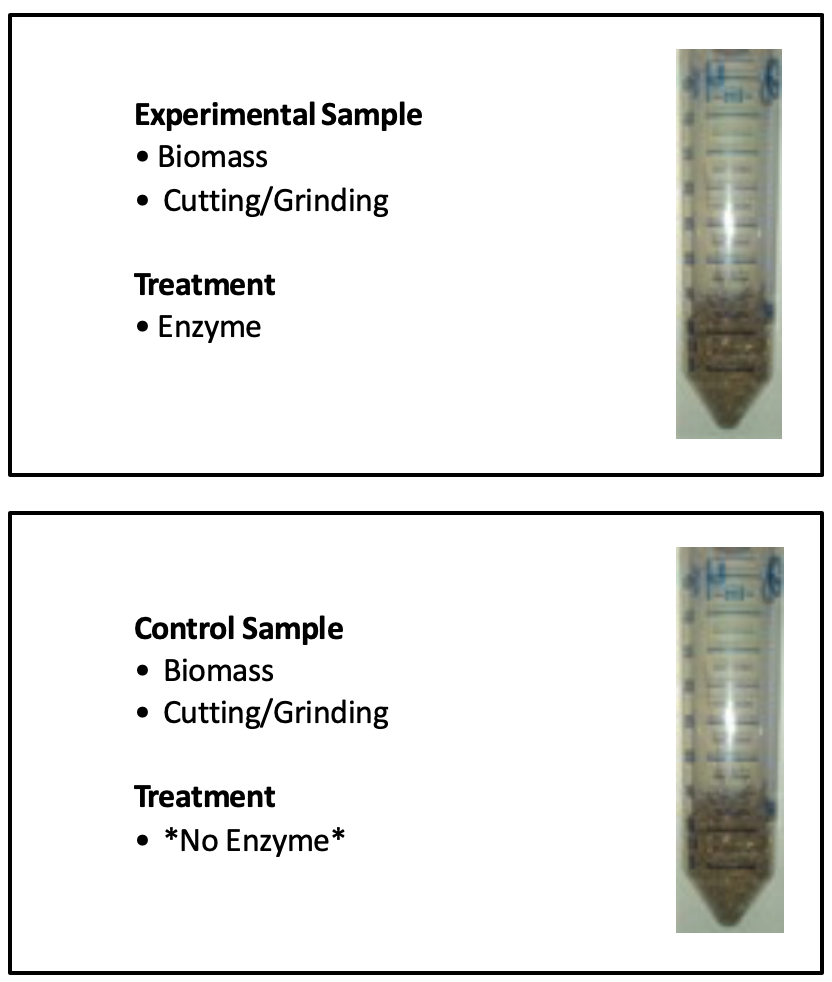
Figure 2: Experimental and control samples of biomass
Experimental Sample
• Biomass
• Cutting/Grinding
Treatment
• Enzyme
Control Sample
• Biomass
• Cutting/Grinding
Treatment
• *No Enzyme*
Table 21.1.
|
Lab Research Stage |
Duration |
Activities |
|---|---|---|
|
1-2 days |
• Develop research plan • Choose biomass type and/or pretreatment options (cutting or grinding) |
|
1 day |
• Set up experiment • Cut, grind and/or boil biomass • Measure initial sugar levels |
|
1 day |
• Add cellulase enzymes • Measure sugar levels (after 24 hours) |
|
1 day |
• Measure initial ethanol levels • Add yeast • Measure final ethanol levels (after 24 hours) |
|
1-2 days |
• Graph final results • Summarize conclusions and communicate findings to class • Write up final results based on evidence from your other lab group results |
Experimental Design and Planning
In your group, discuss and decide which biomass and grinding options will be best for producing ethanol. As instructed by your teacher, write down why you think it will produce the most ethanol. Be prepared to explain what you think will happen in this experiment and pinpoint what evidence you will use to determine whether your prediction was accurate.
The goal of this lab is to produce as much ethanol as possible from 1-gram of biomass mixed with 25-mL of water. Based upon the options provided by your teacher, work with your lab group to decide what biomass type and grinding option you would like to convert into ethanol. Answer the questions below and be prepared to share your answers with the class.
- What biomass did you choose? Explain why.
- If applicable, what grinding option did you choose? Explain why.
- What evidence will you gather from this experiment to determine whether your biomass is effectively converted into ethanol?
- At what stage in the lab (pretreatment, enzyme digestion, fermentation) and in which treatment (control or experimental) do you expect to measure the highest glucose levels? Explain.
- At what stage (pretreatment, enzyme digestion, fermentation) and in which treatment (control or experimental) do you expect to measure the highest ethanol levels? Explain.
Materials
|
4/class |
|
4/class |
|
2/group |
|
1/group |
|
~10/group |
|
1 sheet/group |
|
~50 grams of each |
|
1/group |
|
1/group |
|
4/class |
|
~ 1/group |
|
1/group |
|
1/group |
|
1/group |
|
1/group |
|
1/group |
|
1/group |
|
1/class |
|
~10mL/class |
|
1/2 tsp/group |
|
1/group |
Safety
- All appropriate safety precautions and attire required for a science laboratory should be used, including safety goggles. Please refer to your teacher’s instructions.
- Wash your hands well with soap after completing the lab.
Part II: The Experiment
Procedure
STEP 1: Sample Preparation and Pretreatment
GOAL
Break down plant cell walls to release the cellulose fibers
- Label two 50-mL conical tubes and caps with your team initials, date, and sample description (biomass source and any pre-treatment)
- The labels in Figure 3. are examples. Every group will have 2 tube setups with the same biomass.
- If any pre-treatment is required, do so (cutting, grinding, drying, etc.).
- Measure 1.0 gram of your biomass samples and put the 1.0 gram into the corresponding 50-mL falcon tube.
- Test the initial glucose concentration using the blood glucose test monitor and test strips, record this data. Describe the biomass (ex: Appearance, odor).
- Test the initial ethanol concentration using the ethanol probes; record this data. Describe the biomass (ex: Appearance, odor).

Figure 3: Example labels and diagram of sample preparation.
Hot Water Pretreatment
- Start the hot plate to bring approximately 400-mL water to a gentle boil in a 500-mL glass beaker. Use pre-heated water to fill your beaker.
- Set up a conical tube holder (i.e. chicken-wire screen or aluminum) foil for your 500-mL beaker as directed by your teacher. If you are partnering with another group, you can pack 4 tubes in a beaker without setting up a holder.
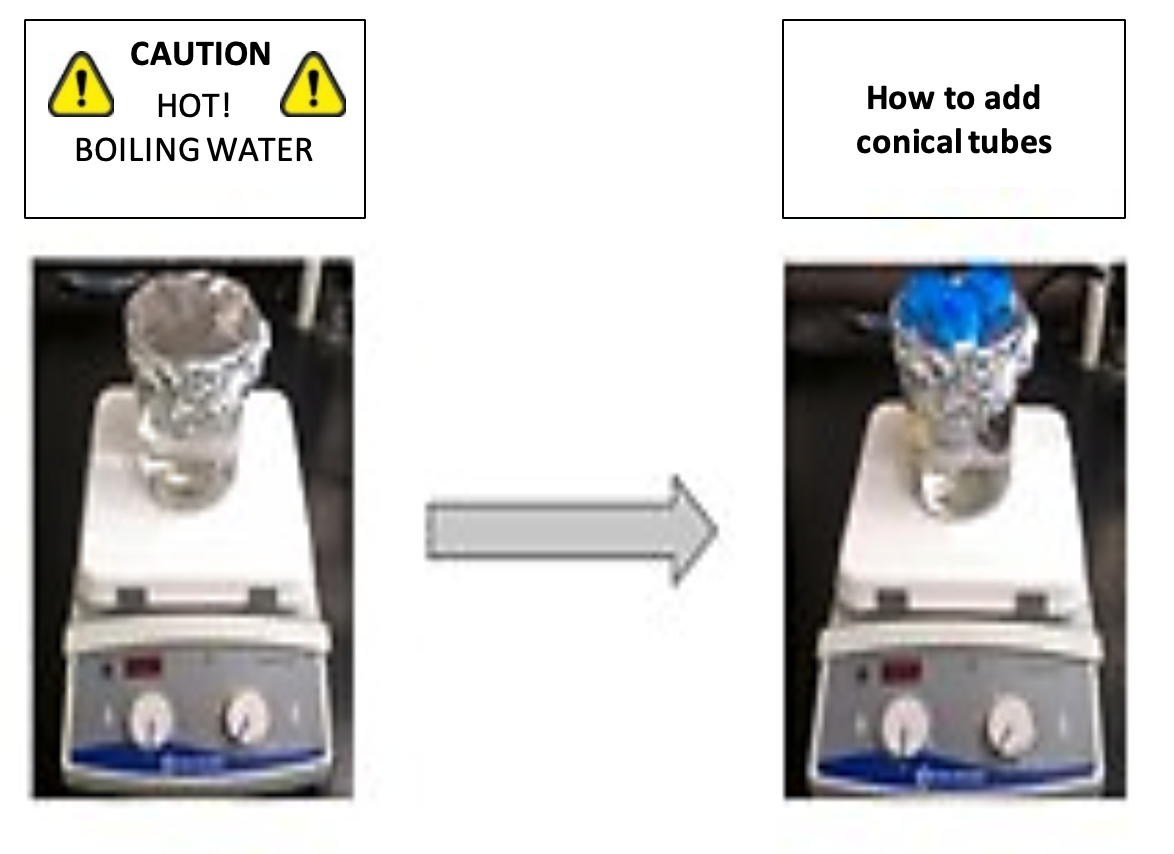
Figure 4: How to setup hotplate and tubes.
- Add 25-mL of distilled water to the to all three of your labeled 50-mL conical tubes.
- Swirl to mix the biomass and the water. Let it sit for 1 minute.
- Loosely screw the cap onto the conical tube; DO NOT tighten all the way.
Figure 5: Contents of the falcon (conical) tube.
- Wait for water in your beaker to come to a gentle boil on your hot plate.
- Gently push your two conical tube samples into the beaker though the aluminum foil or wire screen. If you are using the 4-tube method pack the 4 tubes into the 500-mL beaker. Make sure that the biomass samples and the liquid are completely submerged below the surface of the boiling water in the beaker.
- Leave tubes in the water for 10 to 25 minutes depending on how much time you have. The longer the time period, the higher the potential yield of ethanol will be.
- Turn off the hot plate and remove your samples. Allow them to cool to room temperature. Lab Tip: Use a cold-water bath to make the tubes cool more quickly.
- Test the glucose concentration using the blood glucose test monitor and test strips; record this data. Describe any detectable changes in the biomass (ex: Appearance, odor).
- Test the ethanol concentration using the ethanol probes; record this data. Describe any detectable changes in the biomass (ex: Appearance, odor).
- If samples will not be used in the next 2 days, refrigerate or freeze them immediately. This
will suppress microbial growth.
Step 2: Enzymatic Digestion (Hydrolysis)
GOAL
Digest the cellulose fibers into glucose (sugar)
- Remove samples from refrigerator or freezer and bring to room temperature.
- Make sure the common water bath or the incubator is at 50°C.
- Add 1.0 mL of Celluclast™ cellulase enzyme product to each test tube that is undergoing hydrolysis. The control will not have any enzyme added.
- Screw caps on tightly. Mix gently.
- Place both conical tubes in a common water bath or incubator at 50°C.
- Leave the tubes in the water bath for 24 hours.
- After 24-hour hydrolysis data collection: Use the blood glucose test monitor and test strips to test post-enzyme glucose concentration of the sample. Record this data. Describe any detectable changes in the biomass (ex: Appearance, odor).
- Test the ethanol concentration using the ethanol probes. Record this data. Describe any detectable changes in the biomass (ex: Appearance, odor).
NOTE: For more accurate ethanol readings, allow samples to reach room temperature before taking measurements.
- If fermentation will not begin at this stage, freeze or refrigerate samples to prevent microbial contamination.
Step 3: Fermentation
GOAL
Convert glucose (sugar) into ethanol (fuel)
- Make sure the common water bath or incubator is at 37°C.
- Add ¼ teaspoon or 1.0 gram of active yeast to each tube. These measurements are roughly equivalent.
- Gently mix in the yeast. The yeast will grow more quickly if evenly mixed.
- Loosely screw on the cap to the tubes. It is important that the tubes not be air-tight for the fermentation. Yeast will produce CO2 and will build up pressure in the tube unless the gas is allowed to escape.
- Place conical tubes upright in the 37°C water bath or incubator. Use a test tube rack or similar apparatus (chicken wire) to keep the tubes upright.
OPTIONAL: After 30 minutes measure ethanol and glucose concentration, record data and other observations about changes occurring in the tubes.
- Return your tubes to the 37°C common water bath or incubator for 24 hours of fermentation.
- After 24 hours, remove your tubes from the 37°C water bath.
NOTE: If 24-hour measurement does not fit with class schedule, instructor can remove samples from water bath and refrigerate or freeze until final measurements can be taken.
- Take final glucose readings: Use the blood glucose test monitor and test strips to test post-enzyme glucose concentration of the sample. Record this data. Describe any detectable changes in the biomass (appearance, odor?).
- Take final ethanol readings. Test the ethanol concentration using the ethanol probes.
- Record this data. Describe any detectable changes in the biomass (Appearance, odor). NOTE: For more accurate ethanol readings, allow samples to reach room temperature before taking measurements.
- Clean tubes and lab area as instructed by your teacher.
DATA ANALYSIS
To organize and draw conclusions form your data, it is helpful to compare changes in glucose and ethanol levels over time using bar graphs. Using a computer program such as Microsoft Excel (or by hand), create two bar graphs to summarize your results (Graphs 21.1-2). The empty graphs below can serve as a guide (full sized are available on page 21-9).
Discuss the graphs with your lab group:
- Do these results match your initial prediction? Why or why not?
- How do you explain your results? Summarize and communicate results as instructed by your instructor.
Graph 21.1. 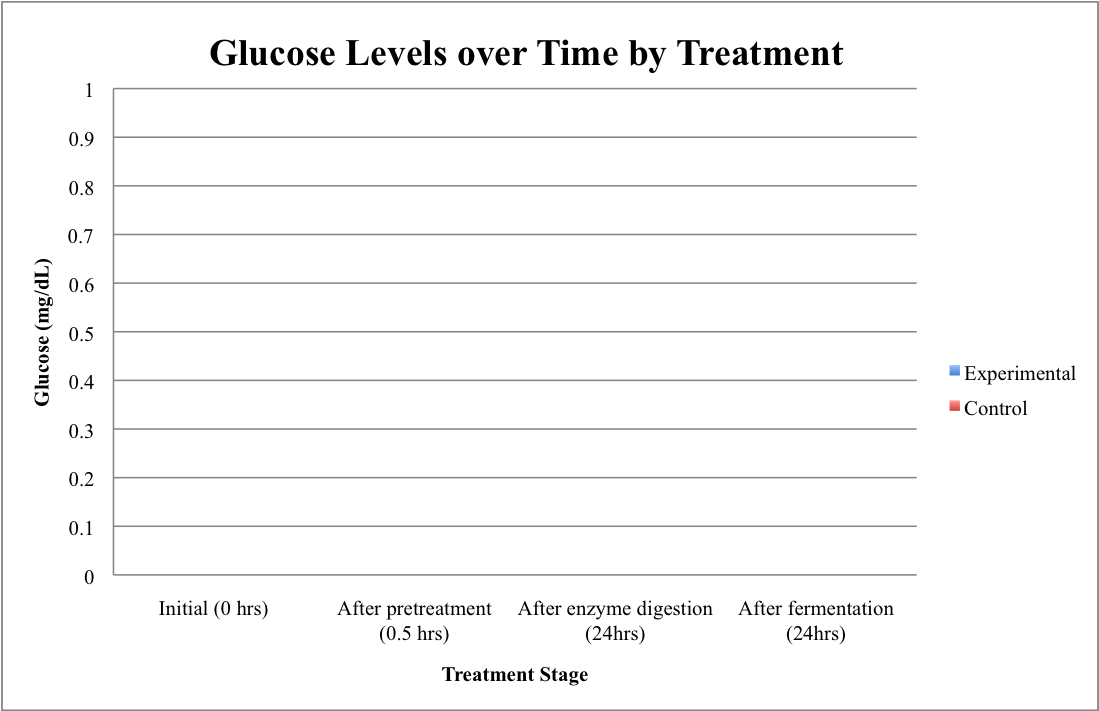
Graph 21.2. 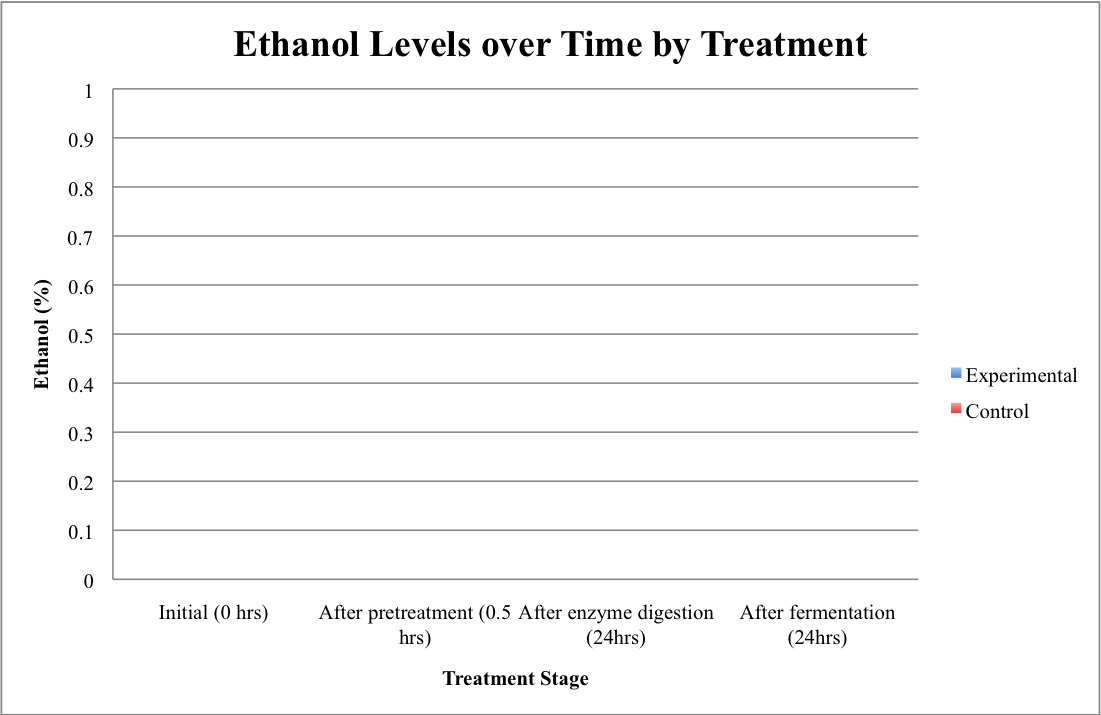
RESULTS
Use your graphs and lab notebook data to answer these questions about the results of this experiment. Be prepared to share your answers with the class.
- Did you observe any changes in glucose and ethanol levels after the enzyme digestion stage (hydrolysis)? Explain why or why not.
- Where does the glucose come from in this experiment?
- Did you observe any changes in glucose and ethanol levels after fermentation? Explain.
- Why do you think that glucose levels went up then then went down in over the course of this experiment?
- Did your observed results match what you expected would happen? Explain why or why not.
CONCLUSION
Share your results and initial conclusions with the class. Learn from your classmates’ results and observations so you can determine what might be the most effective ways to convert biomass into ethanol.
STUDY QUESTIONS
- Of all of the samples tested in your class, what biomass treatment produced the most glucose and ethanol? Explain why you think this treatment was most effective.
- Of all of the samples tested in your class, what biomass treatment produced the least glucose and ethanol? Explain why you think this treatment was least effective.
- If you were to try this experiment again to produce more ethanol what would you do differently? Explain why.
- Explain how you would design an experiment to determine whether the boiling pretreatment had an effect on how much glucose and ethanol is produced.
This material is based upon work supported in part by the Great Lakes Bioenergy Research Center, U.S. Department of Energy, Office of Science, Office of Biological and Environmental Research under Award Numbers DE-SC0018409 and DE-FC02-07ER64494 and is licensed CC-BY-NC-SA . Original activity, CB2E: Converting Cellulosic Biomass to Ethanol.