Biology LibreTexts

2.5: Transferring the Inoculum into a Petri Plate

  • Page ID
    122947
  • \( \newcommand{\vecs}[1]{\overset { \scriptstyle \rightharpoonup} {\mathbf{#1}} } \)

    \( \newcommand{\vecd}[1]{\overset{-\!-\!\rightharpoonup}{\vphantom{a}\smash {#1}}} \)

    \( \newcommand{\id}{\mathrm{id}}\) \( \newcommand{\Span}{\mathrm{span}}\)

    ( \newcommand{\kernel}{\mathrm{null}\,}\) \( \newcommand{\range}{\mathrm{range}\,}\)

    \( \newcommand{\RealPart}{\mathrm{Re}}\) \( \newcommand{\ImaginaryPart}{\mathrm{Im}}\)

    \( \newcommand{\Argument}{\mathrm{Arg}}\) \( \newcommand{\norm}[1]{\| #1 \|}\)

    \( \newcommand{\inner}[2]{\langle #1, #2 \rangle}\)

    \( \newcommand{\Span}{\mathrm{span}}\)

    \( \newcommand{\id}{\mathrm{id}}\)

    \( \newcommand{\Span}{\mathrm{span}}\)

    \( \newcommand{\kernel}{\mathrm{null}\,}\)

    \( \newcommand{\range}{\mathrm{range}\,}\)

    \( \newcommand{\RealPart}{\mathrm{Re}}\)

    \( \newcommand{\ImaginaryPart}{\mathrm{Im}}\)

    \( \newcommand{\Argument}{\mathrm{Arg}}\)

    \( \newcommand{\norm}[1]{\| #1 \|}\)

    \( \newcommand{\inner}[2]{\langle #1, #2 \rangle}\)

    \( \newcommand{\Span}{\mathrm{span}}\) \( \newcommand{\AA}{\unicode[.8,0]{x212B}}\)

    \( \newcommand{\vectorA}[1]{\vec{#1}}      % arrow\)

    \( \newcommand{\vectorAt}[1]{\vec{\text{#1}}}      % arrow\)

    \( \newcommand{\vectorB}[1]{\overset { \scriptstyle \rightharpoonup} {\mathbf{#1}} } \)

    \( \newcommand{\vectorC}[1]{\textbf{#1}} \)

    \( \newcommand{\vectorD}[1]{\overrightarrow{#1}} \)

    \( \newcommand{\vectorDt}[1]{\overrightarrow{\text{#1}}} \)

    \( \newcommand{\vectE}[1]{\overset{-\!-\!\rightharpoonup}{\vphantom{a}\smash{\mathbf {#1}}}} \)

    \( \newcommand{\vecs}[1]{\overset { \scriptstyle \rightharpoonup} {\mathbf{#1}} } \)

    \( \newcommand{\vecd}[1]{\overset{-\!-\!\rightharpoonup}{\vphantom{a}\smash {#1}}} \)

    \(\newcommand{\avec}{\mathbf a}\) \(\newcommand{\bvec}{\mathbf b}\) \(\newcommand{\cvec}{\mathbf c}\) \(\newcommand{\dvec}{\mathbf d}\) \(\newcommand{\dtil}{\widetilde{\mathbf d}}\) \(\newcommand{\evec}{\mathbf e}\) \(\newcommand{\fvec}{\mathbf f}\) \(\newcommand{\nvec}{\mathbf n}\) \(\newcommand{\pvec}{\mathbf p}\) \(\newcommand{\qvec}{\mathbf q}\) \(\newcommand{\svec}{\mathbf s}\) \(\newcommand{\tvec}{\mathbf t}\) \(\newcommand{\uvec}{\mathbf u}\) \(\newcommand{\vvec}{\mathbf v}\) \(\newcommand{\wvec}{\mathbf w}\) \(\newcommand{\xvec}{\mathbf x}\) \(\newcommand{\yvec}{\mathbf y}\) \(\newcommand{\zvec}{\mathbf z}\) \(\newcommand{\rvec}{\mathbf r}\) \(\newcommand{\mvec}{\mathbf m}\) \(\newcommand{\zerovec}{\mathbf 0}\) \(\newcommand{\onevec}{\mathbf 1}\) \(\newcommand{\real}{\mathbb R}\) \(\newcommand{\twovec}[2]{\left[\begin{array}{r}#1 \\ #2 \end{array}\right]}\) \(\newcommand{\ctwovec}[2]{\left[\begin{array}{c}#1 \\ #2 \end{array}\right]}\) \(\newcommand{\threevec}[3]{\left[\begin{array}{r}#1 \\ #2 \\ #3 \end{array}\right]}\) \(\newcommand{\cthreevec}[3]{\left[\begin{array}{c}#1 \\ #2 \\ #3 \end{array}\right]}\) \(\newcommand{\fourvec}[4]{\left[\begin{array}{r}#1 \\ #2 \\ #3 \\ #4 \end{array}\right]}\) \(\newcommand{\cfourvec}[4]{\left[\begin{array}{c}#1 \\ #2 \\ #3 \\ #4 \end{array}\right]}\) \(\newcommand{\fivevec}[5]{\left[\begin{array}{r}#1 \\ #2 \\ #3 \\ #4 \\ #5 \\ \end{array}\right]}\) \(\newcommand{\cfivevec}[5]{\left[\begin{array}{c}#1 \\ #2 \\ #3 \\ #4 \\ #5 \\ \end{array}\right]}\) \(\newcommand{\mattwo}[4]{\left[\begin{array}{rr}#1 \amp #2 \\ #3 \amp #4 \\ \end{array}\right]}\) \(\newcommand{\laspan}[1]{\text{Span}\{#1\}}\) \(\newcommand{\bcal}{\cal B}\) \(\newcommand{\ccal}{\cal C}\) \(\newcommand{\scal}{\cal S}\) \(\newcommand{\wcal}{\cal W}\) \(\newcommand{\ecal}{\cal E}\) \(\newcommand{\coords}[2]{\left\{#1\right\}_{#2}}\) \(\newcommand{\gray}[1]{\color{gray}{#1}}\) \(\newcommand{\lgray}[1]{\color{lightgray}{#1}}\) \(\newcommand{\rank}{\operatorname{rank}}\) \(\newcommand{\row}{\text{Row}}\) \(\newcommand{\col}{\text{Col}}\) \(\renewcommand{\row}{\text{Row}}\) \(\newcommand{\nul}{\text{Nul}}\) \(\newcommand{\var}{\text{Var}}\) \(\newcommand{\corr}{\text{corr}}\) \(\newcommand{\len}[1]{\left|#1\right|}\) \(\newcommand{\bbar}{\overline{\bvec}}\) \(\newcommand{\bhat}{\widehat{\bvec}}\) \(\newcommand{\bperp}{\bvec^\perp}\) \(\newcommand{\xhat}{\widehat{\xvec}}\) \(\newcommand{\vhat}{\widehat{\vvec}}\) \(\newcommand{\uhat}{\widehat{\uvec}}\) \(\newcommand{\what}{\widehat{\wvec}}\) \(\newcommand{\Sighat}{\widehat{\Sigma}}\) \(\newcommand{\lt}{<}\) \(\newcommand{\gt}{>}\) \(\newcommand{\amp}{&}\) \(\definecolor{fillinmathshade}{gray}{0.9}\)

    1. If the agar surface of the plate is visibly wet, use a sterile swab to gently remove the water.

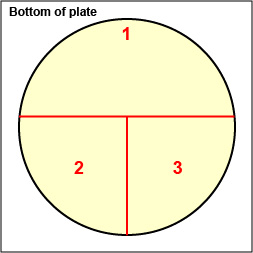
    2. On the bottom of the petri plate, divide the plate into thirds with your wax marker and label as shown below. This will guide your streaking.
    undefined
    Figure \(\PageIndex{1}\): Divide the plate into thirds with your wax marker and label . (Copyright; Gary E. Kaiser, Ph.D. The Community College of Baltimore County, Catonsville Campus CC-BY-3.0)

    3. Lift the edge of the lid just enough to insert the loop.

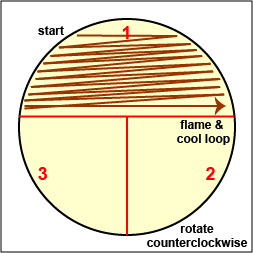
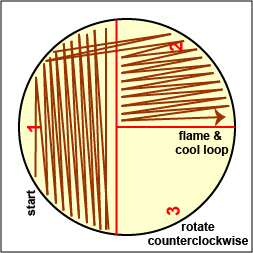
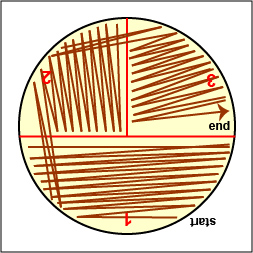
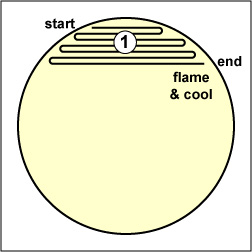
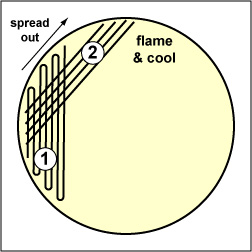
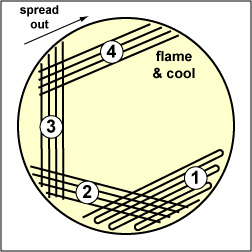
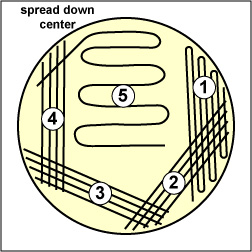
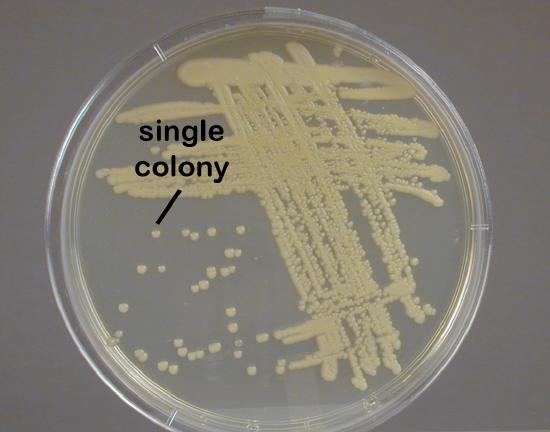
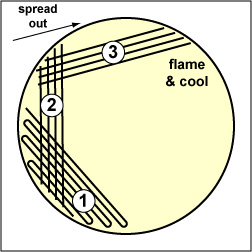
    4. Streak the loop across the surface of the agar medium using the either the pattern shown in Fig. \(\PageIndex{2}\) or the pattern shown in Fig. \(\PageIndex{3}\). These streaking patterns allow you to obtain single isolated bacterial colonies originating from a single bacterium or arrangement of bacteria (see Fig. \(\PageIndex{4}\) ).

    Fig. \(\PageIndex{2A}\): Streaking For Isolation, Step-1

    Fig. \(\PageIndex{2B}\): Streaking For Isolation, Step-2

    Fig. \(\PageIndex{2C}\): Streaking For Isolation, Step-3

    Illustration showing how to streak sector 1 of a petri plate:3 sector method. Illustration showing how to streak sector 2 of a petri plate: 3 sector method. Illustration showing how to streak sector 3 of a petri plate: 3 sector method.
    Streak the inoculum over area "1" as shown above. Then flame the loop and cool it by sticking it into the edge of the agar. Rotate the plate 90 degrees counterclockwise. Rotate the plate so area "1" is on your left. Drag your stetile inoculating loop through area "1" two times and spread out over area "2" as shown above. Then flame the loop and cool it by sticking it into the edge of the agar. Rotate the plate 90 degrees counterclockwise. Rotate the plate so that area "2" is on your left. Drag your sterile inoculating loop through area "2" two times and spread the inoculum on area "2" over area "3." Sterilize the loop.
    (Copyright; Gary E. Kaiser, Ph.D. The Community College of Baltimore County, Catonsville Campus CC-BY-3.0)

    Fig. \(\PageIndex{2D}\): Streaking For Isolation, Step-1

    Fig. \(\PageIndex{2E}\): Streaking For Isolation, Step-2

    Fig. \(\PageIndex{2F}\): Streaking For Isolation, Step-3

    Illustration showing how to streak sector 1 of a petri plate: 5 sector method. Illustration showing how to streak sector 2 of a petri plate: 5 sector method.

    Illustration showing how to streak sector 3 of a petri plate: 5 sector method.

    Streak the inoculum over area "1."

    Flame the loop and cool it by sticking it into the edge of the agar

    Spread the inoculum on area "1" over area "2" using 4-5 separate straight lines.

    Flame the loop and cool it by sticking it into the edge of the agar.

    Spread the inoculum on area "2" over area "3" using 4-5 separate straight lines.

    Flame the loop and cool it by sticking it into the edge of the agar.

    (Copyright; Gary E. Kaiser, Ph.D. The Community College of Baltimore County, Catonsville Campus CC-BY-3.0)

    Fig. \(\PageIndex{3A}\) : Streaking For Isolation, Step-4

    Fig. \(\PageIndex{3B}\) : Streaking For Isolation, Step-5

    Fig. \(\PageIndex{4}\) : Streaking For Isolation, Step-3

    Illustration showing how to streak sector 4 of a petri plate: 5 sector method. Illustration showing how to streak sector 5 of a petri plate: 5 sector method. Photograph showing isolated colonies of <i>Micrococcus luteus</i>

    Spread the inoculum on area "3" over area "4" using 4-5 separate straight lines.

    Flame the loop and cool it by sticking it into the edge of the agar.

    Draw your loop through area "4" and spread it down the center of the plate without touching any of the areas already streaked. Note Isolated colonies.
    (Copyright; Gary E. Kaiser, Ph.D. The Community College of Baltimore County, Catonsville Campus CC-BY-3.0)

    In order to avoid digging into the agar as you streak the loop over the top of the agar you must keep the loop parallel to the the agar surface. Always start streaking at the "12:00 position" (See Fig. \(\PageIndex{2A}\) .) of the plate and streak side-to-side as you pull the loop toward you. As you follow either Fig. \(\PageIndex{2}\) or Fig. \(\PageIndex{3}\), each time you flame and cool the loop between sectors, rotate the plate counterclockwise so you are always working in the "12:00 position" of the plate. This keeps the inoculating loop parallel with the agar surface and helps prevent the loop from digging into the agar.
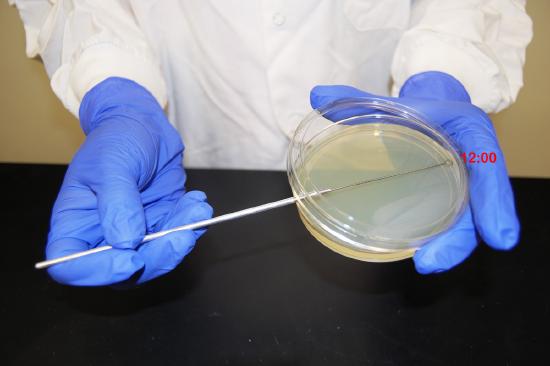
    Photograph showing the 12:00 position of a petri plate.
    Figure \(\PageIndex{5A}\): Streaking an Agar Plate. Keep the inoculating loop parallel with the agar and rotate the plate so you are always streaking the agar in the "12:00" position.(Copyright; Gary E. Kaiser, Ph.D. The Community College of Baltimore County, Catonsville Campus CC-BY-3.0)

    5. Remove the loop and immediately close the lid.

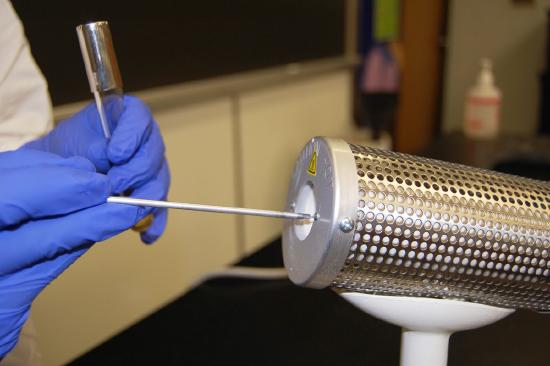
    6. Resterilize the inoculating loop by placing it in the microincinerator for 10 seconds (see Fig. \(\PageIndex{5B}\) ).

    Photograph showing using a microincinerator to sterilize the inoculating loop.
    Figure \(\PageIndex{5B}\): Using a Bacto-incinerator to Sterilize the Inoculating Loop. Sterilize the inoculating loop by placing it in the bacto-incinerator for 10 seconds. (Copyright; Gary E. Kaiser, Ph.D. The Community College of Baltimore County, Catonsville Campus CC-BY-3.0)

    Video of an isolated streak plate


    Figure \(\PageIndex{1}\): Animation showing how to streak an agar plate for isolation using the 3 sector method. (Copyright; Gary E. Kaiser, Ph.D. The Community College of Baltimore County, Catonsville Campus CC-BY-3.0)
    streak_an.gif
    Figure \(\PageIndex{1}\): Animation showing how to streak an agar plate for isolation using the 5 sector method. (Copyright; Gary E. Kaiser, Ph.D. The Community College of Baltimore County, Catonsville Campus CC-BY-3.0e)

    Look at the isolated colonies on three sector streak plates.

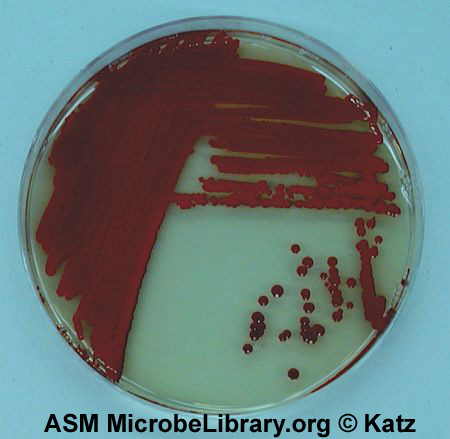
    Fig. \(\PageIndex{6}\): Serratia marcescens on Trypticase Soy Agar; Three Sector Method

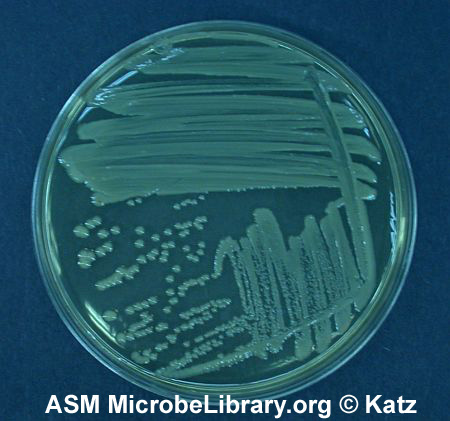
    Fig. \(\PageIndex{7}\): Escherichia coli on Trypticase Soy Agar; Three Sector Method

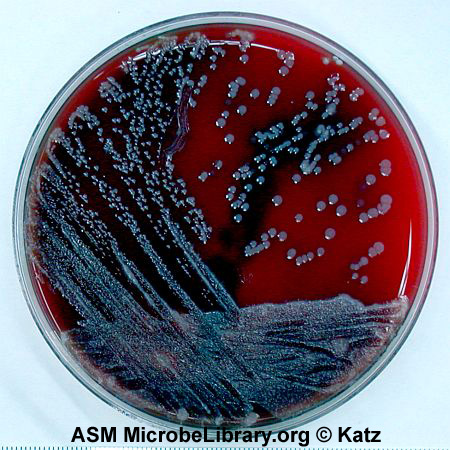
    Fig. \(\PageIndex{8}\): Fecal Specimen on Blood Agar; Three Sector Method

    Streak plate of <i>Serratia marcescens</i> showing isolated colonies. Streak plate of <i>Escherichia coli</i> showing isolated colonies. Streak plate of a fecal smear on blood agar showing isolated colonies.

    Note Isolated colonies.

    Serratia marcescens on trypticase soy agar. © D. Sue Katz, author. Licensed for use, ASM MicrobeLibrary.

    Note Isolated colonies.

    Escherichia coli on trypticase soy agar. © D. Sue Katz, author. Licensed for use, ASM MicrobeLibrary.

    Note Isolated colonies.

    Fecal specimen on trypticase soy agar. © D. Sue Katz, author. Licensed for use, ASM MicrobeLibrary.

    In the future, every procedure in the lab will be done using similar aseptic technique

    Contributors and Attributions

    • Dr. Gary Kaiser (COMMUNITY COLLEGE OF BALTIMORE COUNTY, CATONSVILLE CAMPUS)


    2.5: Transferring the Inoculum into a Petri Plate is shared under a not declared license and was authored, remixed, and/or curated by LibreTexts.

    • Was this article helpful?