Lab 10: Plaque Assay and Biochemical Tests (Day 1)
( \newcommand{\kernel}{\mathrm{null}\,}\)
How do we count viruses?
Unlike bacteria, many of which can be grown on an artificial nutrient medium, viruses require a living host cell for replication. Infected host cells (eukaryotic or prokaryotic) can be cultured and grown, and then the growth medium can be harvested as a source of virus. In this lab, we will be quantifying bacteriophages (viruses that attack bacteria) using a plaque assay. This means that we must grow both bacteria and virus.
As the virus replicates and grows, it will lyse bacteria resulting in an area of clearing that can be observed on a bacterial lawn. These clearings are called plaques. A plaque assay, therefore, is a method by which the number of plaques observed can be used to estimate the amount of virus present in the original culture. The technique required to do so is called the pour-plate technique because you will mix the virus with the bacteria with melted agar and then pour the mixture onto a plate.
The unit of viral titer (concentration) is plaque-forming units per milliliter (pfu/ml).
As we do not know the starting concentration of virus, we will need to do a serial dilution (similar to the standard plate count). After incubation, the number of plaques formed will be used to calculate the original viral (phage) titer.

Plague Assay:
Complete the Following Lab with Your Partner:
1. Obtain 14 microcentrifuge tubes and label either #1-7 or E. coli #1-7.
2. Obtain 7 nutrient agar plates. Label them A-G and place them in the 37°C incubator to warm up until needed.
3. Aseptically add 990 μL of sterile saline to tubes #1.
4. Aseptically add 900 μL of sterile saline to tubes #2-7.
5. Finger vortex the E. coli broth. Then, aseptically add 300 μL to all seven E. coli microcentrifuge tubes.
6. Vortex the T4 bacteriophage suspension and then aseptically transfer 10 μL to tube #1. Close the lid and vortex. This is your 10-2 dilution.
Note
Enterobacteria phage T4 is a bacteriophage that infects Escherichia coli bacteria.
7. Aseptically transfer 100 μL from tube #1 to tube #2, close the lid and vortex. This is your 10-3 dilution.
8. Aseptically transfer 100 μL from tube #2 to tube #3, close the lid and vortex. This is your 10-4 dilution.
9. Aseptically transfer 100 μL from tube #3 to tube #4, close the lid and vortex. This is your 10-5 dilution.
10. Aseptically transfer 100 μL from tube #4 to tube #5, close the lid and vortex. This is your 10-6 dilution.
11. Aseptically transfer 100 μL from tube #5 to tube #6, close the lid and vortex. This is your 10-7 dilution.
12. Aseptically transfer 100 μL from tube #6 to tube #7, close the lid and vortex. This is your 10-8 dilution.
13. Aseptically transfer 100 μL of SALINE into tube E. coli #1, close the lid and vortex. This will become your negative control.
14. Aseptically transfer 100 μL of dilution tube #2 to E. coli #2, close the lid and vortex.
15. Aseptically transfer 100 μL of dilution tube #3 to E. coli #3, close the lid and vortex.
16. Aseptically transfer 100 μL of dilution tube #4 to E. coli #4, close the lid and vortex.
17. Aseptically transfer 100 μL of dilution tube #5 to E. coli #5, close the lid and vortex.
18. Aseptically transfer 100 μL of dilution tube #6 to E. coli #6, close the lid and vortex.
19. Aseptically transfer 100 μL of dilution tube #7 to E. coli #7, close the lid and vortex.
20. Let all seven tubes stand for 15 minutes. We are allowing time for the virus to infect the bacteria.
21. Remove one soft agar tube (containing 2.5 ml of agar) from the hot water bath and add the entire contents of E. coli #1 to it. Using a sterile plastic transfer pipet, mix the contents by pipetting up and down twice. (DO NOT USE YOUR MICROPIPETTER FOR THIS OR YOU WILL LOSE POINTS!!!)
22. Immediately pour the mixture onto plate A. Then, gently tilt the plate back and forth until the soft agar mixture is spread evenly across the solid medium.
Note
Remember that you need to take the soft agar plates and nutrient agar plates out one at a time. Otherwise, the agar will solidify before you have a chance to pour.
23. Allow the agar to solidify completely with the lid on at your table (15-20 minutes). Then, invert and place in the 37°C incubator to grow overnight.
Biochemical Test (Day 1):
How do we identify the bacteria?
Each bacteria species has a distinctive metabolism that produces unique metabolites. We can detect these features through biochemical assays. Often these tests contain both selective and differential factors.
selective agent vs differential agent
Selective agent allows only specific bacteria to grow (readout is growth/no growth). Differential agent allows different bacteria to grow in different ways on the same media (e.g. readout is color change; both bacteria grew but in different colors).

What is an exoenzyme?
An exoenzyme, or extracellular enzyme, is an enzyme that is secreted by a cell into the environment and functions outside of that cell. Exoenzymes are produced by both prokaryotic and eukaryotic cells. Most often these enzymes are involved in the breakdown of larger macromolecules. The breakdown of these larger macromolecules is critical for allowing their smaller components to pass through the cell membrane and enter into the cell. Bacteria and fungi also produce exoenzymes to digest nutrients in their environment, and these organisms can be used to conduct laboratory assays to identify the presence and function of such exoenzymes. Some pathogenic species also use exoenzymes as virulence factors to assist in their spread. In this lab, you will test for three exoenzymes: amylase, lipase, and caseinase.
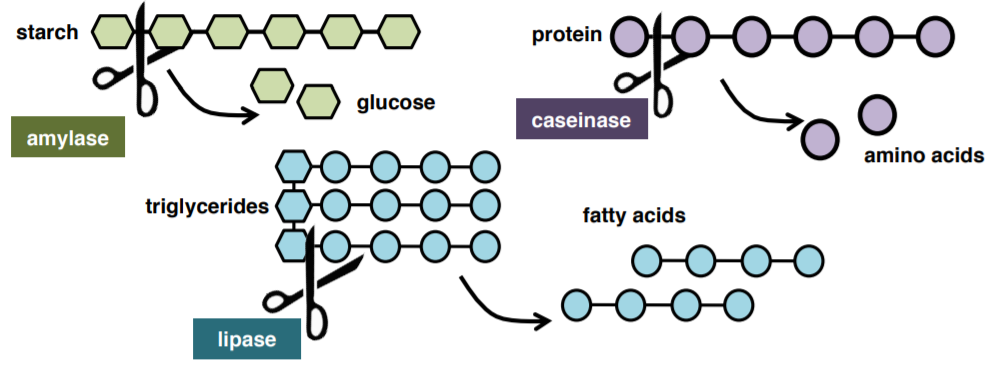
1. WORKING AS A PAIR, collect your three exoenzyme plates (starch, lipase, casein) and your assigned bacteria from the instructor.
2. Divide each plate in half. Using aseptic technique, on one half of the plate streak a straight line (NOT SFIC, NOT A LAWN!) your assigned bacteria with a loop.
3. On the other half of the plate streak the positive control.
4. Incubate all plates at 37°C.

How do you like your sugar?
Carbohydrates (sugars) are a large and diverse family of organic molecules that are used by cells for energy. Before bacteria can utilize these sugars, they must first bring them into the cell via transmembrane sugar transporters. If they lack the correct transporter, they can not metabolize the sugar and will use the peptone instead.
Phenol Red Broth is a general-purpose differential test medium typically used to differentiate gram-negative enteric (gut) bacteria. It contains peptone, phenol red (a pH indicator), a Durham tube, and one carbohydrate (sugar). If the organism is able to utilize the carbohydrate, an acid by-product is created, which turns the media yellow. If the organism is unable to utilize the carbohydrate but does use the peptone, the by-product is ammonia, which raises the pH of the media and turns it fuchsia.

5. Collect your three phenol red broth tubes (glucose, sucrose, lactose) and label them.
6. Aseptically inoculate your tubes with a loopful of your assigned bacteria. All tubes will be placed in the rack at the end of the table and placed in 37°C incubator at the end of class.
Nitrate broth
It is used to determine whether bacteria contain the enzyme nitrate reductase, which reduces nitrate to nitrite (NO3 → NO2)
7. Collect four nitrate tubes and label them.
8. Aseptically inoculate each of your tubes with a loopful of the following bacteria:
- Assigned bacteria
- Alcaligenes faecalis
- Escherichia coli
- Pseudomonas aeruginosa
gelatin
Gelatin is a protein derived from collagen, a connective tissue of animals. When chilled on ice, gelatin forms cross-links to itself to create a semi-solid state (jello!). Gelatin provides a rich source of amino acids and peptides for bacteria, but is too large to be transported inside the cell directly. Therefore, it must first be broken down by exoenzyme proteins such as gelatinase. When bacteria that have this enzyme are inoculated into a nutrient gelatin medium, the gelatin never forms a semi-solid state, even after chilling.
9. Collect one gel tube and label it.
10. Aseptically inoculate your tube by stabbing it with a loopful of your assigned bacteria (yes I really mean a loop). Make sure your cap is loose and place it in the rack at the end of the table.
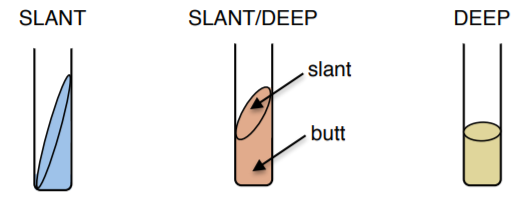
Triple sugar iron (TSI) slant/deep
It tests the ability of bacteria to ferment sugars and to produce H2S, often used to identify Salmonella and Shigella. The medium contains sugars (lactose, sucrose, and glucose) and thiosulfate. Slant/deep allows for aerobic and anaerobic growth conditions.

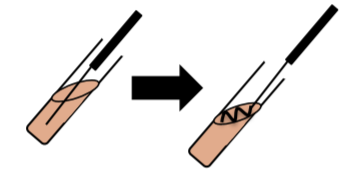
11. Inoculate your TSI slant/deep with your assigned bacteria using a needle by stabbing fully into the butt ONCE and only ONCE.
12. Then, streak across the slant WITHOUT re-dipping your needle in your plate. KEEP CAPS LOOSE and place it on the rack at the end of the table to be incubated at 37°C
Decarboxylase broths
Used for the differentiation of gram-negative enteric bacilli based on the production of arginine dihydrolase, lysine decarboxylase, or ornithine decarboxylase.

13. Aseptically inoculate your decarboxylate broths (including the control) with a loopful of your assigned bacterial culture.
14. Add 10-12 drops of mineral oil to top of each tube.
15. Tighten caps closed (but not He-Man closed) and place in the racks at the end of the table to be incubated at 37°C.
Urea broth
Urease broth is a differential medium that tests the ability of an organism to hydrolyze urea into ammonia and carbon dioxide using the enzyme urease.
16. Inoculate urea broth with loopful of your assigned bacterial culture.
17. Place in the racks at the the end of the table to be incubated at 37°C.
SIM medium
Used in the differentiation of gram-negative enteric bacilli on the basis of sulfide production, indole formation, and motility.
Methyl Red & Voges-Proskauer (MR-VP) broth
The MR test detects bacteria that use the mixed acid fermentation pathway (red=positive); the VP test detects bacteria that use the butylene glycol pathway (red=positive).
Citrate slant
Often used for the detection of gram-negative enteric bacilli based on the ability of an organism to use citrate as the sole source of carbon and energy.
Together these tests make up a very common microbiology lab procedure called the IMViC. "I" is for indole test; "M" is for methyl red test; "V" is for Voges-Proskauer test, and "C" is for citrate test. IMViC tests are used in microbiology labs to identify gram-negative, aerobic, or facultative anaerobic rods which produce gas from lactose. The presence of these bacteria indicates fecal contamination.
18. Inoculate SIM medium with your assigned bacteria using a needle by stabbing ONCE.
19. Place on the rack at the end of the table to be incubated at 37°C.

20. Aseptically inoculate one MR-VP broth tubes with a loopful of your assigned bacteria.
21. Place on the rack at the end of the table to be incubated at 37°C.

22. Aseptically streak your citrate slant with a SMALL loopful of your assigned bacteria.
23. Place on the rack at the end of the table to be incubated at 37°C.

MacConkey Agar (MAC)
Often used to differentiate members of the Enterobacteriaceae on the basis on their ability to ferment lactose. Any bacteria capable of fermenting lactose forms pink colonies.
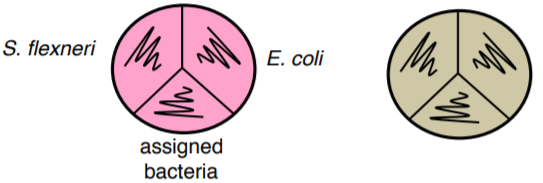
24. Streak your assigned bacteria, Escherichia coli and Shigella flexneri, as shown on MAC and TSA plates.
25. Incubate all plates at 37°C.


