Lab 2: Aseptic Technique
( \newcommand{\kernel}{\mathrm{null}\,}\)
You will be working with many pathogenic species of bacteria in the laboratory. Remember that bacteria are in the air as well as on the skin, the counter, and all objects and equipment that have not been sterilized. The most important tool for transferring cultures is the wire inoculating needle or loop. It can be quickly sterilized by heating it to red hot in a Bunsen burner flame. Adjust the air inlets of the burner so that there are a hotter inner cone and the cooler outer flame. A dry needle may be sterilized by holding it at a 30-degree angle in the outer part of the flame. A wet loop with bacteria on it should first be held in the inner part of the flame to avoid spattering, and then heated until red hot in the outer part of the flame. Always flame the loop immediately before and after use! Allow it to cool before picking up an inoculum of bacteria (or you will kill the bacteria). Hold the loop or wire handle like a pencil.
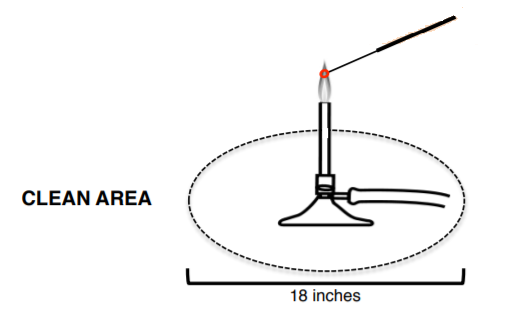
Remember to:
1. Always stand or carry tubes in a rack.
2. Not lay the cap down or touch anything with it.
3. Not remove the lid unnecessarily or for prolonged periods of time.
4. Always put the lid of plates face down.

How To Streak For Isolated Colonies (SFIC):
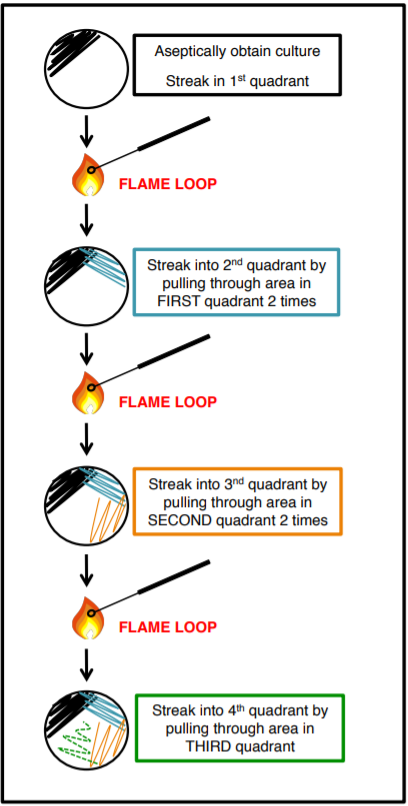
Mixed cultures (more than one species) can be isolated using the streak plate technique. The goal is to acquire a pure culture of one species of bacteria, in a single colony, from a mixed culture We do this by separating the microbes on the surface of agar with quadrant streaking, this method DILUTES the bacteria. The goal is not to have bacteria in all four quadrants but rather to get single isolated colonies.
Exercise
Practice SFIC by using your pencil instead of the loop. Once you put your pencil down in the ‘plate’, don’t lift it again. Make sure to flame between each quadrant.

Different Types Of Media For Bacterial Growth:

SLANT: solid medium made with agar and various nutrients and indicators. Slanting gives the bacteria a greater surface area on which to grow in a tube. Agar slants are also useful in maintaining bacterial cultures, more so than stacks of Petri dishes. Multiple cultures are easily placed into test tube racks and stored under refrigeration. Bacteria are inoculated onto a slant using a loop and grow in the surface of the agar.
SLANT/DEEP: solid medium made with agar and various nutrients and indicators. Similar to a slant but creates a deep zone, commonly called the ‘butt’. This type of culture medium gives the ability to grow bacteria in both an aerobic, oxygen-rich, environment (surface of the slant) and an anaerobic, oxygen deficient, environment (butt of slant). Slant/deeps are inoculated by stabbing a needle into the butt and then immediately streaking across the surface of the slant.
DEEP: solid medium made with agar and various nutrients and indicators. This type of culture is used for the growth of anaerobic bacteria which grow in the absence of oxygen and are inoculated by stabbing the media with a needle.
BROTH: liquid medium made with various nutrients and indicators. Allows for the growth of large volumes of bacteria, the level of growth can be assessed based on the turbidity (cloudiness) of the culture. Bacteria are inoculated into a broth using a loop.
BROTH+DURHAM TUBE: liquid medium made with various nutrients and indicators in which an upside-down smaller tube, called a Durham tube, is placed. Durham tubes are used to detect the production of gases, such as CO2 or N2, by microorganisms. The tube is initially filled with the medium and then collects gas as the bacteria grow, creating a bubble. Bacteria are inoculated into a broth+Durham tube using a loop.
PLATE: solid medium made with agar and various nutrients and indicators. Can be made in Petri dishes of various sizes. Plates are particularly helpful in isolating a specific species of bacteria, which is not possible in a liquid medium. Using the SFIC technique bacteria can be diluted until individual colonies are formed. Bacteria are inoculated onto a plate using a loop
Note
Please be aware that a loop will collect much higher concentrations of bacteria from a plate than from a broth. Therefore, when using the SFIC technique please consider what media/medium you are taking the bacteria from.
Aseptic Transfer Of Bacteria:
FOR THIS LAB YOU WILL BE WORKING INDIVIDUALLY
1. You will be provided with Staphylococus epidermidis in a broth and on a plate. These will be shared with the table and will be found at the front of each table in a white plastic rack.
2. Label 2 broth tubes, 2 slant tubes, and 2 plates.
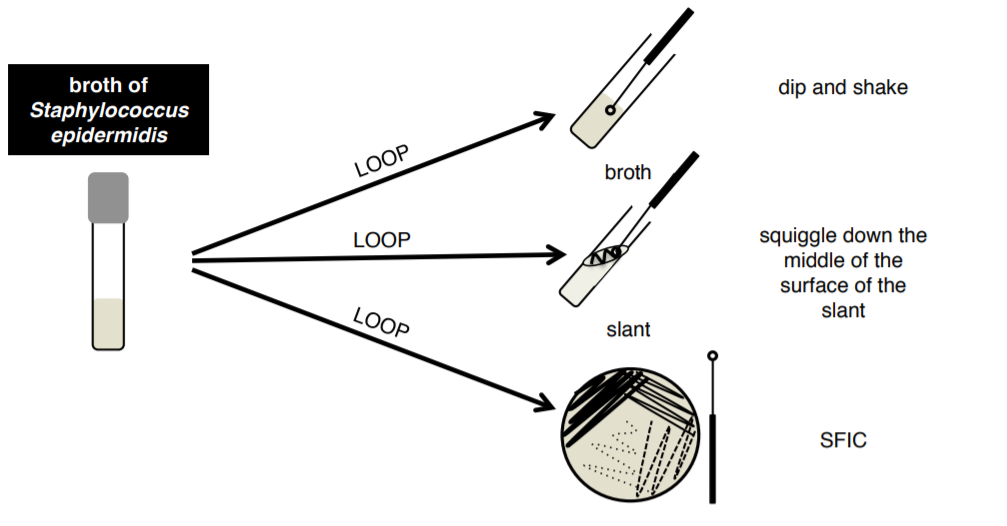
3. Aseptically transfer bacteria from your BROTH culture to a broth, a slant, and a plate using your loop.
Note
There will be a skills test on SFIC and & future extra credit opportunities will be based on this technique, make sure you know how to do it!!
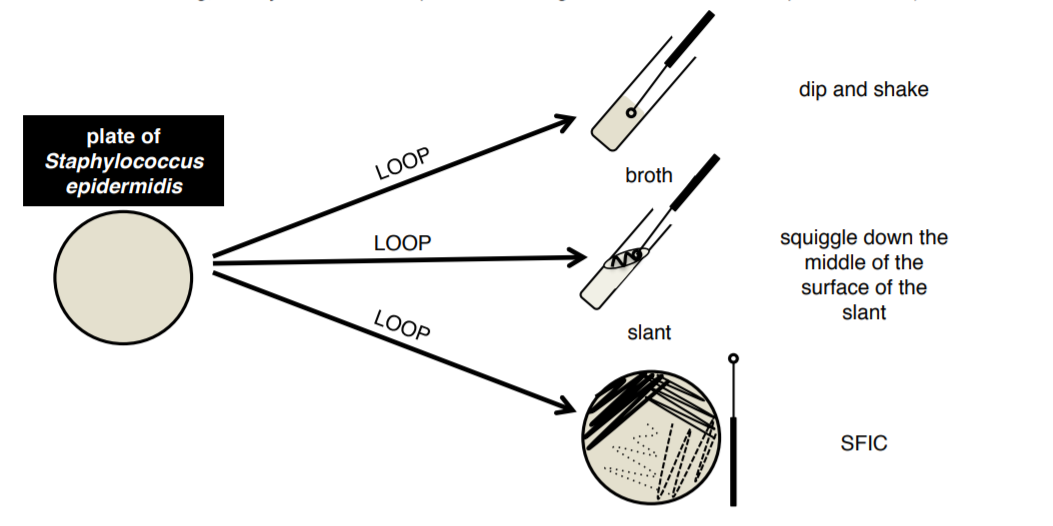
4. Aseptically transfer bacteria from your PLATE culture to a broth, a slant, and a plate
5. Plates will be placed in the 37°C incubator in the container labeled with your lab section. All tubes will be placed in the provided racks at the end of your table. When your table is done, one of you will need to place that rack in the 37°C incubator. (if you have read all the way to the last step before you started inoculating, write your name on a post-it and bring it to the instructor for 1 pt. extra credit)
Bacterial Shape and Arrangement:
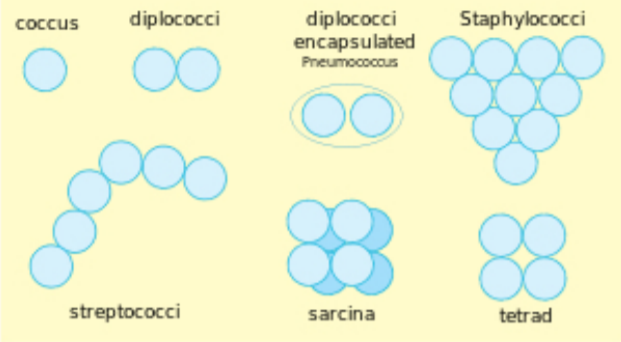
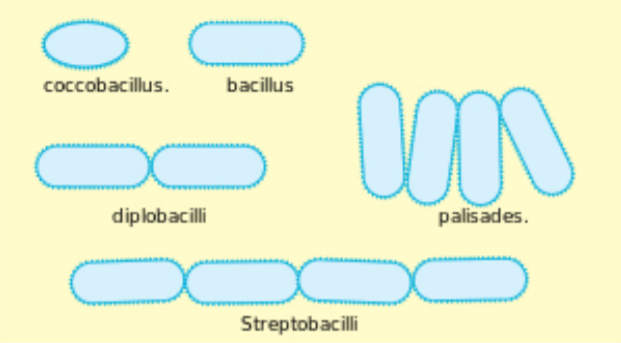
Bacteria are described by three basic criteria: size, shape, and arrangement. The units used to measure organisms seen under a microscope are micrometers (μm). A micrometer is one-millionth of a meter. Most microbes are around 1 μm in size. Viruses are typically 1/10 that size. Animal cells are typically around 10 μm in size. The three most common shapes are the rod (bacillus), the sphere (coccus), and the spiral type (vibrio).

Arrangement is the manner by which groups of bacteria appear together. Some common arrangement types are paired (diplo), grape-like clusters (staphylo) or chains (strepto).
