1.12: Genetic Engineering
- Page ID
- 73677
\( \newcommand{\vecs}[1]{\overset { \scriptstyle \rightharpoonup} {\mathbf{#1}} } \)
\( \newcommand{\vecd}[1]{\overset{-\!-\!\rightharpoonup}{\vphantom{a}\smash {#1}}} \)
\( \newcommand{\dsum}{\displaystyle\sum\limits} \)
\( \newcommand{\dint}{\displaystyle\int\limits} \)
\( \newcommand{\dlim}{\displaystyle\lim\limits} \)
\( \newcommand{\id}{\mathrm{id}}\) \( \newcommand{\Span}{\mathrm{span}}\)
( \newcommand{\kernel}{\mathrm{null}\,}\) \( \newcommand{\range}{\mathrm{range}\,}\)
\( \newcommand{\RealPart}{\mathrm{Re}}\) \( \newcommand{\ImaginaryPart}{\mathrm{Im}}\)
\( \newcommand{\Argument}{\mathrm{Arg}}\) \( \newcommand{\norm}[1]{\| #1 \|}\)
\( \newcommand{\inner}[2]{\langle #1, #2 \rangle}\)
\( \newcommand{\Span}{\mathrm{span}}\)
\( \newcommand{\id}{\mathrm{id}}\)
\( \newcommand{\Span}{\mathrm{span}}\)
\( \newcommand{\kernel}{\mathrm{null}\,}\)
\( \newcommand{\range}{\mathrm{range}\,}\)
\( \newcommand{\RealPart}{\mathrm{Re}}\)
\( \newcommand{\ImaginaryPart}{\mathrm{Im}}\)
\( \newcommand{\Argument}{\mathrm{Arg}}\)
\( \newcommand{\norm}[1]{\| #1 \|}\)
\( \newcommand{\inner}[2]{\langle #1, #2 \rangle}\)
\( \newcommand{\Span}{\mathrm{span}}\) \( \newcommand{\AA}{\unicode[.8,0]{x212B}}\)
\( \newcommand{\vectorA}[1]{\vec{#1}} % arrow\)
\( \newcommand{\vectorAt}[1]{\vec{\text{#1}}} % arrow\)
\( \newcommand{\vectorB}[1]{\overset { \scriptstyle \rightharpoonup} {\mathbf{#1}} } \)
\( \newcommand{\vectorC}[1]{\textbf{#1}} \)
\( \newcommand{\vectorD}[1]{\overrightarrow{#1}} \)
\( \newcommand{\vectorDt}[1]{\overrightarrow{\text{#1}}} \)
\( \newcommand{\vectE}[1]{\overset{-\!-\!\rightharpoonup}{\vphantom{a}\smash{\mathbf {#1}}}} \)
\( \newcommand{\vecs}[1]{\overset { \scriptstyle \rightharpoonup} {\mathbf{#1}} } \)
\(\newcommand{\longvect}{\overrightarrow}\)
\( \newcommand{\vecd}[1]{\overset{-\!-\!\rightharpoonup}{\vphantom{a}\smash {#1}}} \)
\(\newcommand{\avec}{\mathbf a}\) \(\newcommand{\bvec}{\mathbf b}\) \(\newcommand{\cvec}{\mathbf c}\) \(\newcommand{\dvec}{\mathbf d}\) \(\newcommand{\dtil}{\widetilde{\mathbf d}}\) \(\newcommand{\evec}{\mathbf e}\) \(\newcommand{\fvec}{\mathbf f}\) \(\newcommand{\nvec}{\mathbf n}\) \(\newcommand{\pvec}{\mathbf p}\) \(\newcommand{\qvec}{\mathbf q}\) \(\newcommand{\svec}{\mathbf s}\) \(\newcommand{\tvec}{\mathbf t}\) \(\newcommand{\uvec}{\mathbf u}\) \(\newcommand{\vvec}{\mathbf v}\) \(\newcommand{\wvec}{\mathbf w}\) \(\newcommand{\xvec}{\mathbf x}\) \(\newcommand{\yvec}{\mathbf y}\) \(\newcommand{\zvec}{\mathbf z}\) \(\newcommand{\rvec}{\mathbf r}\) \(\newcommand{\mvec}{\mathbf m}\) \(\newcommand{\zerovec}{\mathbf 0}\) \(\newcommand{\onevec}{\mathbf 1}\) \(\newcommand{\real}{\mathbb R}\) \(\newcommand{\twovec}[2]{\left[\begin{array}{r}#1 \\ #2 \end{array}\right]}\) \(\newcommand{\ctwovec}[2]{\left[\begin{array}{c}#1 \\ #2 \end{array}\right]}\) \(\newcommand{\threevec}[3]{\left[\begin{array}{r}#1 \\ #2 \\ #3 \end{array}\right]}\) \(\newcommand{\cthreevec}[3]{\left[\begin{array}{c}#1 \\ #2 \\ #3 \end{array}\right]}\) \(\newcommand{\fourvec}[4]{\left[\begin{array}{r}#1 \\ #2 \\ #3 \\ #4 \end{array}\right]}\) \(\newcommand{\cfourvec}[4]{\left[\begin{array}{c}#1 \\ #2 \\ #3 \\ #4 \end{array}\right]}\) \(\newcommand{\fivevec}[5]{\left[\begin{array}{r}#1 \\ #2 \\ #3 \\ #4 \\ #5 \\ \end{array}\right]}\) \(\newcommand{\cfivevec}[5]{\left[\begin{array}{c}#1 \\ #2 \\ #3 \\ #4 \\ #5 \\ \end{array}\right]}\) \(\newcommand{\mattwo}[4]{\left[\begin{array}{rr}#1 \amp #2 \\ #3 \amp #4 \\ \end{array}\right]}\) \(\newcommand{\laspan}[1]{\text{Span}\{#1\}}\) \(\newcommand{\bcal}{\cal B}\) \(\newcommand{\ccal}{\cal C}\) \(\newcommand{\scal}{\cal S}\) \(\newcommand{\wcal}{\cal W}\) \(\newcommand{\ecal}{\cal E}\) \(\newcommand{\coords}[2]{\left\{#1\right\}_{#2}}\) \(\newcommand{\gray}[1]{\color{gray}{#1}}\) \(\newcommand{\lgray}[1]{\color{lightgray}{#1}}\) \(\newcommand{\rank}{\operatorname{rank}}\) \(\newcommand{\row}{\text{Row}}\) \(\newcommand{\col}{\text{Col}}\) \(\renewcommand{\row}{\text{Row}}\) \(\newcommand{\nul}{\text{Nul}}\) \(\newcommand{\var}{\text{Var}}\) \(\newcommand{\corr}{\text{corr}}\) \(\newcommand{\len}[1]{\left|#1\right|}\) \(\newcommand{\bbar}{\overline{\bvec}}\) \(\newcommand{\bhat}{\widehat{\bvec}}\) \(\newcommand{\bperp}{\bvec^\perp}\) \(\newcommand{\xhat}{\widehat{\xvec}}\) \(\newcommand{\vhat}{\widehat{\vvec}}\) \(\newcommand{\uhat}{\widehat{\uvec}}\) \(\newcommand{\what}{\widehat{\wvec}}\) \(\newcommand{\Sighat}{\widehat{\Sigma}}\) \(\newcommand{\lt}{<}\) \(\newcommand{\gt}{>}\) \(\newcommand{\amp}{&}\) \(\definecolor{fillinmathshade}{gray}{0.9}\)- Define genetic engineering.
- List and briefly explain the five basic steps in genetic engineering. Describe why each is necessary.
- Identify the fundamental differences between genetically engineered crops and non-genetically engineered crops.
- Explain the limitations to traditional breeding that are overcome by genetic engineering.
- Identify the approximate length of time required to obtain a marketable transgenic crop line (complete the entire crop genetic engineering process).
Introduction
The production of genetically engineered plants became possible after Bob Fraley and others succeeded to use Agrobacterium tumefaciens to transform plant cells with recombinant DNA in the early 1980s (Vasil, 2008a). Since this breakthrough in plant biotechnology, GM crops are now routinely developed and grown in many parts of the globe. Current statistics on adoption of genetically engineered crops in the U.S. can be found on the USDA Economic Research Service’s website.
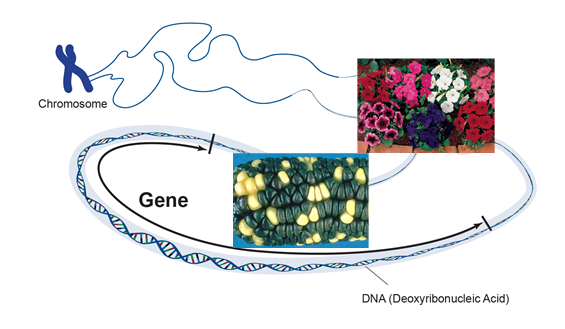
Genetic engineering has been used successfully to develop novel genes of economic importance that can be used to improve the genetics of crop plants. Genetic engineering is the targeted addition of a foreign gene or genes into the genome of an organism. The genes may be isolated from one organism and transferred to another or may be genes of one species that are modified and reinserted into the same species. The new genes, commonly referred to as transgenes, are inserted into a plant by a process called transformation. The inserted gene holds information that will give the organism a trait (Figure 1).
Crop genetic improvement (plant breeding) is an important tool but has limitations. First, in conventional terms, genetic improvement can only be done between two plants that can sexually mate with each other. This limits the new traits that can be added to those that already exist in that species. Second, when plants are mated, (crossed), many traits are transferred along with the trait of interest including traits with undesirable effects on yield potential.
Genetic engineering, on the other hand, is not bound by these limitations. It physically removes the DNA from one organism and transfers the gene(s) for one or a few traits into another. Since crossing is not necessary, the ‘sexual’ barrier between species is overcome. Therefore, traits from any living organism can be transferred into a plant. This method is more specific in that a single trait can be added to a plant.
The overall process of genetic engineering. A basic explanation of the five steps for genetically engineering a crop is provided. The five steps are:
- Locating an organism with a specific trait and extracting its DNA.
- Cloning a gene that controls the trait.
- Designing a gene to express in a specific way.
- Transformation, inserting the gene into the cells of a crop plant.
- Cross the transgene into an elite background.
Step 1: DNA Extraction
The process of genetic engineering requires the successful completion of a series of five steps and discoveries. To better understand each of these, the development of Bt maize will be used as an example.
Before the genetic engineering process can begin, a living organism that exhibits the desired trait must be discovered. The trait for Bt maize (resistance to European corn borer) was discovered around 100 years ago. Silkworm farmers in the Orient had noticed that populations of silkworms were dying. Scientists discovered that a naturally occurring soil bacteria was causing the silkworm deaths. These soil bacteria, called Bacillus thuringiensis, or Bt for short, produced a protein that was toxic to silkworms, the Bt protein.
Although the scientists did not know it, they had made one of the first discoveries necessary in the process of making Bt corn. The same Bt protein found to be toxic to silkworms is also toxic to European corn borer because both insects belong to the Lepidoptera order. The production of the Bt protein in the bacteria is controlled by the bacteria’s genes.
To be able to work with the gene responsible for making the Bt toxin, scientists must extract DNA from the Bt bacteria (Figure 2). This is accomplished by taking a sample of bacteria containing the gene of interest and taking it through a series of steps that separate the DNA from the other parts of a cell.
Step 2: Gene Cloning
The second step of the genetic engineering process is gene cloning. During DNA extraction, all the DNA from the organism is extracted at once. This means the sample of DNA extracted from the Bacillus thuringiensis bacteria will contain the gene for the Bt protein, but also all the other bacterium’s genes. Scientists use gene cloning to separate the single gene of interest from the rest of the DNA extracted (Figure 2).
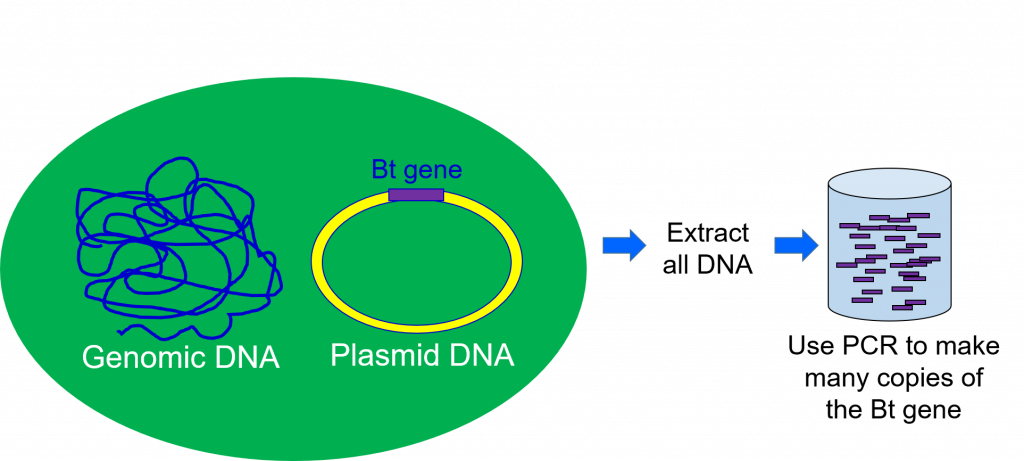
The next stages of genetic engineering will involve further study and experimentation with this gene. To do that, a scientist needs to have thousands of exact copies of it. This copying is also done during the gene cloning step.
Step 3: Gene Design
Gene design relies upon another major discovery. This was the ‘One gene One enzyme’ Theory first proposed by George W. Beadle and Edward L. Tatum in the 1940’s. Discoveries made during their research laid the groundwork for the theory that a single gene stores the information that directs the cell in how to produce a single enzyme (protein). Therefore, there is a single gene that controls the production of the Bt protein. It is called the Bt gene.
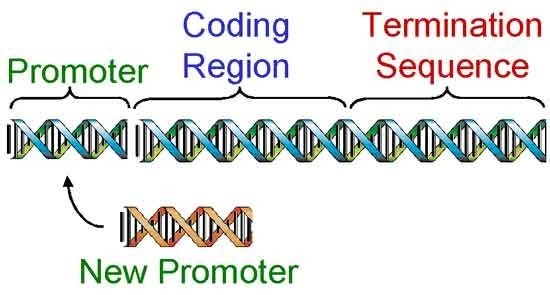
Once a gene has been cloned (Figure 2), genetic engineers begin the third step, designing the gene to work once inside a different organism. This is done in a test tube by cutting the gene apart with restriction enzymes and replacing certain regions (Figure 3).
Scientists replaced the bacterial gene promoter with promoters turn on the Bt gene in selected parts of the plant or promoters that can always turn on the Bt gene in all tissues. As a result, the first Bt gene released was designed to produce a level of Bt protein lethal to European corn borer and to only produce the Bt protein in green tissues of the corn plant, (stems, leaves, etc.). Later, Bt genes were designed to produce the lethal level of protein in all tissues of a corn plant, (leaves, stems, tassel, ear, roots, etc.).
Plant transformation and tissue culture
The process of transformation involves the insertion of the desired transgene construct (Figure 5) into cells of the recipient plant species. In this process, scientists isolate tissue or cells from the cultivar they wish to transform and use one of several methods to insert the transgene into the tissue or cells. The transgene construct contains the following key features.
- A promoter that acts to turn the gene on and off in the cell. The CaMV 35s promoter from the cauliflower mosaic virus (CaMV) is commonly used in genetic engineering. Other types of promoters, such as, the nopaline synthase promoter (NOS-Pro) also may be used to express transgenes in plant tissues.
- A selectable marker that is used to select cells that successfully obtained the construct during the transformation process. In figure 4, the selectable marker in the construct is NPT II (Kanr) that controls resistance to the antibiotic kanamycin. The cells of the plant used for transformation will be grown on a media containing the antibiotic. Other selectable markers that have been used successfully in plants include genes controlling herbicide resistance.
- A terminator sequence, such as the nopaline synthase (NOS) is included to mark the end of the transgene sequence for proper expression in plant cells.

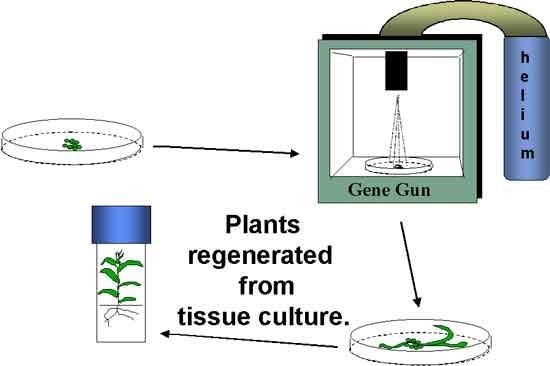
Two commonly used transformation methods include Agrobacterium tumefaciens-mediated transformation and biolistics transformation (aka gene gun), commonly referred to as particle bombardment (Figure 5). The biolistics method involves the use of high pressure to propel tungsten or gold beads coated with DNA of the gene construct into plant cells.
Agrobacterium-mediated plant transformation
Crown galls are tumors of plants that arise at the site of infection by some species of the Agrobacterium. Agrobacteria do not enter the plant cells but transfer a DNA segment called T-DNA from their circular extra chromosomal tumor-inducing (Ti) plasmid into the genome of the host cells. Ti plasmids are maintained in Agrobacteria because a part of their T-DNA contains genes that encode unusual amino acids used by Agrobacterium. The T-DNA also encodes genes that affect host plant hormone physiology resulting in induced growth of the infected cells and tumor formation. Scientists took advantage of Agrobacterium’s ability to stably integrate its T-DNA into the plant genome for introducing rDNA into plant cells. They first removed the genes that cause tumor or crown gall disease in plants from the T-DNA and engineered the plasmid for replication in both Escherichia coli and Agrobacterium cells. The initial replication of the construct in E. coli is useful for verifying the presence of the cloned gene and increasing the quantity of construct DNA for subsequent uses, including sequencing and transformation into Agrobacterium.
The steps in Agrobacterium-mediated transformation of plants are described in Figure 6.
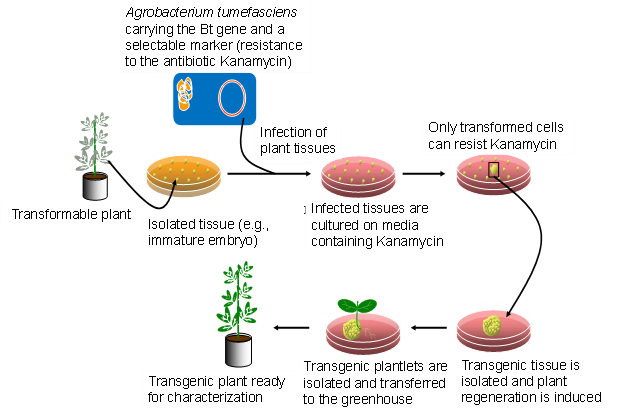
At present, very few host cells receive the construct during the transformation process. Each random insertion of the construct into the genome of plant cells is referred as an event. Useful events are rare because of the random nature of the transformation process. Selectable markers are very important because they allow the identification of the rare events (Figure 7). Scientists must screen many potential transformants to identify events that are useful for breeding.
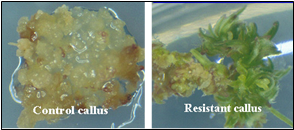
From there, the new DNA may or may not be successfully inserted into a chromosome. The cells that do receive the new gene are called transgenic and are selected from those that are not transgenic (Figure 7). Many types of plant cells are totipotent meaning a single plant cell can develop into an entire plant. Therefore, each transgenic cell can then develop into an entire plant which has the transgene in every cell. The transgenic plants are grown to maturity in greenhouses and the seed they produce, which has inherited the transgene, is collected. The genetic engineer’s job is now complete. He/she will hand the transgenic seeds over to a plant breeder who is responsible for the final step.
Inheritance of a transgene in plants
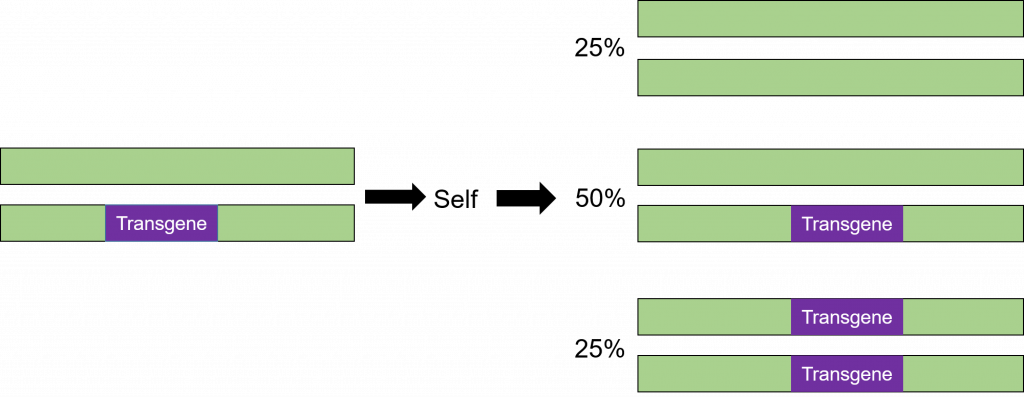
Transformation is successful when a transgene is incorporated into one of the chromosomes. The cells that have only one copy of the transgene in their genomes are said to be hemizygous (hemi = half, zygous = zygote). Because the segregation in the progeny of a hemizygous plant is the same as for a heterozygous plant, the term heterozygous will be used in this course when referring to a plant that is not homozygous for the transgene. The trait will segregate in the progeny in the same manner as any other gene in the plant as illustrated below (Figure 8).
Step 5: Backcross Breeding
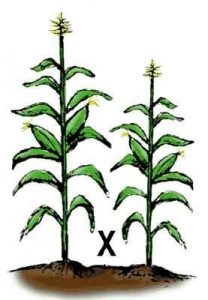
The fifth and final part of producing a genetically engineered crop is backcross breeding (Figure 9). Transgenic plants are crossed with elite breeding lines using traditional plant breeding methods to combine the desired traits of elite parents and the transgene into a single line. The offspring are repeatedly crossed back to the elite line to obtain a high-yielding transgenic line. The result will be a plant with a yield potential close to current hybrids that expresses the trait encoded by the new transgene.
The Process of Plant Genetic Engineering
The entire genetic engineering process is basically the same for any plant. The length of time required to complete all five steps from start to finish varies depending upon the gene, crop species, and available resources. It can take anywhere from 6-15+ years before a new transgenic hybrid is ready for release to be grown in production fields.
The tissue culture process of regenerating transgenic plants from callus may result in genetic variation that is not associated with the transgene. Also, the parent line used for transformation commonly is selected for the frequency with which useful events can be obtained and not its agronomic performance. Therefore, transgenes are incorporated into commercial cultivars by conventional breeding procedures, such as backcrossing.
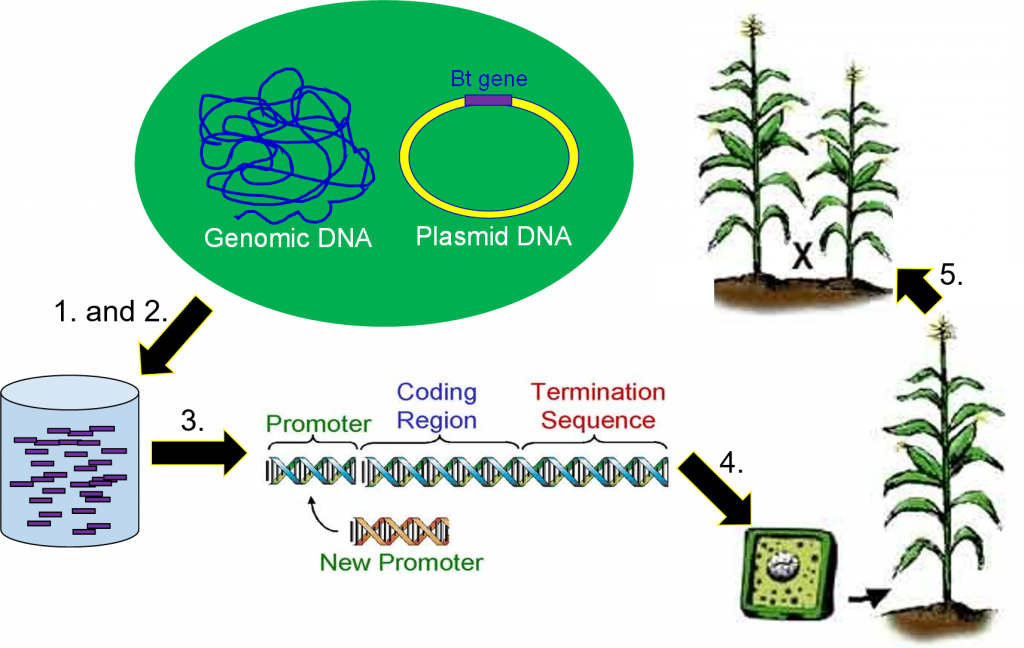
Genetic engineering is the directed addition of foreign DNA (genes) into an organism.
Five basic steps in crop genetic engineering:
- DNA extraction – DNA is extracted from an organism known to have the desired trait.
- Gene cloning – The gene of interest is located and copied.
- Gene modification – The gene is modified to express in a desired way by altering and replacing gene regions.
- Transformation – The gene(s) are delivered into tissue culture cells, using one of several methods, where hopefully they will land in the nucleus and insert into a chromosome.
- Backcross breeding – Transgenic lines are crossed with elite lines to make highyielding transgenic lines.
References
Vasil, I. K. (2008) A short history of plant biotechnology. Phytochem 7: 387-394.
Vasil, I. K. (2008) A history of plant biotechnology: from the Cell Theory of Shleiden and Schwann to biotech crops. Plant Cell Rep 27: 1423-1440.


