
1.11: Paternity Case with Electrophoresis
- Page ID
- 36753
\( \newcommand{\vecs}[1]{\overset { \scriptstyle \rightharpoonup} {\mathbf{#1}} } \)
\( \newcommand{\vecd}[1]{\overset{-\!-\!\rightharpoonup}{\vphantom{a}\smash {#1}}} \)
\( \newcommand{\id}{\mathrm{id}}\) \( \newcommand{\Span}{\mathrm{span}}\)
( \newcommand{\kernel}{\mathrm{null}\,}\) \( \newcommand{\range}{\mathrm{range}\,}\)
\( \newcommand{\RealPart}{\mathrm{Re}}\) \( \newcommand{\ImaginaryPart}{\mathrm{Im}}\)
\( \newcommand{\Argument}{\mathrm{Arg}}\) \( \newcommand{\norm}[1]{\| #1 \|}\)
\( \newcommand{\inner}[2]{\langle #1, #2 \rangle}\)
\( \newcommand{\Span}{\mathrm{span}}\)
\( \newcommand{\id}{\mathrm{id}}\)
\( \newcommand{\Span}{\mathrm{span}}\)
\( \newcommand{\kernel}{\mathrm{null}\,}\)
\( \newcommand{\range}{\mathrm{range}\,}\)
\( \newcommand{\RealPart}{\mathrm{Re}}\)
\( \newcommand{\ImaginaryPart}{\mathrm{Im}}\)
\( \newcommand{\Argument}{\mathrm{Arg}}\)
\( \newcommand{\norm}[1]{\| #1 \|}\)
\( \newcommand{\inner}[2]{\langle #1, #2 \rangle}\)
\( \newcommand{\Span}{\mathrm{span}}\) \( \newcommand{\AA}{\unicode[.8,0]{x212B}}\)
\( \newcommand{\vectorA}[1]{\vec{#1}} % arrow\)
\( \newcommand{\vectorAt}[1]{\vec{\text{#1}}} % arrow\)
\( \newcommand{\vectorB}[1]{\overset { \scriptstyle \rightharpoonup} {\mathbf{#1}} } \)
\( \newcommand{\vectorC}[1]{\textbf{#1}} \)
\( \newcommand{\vectorD}[1]{\overrightarrow{#1}} \)
\( \newcommand{\vectorDt}[1]{\overrightarrow{\text{#1}}} \)
\( \newcommand{\vectE}[1]{\overset{-\!-\!\rightharpoonup}{\vphantom{a}\smash{\mathbf {#1}}}} \)
\( \newcommand{\vecs}[1]{\overset { \scriptstyle \rightharpoonup} {\mathbf{#1}} } \)
\( \newcommand{\vecd}[1]{\overset{-\!-\!\rightharpoonup}{\vphantom{a}\smash {#1}}} \)
\(\newcommand{\avec}{\mathbf a}\) \(\newcommand{\bvec}{\mathbf b}\) \(\newcommand{\cvec}{\mathbf c}\) \(\newcommand{\dvec}{\mathbf d}\) \(\newcommand{\dtil}{\widetilde{\mathbf d}}\) \(\newcommand{\evec}{\mathbf e}\) \(\newcommand{\fvec}{\mathbf f}\) \(\newcommand{\nvec}{\mathbf n}\) \(\newcommand{\pvec}{\mathbf p}\) \(\newcommand{\qvec}{\mathbf q}\) \(\newcommand{\svec}{\mathbf s}\) \(\newcommand{\tvec}{\mathbf t}\) \(\newcommand{\uvec}{\mathbf u}\) \(\newcommand{\vvec}{\mathbf v}\) \(\newcommand{\wvec}{\mathbf w}\) \(\newcommand{\xvec}{\mathbf x}\) \(\newcommand{\yvec}{\mathbf y}\) \(\newcommand{\zvec}{\mathbf z}\) \(\newcommand{\rvec}{\mathbf r}\) \(\newcommand{\mvec}{\mathbf m}\) \(\newcommand{\zerovec}{\mathbf 0}\) \(\newcommand{\onevec}{\mathbf 1}\) \(\newcommand{\real}{\mathbb R}\) \(\newcommand{\twovec}[2]{\left[\begin{array}{r}#1 \\ #2 \end{array}\right]}\) \(\newcommand{\ctwovec}[2]{\left[\begin{array}{c}#1 \\ #2 \end{array}\right]}\) \(\newcommand{\threevec}[3]{\left[\begin{array}{r}#1 \\ #2 \\ #3 \end{array}\right]}\) \(\newcommand{\cthreevec}[3]{\left[\begin{array}{c}#1 \\ #2 \\ #3 \end{array}\right]}\) \(\newcommand{\fourvec}[4]{\left[\begin{array}{r}#1 \\ #2 \\ #3 \\ #4 \end{array}\right]}\) \(\newcommand{\cfourvec}[4]{\left[\begin{array}{c}#1 \\ #2 \\ #3 \\ #4 \end{array}\right]}\) \(\newcommand{\fivevec}[5]{\left[\begin{array}{r}#1 \\ #2 \\ #3 \\ #4 \\ #5 \\ \end{array}\right]}\) \(\newcommand{\cfivevec}[5]{\left[\begin{array}{c}#1 \\ #2 \\ #3 \\ #4 \\ #5 \\ \end{array}\right]}\) \(\newcommand{\mattwo}[4]{\left[\begin{array}{rr}#1 \amp #2 \\ #3 \amp #4 \\ \end{array}\right]}\) \(\newcommand{\laspan}[1]{\text{Span}\{#1\}}\) \(\newcommand{\bcal}{\cal B}\) \(\newcommand{\ccal}{\cal C}\) \(\newcommand{\scal}{\cal S}\) \(\newcommand{\wcal}{\cal W}\) \(\newcommand{\ecal}{\cal E}\) \(\newcommand{\coords}[2]{\left\{#1\right\}_{#2}}\) \(\newcommand{\gray}[1]{\color{gray}{#1}}\) \(\newcommand{\lgray}[1]{\color{lightgray}{#1}}\) \(\newcommand{\rank}{\operatorname{rank}}\) \(\newcommand{\row}{\text{Row}}\) \(\newcommand{\col}{\text{Col}}\) \(\renewcommand{\row}{\text{Row}}\) \(\newcommand{\nul}{\text{Nul}}\) \(\newcommand{\var}{\text{Var}}\) \(\newcommand{\corr}{\text{corr}}\) \(\newcommand{\len}[1]{\left|#1\right|}\) \(\newcommand{\bbar}{\overline{\bvec}}\) \(\newcommand{\bhat}{\widehat{\bvec}}\) \(\newcommand{\bperp}{\bvec^\perp}\) \(\newcommand{\xhat}{\widehat{\xvec}}\) \(\newcommand{\vhat}{\widehat{\vvec}}\) \(\newcommand{\uhat}{\widehat{\uvec}}\) \(\newcommand{\what}{\widehat{\wvec}}\) \(\newcommand{\Sighat}{\widehat{\Sigma}}\) \(\newcommand{\lt}{<}\) \(\newcommand{\gt}{>}\) \(\newcommand{\amp}{&}\) \(\definecolor{fillinmathshade}{gray}{0.9}\)Learning Objectives
Goals:
- Run agarose gel electrophoresis on samples.
- Learn how to analyze DNA fingerprints.
Student Learning Outcomes:
Upon completion of this lab, students will be able to:
- Separate molecules by electrophoresis.
- Analyze bands resulting from gel electrophoresis.
- Determine the paternity of offspring using DNA fingerprint analysis.
Part I: Agarose Gel Electrophoresis
Introduction
Gel electrophoresis is a very common and useful technique for separating DNA, RNA, and protein molecules on the basis of molecular size and charge. Agarose is a polysaccharide, found in seaweed, that forms a gel matrix (meshwork of various-sized holes). When an electric current is passed through the buffer and the gel, the molecules in the sample move toward the electrode with the opposite charge. DNA, RNA and protein molecules typically have a negative overall charge and will move toward the positive electrode. Smaller molecules can move through the matrix of the gel faster than larger molecules.
DNA fingerprinting uses band patterns that result from specific treatment of DNA samples to identify the relationship of a sample to reference samples. In this lab, you will run a simulation of a DNA fingerprinting activity in order to become familiar with this process. You will load samples on a gel and separate the bands in each sample to create specific patterns using gel electrophoresis.
Preparing Agarose Gels
There are various running buffers that can be used to separate DNA. A few of the commonly used buffers are called TAE (Tris Acetate EDTA), TBE (Tris Borate EDTA), and SB (Sodium Borate). Always use the same buffer to make the agarose gel and run the electrophoresis.
MATERIALS
- Agarose powder
- Spatula
- Weigh boat
- 20x stock
- Graduated cylinders
- PipetAid
- Serological pipet
- Flask with vented cap
EQUIPMENT
- Balance
- Microwave
PROCEDURE
- Prepare 500 ml of 1X Sodium Borate buffer from a 20X stock solution.
- Measure 25 mL 20X Sodium Borate buffer stock in a 25 mL graduated cylinder and pour into a 500 mL container.
- Measure 475 mL DI-water in a 500 mL graduated cylinder and pour into the same container.
- Cap tightly and mix.
- Prepare 50 ml 0.8% (w/v) agarose in 1X Sodium Borate buffer to pour four Mini One gels. Note that agarose (and gelatin) are two substances that are prepared in a special way, as they can only dissolve in boiling liquids. So, we NEVER put agarose (and gelatin) powder into graduated cylinders. Instead we pour the powder into the final container (Erlenmeyer flask).
- Measure 50 mL 1X buffer with a 50 mL graduated cylinder and pour into an Erlenmeyer flask.
- Measure 0.4 g of agarose powder and pour into the same flask. This will look like an opaque slurry.
- Use a vented cap if possible (or no cap). Place the flask in a microwave oven and turn on (for 1 minute) at high setting. Keep a close watch - do not allow the liquid to boil over!
- Watch for bubbling of the liquid. As soon as the liquid starts to bubble, stop the microwave, use mitts or silicone “Hot Hands” to swirl the flask 2-3 times.
- Then replace and turn on the microwave again for the second boil.
- As soon as the liquid starts to bubble, stop the microwave, use mitts or “Hot Hands” to hold the flask to the ceiling light. Look carefully for any specks or crystals in the liquid. When there are no more specks visible in the clear solution, then the agarose has completely melted.
- Place the flask on the table and allow to cool to 60oC. When you are first able to hold the flask with bare hands, then the agarose is cool enough to pour into trays. Do not pour agarose too hot, as the casting gels will warp and crackle. Do not cool agarose too long, as the gel will not polymerize evenly.
- Prepare the casting trays and practice loading gel samples while you wait.
Casting Agarose Gels (MINI ONE EMBITEC GEL SYSTEM)
- Place two clear acrylic casting trays into the white casting stand.
- Insert the 9-well comb into the proper slot of the casting stand.
- It is best to use a Pipet-Aid and 25 mL Serological Pipet to measure and transfer 12.5 mL of melted agarose solution into each casting tray. Or pour agarose solution until 1/3 up the comb.
- Quickly move or pop air bubbles with a pipet tip or gel comb. Insert the gel comb into the proper slot.
- Do not move or bump the gel tray until the gel has solidified in about 15 minutes.
- Store extra agarose solution in flask, covered with parafilm or cap, at 4oC for later use.
Practice Loading Gel Samples
Loading gel samples is a skill that takes practice to learn! The actual agarose gel that you will be using for electrophoresis is very delicate and can easily be punctured. The practice gel cannot be punctured, but provides the same size wells to dispense your samples. As DNA is clear, usually a colored loading dye is added to the DNA samples. High-density glycerol is also added to the loading dye, so that the DNA samples will fall to the bottom of the well quickly.
Lab Tip: When loading samples into the gel wells, only push the micropipette plunger to the first stop, do NOT push to the second stop. Be sure to keep your thumb pressed down on the plunger, until the micropipette is completely out of the buffer tank.
- Obtain a practice urethane gel.
- Cover the gel with deionized water. If there are bubbles in the wells, use a plastic transfer pipet to remove the bubbles.
- Use a pipet tip on a P20 micropipette and set dial to 10.0 uL.
- Push and hold micropipette plunger to the first stop.
- Pick up 10 µL of the practice red dye and slowly release your thumb.
- Hold the micropipette vertically (see Figure 1) over the practice gel, such the tip is below the water level and just above the well. There is no need for tip to enter into the well, as the heavy glycerol will pull the sample down into the bottom of the well.
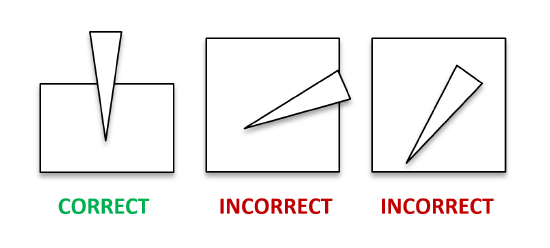
Figure 1. The correct positioning of a micropipette tip - Push the plunger to the FIRST STOP only and keep your thumb there. (Optional: try pushing to the second stop to see what happens.)
- Move your entire arm up, so that the micropipette is out of the water, then allow your thumb to come off the plunger. (Optional: try releasing your thumb while the pipette is still in the water to see what happens).
- Practice loading 10.0 µL of the red dye into three or more wells of the practice gel.
- You should be able to see the colored sample drop down to the bottom of the wells.
Lab Tip: If done correctly, all of the sample will stay in the well. Check if there is any colored dye floating away from the top of the well, which means that the sample may contaminate another well. Check if there is any dye leaking out from the bottom of well, which means that you punctured the well and the sample may not enter the gel.
PART II: Paternity Case: Who is the Father of My Kittens?
Mary has a white cat named “Honey” who was lost for two days about three months ago. She now has four kittens (photo 1) and Mary wants to know if the two neighboring cats, “Tom” or “Butch,” could be the father of each kitten. To analyze their DNA fingerprint, Mary has collected hair follicles from each adult cat and kitten, extracted DNA, and amplified DNA using the polymerase chain reaction.
Hypothesis
Using the photo, complete table 1 with your prediction of the father of each kitten.
|
Kitten |
Potential Father |
Reasoning |
|---|---|---|
|
Cream |
||
|
Molasses |
||
|
Ginger |
||
|
Sugar |
Materials
Reagents
- Pre-cast 0.8% agarose gel
- Seven samples in microfuge tubes. One for each feline
- 135-150 mL 1X sodium borate running buffer (enough to submerge the agarose gel)
Equipment and Supplies
- Electrophoresis system such as MiniOne or other brand with the gel chamber and power supply
- P-20 micropipettes and appropriate tips
- Cell phone or camera to photograph the gel to document results
Procedure
- NOTE: The following is completed when the electrophoresis chamber has been prepared with an 0.8% agarose gel and 1x Sodium Borate buffer in the chamber. Do not forget to document your procedure appropriately in your laboratory notebook.
- Obtain the “DNA samples” – there are seven microfuge tubes labeled P- V.
- Using a P-20 micropipettor and a pipet tip, measure 10µL from Tube P and transfer into the first well of the agarose gel. Be sure to follow the gel loading order noted in Column 1 – Well.
- Using a new tip for each sample, transfer 10µL of each sample into new wells of the gel.
- Be sure to keep track of your sample loading, if you do not follow the table below. If there were any problems with the loading (punctured gel, not enough sample), be sure to write in the NOTE column.
|
Well |
Tube |
DNA Sample 10µL |
Notes for loading |
|---|---|---|---|
|
1 |
P |
Tom (male) |
|
|
2 |
Q |
Cream (kitten) |
|
|
3 |
R |
Molasses (kitten) |
|
|
4 |
S |
Honey (female) |
|
|
5 |
T |
Ginger (kitten) |
|
|
6 |
U |
Sugar (kitten) |
|
|
7 |
V |
Butch (male) |
- If using a MiniOne electrophoresis system, run the gel for 15 minutes, until color bands separate. If using another electrophoresis system, run the gel at 135V until the dye front is.
- For best viewing of the results, pick up the casting tray (with gel) out of the buffer tank, slide the gel onto a white laminated paper, label the samples (and your team name) and take a photo.
- Because DNA samples will diffuse through the agarose gels, you should always record results quickly once the electrophoresis has been turned off.
ANALYSIS
- Use colored pencils to record the band patterns (color the appropriate blocks) in the Data Table below.
|
Tube |
P |
Q |
R |
S |
T |
U |
V |
|---|---|---|---|---|---|---|---|
|
Band |
Tom (Male) |
Cream |
Molasses |
Honey(Female) |
Ginger |
Sugar |
Butch (Male) |
|
Blue #1 |
|||||||
|
Blue #2 |
|||||||
|
Pink #1 |
|||||||
|
Purple #1 |
|||||||
|
Yellow #1 |
|||||||
|
Yellow #2 |
- Carefully consider each band of all four kitten samples and determine whether the band matches Tom, Honey or Butch. For the kitten samples (columns QRTU) in Data Table 3, write (within the colored blocks) who matches that band -- Tom, Honey, or Butch.
- Draw your conclusions based on the “DNA evidence”.
- Fill in the 2nd and 3rd column in table 4 below. Compare your hypothesis in table 1 where you guessed the father for each kitten based on appearances to your conclusion regarding the father based on the DNA evidence. Was your hypothesis correct for each kitten?
- What is the specific evidence that justifies your conclusion determining each kitten’s father? Fill your responses to these questions in the table below.
|
KITTEN |
FATHER based on visual |
FATHER based on DNA |
Evidence |
|---|---|---|---|
|
Cream |
|||
|
Molasses |
|||
|
Ginger |
|||
|
Sugar |
Study Questions
- During gel electrophoresis, DNA will migrate toward which electrode?
- If you had DNA molecules that were small, medium, long, and extra long, which would be closest to the bottom of the gel after electrophoresis?
- What do you know about the pattern of bands that result from an offspring as they relate to the mother and father?
- If you ran DNA fingerprint analysis but the band pattern for the offspring was not matching either parent, what would you conclude?