
5: Simple, Negative, and Gram Stain
- Page ID
- 105485
\( \newcommand{\vecs}[1]{\overset { \scriptstyle \rightharpoonup} {\mathbf{#1}} } \)
\( \newcommand{\vecd}[1]{\overset{-\!-\!\rightharpoonup}{\vphantom{a}\smash {#1}}} \)
\( \newcommand{\dsum}{\displaystyle\sum\limits} \)
\( \newcommand{\dint}{\displaystyle\int\limits} \)
\( \newcommand{\dlim}{\displaystyle\lim\limits} \)
\( \newcommand{\id}{\mathrm{id}}\) \( \newcommand{\Span}{\mathrm{span}}\)
( \newcommand{\kernel}{\mathrm{null}\,}\) \( \newcommand{\range}{\mathrm{range}\,}\)
\( \newcommand{\RealPart}{\mathrm{Re}}\) \( \newcommand{\ImaginaryPart}{\mathrm{Im}}\)
\( \newcommand{\Argument}{\mathrm{Arg}}\) \( \newcommand{\norm}[1]{\| #1 \|}\)
\( \newcommand{\inner}[2]{\langle #1, #2 \rangle}\)
\( \newcommand{\Span}{\mathrm{span}}\)
\( \newcommand{\id}{\mathrm{id}}\)
\( \newcommand{\Span}{\mathrm{span}}\)
\( \newcommand{\kernel}{\mathrm{null}\,}\)
\( \newcommand{\range}{\mathrm{range}\,}\)
\( \newcommand{\RealPart}{\mathrm{Re}}\)
\( \newcommand{\ImaginaryPart}{\mathrm{Im}}\)
\( \newcommand{\Argument}{\mathrm{Arg}}\)
\( \newcommand{\norm}[1]{\| #1 \|}\)
\( \newcommand{\inner}[2]{\langle #1, #2 \rangle}\)
\( \newcommand{\Span}{\mathrm{span}}\) \( \newcommand{\AA}{\unicode[.8,0]{x212B}}\)
\( \newcommand{\vectorA}[1]{\vec{#1}} % arrow\)
\( \newcommand{\vectorAt}[1]{\vec{\text{#1}}} % arrow\)
\( \newcommand{\vectorB}[1]{\overset { \scriptstyle \rightharpoonup} {\mathbf{#1}} } \)
\( \newcommand{\vectorC}[1]{\textbf{#1}} \)
\( \newcommand{\vectorD}[1]{\overrightarrow{#1}} \)
\( \newcommand{\vectorDt}[1]{\overrightarrow{\text{#1}}} \)
\( \newcommand{\vectE}[1]{\overset{-\!-\!\rightharpoonup}{\vphantom{a}\smash{\mathbf {#1}}}} \)
\( \newcommand{\vecs}[1]{\overset { \scriptstyle \rightharpoonup} {\mathbf{#1}} } \)
\(\newcommand{\longvect}{\overrightarrow}\)
\( \newcommand{\vecd}[1]{\overset{-\!-\!\rightharpoonup}{\vphantom{a}\smash {#1}}} \)
\(\newcommand{\avec}{\mathbf a}\) \(\newcommand{\bvec}{\mathbf b}\) \(\newcommand{\cvec}{\mathbf c}\) \(\newcommand{\dvec}{\mathbf d}\) \(\newcommand{\dtil}{\widetilde{\mathbf d}}\) \(\newcommand{\evec}{\mathbf e}\) \(\newcommand{\fvec}{\mathbf f}\) \(\newcommand{\nvec}{\mathbf n}\) \(\newcommand{\pvec}{\mathbf p}\) \(\newcommand{\qvec}{\mathbf q}\) \(\newcommand{\svec}{\mathbf s}\) \(\newcommand{\tvec}{\mathbf t}\) \(\newcommand{\uvec}{\mathbf u}\) \(\newcommand{\vvec}{\mathbf v}\) \(\newcommand{\wvec}{\mathbf w}\) \(\newcommand{\xvec}{\mathbf x}\) \(\newcommand{\yvec}{\mathbf y}\) \(\newcommand{\zvec}{\mathbf z}\) \(\newcommand{\rvec}{\mathbf r}\) \(\newcommand{\mvec}{\mathbf m}\) \(\newcommand{\zerovec}{\mathbf 0}\) \(\newcommand{\onevec}{\mathbf 1}\) \(\newcommand{\real}{\mathbb R}\) \(\newcommand{\twovec}[2]{\left[\begin{array}{r}#1 \\ #2 \end{array}\right]}\) \(\newcommand{\ctwovec}[2]{\left[\begin{array}{c}#1 \\ #2 \end{array}\right]}\) \(\newcommand{\threevec}[3]{\left[\begin{array}{r}#1 \\ #2 \\ #3 \end{array}\right]}\) \(\newcommand{\cthreevec}[3]{\left[\begin{array}{c}#1 \\ #2 \\ #3 \end{array}\right]}\) \(\newcommand{\fourvec}[4]{\left[\begin{array}{r}#1 \\ #2 \\ #3 \\ #4 \end{array}\right]}\) \(\newcommand{\cfourvec}[4]{\left[\begin{array}{c}#1 \\ #2 \\ #3 \\ #4 \end{array}\right]}\) \(\newcommand{\fivevec}[5]{\left[\begin{array}{r}#1 \\ #2 \\ #3 \\ #4 \\ #5 \\ \end{array}\right]}\) \(\newcommand{\cfivevec}[5]{\left[\begin{array}{c}#1 \\ #2 \\ #3 \\ #4 \\ #5 \\ \end{array}\right]}\) \(\newcommand{\mattwo}[4]{\left[\begin{array}{rr}#1 \amp #2 \\ #3 \amp #4 \\ \end{array}\right]}\) \(\newcommand{\laspan}[1]{\text{Span}\{#1\}}\) \(\newcommand{\bcal}{\cal B}\) \(\newcommand{\ccal}{\cal C}\) \(\newcommand{\scal}{\cal S}\) \(\newcommand{\wcal}{\cal W}\) \(\newcommand{\ecal}{\cal E}\) \(\newcommand{\coords}[2]{\left\{#1\right\}_{#2}}\) \(\newcommand{\gray}[1]{\color{gray}{#1}}\) \(\newcommand{\lgray}[1]{\color{lightgray}{#1}}\) \(\newcommand{\rank}{\operatorname{rank}}\) \(\newcommand{\row}{\text{Row}}\) \(\newcommand{\col}{\text{Col}}\) \(\renewcommand{\row}{\text{Row}}\) \(\newcommand{\nul}{\text{Nul}}\) \(\newcommand{\var}{\text{Var}}\) \(\newcommand{\corr}{\text{corr}}\) \(\newcommand{\len}[1]{\left|#1\right|}\) \(\newcommand{\bbar}{\overline{\bvec}}\) \(\newcommand{\bhat}{\widehat{\bvec}}\) \(\newcommand{\bperp}{\bvec^\perp}\) \(\newcommand{\xhat}{\widehat{\xvec}}\) \(\newcommand{\vhat}{\widehat{\vvec}}\) \(\newcommand{\uhat}{\widehat{\uvec}}\) \(\newcommand{\what}{\widehat{\wvec}}\) \(\newcommand{\Sighat}{\widehat{\Sigma}}\) \(\newcommand{\lt}{<}\) \(\newcommand{\gt}{>}\) \(\newcommand{\amp}{&}\) \(\definecolor{fillinmathshade}{gray}{0.9}\)- Identify the appropriate steps for making a smear from solid and liquid cultures.
- Determine the difference between a negatively and positively charged simple stain.
- Perform the appropriate steps for performing a simple stain.
- List the steps necessary for successfully performing a Gram stain.
- Explain how each of the steps contribute to the final outcome in Gram negative vs. Gram positive organisms.
- Employ your understanding of the Gram stain procedure to troubleshoot unexpected staining outcomes.
- Identify specimens as Gram positive or Gram negative based on staining.
Introduction
Smears and Simple Stains
In order for our specimen to be appropriately stained, we must first adhere our sample to a microscope slide. This process of generating a slide with a thin layer of specimen is called smearing. The actual thin layer of specimen on the slide is called a smear. There are two different methods of smearing based on the source of the inoculum: solid media or liquid media. Read on to learn about how we generate smears from solid and liquid cultures.
Location, Location, Location- Where to Put your Smear
Location matters! Placing the smears in a specific conformation on the slide allows us to better keep track of our specimens and keeps part of the slide available for handling. Typically, all staining is done using a clothespin to handle the slide. This makes washing and other manipulations much easier than using your hands, which may become stained from the dye. It is important that you only put two smears per slide and that both smears are offset, never centered on the slide. See the below image, which also includes proper handling of the slide using a clothes pin.
What is the point of fixation?
Fixation is imperative to proper adherence of the specimen to the slide and for preserving the specimen. The process of fixation essentially crosslinks the sample to the slide so that the specimen is not lost as you stain and wash it. Fixation has the following effects on the specimen:
- Adheres the specimen to the slide
- Preserves the specimen, allowing it to be saved for later use
- Preserves the overall shape and size of the specimen
- Kills the specimen (making it safer to handle)
- Denatures enzymes that may degrade the cell
Please note that you can "over-fix" a specimen, which may destroy or alter your specimen. It is important to follow the protocol carefully do avoid damaging your sample.
Troubleshooting
Common problems associated with smearing include:
- Inappropriate specimen density- This occurs for many reasons, including user error, but a poor smear density can also be a result of variations in growth of your specimen. If your specimen has low turbidity, you may consider adding more specimen. If your specimen is highly turbid, you may consider adding a little less. Similarly, with solid cultures, it's important to get an appropriate density of specimen.
- Over-fixing- The specimen may appear damaged or abnormal in shape and size. Try reducing the fixation time.
- Under-fixing- The specimen is not observed on the slide. This can occur as a result of not fixing the specimen long enough. As a result, the specimen is not cross-linked to your slide and it may be washed off during the staining process.
How do simple stains work?
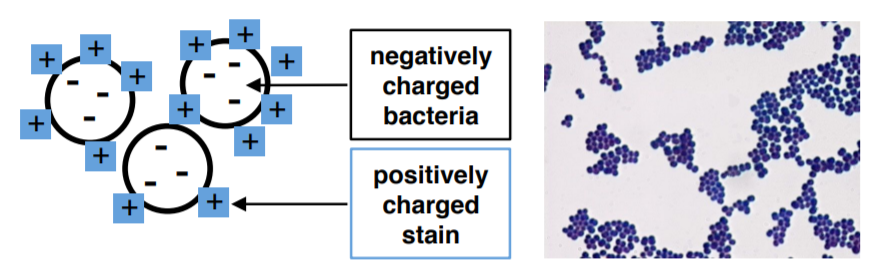
Most stains are salts or acids, meaning that they dissociate into ions when dissolved in water. The stain dissociates into a two ions: the chromophore and the corresponding salt ion. The chromophore is responsible for the color of the stain.
In a direct stain, the chromophore ion is positive (basic). As a result, the positive charge of the chromophore reacts with the slightly negative charge of the specimen plasma membrane. The specimen is directly stained by the dye.
In a negative stain, the chromophore ion is negative (acidic). Based on this information alone, can you guess where the chromophore would be found? If you guessed anywhere but the specimen, you are correct!! Because the chromophore in a negative stain is negative, it repels the specimen and instead interacts with the background (the slide). As a result, the specimen is colorless, but the background is stained.
The Infamous Gram Stain
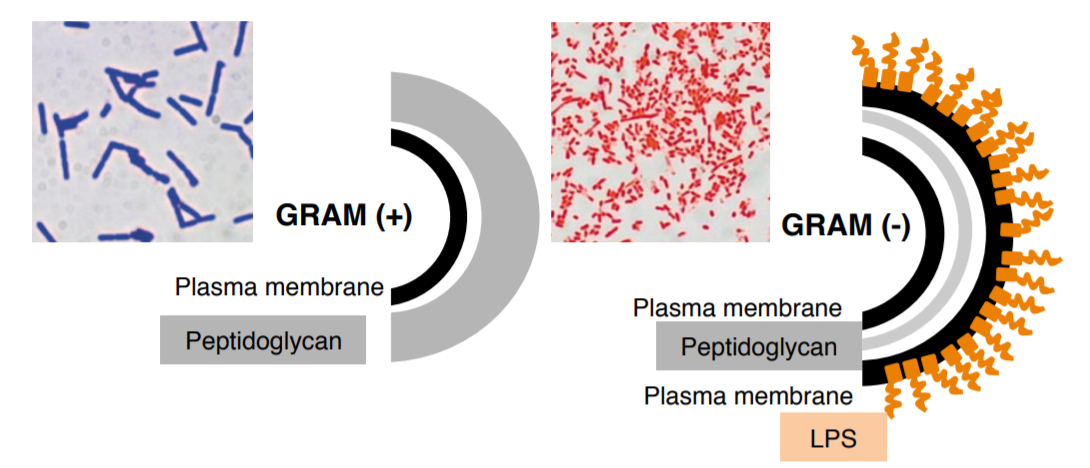
The Gram stain is often the very first step in identifying a microorganism in a clinical setting. It immediately helps clinicians to exclude a significant number of microorganisms from their diagnosis. The Gram stain is a differential stain that enables you to classify bacteria based on the composition of their cell walls. As with penicillin, this stain was an accidental discovery made by Hans Christian Gram in 1884. Using crystal violet as a dye, he stained the cells and realized that some cells retained the dye (Gram positive), while others didn't (Gram negative). It was soon realized that organisms that retained the dye had significantly more peptidoglycan in their cell walls compared to organisms that could not retain the dye. The image below illustrates the differences between Gram positive and Gram negative cell walls.
How does the Gram stain work?
- Crystal violet (CV) stains all bacteria.
- Iodine (I) combines with the CV, forming crystal violet-iodine complexes (CV-I) in the cell wall.
- Ethanol removes CV-I complexes (decolorizes) in a time-dependent manner.
- Safranin is used to counterstain decolorized organisms.
Now that you know how to perform a Gram stain, let's talk about things that can go wrong:
- Making your smear too heavy- this can result in huge clumps of bacteria that are so close together that you can't determine their morphology.
- Using an old culture- as bacteria grow, they eventually die, resulting in loss of cellular integrity. This means that the cells are so damaged they cannot appropriately retain the die. The older the culture, the more dead bacteria, the more uncertain you are of your outcome. See image B below.
- Over-decolorizing with ethanol- if you wash too long or too much with ethanol during the decolorization step, then you might remove some of the stain from your Gram positive population. Both old cultures and over-decolorization lead to a mixed staining outcome where some organisms may take up the dye while others don't. See image B below.

Lab Procedures:
Smear Generation:
1. Working in pairs, label each slide and draw a circle on the center of the slide with a wax pencil which is provided at your table, DO NOT use a sharpie, this will keep the bacteria concentrated in one area on the slide.
2. Prepare an emulsion on each slide:
- If you are taking a bacteria from a plate, place a small drop of water on a slide and aseptically add bacteria.
- If you are taking a bacteria from a broth, place 3-6 loopfulls of bacteria onto a slide with no water added.
3. You and your lab partner will need to prepare the following slides:
- 3 slides of Staphylococcus epidermidis (one for simple stain, one for gram stain, one as back-up)
- 3 slides of Pseudomonas aeruginosa (one for simple stain, one for gram stain, one as back-up)
- 3 slides of Escherichia coli (one for simple stain, one for gram stain, on as back-up)
4. Mix gently until you get an even cloudy mixture (should look like skim milk)
Note
If you mix too aggressively, you will lose the bacterial morphology.
5. Allow the slide(s) to air dry on the slide warmer. While the slides are drying, start your negative stain.
6. Once the liquid has completely evaporated, heat fix by passing the slide through a flame three times.
Note
If you heat fix too little, the bacteria will wash off the slide. If you heat fix too much, you will cook the bacteria and denature them.
7. Allow the slide to cool and then continue with your staining protocol.
NEGATIVE STAIN:
Definition
Nigrosin is a simple and indirect stain used for determining bacterial morphology. The shapes and sizes of the organisms are seen as color-free outlines against the dark background. An advantage of using this method is that prior fixation by heat is not needed, so the organisms are seen in more lifelike shapes. Nigrosin is an acidic stain which becomes negatively charged. Since the surface of most bacterial cells is negatively charged, the cell surface repels the stain. The glass of the slide will stain, but the bacterial cells will not.

1. Add a small drop of nigrosin to a fresh slide.
2. Aseptically transfer one loopful of bacteria (from a liquid or solid culture) into the drop of nigrosin and mix gently.
3. Use a second slide, held at a 45-degree angle to smear across your slide.
4. Allow the slides to air dry on the counter. Do not use slide warmer!
5. Repeat this procedure to make a slide of the remaining bacteria.
6. Examine all three slides under oil immersion and record your results below:
| Observations (color, shape, arrangement, unique features) | |
| S. epidermidis |
|
| S. aureus |
|
| E. coli |
|
SIMPLE STAIN:
Definition
Methylene blue is a simple and direct stain used for determining bacterial morphology (shape and arrangement). It is a cationic dye (positive charge) which stains the cell a blue color. The presence of negatively charged molecules in the cell (like DNA & RNA) causes the cell to stain blue.
1. Start with a prepared slide (from your initial smear generation at the start of lab).
2. Add Methylene blue stain to heat-fixed slide and leave for 2 minutes.
3. Hold the slide in an angle and rinse gently with water from the squirt bottle.
4. Blot gently with bibulous paper to get rid of excess water.
5. Repeat for remaining bacteria slides.
6. Examine under oil immersion and record your results below.
| Observations (color, shape, arrangement, unique features) | |
| S. epidermidis |
|
| S. aureus |
|
| E. coli |
|
GRAM STAIN:
Definition
The Gram stain is the most important and universally used staining technique in the bacteriology laboratory. It is used to distinguish between gram (+) and gram (-) bacteria. The difference between gram (+) and gram (-) bacteria lies in the ability of the cell wall of the organism to retain the crystal violet.
1. Use the slides that you already prepared (S. epidermidis, P. aeruginosa, E. coli).
2. Stain with crystal violet for 1 minute, then rinse gently with water.
3. Treat with iodine mixture for 1 minute, then rinse gently with water.
4. Rinse with ~3-6 drops of 95% alcohol to decolorize, then rinse gently with water.
5. Counterstain with safranin for 30 seconds, then rinse with water.
6. Examine under oil immersion and record your results below.
| Observations (color, shape, arrangement, unique features) | |
| S. epidermidis |
|
| S. aureus |
|
| E. coli |
|