
11.3: Plaque Count Procedure
- Page ID
- 123431
\( \newcommand{\vecs}[1]{\overset { \scriptstyle \rightharpoonup} {\mathbf{#1}} } \)
\( \newcommand{\vecd}[1]{\overset{-\!-\!\rightharpoonup}{\vphantom{a}\smash {#1}}} \)
\( \newcommand{\id}{\mathrm{id}}\) \( \newcommand{\Span}{\mathrm{span}}\)
( \newcommand{\kernel}{\mathrm{null}\,}\) \( \newcommand{\range}{\mathrm{range}\,}\)
\( \newcommand{\RealPart}{\mathrm{Re}}\) \( \newcommand{\ImaginaryPart}{\mathrm{Im}}\)
\( \newcommand{\Argument}{\mathrm{Arg}}\) \( \newcommand{\norm}[1]{\| #1 \|}\)
\( \newcommand{\inner}[2]{\langle #1, #2 \rangle}\)
\( \newcommand{\Span}{\mathrm{span}}\)
\( \newcommand{\id}{\mathrm{id}}\)
\( \newcommand{\Span}{\mathrm{span}}\)
\( \newcommand{\kernel}{\mathrm{null}\,}\)
\( \newcommand{\range}{\mathrm{range}\,}\)
\( \newcommand{\RealPart}{\mathrm{Re}}\)
\( \newcommand{\ImaginaryPart}{\mathrm{Im}}\)
\( \newcommand{\Argument}{\mathrm{Arg}}\)
\( \newcommand{\norm}[1]{\| #1 \|}\)
\( \newcommand{\inner}[2]{\langle #1, #2 \rangle}\)
\( \newcommand{\Span}{\mathrm{span}}\) \( \newcommand{\AA}{\unicode[.8,0]{x212B}}\)
\( \newcommand{\vectorA}[1]{\vec{#1}} % arrow\)
\( \newcommand{\vectorAt}[1]{\vec{\text{#1}}} % arrow\)
\( \newcommand{\vectorB}[1]{\overset { \scriptstyle \rightharpoonup} {\mathbf{#1}} } \)
\( \newcommand{\vectorC}[1]{\textbf{#1}} \)
\( \newcommand{\vectorD}[1]{\overrightarrow{#1}} \)
\( \newcommand{\vectorDt}[1]{\overrightarrow{\text{#1}}} \)
\( \newcommand{\vectE}[1]{\overset{-\!-\!\rightharpoonup}{\vphantom{a}\smash{\mathbf {#1}}}} \)
\( \newcommand{\vecs}[1]{\overset { \scriptstyle \rightharpoonup} {\mathbf{#1}} } \)
\( \newcommand{\vecd}[1]{\overset{-\!-\!\rightharpoonup}{\vphantom{a}\smash {#1}}} \)
\(\newcommand{\avec}{\mathbf a}\) \(\newcommand{\bvec}{\mathbf b}\) \(\newcommand{\cvec}{\mathbf c}\) \(\newcommand{\dvec}{\mathbf d}\) \(\newcommand{\dtil}{\widetilde{\mathbf d}}\) \(\newcommand{\evec}{\mathbf e}\) \(\newcommand{\fvec}{\mathbf f}\) \(\newcommand{\nvec}{\mathbf n}\) \(\newcommand{\pvec}{\mathbf p}\) \(\newcommand{\qvec}{\mathbf q}\) \(\newcommand{\svec}{\mathbf s}\) \(\newcommand{\tvec}{\mathbf t}\) \(\newcommand{\uvec}{\mathbf u}\) \(\newcommand{\vvec}{\mathbf v}\) \(\newcommand{\wvec}{\mathbf w}\) \(\newcommand{\xvec}{\mathbf x}\) \(\newcommand{\yvec}{\mathbf y}\) \(\newcommand{\zvec}{\mathbf z}\) \(\newcommand{\rvec}{\mathbf r}\) \(\newcommand{\mvec}{\mathbf m}\) \(\newcommand{\zerovec}{\mathbf 0}\) \(\newcommand{\onevec}{\mathbf 1}\) \(\newcommand{\real}{\mathbb R}\) \(\newcommand{\twovec}[2]{\left[\begin{array}{r}#1 \\ #2 \end{array}\right]}\) \(\newcommand{\ctwovec}[2]{\left[\begin{array}{c}#1 \\ #2 \end{array}\right]}\) \(\newcommand{\threevec}[3]{\left[\begin{array}{r}#1 \\ #2 \\ #3 \end{array}\right]}\) \(\newcommand{\cthreevec}[3]{\left[\begin{array}{c}#1 \\ #2 \\ #3 \end{array}\right]}\) \(\newcommand{\fourvec}[4]{\left[\begin{array}{r}#1 \\ #2 \\ #3 \\ #4 \end{array}\right]}\) \(\newcommand{\cfourvec}[4]{\left[\begin{array}{c}#1 \\ #2 \\ #3 \\ #4 \end{array}\right]}\) \(\newcommand{\fivevec}[5]{\left[\begin{array}{r}#1 \\ #2 \\ #3 \\ #4 \\ #5 \\ \end{array}\right]}\) \(\newcommand{\cfivevec}[5]{\left[\begin{array}{c}#1 \\ #2 \\ #3 \\ #4 \\ #5 \\ \end{array}\right]}\) \(\newcommand{\mattwo}[4]{\left[\begin{array}{rr}#1 \amp #2 \\ #3 \amp #4 \\ \end{array}\right]}\) \(\newcommand{\laspan}[1]{\text{Span}\{#1\}}\) \(\newcommand{\bcal}{\cal B}\) \(\newcommand{\ccal}{\cal C}\) \(\newcommand{\scal}{\cal S}\) \(\newcommand{\wcal}{\cal W}\) \(\newcommand{\ecal}{\cal E}\) \(\newcommand{\coords}[2]{\left\{#1\right\}_{#2}}\) \(\newcommand{\gray}[1]{\color{gray}{#1}}\) \(\newcommand{\lgray}[1]{\color{lightgray}{#1}}\) \(\newcommand{\rank}{\operatorname{rank}}\) \(\newcommand{\row}{\text{Row}}\) \(\newcommand{\col}{\text{Col}}\) \(\renewcommand{\row}{\text{Row}}\) \(\newcommand{\nul}{\text{Nul}}\) \(\newcommand{\var}{\text{Var}}\) \(\newcommand{\corr}{\text{corr}}\) \(\newcommand{\len}[1]{\left|#1\right|}\) \(\newcommand{\bbar}{\overline{\bvec}}\) \(\newcommand{\bhat}{\widehat{\bvec}}\) \(\newcommand{\bperp}{\bvec^\perp}\) \(\newcommand{\xhat}{\widehat{\xvec}}\) \(\newcommand{\vhat}{\widehat{\vvec}}\) \(\newcommand{\uhat}{\widehat{\uvec}}\) \(\newcommand{\what}{\widehat{\wvec}}\) \(\newcommand{\Sighat}{\widehat{\Sigma}}\) \(\newcommand{\lt}{<}\) \(\newcommand{\gt}{>}\) \(\newcommand{\amp}{&}\) \(\definecolor{fillinmathshade}{gray}{0.9}\)Today you will infect the bacterium Escherichia coli B with its specific bacteriophage, Coliphage T4.
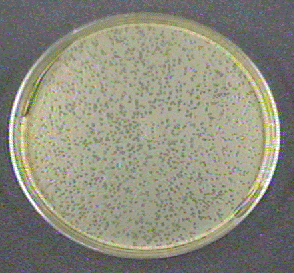
In the first part of the lab you will perform a plaque count. A plaque (see Fig. \(\PageIndex{1}\)) is a small, clear area on an agar plate where the host bacteria have been lysed as a result of the lytic life cycle of the infecting bacteriophages. As the bacteria replicate on the plate they form a "lawn" of confluent growth. Meanwhile, each bacteriophage that adsorbs to a bacterium will reproduce and cause lysis of that bacterium. The released bacteriophages then infect neighboring bacteria, causing their lysis. Eventually a visible self-limiting area of lysis, a plaque, is observed on the plate.
The second part of the lab will demonstrate viral specificity. Viral specificity means that a specific strain of bacteriophage will only adsorb to a specific strain of susceptible host bacterium. In fact, viral specificity is just as specific as an enzyme-substrate reaction or an antigen-antibody reaction. Therefore, viral specificity can be used sometimes as a tool for identifying unknown bacteria. Known bacteriophages are used to identify unknown bacteria by observing whether or not the bacteria are lysed. This is called phage typing.
Phage typing is useful in identifying strains of such bacteria as Staphylococcus aureus, Pseudomonas aeruginosa and Salmonella species. For example, by using a series of known staphylococcal bacteriophages against the Staphylococcus aureus isolated from a given environment, one can determine if it is identical to or different from the strain of Staphylococcus aureus isolated from a lesion or from a food. This can be useful in tracing the route of transmission.
PLAQUE COUNT
- 1 tube containing 9.9 ml of sterile saline;
- 3 tubes containing 9.0 ml of sterile saline;
- 3 sterile empty dilution tubes;
- 3 Trypticase Soy agar plates;
- 3 sterile 1.0 ml pipettes;
- 1 sterile 10.0 ml pipette;
- bottle of melted Motility Test medium from a water bath held at 47C.
Trypticase Soy broth culture of Escherichia coli B, suspension of Coliphage T4.
PROCEDURE (to be done in groups of three)
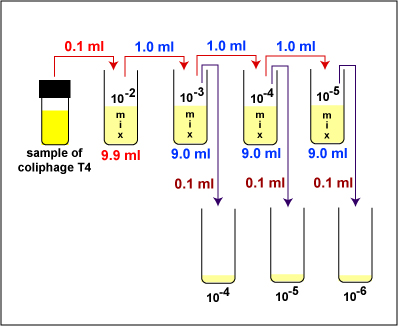
1. Take 1 tube containing 9.9 ml of sterile saline, 3 tubes containing 9.0 ml of sterile saline, and 3 sterile empty dilution tubes and label the tubes as shown in Fig. \(\PageIndex{2}\). Label the 3 TSA plates 10-4, 10-5, and 10-6.
2. Dilute the Coliphage T4 stock as described below and shown in Fig. \(\PageIndex{2}\).

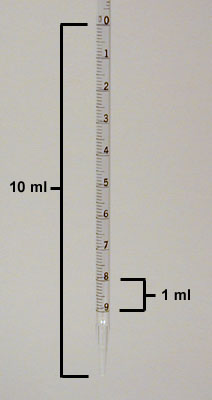
a. Remove a sterile 1.0 ml pipette from the bag. Do not touch the portion of the pipette that will go into the tubes and do not lay the pipette down. From the tip of the pipette to the "0" line is 1 ml; each numbered division (0.1, 0.2, etc.) represents 0.1 ml; each division between two numbers represents 0.01 ml (see Fig. \(\PageIndex{3}\)).

b. Insert the cotton-tipped end of the pipette into a blue 2 ml pipette filler.
c. Uncap the sample of Coliphage T4, insert the pipette to the bottom of the tube, and withdraw 0.1 ml (see Fig. \(\PageIndex{3}\) above) of the sample by turning the filler knob towards you. Recap the tube.
d. Place the lip of the 10-2 dilution tube at the opening of the microincinerator for 2-3 seconds and dispense the 0.1 ml of Coliphage T4 into the tube by turning the filler knob away from you. Draw the liquid up and down in the pipette several times to rinse the pipette and help mix. Flame and cap the tube. This will give a 1/100 or 10-2 dilution of the bacteriophage.
e. Using a vortex mixer, mix the tube thoroughly. This is to assure an even distribution of the bacteriophage throughout the liquid.
f. Using the same pipette and procedure, aseptically withdraw 1.0 ml (see Fig. 6 above) from the 10-2 dilution tube and dispense into the 10 -3 dilution tube. This will give a 1/1000 or 10-3 dilution of the bacteriophage. Using a vortex mixer, mix the tube thoroughly.
g. Using the same pipette and procedure, aseptically withdraw 1.0 ml (up to the "0" line; see Fig. \(\PageIndex{3}\) above) from the 10-3 dilution tube and dispense into the 10-4 dilution tube. This will give a 1/10,000 or 10-4 dilution of the bacteriophage. Using a vortex mixer, mix the tube thoroughly.
h. Using the same pipette and procedure, aseptically withdraw 1.0 ml (see Fig. \(\PageIndex{3}\) above) from the 10-4 dilution tube and dispense into the 10-5 dilution tube. This will give a 1/100,000 or 10-5 dilution of the bacteriophage. Using a vortex mixer, mix the tube thoroughly.
i. Discard the pipette in the used pipette container.
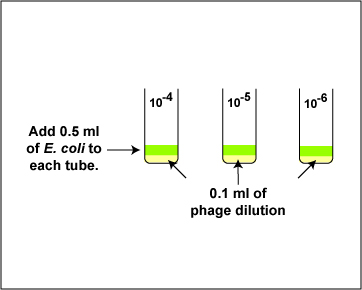
3. Take 3 empty, sterile tubes and treat as described below and shown in Fig. \(\PageIndex{4}\).
a. Using a new sterile 1.0 ml pipette and the procedure described above, aseptically remove 0.1 ml of the 10-5 bacteriophage dilution and dispense into the10-6 empty tube.
b. Using the same pipette and procedure, aseptically remove 0.1 ml of the 10-4 bacteriophage dilution and dispense into the 10-5 empty tube.
c. Using the same pipette and procedure, aseptically remove 0.1 ml of the 10-3 bacteriophage dilution and dispense into the 10-4 empty tube.
d. Discard the pipette in the used pipette container.
4. Using a new sterile 1.0 ml pipette, add 0.5 ml (see Fig. \(\PageIndex{6}\) above) of E. coli B to the 0.1 ml of bacteriophage in each of the 3 tubes from step 3 as shown in Fig. \(\PageIndex{5}\). Using a vortex mixer, mix the tube thoroughly. Discard the pipette in the used pipette container.
5. Let the 3 tubes of E. coli / coliphage T4 mixture sit for 10-15 minutes to promote adsorption.
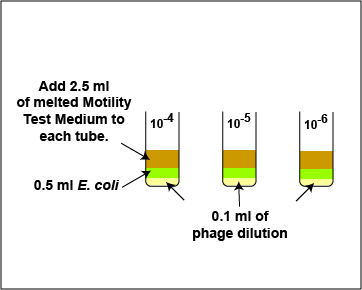
6. Using a sterile 10.0 ml pipette, add 2.5 ml (see Fig. \(\PageIndex{6}\)) of sterile, melted Motility Test Medium to the E. coli / bacteriophage mixture in each of the 3 tubes from step 4 as shown in Fig. \(\PageIndex{10}\). Using a vortex mixer, mix the tube thoroughly. Discard the pipette in the used pipette container.
|
Fig \(\PageIndex{6}\): A 10 Milliliter (ml) Pipette |
Fig. \(\PageIndex{7}\): Adding the Melted Motility Test Medium in the Plaque Count Experiment |
|---|---|
 |
 |
| Copyright; Gary E. Kaiser, Ph.D. The Community College of Baltimore County, Catonsville Campus CC-BY-3.0 | Copyright; Gary E. Kaiser, Ph.D. The Community College of Baltimore County, Catonsville Campus CC-BY-3.0 |
7. Incubate the 3 TSA plates right side up and stacked in the petri plate holder on the shelf of the 37°C incubator corresponding to your lab section until the next lab period.
Contributors and Attributions
Dr. Gary Kaiser (COMMUNITY COLLEGE OF BALTIMORE COUNTY, CATONSVILLE CAMPUS)