
4.5: Procedure
- Page ID
- 123042
\( \newcommand{\vecs}[1]{\overset { \scriptstyle \rightharpoonup} {\mathbf{#1}} } \)
\( \newcommand{\vecd}[1]{\overset{-\!-\!\rightharpoonup}{\vphantom{a}\smash {#1}}} \)
\( \newcommand{\id}{\mathrm{id}}\) \( \newcommand{\Span}{\mathrm{span}}\)
( \newcommand{\kernel}{\mathrm{null}\,}\) \( \newcommand{\range}{\mathrm{range}\,}\)
\( \newcommand{\RealPart}{\mathrm{Re}}\) \( \newcommand{\ImaginaryPart}{\mathrm{Im}}\)
\( \newcommand{\Argument}{\mathrm{Arg}}\) \( \newcommand{\norm}[1]{\| #1 \|}\)
\( \newcommand{\inner}[2]{\langle #1, #2 \rangle}\)
\( \newcommand{\Span}{\mathrm{span}}\)
\( \newcommand{\id}{\mathrm{id}}\)
\( \newcommand{\Span}{\mathrm{span}}\)
\( \newcommand{\kernel}{\mathrm{null}\,}\)
\( \newcommand{\range}{\mathrm{range}\,}\)
\( \newcommand{\RealPart}{\mathrm{Re}}\)
\( \newcommand{\ImaginaryPart}{\mathrm{Im}}\)
\( \newcommand{\Argument}{\mathrm{Arg}}\)
\( \newcommand{\norm}[1]{\| #1 \|}\)
\( \newcommand{\inner}[2]{\langle #1, #2 \rangle}\)
\( \newcommand{\Span}{\mathrm{span}}\) \( \newcommand{\AA}{\unicode[.8,0]{x212B}}\)
\( \newcommand{\vectorA}[1]{\vec{#1}} % arrow\)
\( \newcommand{\vectorAt}[1]{\vec{\text{#1}}} % arrow\)
\( \newcommand{\vectorB}[1]{\overset { \scriptstyle \rightharpoonup} {\mathbf{#1}} } \)
\( \newcommand{\vectorC}[1]{\textbf{#1}} \)
\( \newcommand{\vectorD}[1]{\overrightarrow{#1}} \)
\( \newcommand{\vectorDt}[1]{\overrightarrow{\text{#1}}} \)
\( \newcommand{\vectE}[1]{\overset{-\!-\!\rightharpoonup}{\vphantom{a}\smash{\mathbf {#1}}}} \)
\( \newcommand{\vecs}[1]{\overset { \scriptstyle \rightharpoonup} {\mathbf{#1}} } \)
\( \newcommand{\vecd}[1]{\overset{-\!-\!\rightharpoonup}{\vphantom{a}\smash {#1}}} \)
\(\newcommand{\avec}{\mathbf a}\) \(\newcommand{\bvec}{\mathbf b}\) \(\newcommand{\cvec}{\mathbf c}\) \(\newcommand{\dvec}{\mathbf d}\) \(\newcommand{\dtil}{\widetilde{\mathbf d}}\) \(\newcommand{\evec}{\mathbf e}\) \(\newcommand{\fvec}{\mathbf f}\) \(\newcommand{\nvec}{\mathbf n}\) \(\newcommand{\pvec}{\mathbf p}\) \(\newcommand{\qvec}{\mathbf q}\) \(\newcommand{\svec}{\mathbf s}\) \(\newcommand{\tvec}{\mathbf t}\) \(\newcommand{\uvec}{\mathbf u}\) \(\newcommand{\vvec}{\mathbf v}\) \(\newcommand{\wvec}{\mathbf w}\) \(\newcommand{\xvec}{\mathbf x}\) \(\newcommand{\yvec}{\mathbf y}\) \(\newcommand{\zvec}{\mathbf z}\) \(\newcommand{\rvec}{\mathbf r}\) \(\newcommand{\mvec}{\mathbf m}\) \(\newcommand{\zerovec}{\mathbf 0}\) \(\newcommand{\onevec}{\mathbf 1}\) \(\newcommand{\real}{\mathbb R}\) \(\newcommand{\twovec}[2]{\left[\begin{array}{r}#1 \\ #2 \end{array}\right]}\) \(\newcommand{\ctwovec}[2]{\left[\begin{array}{c}#1 \\ #2 \end{array}\right]}\) \(\newcommand{\threevec}[3]{\left[\begin{array}{r}#1 \\ #2 \\ #3 \end{array}\right]}\) \(\newcommand{\cthreevec}[3]{\left[\begin{array}{c}#1 \\ #2 \\ #3 \end{array}\right]}\) \(\newcommand{\fourvec}[4]{\left[\begin{array}{r}#1 \\ #2 \\ #3 \\ #4 \end{array}\right]}\) \(\newcommand{\cfourvec}[4]{\left[\begin{array}{c}#1 \\ #2 \\ #3 \\ #4 \end{array}\right]}\) \(\newcommand{\fivevec}[5]{\left[\begin{array}{r}#1 \\ #2 \\ #3 \\ #4 \\ #5 \\ \end{array}\right]}\) \(\newcommand{\cfivevec}[5]{\left[\begin{array}{c}#1 \\ #2 \\ #3 \\ #4 \\ #5 \\ \end{array}\right]}\) \(\newcommand{\mattwo}[4]{\left[\begin{array}{rr}#1 \amp #2 \\ #3 \amp #4 \\ \end{array}\right]}\) \(\newcommand{\laspan}[1]{\text{Span}\{#1\}}\) \(\newcommand{\bcal}{\cal B}\) \(\newcommand{\ccal}{\cal C}\) \(\newcommand{\scal}{\cal S}\) \(\newcommand{\wcal}{\cal W}\) \(\newcommand{\ecal}{\cal E}\) \(\newcommand{\coords}[2]{\left\{#1\right\}_{#2}}\) \(\newcommand{\gray}[1]{\color{gray}{#1}}\) \(\newcommand{\lgray}[1]{\color{lightgray}{#1}}\) \(\newcommand{\rank}{\operatorname{rank}}\) \(\newcommand{\row}{\text{Row}}\) \(\newcommand{\col}{\text{Col}}\) \(\renewcommand{\row}{\text{Row}}\) \(\newcommand{\nul}{\text{Nul}}\) \(\newcommand{\var}{\text{Var}}\) \(\newcommand{\corr}{\text{corr}}\) \(\newcommand{\len}[1]{\left|#1\right|}\) \(\newcommand{\bbar}{\overline{\bvec}}\) \(\newcommand{\bhat}{\widehat{\bvec}}\) \(\newcommand{\bperp}{\bvec^\perp}\) \(\newcommand{\xhat}{\widehat{\xvec}}\) \(\newcommand{\vhat}{\widehat{\vvec}}\) \(\newcommand{\uhat}{\widehat{\uvec}}\) \(\newcommand{\what}{\widehat{\wvec}}\) \(\newcommand{\Sighat}{\widehat{\Sigma}}\) \(\newcommand{\lt}{<}\) \(\newcommand{\gt}{>}\) \(\newcommand{\amp}{&}\) \(\definecolor{fillinmathshade}{gray}{0.9}\)MATERIALS
- 6 tubes each containing 9.0 ml sterile saline,
- 3 plates of Trypticase Soy agar,
- 2 sterile 1.0 ml pipettes, pipette filler,
- turntable,
- bent glass rod,
- dish of alcohol
ORGANISM
Trypticase Soy broth culture of Escherichia coli
PROCEDURE
A. Plate Count (to be done in pairs)
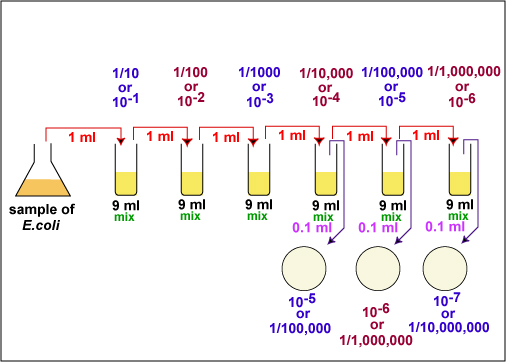
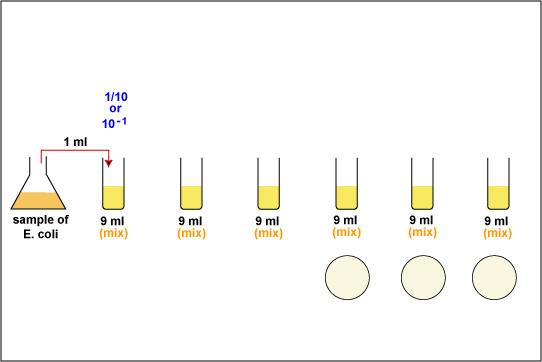
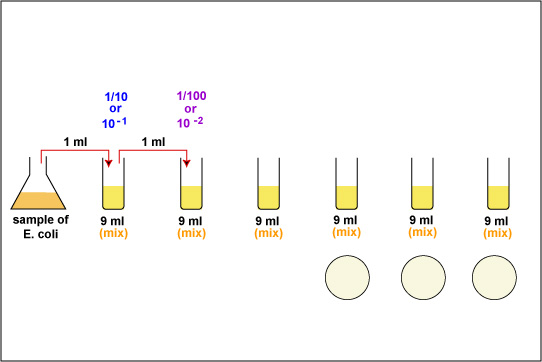
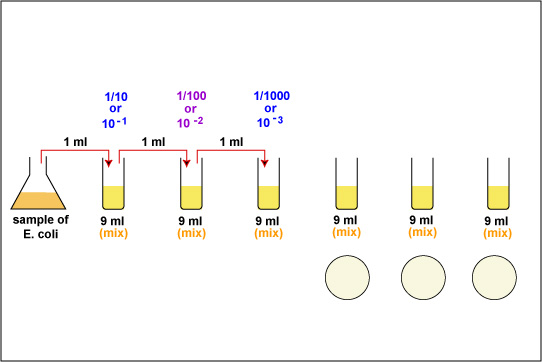
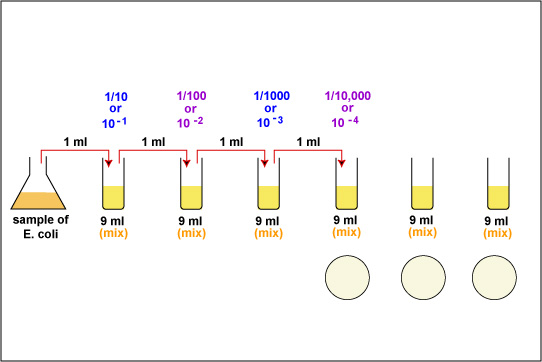
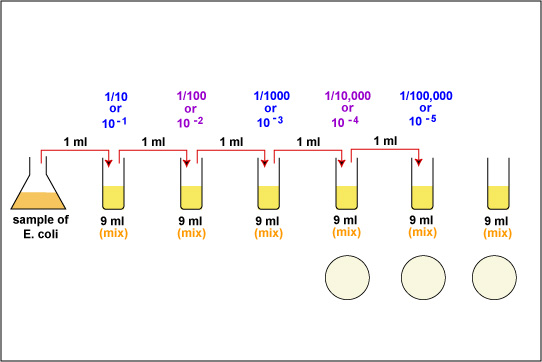
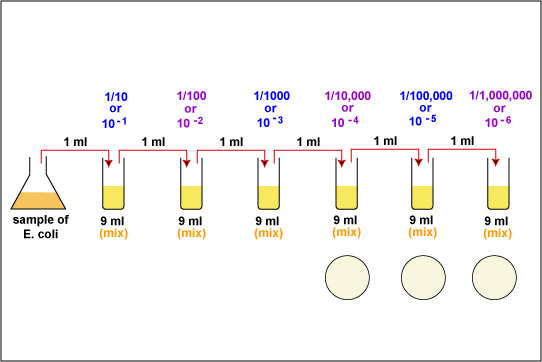
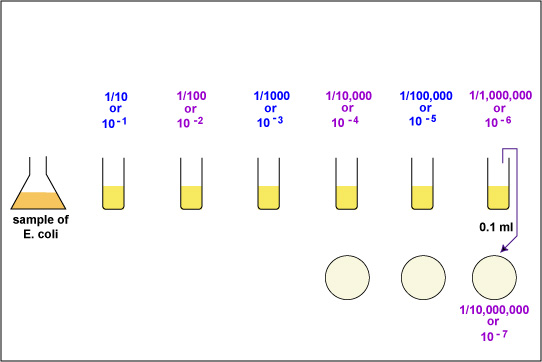
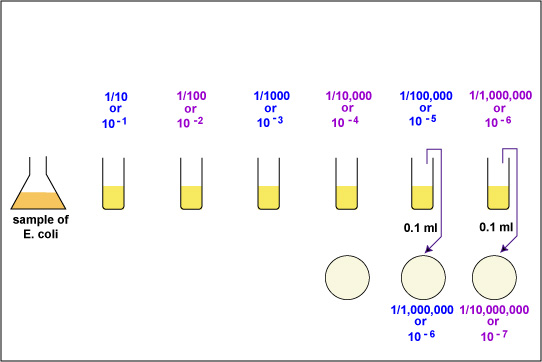
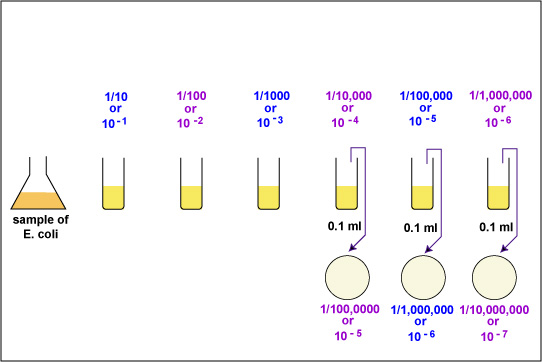
1. Take 6 dilution tubes, each containing 9.0 ml of sterile saline. Aseptically dilute 1.0 ml of a sample of E. coli as shown in Fig. \(\PageIndex{1}\) and described below.
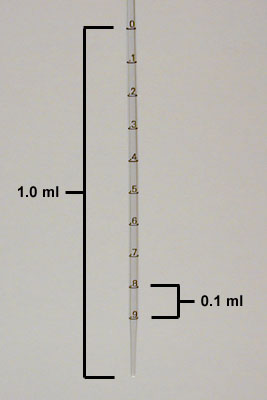
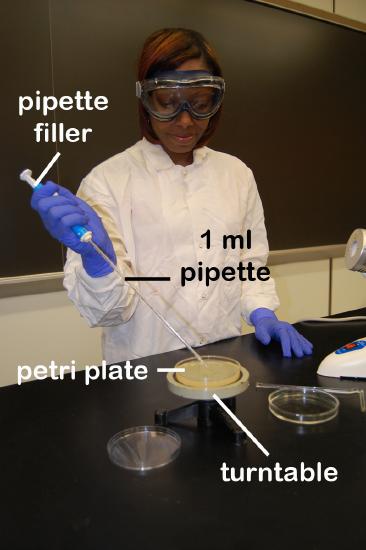
a. Remove a sterile 1.0 ml pipette from the bag. Do not touch the portion of the pipette that will go into the tubes and do not lay the pipette down. From the tip of the pipette to the "0" line is 1 ml; each numbered division (0.1, 0.2, etc.) represents 0.1 ml. (See Fig. \(\PageIndex{2}\).)
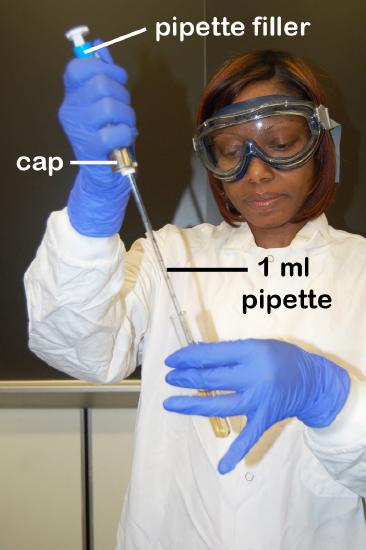
b. Insert the cotton-tipped end of the pipette into a blue 2 ml pipette filler.
c. Place the lip of the culture tube at the opening of the bacto-incinerator for 2-3 seconds, insert the pipette to the bottom of the flask, and withdraw 1.0 ml (up to the "0" line; see Fig. \(\PageIndex{2}\)) of the sample by turning the filler knob towards you. Draw the sample up slowly so that it isn't accidentally drawn into the filler itself. Reflame and cap the sample. (See Fig. \(\PageIndex{3}\).)
d. Flame the first dilution tube and dispense the 1.0 ml of sample into the tube by turning the filler knob away from you. Draw the liquid up and down in the pipette several times to rinse the pipette and help mix. Reflame and cap the tube.
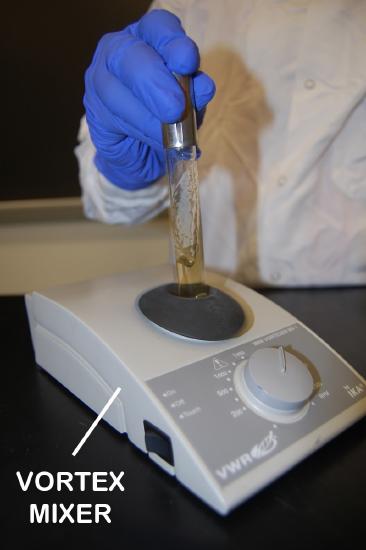
e. Mix the tube thoroughly by either holding the tube in one hand and vigorously tapping the bottom with the other hand or by using a vortex mixer. (See Fig. \(\PageIndex{4}\).) This is to assure an even distribution of the bacteria throughout the liquid.
f. Using the same procedure, aseptically withdraw 1.0 ml. (see Fig. \(\PageIndex{2}\) above) from the first dilution tube and dispense into the second dilution tube. Continue doing this from tube to tube, as shown in Fig. \(\PageIndex{1}\) above, until the dilution is completed. Discard the pipette in the used pipette container.
Your instructor will demonstrate these pipetting and mixing techniques.
2. Using a new 1.0 ml pipette, aseptically transfer 0.1 ml (see Fig. 8) from each of the last three dilution tubes onto the surface of the corresponding plates of trypticase soy agar as shown in Fig. \(\PageIndex{1}\) and Fig. \(\PageIndex{5}\). Note that since only 0.1 ml of the bacterial dilution rather than the desired 1.0 ml is placed on the plate, the actual dilution on the plate is 1/10 the dilution of the tube from which it came.
3. Using a turntable and sterile bent glass rod (see Fig. \(\PageIndex{6}\)), immediately spread the solution over the surface of the plates as follows:
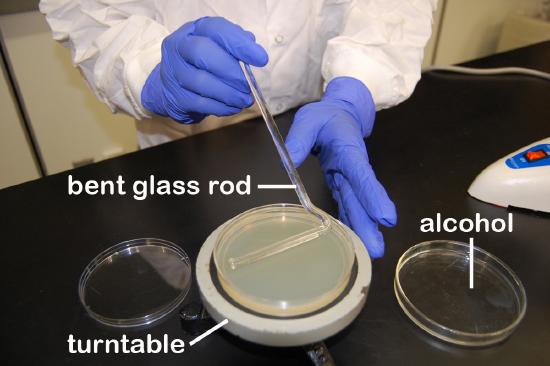
a. Place the plate containing the 0.1 ml of dilution on a turntable.
b. Sterilize the glass rod by dipping the bent portion in a dish of alcohol and igniting the alcohol with the flame from your burner. Let the flame burn out.
c. Place the bent portion of the glass rod on the agar surface and spin the turntable for about 30 seconds to distribute the 0.1 ml of dilution evenly over the entire agar surface.
d. Replace the lid and resterilize the glass rod with alcohol and flaming.
e. Repeat for each plate.
f. Discard the pipette in the used pipette container.
4. Incubate the 3 agar plates upside down and stacked in the petri plate holder on the shelf of the 37°C incubator corresponding to your lab section until the next lab period. Place the used dilution tubes in the disposal baskets in the hood.
The procedure is summarized in Figs. \(\PageIndex{7A}\)- \(\PageIndex{7I}\).
|
Fig. \(\PageIndex{7A}\): Dilution of Bacterial Sample, Step 1 |
Fig. \(\PageIndex{7B}\): Dilution of Bacterial Sample, Step 2 |
Fig. \(\PageIndex{7C}\): Dilution of Bacterial Sample, Step 3 |
|---|---|---|
 |
 |
 |
| Aseptically pipette 1.0 ml of E. coli into 9.0 ml of sterile saline. This will give a 1/10 or 10-1 dilution of the sample. Using a vortex mixer, mix the contents of the tube. | Aseptically pipette 1.0 ml of the 10-1 dilution into 9.0 ml of sterile saline. This will give a 1/100 or 10-2 dilution of the sample. Using a vortex mixer, mix the contents of the tube. | Aseptically pipette 1.0 ml of the 10-2 dilution into 9.0 ml of sterile saline. This will give a 1/1000 or 10-3 dilution of the sample. Using a vortex mixer, mix the contents of the tube. |
| (Copyright; Gary E. Kaiser, Ph.D. The Community College of Baltimore County, Catonsville Campus CC-BY-3.0) | ||
|
Fig. \(\PageIndex{7D}\): Dilution of Bacterial Sample, Step 4 |
Fig. \(\PageIndex{7E}\): Dilution of Bacterial Sample, Step 5 |
Fig. \(\PageIndex{7F}\): Dilution of Bacterial Sample, Step 6 |
|---|---|---|
 |
 |
 |
| Aseptically pipette 1.0 ml of the 10-3 dilution into 9.0 ml of sterile saline. This will give a 1/10,000 or 10-4 dilution of the sample. Using a vortex mixer, mix the contents of the tube. | Aseptically pipette 1.0 ml of the 10-4 dilution into 9.0 ml of sterile saline. This will give a 1/100,000 or 10-5 dilution of the sample. Using a vortex mixer, mix the contents of the tube. | Aseptically pipette 1.0 ml of the 10-5 dilution into 9.0 ml of sterile saline. This will give a 1/1,000,000 or 10-6 dilution of the sample. Using a vortex mixer, mix the contents of the tube. |
| (Copyright; Gary E. Kaiser, Ph.D. The Community College of Baltimore County, Catonsville Campus CC-BY-3.0) | ||
|
Fig. \(\PageIndex{7G}\): Dilution of Bacterial Sample, Step 7 |
Fig. \(\PageIndex{7H}\): Dilution of Bacterial Sample, Step 8 |
Fig. \(\PageIndex{7I}\): Dilution of Bacterial Sample, Step 9 |
|---|---|---|
 |
 |
 |
| Aseptically pipette 0.1 ml of the 10-6 bacterial dilution onto a plate of TSA. This will give a 1/10,000,000 or 10-7 dilution of the sample. Using a bent-glass rod and a turntable, spread the bacteria out over the surface of the plate. | Aseptically pipette 0.1 ml of the 10-5 bacterial dilution onto a plate of TSA. This will give a 1/1,000,000 or 10-6 dilution of the sample. Using a bent-glass rod and a turntable, spread the bacteria out over the surface of the plate. |
Aseptically pipette 0.1 ml of the 10-4 bacterial dilution onto a plate of TSA. This will give a 1/100,000 or 10-5 dilution of the sample. Using a bent-glass rod and a turntable, spread the bacteria out over the surface of the plate. Incubate the 3 plates at 37°C. |
| (Copyright; Gary E. Kaiser, Ph.D. The Community College of Baltimore County, Catonsville Campus CC-BY-3.0) | ||
B. Direct Microscopic Method (demonstration)
1. Pipette 1.0 ml of the sample of E. coli into a tube containing 1.0 ml of the dye methylene blue. This gives a 1/2 dilution of the sample.
2. Using a Pasteur pipette, fill the chamber of a Petroff-Hausser counting chamber with this 1/2 dilution.
3. Place a coverslip over the chamber and focus on the squares using 400X (40X objective).
4. Count the number of bacteria in 5 large double-lined squares. For those organisms on the lines, count those on the left and upper lines but not those on the right and lower lines. Divide this total number by 5 to find the average number of bacteria per large square.
5. Calculate the number of bacteria per cc as follows:
The number of bacteria per cc =
The average number of bacteria per large square X
The dilution factor of the large square (1,250,000) X
The dilution factor of any dilutions made prior to placing the sample
in the counting chamber, such as mixing it with dye (2 in this case)
C. Turbidity
Your instructor will set up a spectrophotometer demonstration illustrating that as the number of bacteria in a broth culture increases, the absorbance increases (or the percent light transmitted decreases).
Contributors and Attributions
Dr. Gary Kaiser (COMMUNITY COLLEGE OF BALTIMORE COUNTY, CATONSVILLE CAMPUS)