Biology LibreTexts

5: Plasmid DNA Extraction (Mini-Prep)

  • Page ID
    79494
    • Nathan Reyna, Ruth Plymale, & Kristen Johnson
    • Ouachita Babtist University & University of New Hampshire

    \( \newcommand{\vecs}[1]{\overset { \scriptstyle \rightharpoonup} {\mathbf{#1}} } \)

    \( \newcommand{\vecd}[1]{\overset{-\!-\!\rightharpoonup}{\vphantom{a}\smash {#1}}} \)

    \( \newcommand{\id}{\mathrm{id}}\) \( \newcommand{\Span}{\mathrm{span}}\)

    ( \newcommand{\kernel}{\mathrm{null}\,}\) \( \newcommand{\range}{\mathrm{range}\,}\)

    \( \newcommand{\RealPart}{\mathrm{Re}}\) \( \newcommand{\ImaginaryPart}{\mathrm{Im}}\)

    \( \newcommand{\Argument}{\mathrm{Arg}}\) \( \newcommand{\norm}[1]{\| #1 \|}\)

    \( \newcommand{\inner}[2]{\langle #1, #2 \rangle}\)

    \( \newcommand{\Span}{\mathrm{span}}\)

    \( \newcommand{\id}{\mathrm{id}}\)

    \( \newcommand{\Span}{\mathrm{span}}\)

    \( \newcommand{\kernel}{\mathrm{null}\,}\)

    \( \newcommand{\range}{\mathrm{range}\,}\)

    \( \newcommand{\RealPart}{\mathrm{Re}}\)

    \( \newcommand{\ImaginaryPart}{\mathrm{Im}}\)

    \( \newcommand{\Argument}{\mathrm{Arg}}\)

    \( \newcommand{\norm}[1]{\| #1 \|}\)

    \( \newcommand{\inner}[2]{\langle #1, #2 \rangle}\)

    \( \newcommand{\Span}{\mathrm{span}}\) \( \newcommand{\AA}{\unicode[.8,0]{x212B}}\)

    \( \newcommand{\vectorA}[1]{\vec{#1}}      % arrow\)

    \( \newcommand{\vectorAt}[1]{\vec{\text{#1}}}      % arrow\)

    \( \newcommand{\vectorB}[1]{\overset { \scriptstyle \rightharpoonup} {\mathbf{#1}} } \)

    \( \newcommand{\vectorC}[1]{\textbf{#1}} \)

    \( \newcommand{\vectorD}[1]{\overrightarrow{#1}} \)

    \( \newcommand{\vectorDt}[1]{\overrightarrow{\text{#1}}} \)

    \( \newcommand{\vectE}[1]{\overset{-\!-\!\rightharpoonup}{\vphantom{a}\smash{\mathbf {#1}}}} \)

    \( \newcommand{\vecs}[1]{\overset { \scriptstyle \rightharpoonup} {\mathbf{#1}} } \)

    \( \newcommand{\vecd}[1]{\overset{-\!-\!\rightharpoonup}{\vphantom{a}\smash {#1}}} \)

    \(\newcommand{\avec}{\mathbf a}\) \(\newcommand{\bvec}{\mathbf b}\) \(\newcommand{\cvec}{\mathbf c}\) \(\newcommand{\dvec}{\mathbf d}\) \(\newcommand{\dtil}{\widetilde{\mathbf d}}\) \(\newcommand{\evec}{\mathbf e}\) \(\newcommand{\fvec}{\mathbf f}\) \(\newcommand{\nvec}{\mathbf n}\) \(\newcommand{\pvec}{\mathbf p}\) \(\newcommand{\qvec}{\mathbf q}\) \(\newcommand{\svec}{\mathbf s}\) \(\newcommand{\tvec}{\mathbf t}\) \(\newcommand{\uvec}{\mathbf u}\) \(\newcommand{\vvec}{\mathbf v}\) \(\newcommand{\wvec}{\mathbf w}\) \(\newcommand{\xvec}{\mathbf x}\) \(\newcommand{\yvec}{\mathbf y}\) \(\newcommand{\zvec}{\mathbf z}\) \(\newcommand{\rvec}{\mathbf r}\) \(\newcommand{\mvec}{\mathbf m}\) \(\newcommand{\zerovec}{\mathbf 0}\) \(\newcommand{\onevec}{\mathbf 1}\) \(\newcommand{\real}{\mathbb R}\) \(\newcommand{\twovec}[2]{\left[\begin{array}{r}#1 \\ #2 \end{array}\right]}\) \(\newcommand{\ctwovec}[2]{\left[\begin{array}{c}#1 \\ #2 \end{array}\right]}\) \(\newcommand{\threevec}[3]{\left[\begin{array}{r}#1 \\ #2 \\ #3 \end{array}\right]}\) \(\newcommand{\cthreevec}[3]{\left[\begin{array}{c}#1 \\ #2 \\ #3 \end{array}\right]}\) \(\newcommand{\fourvec}[4]{\left[\begin{array}{r}#1 \\ #2 \\ #3 \\ #4 \end{array}\right]}\) \(\newcommand{\cfourvec}[4]{\left[\begin{array}{c}#1 \\ #2 \\ #3 \\ #4 \end{array}\right]}\) \(\newcommand{\fivevec}[5]{\left[\begin{array}{r}#1 \\ #2 \\ #3 \\ #4 \\ #5 \\ \end{array}\right]}\) \(\newcommand{\cfivevec}[5]{\left[\begin{array}{c}#1 \\ #2 \\ #3 \\ #4 \\ #5 \\ \end{array}\right]}\) \(\newcommand{\mattwo}[4]{\left[\begin{array}{rr}#1 \amp #2 \\ #3 \amp #4 \\ \end{array}\right]}\) \(\newcommand{\laspan}[1]{\text{Span}\{#1\}}\) \(\newcommand{\bcal}{\cal B}\) \(\newcommand{\ccal}{\cal C}\) \(\newcommand{\scal}{\cal S}\) \(\newcommand{\wcal}{\cal W}\) \(\newcommand{\ecal}{\cal E}\) \(\newcommand{\coords}[2]{\left\{#1\right\}_{#2}}\) \(\newcommand{\gray}[1]{\color{gray}{#1}}\) \(\newcommand{\lgray}[1]{\color{lightgray}{#1}}\) \(\newcommand{\rank}{\operatorname{rank}}\) \(\newcommand{\row}{\text{Row}}\) \(\newcommand{\col}{\text{Col}}\) \(\renewcommand{\row}{\text{Row}}\) \(\newcommand{\nul}{\text{Nul}}\) \(\newcommand{\var}{\text{Var}}\) \(\newcommand{\corr}{\text{corr}}\) \(\newcommand{\len}[1]{\left|#1\right|}\) \(\newcommand{\bbar}{\overline{\bvec}}\) \(\newcommand{\bhat}{\widehat{\bvec}}\) \(\newcommand{\bperp}{\bvec^\perp}\) \(\newcommand{\xhat}{\widehat{\xvec}}\) \(\newcommand{\vhat}{\widehat{\vvec}}\) \(\newcommand{\uhat}{\widehat{\uvec}}\) \(\newcommand{\what}{\widehat{\wvec}}\) \(\newcommand{\Sighat}{\widehat{\Sigma}}\) \(\newcommand{\lt}{<}\) \(\newcommand{\gt}{>}\) \(\newcommand{\amp}{&}\) \(\definecolor{fillinmathshade}{gray}{0.9}\)

    Zymo-Pure Plasmid DNA extraction (Micro-Centrifuge Method)


    Learning Objective
    • Isolation of Plasmid DNA from overnight cultures in LB.

    This method is spin column-based and purifies up to 100 \(\mu g\) of ultra-pure endotoxin-free plasmid DNA in less than 15 minutes. The result is plasmid DNA suitable for transfection, restriction endonuclease digestion, bacterial transformation, PCR amplification, and DNA sequencing. (ZymoPURE Plasmid Miniprep Kit)

    Note

    Watch the Youtube video for questions about the Miniprep protocol

    ZymoPURE Plasmid Miniprep video

    Note

    The P1 reagent is temperature sensitive due to RNase being present, and should be kept in the fridge or on ice at all times. All other reagents will be stored at room temperature.

    Reagent name and Code Storage Temperature
    ZymoPURE™ P1 (Red) 4°C
    ZymoPURE™ P2 (Green) Room Temp.
    ZymoPURE™ P3 (Yellow) Room Temp.
    ZymoPURE™ Binding Buffer Room Temp.
    ZymoPURE™ Wash 1 Room Temp.
    ZymoPURE™ Wash 2 Room Temp.
    ZymoPURE™ Elution Buffer Room Temp.
    Zymo-Spin™ II-P Columns (must have purple ring) Room Temp.
    Collection Tubes Room Temp.

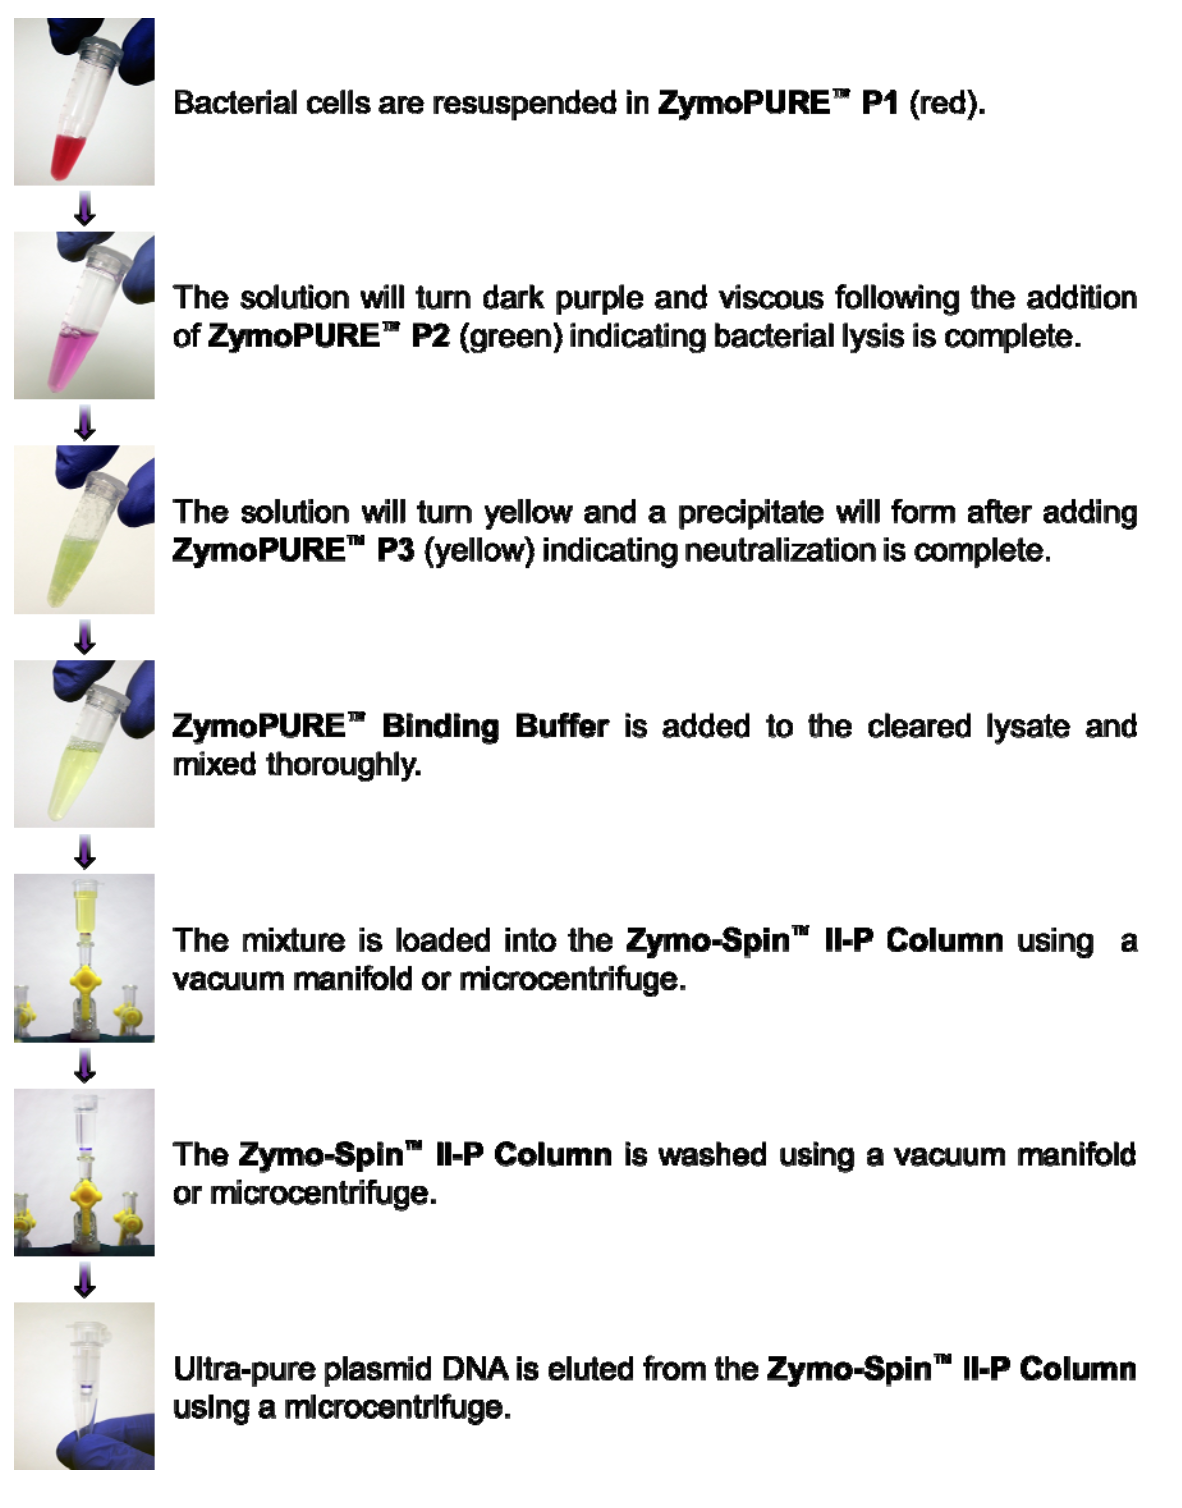
    Visual Procedure of Zymo Plasmid Mini-Prep

    截屏2021-09-07 下午10.56.35.png

    TIPS BEFORE STARTING

    The first couple of times you do the Mini-Prep, on the protocol indicate/LABEL WHERE your DNA is for each of the steps! (e.g., DNA is in the supernatant/liquid OR DNA is in the pellet). Each step below has a “circle one” option asking where the DNA is! (pellet or supernatant).

    Note

    If you understand exactly where your DNA is in each one of the steps, you won’t LOSE your DNA!!

    Protocol: (make sure you have all reagents before you begin… get ice!!!)

    1. Using a serological pipet, pipet out 1.0 to 3 mL (preferably 3 ml) of bacterial culture into a 1.5 ml microcentrifuge tube. Centrifuge this microcentrifuge tube at full speed for 20 seconds. You will see a small pellet form at the bottom of the tube. (You must repeat steps 1-2 to get more than 1 ml worth of cells

          Where is your DNA?           Pellet or          Supernatant
       
    2. Remove as much media as possible by pouring it off into the Biohazard bag. Do not disrupt the cell pellet! (Repeat steps 1-2 to increase cell concentration: However, 1-2ml of culture should be enough plasmid.)

    Where is your DNA?           Pellet or          Supernatant

    1. Add 250 \(\mu\)L of ZymoPUREP1 (Red) to the bacterial cell pellet and vortex or pipet the pellet to resuspend it completely. (P1 is stored in the fridge at 4°C. Keep on ice when not in use.) This step involves RNase to purify the DNA by destroying any RNA in the sample.

    Where is your DNA?           Pellet or          Supernatant

    1. Add 250 \(\mu\)L of ZymoPURE™ P2 (Green) and immediately mix by gently inverting the tube 6-8 times. Do not vortex! Let sit at room temperature for 2-3 minutes. Do not let sit for longer than 3 minutes. (Cells are completely lysed when the solution appears clear, purple, and viscous.)

    Where is your DNA?           Pellet or          Supernatant

    • Centrifuge the neutralized lysate for 5 minutes at 16,000 xg (or Max speed). (Do not disrupt the white/pelleted cell debris).
    1. Add 275 \(\mu\)L of ZymoPUREBinding Buffer to the cleared lysate from step 8 and mix thoroughly by inverting the capped tube 8 times.
    2. Place a Zymo-SpinII-P Column (Purple ring) in a Collection Tube and transfer the entire mixture from step 9 by pouring or pipetting it into the Zymo-SpinTM II-P Column.
    3. Incubate the Zymo-SpinII-P/Collection Tube assembly at room temperature for 2 minutes and then centrifuge at 5,000 xg for 1 min. Discard the flow through in the Biohazard bag.
    4. Add 800 \(\mu\)L of ZymoPUREWash 2 to the Zymo-SpinII-P Column and centrifuge at 5,000 xg for 1 min. Discard the flow through.
    5. Add 200 \(\mu\)L of ZymoPUREWash 2 to the Zymo-SpinII-P Column and centrifuge at 5,000 xg for 1 min. Discard the flow through.
    6. Centrifuge the Zymo-Spin™ II-P Column at \(\ge\) 10,000 xg (full speed) for 1 min in order to remove any residual wash buffer.
    7. Transfer the Zymo-Spin™ II-P Column into a clean 1.5 ml microcentrifuge tube and add 25 \(\mu\)L of (warmed 50\(^{\circ}C\)- optional) ZymoPUREElution Buffer directly to the column matrix. Incubate at room temperature for 2 minutes, and then centrifuge at \(\ge\) 10,000 xg (full speed) for 1 minute in a microcentrifuge. (warmed buffer and a 5 min incubation may increase plasmid concentrations)

    This page titled 5: Plasmid DNA Extraction (Mini-Prep) is shared under a not declared license and was authored, remixed, and/or curated by Nathan Reyna, Ruth Plymale, & Kristen Johnson.

    • Was this article helpful?