
3.4: Materials and Procedures
- Page ID
- 40165

\( \newcommand{\vecs}[1]{\overset { \scriptstyle \rightharpoonup} {\mathbf{#1}} } \)
\( \newcommand{\vecd}[1]{\overset{-\!-\!\rightharpoonup}{\vphantom{a}\smash {#1}}} \)
\( \newcommand{\id}{\mathrm{id}}\) \( \newcommand{\Span}{\mathrm{span}}\)
( \newcommand{\kernel}{\mathrm{null}\,}\) \( \newcommand{\range}{\mathrm{range}\,}\)
\( \newcommand{\RealPart}{\mathrm{Re}}\) \( \newcommand{\ImaginaryPart}{\mathrm{Im}}\)
\( \newcommand{\Argument}{\mathrm{Arg}}\) \( \newcommand{\norm}[1]{\| #1 \|}\)
\( \newcommand{\inner}[2]{\langle #1, #2 \rangle}\)
\( \newcommand{\Span}{\mathrm{span}}\)
\( \newcommand{\id}{\mathrm{id}}\)
\( \newcommand{\Span}{\mathrm{span}}\)
\( \newcommand{\kernel}{\mathrm{null}\,}\)
\( \newcommand{\range}{\mathrm{range}\,}\)
\( \newcommand{\RealPart}{\mathrm{Re}}\)
\( \newcommand{\ImaginaryPart}{\mathrm{Im}}\)
\( \newcommand{\Argument}{\mathrm{Arg}}\)
\( \newcommand{\norm}[1]{\| #1 \|}\)
\( \newcommand{\inner}[2]{\langle #1, #2 \rangle}\)
\( \newcommand{\Span}{\mathrm{span}}\) \( \newcommand{\AA}{\unicode[.8,0]{x212B}}\)
\( \newcommand{\vectorA}[1]{\vec{#1}} % arrow\)
\( \newcommand{\vectorAt}[1]{\vec{\text{#1}}} % arrow\)
\( \newcommand{\vectorB}[1]{\overset { \scriptstyle \rightharpoonup} {\mathbf{#1}} } \)
\( \newcommand{\vectorC}[1]{\textbf{#1}} \)
\( \newcommand{\vectorD}[1]{\overrightarrow{#1}} \)
\( \newcommand{\vectorDt}[1]{\overrightarrow{\text{#1}}} \)
\( \newcommand{\vectE}[1]{\overset{-\!-\!\rightharpoonup}{\vphantom{a}\smash{\mathbf {#1}}}} \)
\( \newcommand{\vecs}[1]{\overset { \scriptstyle \rightharpoonup} {\mathbf{#1}} } \)
\( \newcommand{\vecd}[1]{\overset{-\!-\!\rightharpoonup}{\vphantom{a}\smash {#1}}} \)
\(\newcommand{\avec}{\mathbf a}\) \(\newcommand{\bvec}{\mathbf b}\) \(\newcommand{\cvec}{\mathbf c}\) \(\newcommand{\dvec}{\mathbf d}\) \(\newcommand{\dtil}{\widetilde{\mathbf d}}\) \(\newcommand{\evec}{\mathbf e}\) \(\newcommand{\fvec}{\mathbf f}\) \(\newcommand{\nvec}{\mathbf n}\) \(\newcommand{\pvec}{\mathbf p}\) \(\newcommand{\qvec}{\mathbf q}\) \(\newcommand{\svec}{\mathbf s}\) \(\newcommand{\tvec}{\mathbf t}\) \(\newcommand{\uvec}{\mathbf u}\) \(\newcommand{\vvec}{\mathbf v}\) \(\newcommand{\wvec}{\mathbf w}\) \(\newcommand{\xvec}{\mathbf x}\) \(\newcommand{\yvec}{\mathbf y}\) \(\newcommand{\zvec}{\mathbf z}\) \(\newcommand{\rvec}{\mathbf r}\) \(\newcommand{\mvec}{\mathbf m}\) \(\newcommand{\zerovec}{\mathbf 0}\) \(\newcommand{\onevec}{\mathbf 1}\) \(\newcommand{\real}{\mathbb R}\) \(\newcommand{\twovec}[2]{\left[\begin{array}{r}#1 \\ #2 \end{array}\right]}\) \(\newcommand{\ctwovec}[2]{\left[\begin{array}{c}#1 \\ #2 \end{array}\right]}\) \(\newcommand{\threevec}[3]{\left[\begin{array}{r}#1 \\ #2 \\ #3 \end{array}\right]}\) \(\newcommand{\cthreevec}[3]{\left[\begin{array}{c}#1 \\ #2 \\ #3 \end{array}\right]}\) \(\newcommand{\fourvec}[4]{\left[\begin{array}{r}#1 \\ #2 \\ #3 \\ #4 \end{array}\right]}\) \(\newcommand{\cfourvec}[4]{\left[\begin{array}{c}#1 \\ #2 \\ #3 \\ #4 \end{array}\right]}\) \(\newcommand{\fivevec}[5]{\left[\begin{array}{r}#1 \\ #2 \\ #3 \\ #4 \\ #5 \\ \end{array}\right]}\) \(\newcommand{\cfivevec}[5]{\left[\begin{array}{c}#1 \\ #2 \\ #3 \\ #4 \\ #5 \\ \end{array}\right]}\) \(\newcommand{\mattwo}[4]{\left[\begin{array}{rr}#1 \amp #2 \\ #3 \amp #4 \\ \end{array}\right]}\) \(\newcommand{\laspan}[1]{\text{Span}\{#1\}}\) \(\newcommand{\bcal}{\cal B}\) \(\newcommand{\ccal}{\cal C}\) \(\newcommand{\scal}{\cal S}\) \(\newcommand{\wcal}{\cal W}\) \(\newcommand{\ecal}{\cal E}\) \(\newcommand{\coords}[2]{\left\{#1\right\}_{#2}}\) \(\newcommand{\gray}[1]{\color{gray}{#1}}\) \(\newcommand{\lgray}[1]{\color{lightgray}{#1}}\) \(\newcommand{\rank}{\operatorname{rank}}\) \(\newcommand{\row}{\text{Row}}\) \(\newcommand{\col}{\text{Col}}\) \(\renewcommand{\row}{\text{Row}}\) \(\newcommand{\nul}{\text{Nul}}\) \(\newcommand{\var}{\text{Var}}\) \(\newcommand{\corr}{\text{corr}}\) \(\newcommand{\len}[1]{\left|#1\right|}\) \(\newcommand{\bbar}{\overline{\bvec}}\) \(\newcommand{\bhat}{\widehat{\bvec}}\) \(\newcommand{\bperp}{\bvec^\perp}\) \(\newcommand{\xhat}{\widehat{\xvec}}\) \(\newcommand{\vhat}{\widehat{\vvec}}\) \(\newcommand{\uhat}{\widehat{\uvec}}\) \(\newcommand{\what}{\widehat{\wvec}}\) \(\newcommand{\Sighat}{\widehat{\Sigma}}\) \(\newcommand{\lt}{<}\) \(\newcommand{\gt}{>}\) \(\newcommand{\amp}{&}\) \(\definecolor{fillinmathshade}{gray}{0.9}\)Materials
Wet Mount Materials:
- Glass slides
- Hanging drop slides
- Coverslips
- Vaseline
- Detain/Protoslo
Live Material:
- Mixed Protists
Prepared Slides:
- Amoeba proteus
- Trypanosoma gambiense (West African trypanosomiasis)
- Plasmodium vivax (malaria)
- Paramecium caudatum
- Giardia lamblia (giardiasis)
- Cryptospiridium parvum
- Entamoeba histolytica (Amoebic dysentery)
- Trichomonas vaginalis
- Balantidium coli
Procedures
Use and care of the microscope
- ALWAYS carry the microscope upright by holding the instrument with one hand on the arm of the scope and the other under the base.
- Clean the oculars and objectives before you start: use ONLY special LENS PAPER for cleaning the lenses and lens cleaner; NEVER use Kimwipes, paper towels, or any other paper or cloth. You may use Kimwipes for cleaning dirty slides, stage, etc.
- Connect the light source, turn on at the switch, and adjust light to a medium intensity. Make sure that the stage diaphragm and field diaphragms are open.
- Place the slide specimen over the opening on the stage under the low power (4X or 10X) and center it over the light.
- Before looking into the microscope, turn the coarse adjustment so that the stage, with slide, is at its highest position. Do not do this on anything but low power, at high power the stage can hit the objective. Also, only use the coarse adjustment with the low power objective. NEVER use the coarse adjustment with any other objective.
- The substage condenser, if moveable, should be raised to its highest position. You may need to adjust it later.
- For the safety of your sight, keep both eyes open when looking into a microscope. This will take some practice, but you will soon master the technique. The oculars can be adjusted to match your intraocular distance, the distance between your eyes, for maximum comfort and clear viewing. The oculars can also be individually focused by looking through each, one at a time, and then rotating the ocular in or out—this is especially helpful if there is a discrepancy between the vision of each eye.
- Look into the ocular and gradually turn the coarse adjustment knob, lowering the stage until the object on the slide comes into view. When the object is in approximate focus, use the fine adjustment knob to get the sharpest view.
- Use the iris diaphragm to change the amount of light coming through the object on the slide when needed. The use of this light control is very important. When plant or animal tissues are not stained or poorly stained, they may be made more visible by DECREASING the amount of light. Open and close the diaphragm several times to note differences in the appearance of the object being viewed.
- Adjust the sub-stage condenser to provide a clear white background. Practice moving the condenser up and down to see the effect the condenser has on image clarity. Proper condenser height allows for the light rays to cross through the specimen at the optimum point.
- The microscopes are “parfocal”; if the image is in focus at low power it will be nearly in focus at a higher power. To view specimen at higher magnification, first focus on low power then center the object in the field of view and rotate the nosepiece until the high dry power objective clicks into place. You should only need to focus slightly with the FINE ADJUSTMENT KNOB ONLY. You may need to turn the light adjustment to the next highest number and adjust the diaphragm accordingly.
- Never use the coarse adjustment knob with the high dry power objective. When using slides with thick covers or thick preparations, look at the position of the objective at low power and watch as you turn the nose piece to high power . . . NEVER FORCE the high power into place.
- The 100x objective is for OIL IMMERSION only. You will be instructed on this separately in more detail. In short, once your specimen is in focus on high dry power, move the 100x objective towards the slide, but not quite in place. Place a drop of immersion oil directly on the area of the slide that you are viewing and then click the 100x objective into place. Use the fine focus carefully to sharpen the image. The lens will be immersed in the oil. This technique allows maximum light rays to be focused through the specimen for improved resolution at the highest magnification (1000x) that your microscope will allow. NEVER USE OIL ON ANY OTHER LENS, AND DO NOT USE THE 100X LENS WITHOUT OIL. Be very cautious not to drag the 40x lens through the oil. Always clean all lenses after using oil immersion. Particularly, check the 40x for oil, and clean the 100x completely.
- Before putting the microscope away: remove all slides, clean stage, set the low-power objective into place, move the stage to the maximum distance away from the objectives, turn off light at the switch, and unplug the microscope by the plug – NEVER pull the cord. If oil was used, remove any oil with the lens cleaner and lens paper. Gently coil cord around the cord holder or wrap with velcro strap.
YOUR INSTRUCTOR MUST CHECK YOUR MICROSCOPE BEFORE YOU PUT IT AWAY.
Replace the cover and return the microscope to the appropriate cabinet and numbered space, oculars facing in.
Note
The objective of today is to learn to use the microscope. Concentrate on successfully finding and focusing on the specimens; utilizing components of the microscope (open and close diaphragms, adjust condenser up and down, dark-field and phase contrast, moving between objectives, etc.) so that you feel comfortable and confidant. Today you do not need to see everything and draw everything. DO prepare and observe a wet mount and a variety of prepared slides in order to get familiar with the microscope and its capabilities. You will have additional time to concentrate on the organisms in the next lab.
Live material-Wet Mount and Hanging Drop Slides
Observe the live Mixed Protist Survey via a wet mount and a hanging drop slide. View the specimen with Bright Field, Phase Contrast, and Dark Field if your microscope is equipped with it. Take measurements. Draw what you observe.
Wet mount:
- Place one drop of sample onto a cleaned slide. Add a drop of Detain if desired to slow down the movement of the organisms.
- Observe under the microscope (low and high power) with bright-field, dark-field, and phase contrast. Draw some of your observations.
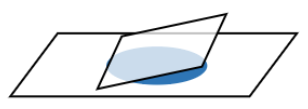
Hanging Drop:
- Place 4 small dabs of Vaseline in the corners of a cover slip. Place one drop of sample onto the center of the coverslip. Add a drop of Detain if desired to slow down the movement of the organisms.
- Invert the coverslip over a depression slide so that the drop of sample hangs down from the coverslip over the well in the slide.
- Observe under the microscope (low and high power) with bright-field, dark-field, and phase contrast. Draw some of your observations.

Prepared slides
Examine a few of the prepared slides (use Bright Field only). Observe and draw.
Results
- Ocular micrometer
|
Objective |
Value of each space in the ocular micrometer (um) |
|---|---|
|
10x |
|
|
20x |
|
|
40x |
|
|
100x |
|
- Draw your observations below. Label each with total magnification; take a measurement of each if possible.

Contributors and Attributions
Kelly C. Burke (College of the Canyons)