
3.2: Introduction
- Page ID
- 40163

\( \newcommand{\vecs}[1]{\overset { \scriptstyle \rightharpoonup} {\mathbf{#1}} } \)
\( \newcommand{\vecd}[1]{\overset{-\!-\!\rightharpoonup}{\vphantom{a}\smash {#1}}} \)
\( \newcommand{\dsum}{\displaystyle\sum\limits} \)
\( \newcommand{\dint}{\displaystyle\int\limits} \)
\( \newcommand{\dlim}{\displaystyle\lim\limits} \)
\( \newcommand{\id}{\mathrm{id}}\) \( \newcommand{\Span}{\mathrm{span}}\)
( \newcommand{\kernel}{\mathrm{null}\,}\) \( \newcommand{\range}{\mathrm{range}\,}\)
\( \newcommand{\RealPart}{\mathrm{Re}}\) \( \newcommand{\ImaginaryPart}{\mathrm{Im}}\)
\( \newcommand{\Argument}{\mathrm{Arg}}\) \( \newcommand{\norm}[1]{\| #1 \|}\)
\( \newcommand{\inner}[2]{\langle #1, #2 \rangle}\)
\( \newcommand{\Span}{\mathrm{span}}\)
\( \newcommand{\id}{\mathrm{id}}\)
\( \newcommand{\Span}{\mathrm{span}}\)
\( \newcommand{\kernel}{\mathrm{null}\,}\)
\( \newcommand{\range}{\mathrm{range}\,}\)
\( \newcommand{\RealPart}{\mathrm{Re}}\)
\( \newcommand{\ImaginaryPart}{\mathrm{Im}}\)
\( \newcommand{\Argument}{\mathrm{Arg}}\)
\( \newcommand{\norm}[1]{\| #1 \|}\)
\( \newcommand{\inner}[2]{\langle #1, #2 \rangle}\)
\( \newcommand{\Span}{\mathrm{span}}\) \( \newcommand{\AA}{\unicode[.8,0]{x212B}}\)
\( \newcommand{\vectorA}[1]{\vec{#1}} % arrow\)
\( \newcommand{\vectorAt}[1]{\vec{\text{#1}}} % arrow\)
\( \newcommand{\vectorB}[1]{\overset { \scriptstyle \rightharpoonup} {\mathbf{#1}} } \)
\( \newcommand{\vectorC}[1]{\textbf{#1}} \)
\( \newcommand{\vectorD}[1]{\overrightarrow{#1}} \)
\( \newcommand{\vectorDt}[1]{\overrightarrow{\text{#1}}} \)
\( \newcommand{\vectE}[1]{\overset{-\!-\!\rightharpoonup}{\vphantom{a}\smash{\mathbf {#1}}}} \)
\( \newcommand{\vecs}[1]{\overset { \scriptstyle \rightharpoonup} {\mathbf{#1}} } \)
\(\newcommand{\longvect}{\overrightarrow}\)
\( \newcommand{\vecd}[1]{\overset{-\!-\!\rightharpoonup}{\vphantom{a}\smash {#1}}} \)
\(\newcommand{\avec}{\mathbf a}\) \(\newcommand{\bvec}{\mathbf b}\) \(\newcommand{\cvec}{\mathbf c}\) \(\newcommand{\dvec}{\mathbf d}\) \(\newcommand{\dtil}{\widetilde{\mathbf d}}\) \(\newcommand{\evec}{\mathbf e}\) \(\newcommand{\fvec}{\mathbf f}\) \(\newcommand{\nvec}{\mathbf n}\) \(\newcommand{\pvec}{\mathbf p}\) \(\newcommand{\qvec}{\mathbf q}\) \(\newcommand{\svec}{\mathbf s}\) \(\newcommand{\tvec}{\mathbf t}\) \(\newcommand{\uvec}{\mathbf u}\) \(\newcommand{\vvec}{\mathbf v}\) \(\newcommand{\wvec}{\mathbf w}\) \(\newcommand{\xvec}{\mathbf x}\) \(\newcommand{\yvec}{\mathbf y}\) \(\newcommand{\zvec}{\mathbf z}\) \(\newcommand{\rvec}{\mathbf r}\) \(\newcommand{\mvec}{\mathbf m}\) \(\newcommand{\zerovec}{\mathbf 0}\) \(\newcommand{\onevec}{\mathbf 1}\) \(\newcommand{\real}{\mathbb R}\) \(\newcommand{\twovec}[2]{\left[\begin{array}{r}#1 \\ #2 \end{array}\right]}\) \(\newcommand{\ctwovec}[2]{\left[\begin{array}{c}#1 \\ #2 \end{array}\right]}\) \(\newcommand{\threevec}[3]{\left[\begin{array}{r}#1 \\ #2 \\ #3 \end{array}\right]}\) \(\newcommand{\cthreevec}[3]{\left[\begin{array}{c}#1 \\ #2 \\ #3 \end{array}\right]}\) \(\newcommand{\fourvec}[4]{\left[\begin{array}{r}#1 \\ #2 \\ #3 \\ #4 \end{array}\right]}\) \(\newcommand{\cfourvec}[4]{\left[\begin{array}{c}#1 \\ #2 \\ #3 \\ #4 \end{array}\right]}\) \(\newcommand{\fivevec}[5]{\left[\begin{array}{r}#1 \\ #2 \\ #3 \\ #4 \\ #5 \\ \end{array}\right]}\) \(\newcommand{\cfivevec}[5]{\left[\begin{array}{c}#1 \\ #2 \\ #3 \\ #4 \\ #5 \\ \end{array}\right]}\) \(\newcommand{\mattwo}[4]{\left[\begin{array}{rr}#1 \amp #2 \\ #3 \amp #4 \\ \end{array}\right]}\) \(\newcommand{\laspan}[1]{\text{Span}\{#1\}}\) \(\newcommand{\bcal}{\cal B}\) \(\newcommand{\ccal}{\cal C}\) \(\newcommand{\scal}{\cal S}\) \(\newcommand{\wcal}{\cal W}\) \(\newcommand{\ecal}{\cal E}\) \(\newcommand{\coords}[2]{\left\{#1\right\}_{#2}}\) \(\newcommand{\gray}[1]{\color{gray}{#1}}\) \(\newcommand{\lgray}[1]{\color{lightgray}{#1}}\) \(\newcommand{\rank}{\operatorname{rank}}\) \(\newcommand{\row}{\text{Row}}\) \(\newcommand{\col}{\text{Col}}\) \(\renewcommand{\row}{\text{Row}}\) \(\newcommand{\nul}{\text{Nul}}\) \(\newcommand{\var}{\text{Var}}\) \(\newcommand{\corr}{\text{corr}}\) \(\newcommand{\len}[1]{\left|#1\right|}\) \(\newcommand{\bbar}{\overline{\bvec}}\) \(\newcommand{\bhat}{\widehat{\bvec}}\) \(\newcommand{\bperp}{\bvec^\perp}\) \(\newcommand{\xhat}{\widehat{\xvec}}\) \(\newcommand{\vhat}{\widehat{\vvec}}\) \(\newcommand{\uhat}{\widehat{\uvec}}\) \(\newcommand{\what}{\widehat{\wvec}}\) \(\newcommand{\Sighat}{\widehat{\Sigma}}\) \(\newcommand{\lt}{<}\) \(\newcommand{\gt}{>}\) \(\newcommand{\amp}{&}\) \(\definecolor{fillinmathshade}{gray}{0.9}\)Van Leeuwenhoek, in the late 1600’s, was the first person to see the microbial world. Although microscopes had been invented earlier, Van Leeuwenhoek perfected a technique to produce lenses that were unmatched for centuries. With these lenses he made thousands of observations on all manner of specimens. Primarily, as a cloth merchant, he was hoping to better observe the quality of his cloth goods. Instead, he discovered an entirely new world. For microbiologists, this is the beginning of their entire field, and the seminal event in natural science. Prior to Van Leeuwenhook no one knew microbes even existed. He truly changed man’s perception and knowledge of the world around us in a most fundamental way. An eccentric non-scientist he is now revered for his curiosity, lens crafting, and discovery of microscopic life. In this lab you will be introduced to techniques in microscopy that Van Leeuwenhook could never have dreamed of. Electricity, Nobel Prize winning advances in optics, knowledge of atomic forces and particle physics, have led to microscopes that can allow us to observe small molecular structures on the nano-scale. As you view the live Protists in lab today you will be expecting to see small organisms swimming around, and you may take that for granted. Imagine not expecting to observe anything living and the surprise you would feel at seeing wiggling “animalcules” in your field of view!
Light Microscopy
The light microscope uses visible light and a series of lenses in order to view microscopic specimens. The condenser lens sits above the light source and below the stage and specimen. The condenser lens focuses the light as it goes through the specimen and can be adjusted for optimization. The objective lenses magnify the specimen, capture the transmitted and reflected light and create a real image of the specimen. The ocular lens further magnifies the image and creates a virtual image for viewing. The total magnification of a specimen is obtained by multiplying the magnification of the objective lens by the ocular lens.
What you observe through the microscope is your field of view. As one increases the magnification, your field of view decreases. At low magnification you might see an entire organism. As you move to higher magnification you zoom in onto a smaller portion of the organism. The depth of field is the depth of the plane of focus—how “deep” something is in focus. As one increases magnification, the depth of field decreases. Working distance is the distance between your specimen/slide and the objective lens. As magnification increases the working distance decreases substantially. When using oil immersion the working distance is very reduced and one must be extremely aware NOT to use the coarse focus with any objective other than low power (10x).
Refraction of light is an important concept to understand when learning how to use a microscope. As light moves through different media (air, glass, water, etc.), from one to another, the light “bends” or refracts. The angle of refraction depends on the types of media the light is passing through. Different media will have a different refractive index. This is why you need to wear swim goggles in order to see clearly underwater. As light moves from air to water it refracts, wearing goggles creates an air space in front of your eyes and the light bends again, in essence correcting itself in terms of your ability to see clearly.
Another important concept in microscopy is resolution. Resolution is the ability to distinguish two points as separate points. If the points are too close together they cannot be “resolved” and actually look like one single point. It’s convenient to think of this as clarity. In a light microscope the resolving power is limited to objects that are about 0.2Um apart.
Your microscopes have a special 100x oil immersion lens. This lens is actually immersed in a drop of oil that one places directly on top of a stained specimen on a slide. The oil used has the same refractive index as glass. Normally, light passes from the glass slide/specimen through air, and then into the glass objective lens. As the light moves from glass to air to glass, it refracts and light is lost. When using oil immersion, light passes from glass to oil (with the same refractive index as glass) to glass. In this case, the light does not refract and optimal light collection in the objective lens is obtained. Oil immersion does not increase magnification but does increase resolution (clarity).
There are several types of light microscopy. The Olympus microscopes have a special turret under the stage that adjusts for different viewing options. 0 is for Bright-field, DF is Dark-Field, PH 1, 2, 3, are for Phase settings.
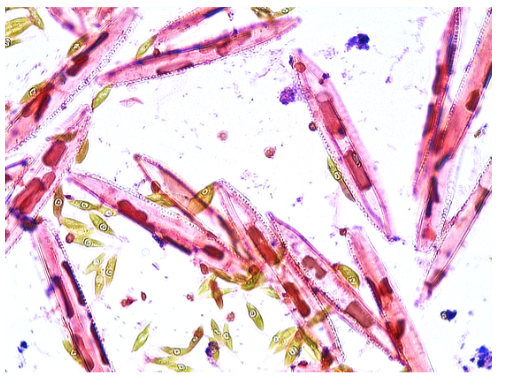
Bright-field (BF) microscopy is probably what you are most familiar with. The light passes through the specimen and is collected in the objectives. While there is refraction, much of the light passes through the specimen and into the objective. Unstained specimens are difficult to see so microscopic cells are typically stained to increase contrast so that they can be seen. The stained specimens appear dark against a “bright” background.
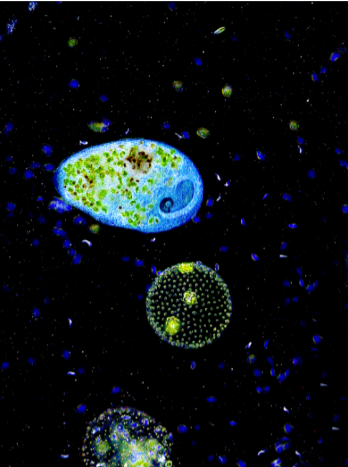
In Dark-field (DF) microscopy, some of the rays of light are blocked as they pass through the condenser. This is via a special occulting disc that essentially scatters the light and the light reflected off the specimen is collected in the objective. This gives a very vivid and beautiful effect when viewing live specimens like Protists. Make sure that you view the live Protist samples with Dark-field, you won’t be disappointed!
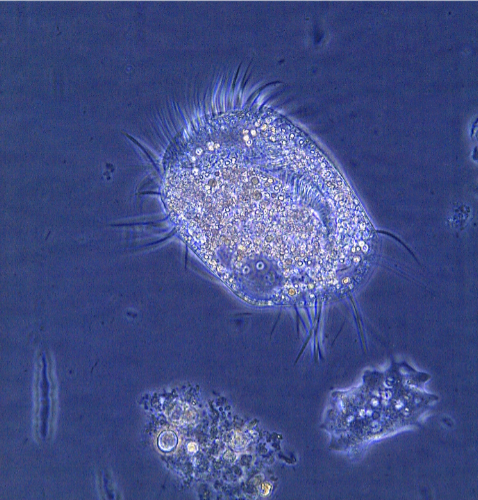
Phase Contrast microscopy
Phase Contrast microscopy is a technique for viewing live specimens, which enables one to see the details and finer structures of cells. As stated above, most live cells are difficult to see in BF microscopy because of the lack of contrast. Staining does not usually help see fine cell details, unless sophisticated differential staining techniques are used. In addition, staining often kills cells, and can alter specimens. Further, stained cells are not moving, feeding, metabolizing, dividing, etc. So phase microscopy has many advantages. To understand how phase contrast works think about a typical eukaryotic cell. This cell would have a nucleus, cytoplasm, perhaps cilia on the outside, etc. Each of these cell structures have different densities, and so refract light differently.
If you follow the light pathway in a phase scope it first passes through a condenser annulus. Only light in parallel waves passes through the openings in the annulus and illuminates the specimen. Some light passes straight/undeviated around the specimen. Other light passes through the specimen and is diffracted by the specimen. Different parts of the specimen will diffract the light differently because of the relative thickness of different parts of the sample (the diffracted light is also scattered). This causes a “phase shift” because when light is diffracted it slows. The thicker the specimen (or part of the specimen) the more the light wave is diffracted and thus, slowed.
Undeviated light surrounding the specimen is not slowed because it is not diffracted (no change in the medium the light is passing through, so no bending—or not very much!).
So the thickness of different parts of the specimen will refract (bend) the light to different degrees. Therefore the location of the light emerging from the specimen into the objective is different than the light passing through the surrounding media. This is the phase shift.
The undeviated light and diffracted light is then collected in the objective and passes through a phase plate in the objective which alters the undeviated light to further enhance contrast. Ultimately they, diffracted light and undeviated light waves, combine and are focused in the objective to form the image we see. The image depends on the intensity differences in the undeviated and diffracted light waves, which causes contrast. In regular bright-field microscopy, there are no “phase” differences and so very little contrast.
This ultimately increases contrast between the background light, and light passing through cell structures giving a 3-D effect and the ability to see many of the cell structures. An artifact of this, however, is a halo effect around cells.
The invention of this technique earned Frederick Zernike a Nobel Prize in 1953!
Fluorescent microscopy
Fluorescent microscopy is a technique that utilizes fluorescent dyes to stain different parts of cells. Often the dyes are attached to antibodies that very specifically attach to different bacteria or cell structures. These dyes are called fluorophores. They absorb certain wavelengths of light and emit others. Fluorophores come in a range of colors that span the visible spectrum. Three of the most common fluorophores used are DAPI (emits blue), FITC (emits green), and Texas Red (emits red).
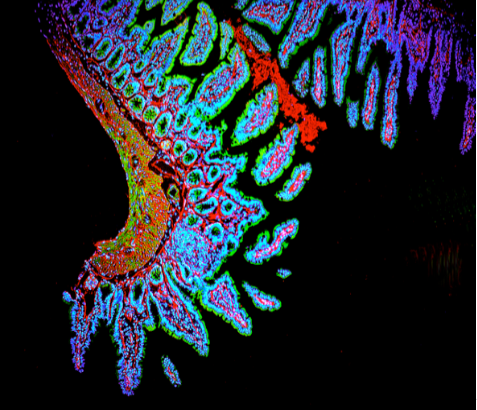
A conventional light microscope uses visible light (400-700 nanometers) to illuminate and produce a magnified image of a sample, while a fluorescence microscope uses higher intensity ultra violet light that excites fluorescent molecules in a specimen. Following excitation, the fluorescent molecules will then emit a longer wavelength light, which produces the magnified image of the sample.
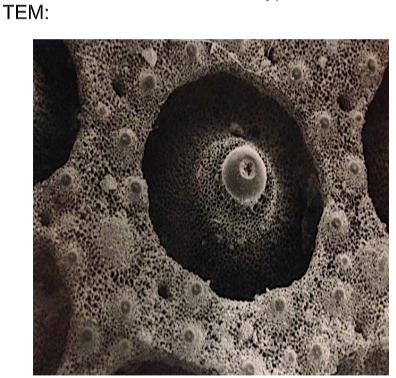
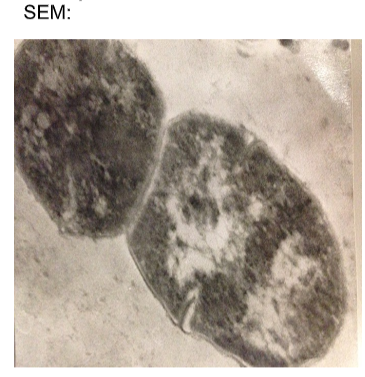
Scanning and Transmission Electron Microscopy (TEM/SEM)
Your instructor may also discuss electron microscopy, which utilizes electrons instead of visible light. You should refer to your textbook to read more about this and other types of modern microscopic techniques.
Measurement: Using the ocular micrometer
The ocular micrometer is a ruler located in one of the ocular lenses in the microscope. This ruler is fixed. However, as you increase magnification, the value of each of the individual spaces changes because the image is magnified. At low power (10x) for example, one might be able to see an entire organism, whereas at high dry (400x) or oil immersion (100x), one would only be able to see part of the organism because it is magnified. There is an inverse relationship between the value of each space in the slide and the magnification. As magnification increases, the value of each space will decrease proportionally. Your instructor will go through calibration of your ocular micrometer.
Contributors and Attributions
Kelly C. Burke (College of the Canyons)