
2.7: Sample Preparation for Microscopic Staining
- Page ID
- 142379

\( \newcommand{\vecs}[1]{\overset { \scriptstyle \rightharpoonup} {\mathbf{#1}} } \)
\( \newcommand{\vecd}[1]{\overset{-\!-\!\rightharpoonup}{\vphantom{a}\smash {#1}}} \)
\( \newcommand{\dsum}{\displaystyle\sum\limits} \)
\( \newcommand{\dint}{\displaystyle\int\limits} \)
\( \newcommand{\dlim}{\displaystyle\lim\limits} \)
\( \newcommand{\id}{\mathrm{id}}\) \( \newcommand{\Span}{\mathrm{span}}\)
( \newcommand{\kernel}{\mathrm{null}\,}\) \( \newcommand{\range}{\mathrm{range}\,}\)
\( \newcommand{\RealPart}{\mathrm{Re}}\) \( \newcommand{\ImaginaryPart}{\mathrm{Im}}\)
\( \newcommand{\Argument}{\mathrm{Arg}}\) \( \newcommand{\norm}[1]{\| #1 \|}\)
\( \newcommand{\inner}[2]{\langle #1, #2 \rangle}\)
\( \newcommand{\Span}{\mathrm{span}}\)
\( \newcommand{\id}{\mathrm{id}}\)
\( \newcommand{\Span}{\mathrm{span}}\)
\( \newcommand{\kernel}{\mathrm{null}\,}\)
\( \newcommand{\range}{\mathrm{range}\,}\)
\( \newcommand{\RealPart}{\mathrm{Re}}\)
\( \newcommand{\ImaginaryPart}{\mathrm{Im}}\)
\( \newcommand{\Argument}{\mathrm{Arg}}\)
\( \newcommand{\norm}[1]{\| #1 \|}\)
\( \newcommand{\inner}[2]{\langle #1, #2 \rangle}\)
\( \newcommand{\Span}{\mathrm{span}}\) \( \newcommand{\AA}{\unicode[.8,0]{x212B}}\)
\( \newcommand{\vectorA}[1]{\vec{#1}} % arrow\)
\( \newcommand{\vectorAt}[1]{\vec{\text{#1}}} % arrow\)
\( \newcommand{\vectorB}[1]{\overset { \scriptstyle \rightharpoonup} {\mathbf{#1}} } \)
\( \newcommand{\vectorC}[1]{\textbf{#1}} \)
\( \newcommand{\vectorD}[1]{\overrightarrow{#1}} \)
\( \newcommand{\vectorDt}[1]{\overrightarrow{\text{#1}}} \)
\( \newcommand{\vectE}[1]{\overset{-\!-\!\rightharpoonup}{\vphantom{a}\smash{\mathbf {#1}}}} \)
\( \newcommand{\vecs}[1]{\overset { \scriptstyle \rightharpoonup} {\mathbf{#1}} } \)
\(\newcommand{\longvect}{\overrightarrow}\)
\( \newcommand{\vecd}[1]{\overset{-\!-\!\rightharpoonup}{\vphantom{a}\smash {#1}}} \)
\(\newcommand{\avec}{\mathbf a}\) \(\newcommand{\bvec}{\mathbf b}\) \(\newcommand{\cvec}{\mathbf c}\) \(\newcommand{\dvec}{\mathbf d}\) \(\newcommand{\dtil}{\widetilde{\mathbf d}}\) \(\newcommand{\evec}{\mathbf e}\) \(\newcommand{\fvec}{\mathbf f}\) \(\newcommand{\nvec}{\mathbf n}\) \(\newcommand{\pvec}{\mathbf p}\) \(\newcommand{\qvec}{\mathbf q}\) \(\newcommand{\svec}{\mathbf s}\) \(\newcommand{\tvec}{\mathbf t}\) \(\newcommand{\uvec}{\mathbf u}\) \(\newcommand{\vvec}{\mathbf v}\) \(\newcommand{\wvec}{\mathbf w}\) \(\newcommand{\xvec}{\mathbf x}\) \(\newcommand{\yvec}{\mathbf y}\) \(\newcommand{\zvec}{\mathbf z}\) \(\newcommand{\rvec}{\mathbf r}\) \(\newcommand{\mvec}{\mathbf m}\) \(\newcommand{\zerovec}{\mathbf 0}\) \(\newcommand{\onevec}{\mathbf 1}\) \(\newcommand{\real}{\mathbb R}\) \(\newcommand{\twovec}[2]{\left[\begin{array}{r}#1 \\ #2 \end{array}\right]}\) \(\newcommand{\ctwovec}[2]{\left[\begin{array}{c}#1 \\ #2 \end{array}\right]}\) \(\newcommand{\threevec}[3]{\left[\begin{array}{r}#1 \\ #2 \\ #3 \end{array}\right]}\) \(\newcommand{\cthreevec}[3]{\left[\begin{array}{c}#1 \\ #2 \\ #3 \end{array}\right]}\) \(\newcommand{\fourvec}[4]{\left[\begin{array}{r}#1 \\ #2 \\ #3 \\ #4 \end{array}\right]}\) \(\newcommand{\cfourvec}[4]{\left[\begin{array}{c}#1 \\ #2 \\ #3 \\ #4 \end{array}\right]}\) \(\newcommand{\fivevec}[5]{\left[\begin{array}{r}#1 \\ #2 \\ #3 \\ #4 \\ #5 \\ \end{array}\right]}\) \(\newcommand{\cfivevec}[5]{\left[\begin{array}{c}#1 \\ #2 \\ #3 \\ #4 \\ #5 \\ \end{array}\right]}\) \(\newcommand{\mattwo}[4]{\left[\begin{array}{rr}#1 \amp #2 \\ #3 \amp #4 \\ \end{array}\right]}\) \(\newcommand{\laspan}[1]{\text{Span}\{#1\}}\) \(\newcommand{\bcal}{\cal B}\) \(\newcommand{\ccal}{\cal C}\) \(\newcommand{\scal}{\cal S}\) \(\newcommand{\wcal}{\cal W}\) \(\newcommand{\ecal}{\cal E}\) \(\newcommand{\coords}[2]{\left\{#1\right\}_{#2}}\) \(\newcommand{\gray}[1]{\color{gray}{#1}}\) \(\newcommand{\lgray}[1]{\color{lightgray}{#1}}\) \(\newcommand{\rank}{\operatorname{rank}}\) \(\newcommand{\row}{\text{Row}}\) \(\newcommand{\col}{\text{Col}}\) \(\renewcommand{\row}{\text{Row}}\) \(\newcommand{\nul}{\text{Nul}}\) \(\newcommand{\var}{\text{Var}}\) \(\newcommand{\corr}{\text{corr}}\) \(\newcommand{\len}[1]{\left|#1\right|}\) \(\newcommand{\bbar}{\overline{\bvec}}\) \(\newcommand{\bhat}{\widehat{\bvec}}\) \(\newcommand{\bperp}{\bvec^\perp}\) \(\newcommand{\xhat}{\widehat{\xvec}}\) \(\newcommand{\vhat}{\widehat{\vvec}}\) \(\newcommand{\uhat}{\widehat{\uvec}}\) \(\newcommand{\what}{\widehat{\wvec}}\) \(\newcommand{\Sighat}{\widehat{\Sigma}}\) \(\newcommand{\lt}{<}\) \(\newcommand{\gt}{>}\) \(\newcommand{\amp}{&}\) \(\definecolor{fillinmathshade}{gray}{0.9}\)- Differentiate between wet mount and fixation in terms of microscopic sample preparation
- Describe the unique features of commonly used stains
- Identify appropriate dyes for positive vs negative stains
- Differentiate between simple and differential stains
In their natural state, most of the cells and microorganisms that we observe under the microscope lack color and contrast. This makes it difficult, if not impossible, to detect important cellular structures and their distinguishing characteristics without artificially treating specimens. We have already alluded to certain techniques involving stains and fluorescent dyes, and in this section we will discuss specific techniques for sample preparation in greater detail. Indeed, numerous methods have been developed to identify specific microbes, cellular structures, DNA sequences, or indicators of infection in tissue samples, under the microscope. Here, we will focus on the most clinically relevant techniques.
Preparing Specimens for Light Microscopy
In clinical settings, light microscopes are the most commonly used microscopes. There are two basic types of preparation used to view specimens with a light microscope: wet mounts and fixed specimens.
The simplest type of preparation is the wet mount, in which the specimen is placed on the slide in a drop of liquid. Some specimens, such as a drop of urine, are already in a liquid form and can be deposited on the slide using a dropper. Solid specimens, such as a skin scraping, can be placed on the slide before adding a drop of liquid to prepare the wet mount. Sometimes the liquid used is simply water, but often stains are added to enhance contrast. Once the liquid has been added to the slide, a coverslip is placed on top and the specimen is ready for examination under the microscope.
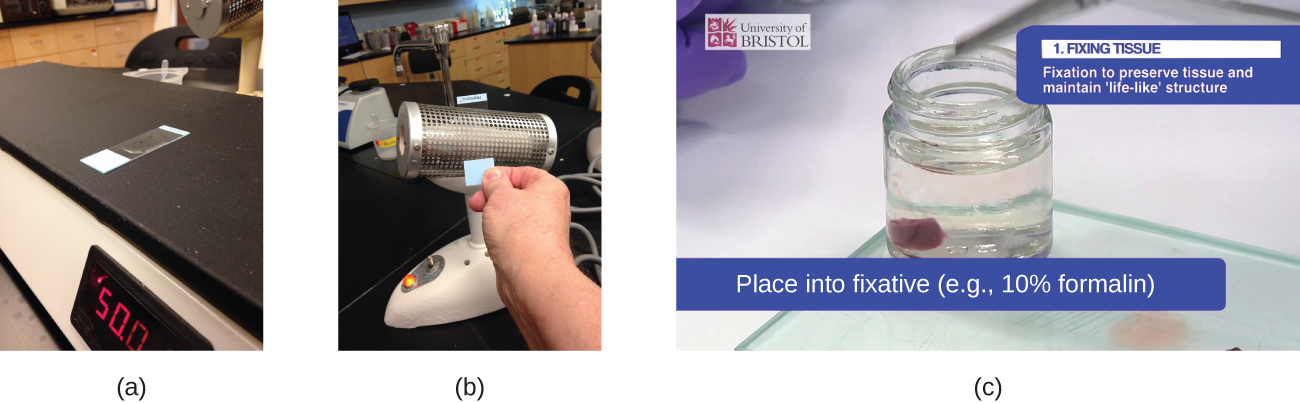
The second method of preparing specimens for light microscopy is fixation. The “fixing” of a sample refers to the process of attaching cells to a slide. Fixation is often achieved either by heating (heat fixing) or chemically treating the specimen. In addition to attaching the specimen to the slide, fixation also kills microorganisms in the specimen, stopping their movement and metabolism while preserving the integrity of their cellular components for observation.
To heat-fix a sample, a thin layer of the specimen is spread on the slide (called a smear), and the slide is then briefly heated over a heat source (Figure \(\PageIndex{1}\)). Chemical fixatives are often preferable to heat for tissue specimens. Chemical agents such as acetic acid, ethanol, methanol, formaldehyde (formalin), and glutaraldehyde can denature proteins, stop biochemical reactions, and stabilize cell structures in tissue samples (Figure \(\PageIndex{1}\)).
Query \(\PageIndex{1}\)
In addition to fixation, staining is almost always applied to color certain features of a specimen before examining it under a light microscope. Stains, or dyes, contain salts made up of a positive ion and a negative ion. Depending on the type of dye, the positive or the negative ion may be the chromophore (the colored ion); the other, uncolored ion is called the counterion. If the chromophore is the positively charged ion, the stain is classified as a basic dye; if the negative ion is the chromophore, the stain is considered an acidic dye.
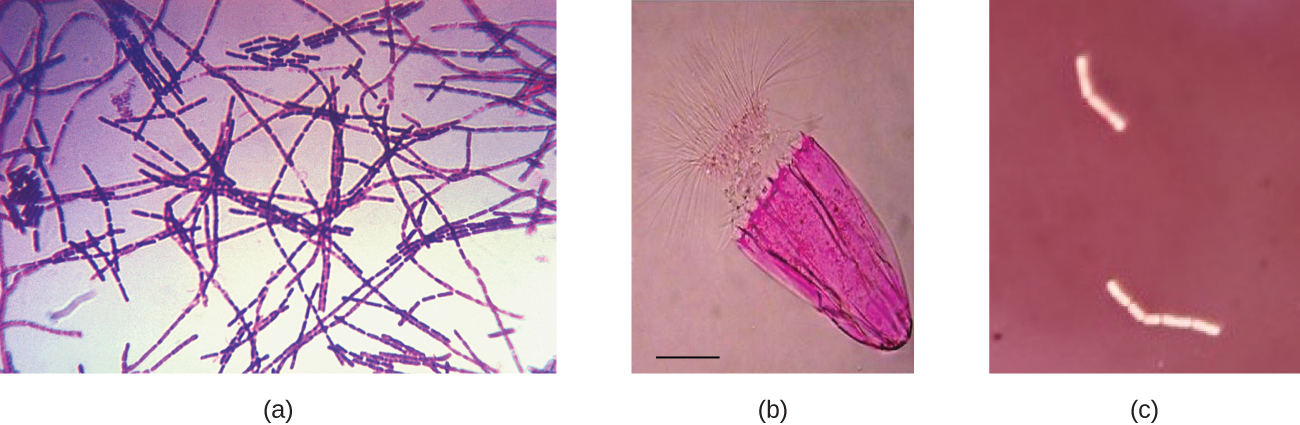
Dyes are selected for staining based on the chemical properties of the dye and the specimen being observed, which determine how the dye will interact with the specimen. In most cases, it is preferable to use a positive stain, a dye that will be absorbed by the cells or organisms being observed, adding color to objects of interest to make them stand out against the background. However, there are scenarios in which it is advantageous to use a negative stain, which is absorbed by the background but not by the cells or organisms in the specimen. Negative staining produces an outline or silhouette of the organisms against a colorful background (Figure \(\PageIndex{2}\)).
Query \(\PageIndex{1}\)
Because cells typically have negatively charged cell walls, the positive chromophores in basic dyes tend to stick to the cell walls, making them positive stains. Thus, commonly used basic dyes such as basic fuchsin, crystal violet, malachite green, methylene blue, and safranin typically serve as positive stains. On the other hand, the negatively charged chromophores in acidic dyes are repelled by negatively charged cell walls, making them negative stains. Commonly used acidic dyes include acid fuchsin, eosin, and rose bengal. Figure \(\PageIndex{10}\) provides more detail.
Some staining techniques involve the application of only one dye to the sample; others require more than one dye. In simple staining, a single dye is used to emphasize particular structures in the specimen. A simple stain will generally make all of the organisms in a sample appear to be the same color, even if the sample contains more than one type of organism. In contrast, differential staining distinguishes organisms based on their interactions with multiple stains. In other words, two organisms in a differentially stained sample may appear to be different colors. Differential staining techniques commonly used in clinical settings include Gram staining, acid-fast staining, endospore staining, flagella staining, and capsule staining. Figure \(\PageIndex{11}\) provides more detail on these differential staining techniques.
Query \(\PageIndex{1}\)
Key Concepts and Summary
- Samples must be properly prepared for microscopy. This may involve staining, fixation, and/or cutting thin sections.