
2.8: Differential Staining
- Page ID
- 160762

\( \newcommand{\vecs}[1]{\overset { \scriptstyle \rightharpoonup} {\mathbf{#1}} } \)
\( \newcommand{\vecd}[1]{\overset{-\!-\!\rightharpoonup}{\vphantom{a}\smash {#1}}} \)
\( \newcommand{\dsum}{\displaystyle\sum\limits} \)
\( \newcommand{\dint}{\displaystyle\int\limits} \)
\( \newcommand{\dlim}{\displaystyle\lim\limits} \)
\( \newcommand{\id}{\mathrm{id}}\) \( \newcommand{\Span}{\mathrm{span}}\)
( \newcommand{\kernel}{\mathrm{null}\,}\) \( \newcommand{\range}{\mathrm{range}\,}\)
\( \newcommand{\RealPart}{\mathrm{Re}}\) \( \newcommand{\ImaginaryPart}{\mathrm{Im}}\)
\( \newcommand{\Argument}{\mathrm{Arg}}\) \( \newcommand{\norm}[1]{\| #1 \|}\)
\( \newcommand{\inner}[2]{\langle #1, #2 \rangle}\)
\( \newcommand{\Span}{\mathrm{span}}\)
\( \newcommand{\id}{\mathrm{id}}\)
\( \newcommand{\Span}{\mathrm{span}}\)
\( \newcommand{\kernel}{\mathrm{null}\,}\)
\( \newcommand{\range}{\mathrm{range}\,}\)
\( \newcommand{\RealPart}{\mathrm{Re}}\)
\( \newcommand{\ImaginaryPart}{\mathrm{Im}}\)
\( \newcommand{\Argument}{\mathrm{Arg}}\)
\( \newcommand{\norm}[1]{\| #1 \|}\)
\( \newcommand{\inner}[2]{\langle #1, #2 \rangle}\)
\( \newcommand{\Span}{\mathrm{span}}\) \( \newcommand{\AA}{\unicode[.8,0]{x212B}}\)
\( \newcommand{\vectorA}[1]{\vec{#1}} % arrow\)
\( \newcommand{\vectorAt}[1]{\vec{\text{#1}}} % arrow\)
\( \newcommand{\vectorB}[1]{\overset { \scriptstyle \rightharpoonup} {\mathbf{#1}} } \)
\( \newcommand{\vectorC}[1]{\textbf{#1}} \)
\( \newcommand{\vectorD}[1]{\overrightarrow{#1}} \)
\( \newcommand{\vectorDt}[1]{\overrightarrow{\text{#1}}} \)
\( \newcommand{\vectE}[1]{\overset{-\!-\!\rightharpoonup}{\vphantom{a}\smash{\mathbf {#1}}}} \)
\( \newcommand{\vecs}[1]{\overset { \scriptstyle \rightharpoonup} {\mathbf{#1}} } \)
\(\newcommand{\longvect}{\overrightarrow}\)
\( \newcommand{\vecd}[1]{\overset{-\!-\!\rightharpoonup}{\vphantom{a}\smash {#1}}} \)
\(\newcommand{\avec}{\mathbf a}\) \(\newcommand{\bvec}{\mathbf b}\) \(\newcommand{\cvec}{\mathbf c}\) \(\newcommand{\dvec}{\mathbf d}\) \(\newcommand{\dtil}{\widetilde{\mathbf d}}\) \(\newcommand{\evec}{\mathbf e}\) \(\newcommand{\fvec}{\mathbf f}\) \(\newcommand{\nvec}{\mathbf n}\) \(\newcommand{\pvec}{\mathbf p}\) \(\newcommand{\qvec}{\mathbf q}\) \(\newcommand{\svec}{\mathbf s}\) \(\newcommand{\tvec}{\mathbf t}\) \(\newcommand{\uvec}{\mathbf u}\) \(\newcommand{\vvec}{\mathbf v}\) \(\newcommand{\wvec}{\mathbf w}\) \(\newcommand{\xvec}{\mathbf x}\) \(\newcommand{\yvec}{\mathbf y}\) \(\newcommand{\zvec}{\mathbf z}\) \(\newcommand{\rvec}{\mathbf r}\) \(\newcommand{\mvec}{\mathbf m}\) \(\newcommand{\zerovec}{\mathbf 0}\) \(\newcommand{\onevec}{\mathbf 1}\) \(\newcommand{\real}{\mathbb R}\) \(\newcommand{\twovec}[2]{\left[\begin{array}{r}#1 \\ #2 \end{array}\right]}\) \(\newcommand{\ctwovec}[2]{\left[\begin{array}{c}#1 \\ #2 \end{array}\right]}\) \(\newcommand{\threevec}[3]{\left[\begin{array}{r}#1 \\ #2 \\ #3 \end{array}\right]}\) \(\newcommand{\cthreevec}[3]{\left[\begin{array}{c}#1 \\ #2 \\ #3 \end{array}\right]}\) \(\newcommand{\fourvec}[4]{\left[\begin{array}{r}#1 \\ #2 \\ #3 \\ #4 \end{array}\right]}\) \(\newcommand{\cfourvec}[4]{\left[\begin{array}{c}#1 \\ #2 \\ #3 \\ #4 \end{array}\right]}\) \(\newcommand{\fivevec}[5]{\left[\begin{array}{r}#1 \\ #2 \\ #3 \\ #4 \\ #5 \\ \end{array}\right]}\) \(\newcommand{\cfivevec}[5]{\left[\begin{array}{c}#1 \\ #2 \\ #3 \\ #4 \\ #5 \\ \end{array}\right]}\) \(\newcommand{\mattwo}[4]{\left[\begin{array}{rr}#1 \amp #2 \\ #3 \amp #4 \\ \end{array}\right]}\) \(\newcommand{\laspan}[1]{\text{Span}\{#1\}}\) \(\newcommand{\bcal}{\cal B}\) \(\newcommand{\ccal}{\cal C}\) \(\newcommand{\scal}{\cal S}\) \(\newcommand{\wcal}{\cal W}\) \(\newcommand{\ecal}{\cal E}\) \(\newcommand{\coords}[2]{\left\{#1\right\}_{#2}}\) \(\newcommand{\gray}[1]{\color{gray}{#1}}\) \(\newcommand{\lgray}[1]{\color{lightgray}{#1}}\) \(\newcommand{\rank}{\operatorname{rank}}\) \(\newcommand{\row}{\text{Row}}\) \(\newcommand{\col}{\text{Col}}\) \(\renewcommand{\row}{\text{Row}}\) \(\newcommand{\nul}{\text{Nul}}\) \(\newcommand{\var}{\text{Var}}\) \(\newcommand{\corr}{\text{corr}}\) \(\newcommand{\len}[1]{\left|#1\right|}\) \(\newcommand{\bbar}{\overline{\bvec}}\) \(\newcommand{\bhat}{\widehat{\bvec}}\) \(\newcommand{\bperp}{\bvec^\perp}\) \(\newcommand{\xhat}{\widehat{\xvec}}\) \(\newcommand{\vhat}{\widehat{\vvec}}\) \(\newcommand{\uhat}{\widehat{\uvec}}\) \(\newcommand{\what}{\widehat{\wvec}}\) \(\newcommand{\Sighat}{\widehat{\Sigma}}\) \(\newcommand{\lt}{<}\) \(\newcommand{\gt}{>}\) \(\newcommand{\amp}{&}\) \(\definecolor{fillinmathshade}{gray}{0.9}\)- Explain the principles behind Gram, endospore, acid-fast, negative capsule, and flagella staining
- Describe the procedures and reagents of these differential stains
- Interpret the clinical applications of these staining methods
Gram Staining
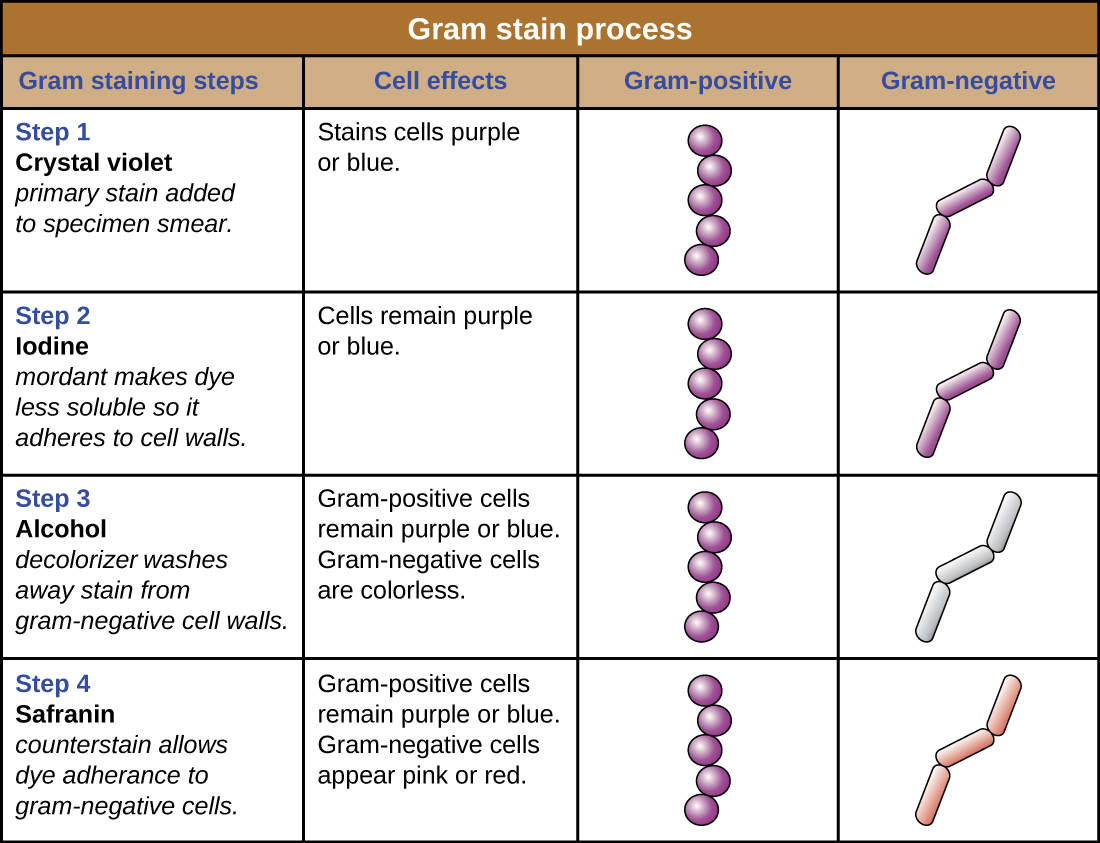
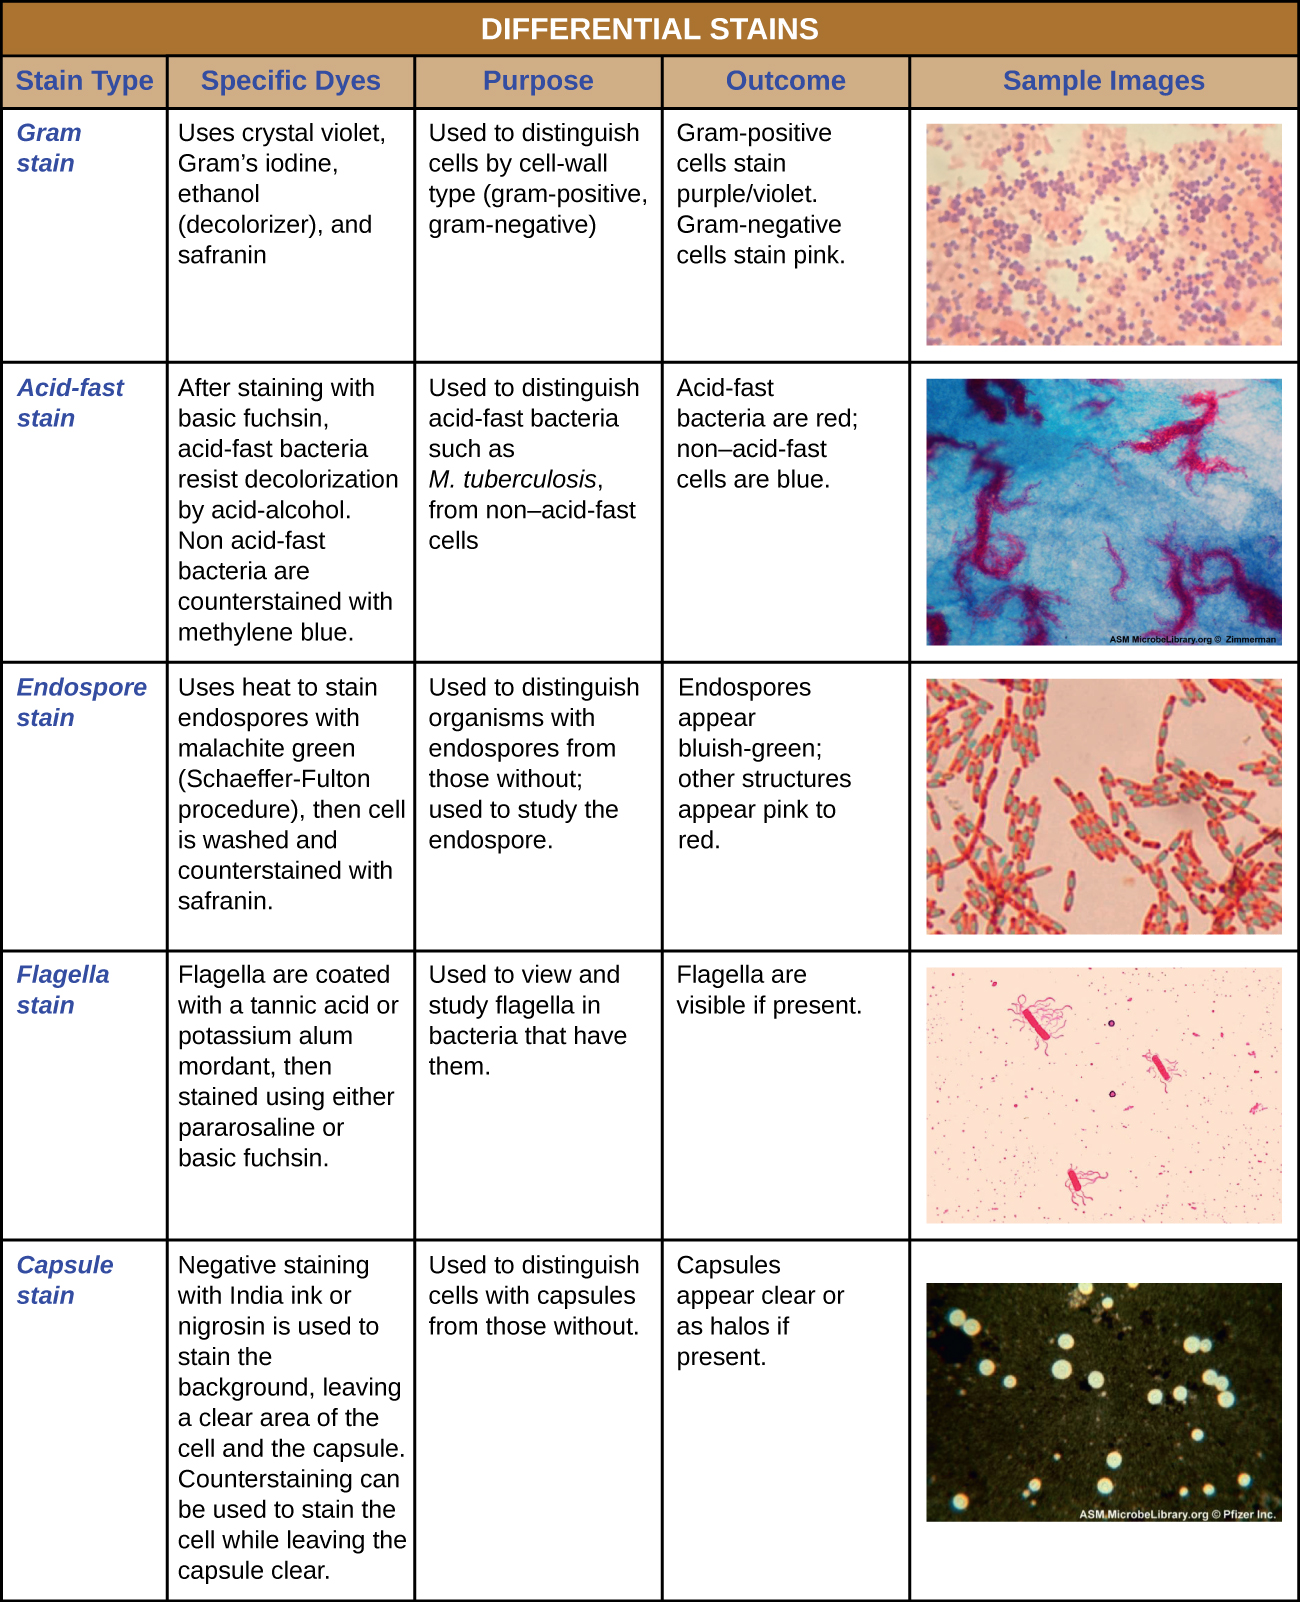
The Gram stain procedure is a differential staining procedure that involves multiple steps. It was developed by Danish microbiologist Hans Christian Gram in 1884 as an effective method to distinguish between bacteria with different types of cell walls, and even today it remains one of the most frequently used staining techniques. The steps of the Gram stain procedure are listed below and illustrated in Figure \(\PageIndex{3}\).
- First, crystal violet, a primary stain, is applied to a heat-fixed smear, giving all of the cells a purple color.
- Next, Gram’s iodine, a mordant, is added. A mordant is a substance used to set or stabilize stains or dyes; in this case, Gram’s iodine acts like a trapping agent that complexes with the crystal violet, making the crystal violet–iodine complex clump and stay contained in thick layers of peptidoglycan in the cell walls.
- Next, a decolorizing agent is added, usually ethanol or an acetone/ethanol solution. Cells that have thick peptidoglycan layers in their cell walls are much less affected by the decolorizing agent; they generally retain the crystal violet dye and remain purple. However, the decolorizing agent more easily washes the dye out of cells with thinner peptidoglycan layers, making them again colorless.
- Finally, a secondary counterstain, usually safranin, is added. This stains the decolorized cells pink and is less noticeable in the cells that still contain the crystal violet dye.
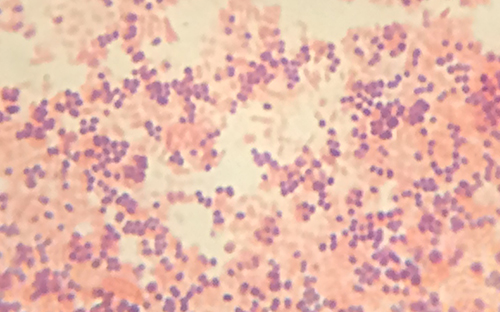
The purple, crystal-violet stained cells are referred to as gram-positive cells, while the red, safranin-dyed cells are gram-negative (Figure \(\PageIndex{4}\)). However, there are several important considerations in interpreting the results of a Gram stain. First, older bacterial cells may have damage to their cell walls that causes them to appear gram-negative even if the species is gram-positive. Thus, it is best to use fresh bacterial cultures for Gram staining. Second, errors such as leaving on decolorizer too long can affect the results. In some cases, most cells will appear gram-positive while a few appear gram-negative (as in Figure \(\PageIndex{4}\)). This suggests damage to the individual cells or that decolorizer was left on for too long; the cells should still be classified as gram-positive if they are all the same species rather than a mixed culture.
Besides their differing interactions with dyes and decolorizing agents, the chemical differences between gram-positive and gram-negative cells have other implications with clinical relevance. For example, Gram staining can help clinicians classify bacterial pathogens in a sample into categories associated with specific properties. Gram-negative bacteria tend to be more resistant to certain antibiotics than gram-positive bacteria. We will discuss this and other applications of Gram staining in more detail in later chapters.
Query \(\PageIndex{1}\)
Query \(\PageIndex{1}\)
Acid-Fast Stains
Acid-fast staining is another commonly used, differential staining technique that can be an important diagnostic tool. An acid-fast stain is able to differentiate two types of gram-positive cells: those that have waxy mycolic acids in their cell walls, and those that do not. Two different methods for acid-fast staining are the Ziehl-Neelsen technique and the Kinyoun technique. Both use carbolfuchsin as the primary stain. The waxy, acid-fast cells retain the carbolfuchsin even after a decolorizing agent (an acid-alcohol solution) is applied. A secondary counterstain, methylene blue, is then applied, which renders non–acid-fast cells blue.
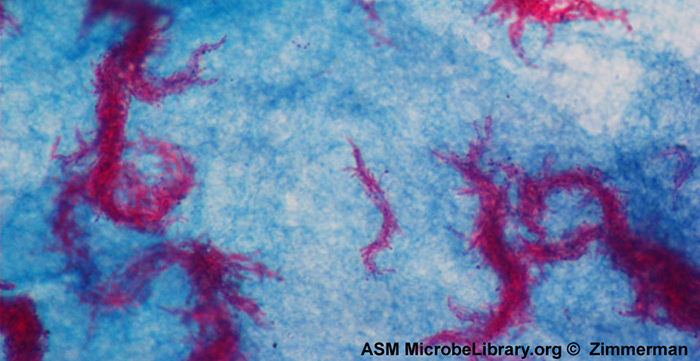
The fundamental difference between the two carbolfuchsin-based methods is whether heat is used during the primary staining process. The Ziehl-Neelsen method uses heat to infuse the carbolfuchsin into the acid-fast cells, whereas the Kinyoun method does not use heat. Both techniques are important diagnostic tools because a number of specific diseases are caused by acid-fast bacteria(AFB). If AFB are present in a tissue sample, their red or pink color can be seen clearly against the blue background of the surrounding tissue cells (Figure \(\PageIndex{6}\)).
Mycobacterium tuberculosis, the bacterium that causes tuberculosis, can be detected in specimens based on the presence of acid-fast bacilli. Often, a smear is prepared from a sample of the patient’s sputum and then stained using the Ziehl-Neelsen technique (Figure \(\PageIndex{6}\)). If acid-fast bacteria are confirmed, they are generally cultured to make a positive identification. Variations of this approach can be used as a first step in determining whether M. tuberculosis or other acid-fast bacteria are present, though samples from elsewhere in the body (such as urine) may contain other Mycobacterium species.
An alternative approach for determining the presence of M. tuberculosis is immunofluorescence. In this technique, fluorochrome-labeled antibodies bind to M. tuberculosis, if present. Antibody-specific fluorescent dyes can be used to view the mycobacteria with a fluorescence microscope.
Query \(\PageIndex{1}\)
Capsule Staining
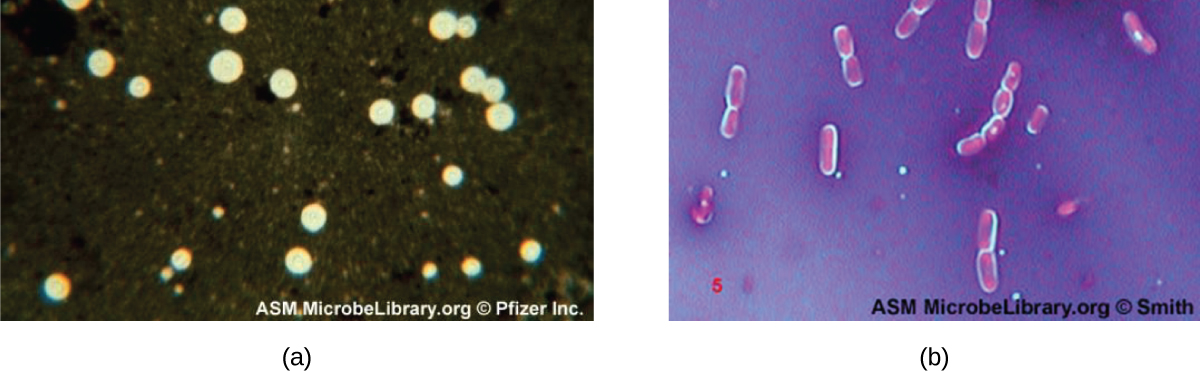
Certain bacteria and yeasts have a protective outer structure called a capsule. Since the presence of a capsule is directly related to a microbe’s virulence (its ability to cause disease), the ability to determine whether cells in a sample have capsules is an important diagnostic tool. Capsules do not absorb most basic dyes; therefore, a negative staining technique (staining around the cells) is typically used for capsule staining. The dye stains the background but does not penetrate the capsules, which appear like halos around the borders of the cell. The specimen does not need to be heat-fixed prior to negative staining.
One common negative staining technique for identifying encapsulated yeast and bacteria is to add a few drops of India ink or nigrosin to a specimen. Other capsular stains can also be used to negatively stain encapsulated cells (Figure \(\PageIndex{7}\)). Alternatively, positive and negative staining techniques can be combined to visualize capsules: The positive stain colors the body of the cell, and the negative stain colors the background but not the capsule, leaving halo around each cell.
Endospore Staining
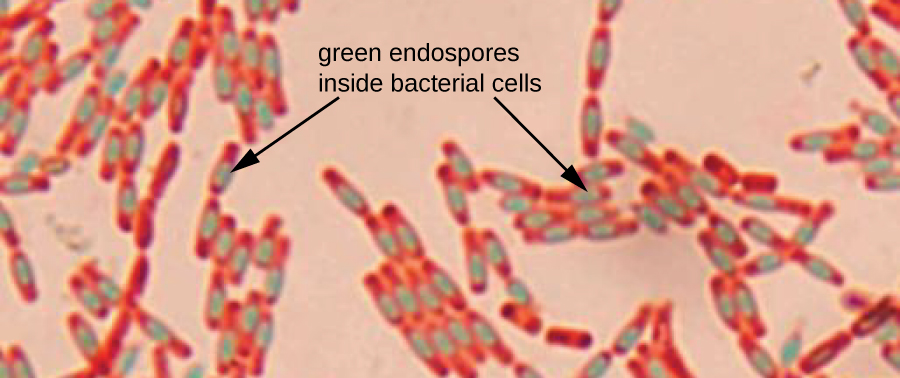
Endospores are structures produced within certain bacterial cells that allow them to survive harsh conditions. Gram staining alone cannot be used to visualize endospores, which appear clear when Gram-stained cells are viewed. Endospore staining uses two stains to differentiate endospores from the rest of the cell. The Schaeffer-Fulton method (the most commonly used endospore-staining technique) uses heat to push the primary stain (malachite green) into the endospore. Washing with water decolorizes the cell, but the endospore retains the green stain. The cell is then counterstained pink with safranin. The resulting image reveals the shape and location of endospores, if they are present. The green endospores will appear either within the pink vegetative cells or as separate from the pink cells altogether. If no endospores are present, then only the pink vegetative cells will be visible (Figure \(\PageIndex{8}\)).
Endospore-staining techniques are important for identifying Bacillus and Clostridium, two genera of endospore-producing bacteria that contain clinically significant species. Among others, B. anthracis(which causes anthrax) has been of particular interest because of concern that its spores could be used as a bioterrorism agent. C. difficile is a particularly important species responsible for the typically hospital-acquired infection known as “C. diff.”
Query \(\PageIndex{1}\)
Flagella Staining
Flagella (singular: flagellum) are tail-like cellular structures used for locomotion by some bacteria, archaea, and eukaryotes. Because they are so thin, flagella typically cannot be seen under a light microscope without a specialized flagella staining technique. Flagella staining thickens the flagella by first applying mordant (generally tannic acid, but sometimes potassium alum), which coats the flagella; then the specimen is stained with pararosaniline (most commonly) or basic fuchsin (Figure \(\PageIndex{9}\)).
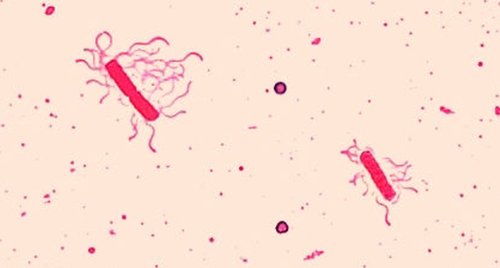
Though flagella staining is uncommon in clinical settings, the technique is commonly used by microbiologists, since the location and number of flagella can be useful in classifying and identifying bacteria in a sample. When using this technique, it is important to handle the specimen with great care; flagella are delicate structures that can easily be damaged or pulled off, compromising attempts to accurately locate and count the number of flagella.
Query \(\PageIndex{1}\)

Key Concepts and Summary
- A variety of staining techniques can be used with light microscopy, including Gram staining, acid-fast staining, capsule staining, endospore staining, and flagella staining.