
1.2: Focusing
- Page ID
- 122936
\( \newcommand{\vecs}[1]{\overset { \scriptstyle \rightharpoonup} {\mathbf{#1}} } \)
\( \newcommand{\vecd}[1]{\overset{-\!-\!\rightharpoonup}{\vphantom{a}\smash {#1}}} \)
\( \newcommand{\dsum}{\displaystyle\sum\limits} \)
\( \newcommand{\dint}{\displaystyle\int\limits} \)
\( \newcommand{\dlim}{\displaystyle\lim\limits} \)
\( \newcommand{\id}{\mathrm{id}}\) \( \newcommand{\Span}{\mathrm{span}}\)
( \newcommand{\kernel}{\mathrm{null}\,}\) \( \newcommand{\range}{\mathrm{range}\,}\)
\( \newcommand{\RealPart}{\mathrm{Re}}\) \( \newcommand{\ImaginaryPart}{\mathrm{Im}}\)
\( \newcommand{\Argument}{\mathrm{Arg}}\) \( \newcommand{\norm}[1]{\| #1 \|}\)
\( \newcommand{\inner}[2]{\langle #1, #2 \rangle}\)
\( \newcommand{\Span}{\mathrm{span}}\)
\( \newcommand{\id}{\mathrm{id}}\)
\( \newcommand{\Span}{\mathrm{span}}\)
\( \newcommand{\kernel}{\mathrm{null}\,}\)
\( \newcommand{\range}{\mathrm{range}\,}\)
\( \newcommand{\RealPart}{\mathrm{Re}}\)
\( \newcommand{\ImaginaryPart}{\mathrm{Im}}\)
\( \newcommand{\Argument}{\mathrm{Arg}}\)
\( \newcommand{\norm}[1]{\| #1 \|}\)
\( \newcommand{\inner}[2]{\langle #1, #2 \rangle}\)
\( \newcommand{\Span}{\mathrm{span}}\) \( \newcommand{\AA}{\unicode[.8,0]{x212B}}\)
\( \newcommand{\vectorA}[1]{\vec{#1}} % arrow\)
\( \newcommand{\vectorAt}[1]{\vec{\text{#1}}} % arrow\)
\( \newcommand{\vectorB}[1]{\overset { \scriptstyle \rightharpoonup} {\mathbf{#1}} } \)
\( \newcommand{\vectorC}[1]{\textbf{#1}} \)
\( \newcommand{\vectorD}[1]{\overrightarrow{#1}} \)
\( \newcommand{\vectorDt}[1]{\overrightarrow{\text{#1}}} \)
\( \newcommand{\vectE}[1]{\overset{-\!-\!\rightharpoonup}{\vphantom{a}\smash{\mathbf {#1}}}} \)
\( \newcommand{\vecs}[1]{\overset { \scriptstyle \rightharpoonup} {\mathbf{#1}} } \)
\(\newcommand{\longvect}{\overrightarrow}\)
\( \newcommand{\vecd}[1]{\overset{-\!-\!\rightharpoonup}{\vphantom{a}\smash {#1}}} \)
\(\newcommand{\avec}{\mathbf a}\) \(\newcommand{\bvec}{\mathbf b}\) \(\newcommand{\cvec}{\mathbf c}\) \(\newcommand{\dvec}{\mathbf d}\) \(\newcommand{\dtil}{\widetilde{\mathbf d}}\) \(\newcommand{\evec}{\mathbf e}\) \(\newcommand{\fvec}{\mathbf f}\) \(\newcommand{\nvec}{\mathbf n}\) \(\newcommand{\pvec}{\mathbf p}\) \(\newcommand{\qvec}{\mathbf q}\) \(\newcommand{\svec}{\mathbf s}\) \(\newcommand{\tvec}{\mathbf t}\) \(\newcommand{\uvec}{\mathbf u}\) \(\newcommand{\vvec}{\mathbf v}\) \(\newcommand{\wvec}{\mathbf w}\) \(\newcommand{\xvec}{\mathbf x}\) \(\newcommand{\yvec}{\mathbf y}\) \(\newcommand{\zvec}{\mathbf z}\) \(\newcommand{\rvec}{\mathbf r}\) \(\newcommand{\mvec}{\mathbf m}\) \(\newcommand{\zerovec}{\mathbf 0}\) \(\newcommand{\onevec}{\mathbf 1}\) \(\newcommand{\real}{\mathbb R}\) \(\newcommand{\twovec}[2]{\left[\begin{array}{r}#1 \\ #2 \end{array}\right]}\) \(\newcommand{\ctwovec}[2]{\left[\begin{array}{c}#1 \\ #2 \end{array}\right]}\) \(\newcommand{\threevec}[3]{\left[\begin{array}{r}#1 \\ #2 \\ #3 \end{array}\right]}\) \(\newcommand{\cthreevec}[3]{\left[\begin{array}{c}#1 \\ #2 \\ #3 \end{array}\right]}\) \(\newcommand{\fourvec}[4]{\left[\begin{array}{r}#1 \\ #2 \\ #3 \\ #4 \end{array}\right]}\) \(\newcommand{\cfourvec}[4]{\left[\begin{array}{c}#1 \\ #2 \\ #3 \\ #4 \end{array}\right]}\) \(\newcommand{\fivevec}[5]{\left[\begin{array}{r}#1 \\ #2 \\ #3 \\ #4 \\ #5 \\ \end{array}\right]}\) \(\newcommand{\cfivevec}[5]{\left[\begin{array}{c}#1 \\ #2 \\ #3 \\ #4 \\ #5 \\ \end{array}\right]}\) \(\newcommand{\mattwo}[4]{\left[\begin{array}{rr}#1 \amp #2 \\ #3 \amp #4 \\ \end{array}\right]}\) \(\newcommand{\laspan}[1]{\text{Span}\{#1\}}\) \(\newcommand{\bcal}{\cal B}\) \(\newcommand{\ccal}{\cal C}\) \(\newcommand{\scal}{\cal S}\) \(\newcommand{\wcal}{\cal W}\) \(\newcommand{\ecal}{\cal E}\) \(\newcommand{\coords}[2]{\left\{#1\right\}_{#2}}\) \(\newcommand{\gray}[1]{\color{gray}{#1}}\) \(\newcommand{\lgray}[1]{\color{lightgray}{#1}}\) \(\newcommand{\rank}{\operatorname{rank}}\) \(\newcommand{\row}{\text{Row}}\) \(\newcommand{\col}{\text{Col}}\) \(\renewcommand{\row}{\text{Row}}\) \(\newcommand{\nul}{\text{Nul}}\) \(\newcommand{\var}{\text{Var}}\) \(\newcommand{\corr}{\text{corr}}\) \(\newcommand{\len}[1]{\left|#1\right|}\) \(\newcommand{\bbar}{\overline{\bvec}}\) \(\newcommand{\bhat}{\widehat{\bvec}}\) \(\newcommand{\bperp}{\bvec^\perp}\) \(\newcommand{\xhat}{\widehat{\xvec}}\) \(\newcommand{\vhat}{\widehat{\vvec}}\) \(\newcommand{\uhat}{\widehat{\uvec}}\) \(\newcommand{\what}{\widehat{\wvec}}\) \(\newcommand{\Sighat}{\widehat{\Sigma}}\) \(\newcommand{\lt}{<}\) \(\newcommand{\gt}{>}\) \(\newcommand{\amp}{&}\) \(\definecolor{fillinmathshade}{gray}{0.9}\)MEASUREMENT OF MICROORGANISMS
The approximate size of a microorganism can be determined using an ocular micrometer (see Fig. 6) , an eyepiece that contains a scale that will appear superimposed upon the focused specimen.
Video illustrating how to compare the size of microorganisms
reated by Gracia Alvaro Montoya, MetaBallsStudios (MBS), United Kingdom, Nov., 2017
FOCUSING
Videos reviewing techniques used in this lab
Focusing With The 1000X Oil Immersion Objective - Olympus CX31 Microscope. See Fig. \(\PageIndex{1}\)
1. Before you plug in the microscope, turn the light intensity control dial on the right-hand side of the microscope to 1 (see Fig. \(\PageIndex{3}\)). Now plug in the microscope and turn it on (see Fig. \(\PageIndex{3}\)).
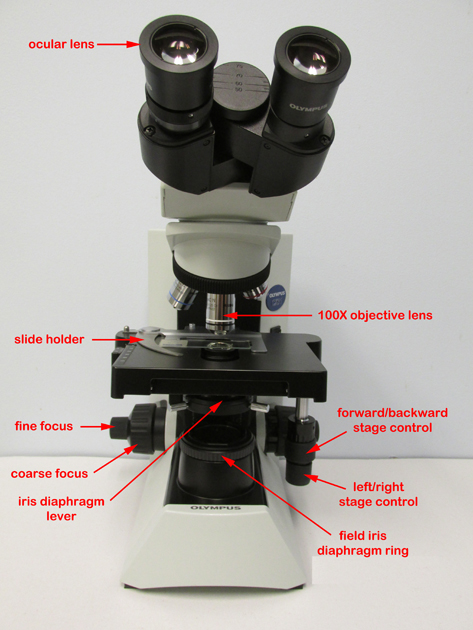
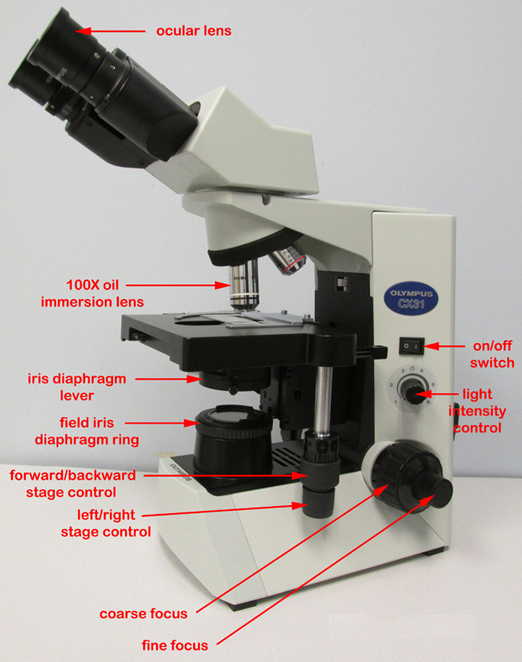
2. Place a rounded drop of immersion oil on the area of the slide that is to be observed under the microscope, typically an area that shows some visible stain. Place the slide in the slide holder (see Fig. \(\PageIndex{4}\)) and center the slide using the two mechanical stage control knobs under the right-hand side of the stage (see Fig. \(\PageIndex{3}\) above).

3. Rotate the white-striped 100X oil immersion objective until it is locked into place. This will give a total magnification of 1000X.
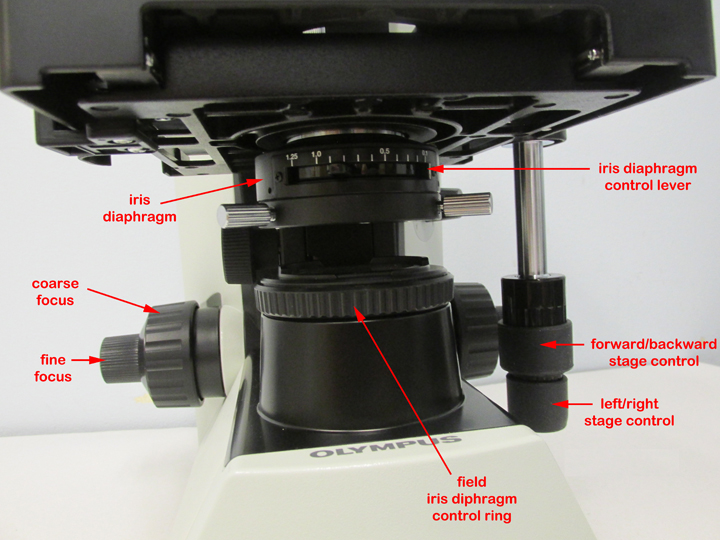
4. Turn the light intensity control dial on the right-hand side of the microscope to 6 (see Fig. \(\PageIndex{3}\)). Make sure the iris diaphragm lever in front under the stage is set approximately at 0.9, (toward the left side of the stage; see Fig. \(\PageIndex{5}\)). Do not close the field iris diaphragm ring on the light source; that should remain fully open. The knob under the stage on the left-hand side of the stage controlling the height of the condenser should be turned so the condenser is all the way up.
CC-BY-4.0 )
5. Watching the slide and objective lens carefully from the front of the microscope, lower the oil immersion objective into the oil by raising the stage until the white-striped, 100X, oil immersion lens just touches the immersion oil on the slide (see Fig. \(\PageIndex{6}\)). Do this by turning the coarse focus (larger knob; see Fig. \(\PageIndex{2}\) above) away from you until the 100X oil immersion objective lens just touches the oil. When the lens enters the immersion oil you will see the light scatter away from the lens. Do not push the spring-loaded portion of the lens up into the barrel of the oil immersion lens.
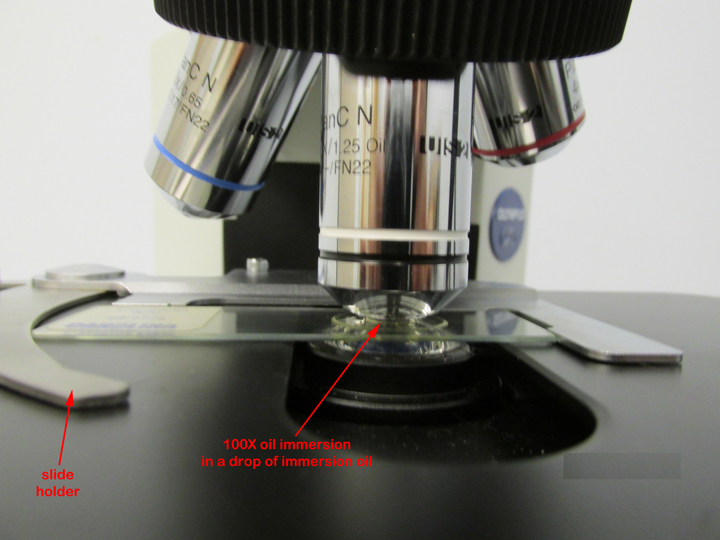
CC-BY-4.0 )
6. While looking through the eyepieces, turn the fine focus (smaller knob; see Fig. \(\PageIndex{2}\) above) away from you at a slow steady speed until the specimen comes into focus. If the specimen does not come into focus within around 30 seconds of turning the fine focus, go back and repeat step 5 and 6.
7. Using the iris diaphragm lever, adjust the light to obtain optimum contrast (see Fig.\(\PageIndex{5}\) above).
8. When finished, wipe the oil off of the oil immersion objective with lens paper, turn the light intensity control dial back to 1, turn off the microscope, unplug the power cord, and wrap the cord around the cord holder on the back of the microscope.
An alternate focusing technique is to first focus on the slide with the yellow-striped 10X objective by using only the coarse focus control and then without moving the stage, add immersion oil, rotate the white-striped 100X oil immersion objective into place, and adjust the fine focus and the light as needed. This procedure is discussed in the Introduction to the lab manual.
Focusing With The 10X Objective - Olympus CX31 Microscope (see Fig. 7 above)
Rotate the yellow-striped 10X objective until it locks into place. This will give a total magnification of 100X.
2. Using the iris diaphragm lever under the stage (see Fig. 10 above), reduce the light by sliding the lever most of the way to the right.
3. Turn the coarse focus control (larger knob; see Fig. 7 above) all the way away from you until it stops.
4. Look through the eyepieces and turn the coarse focus control (larger knob) towards you slowly until the specimen comes into focus.
5. Get the specimen into sharp focus using the fine focus control (smaller knob; see Fig.\(\PageIndex{2}\) above) and adjust the light for optimum contrast using the iris diaphragm lever (see Fig. 10 above) and/or the light intensity control (see Fig. 7 above).
Contributors and Attributions
Dr. Gary Kaiser (COMMUNITY COLLEGE OF BALTIMORE COUNTY, CATONSVILLE CAMPUS)