
20.9: Laboratory Activities and Assignment
- Page ID
- 53824

\( \newcommand{\vecs}[1]{\overset { \scriptstyle \rightharpoonup} {\mathbf{#1}} } \)
\( \newcommand{\vecd}[1]{\overset{-\!-\!\rightharpoonup}{\vphantom{a}\smash {#1}}} \)
\( \newcommand{\dsum}{\displaystyle\sum\limits} \)
\( \newcommand{\dint}{\displaystyle\int\limits} \)
\( \newcommand{\dlim}{\displaystyle\lim\limits} \)
\( \newcommand{\id}{\mathrm{id}}\) \( \newcommand{\Span}{\mathrm{span}}\)
( \newcommand{\kernel}{\mathrm{null}\,}\) \( \newcommand{\range}{\mathrm{range}\,}\)
\( \newcommand{\RealPart}{\mathrm{Re}}\) \( \newcommand{\ImaginaryPart}{\mathrm{Im}}\)
\( \newcommand{\Argument}{\mathrm{Arg}}\) \( \newcommand{\norm}[1]{\| #1 \|}\)
\( \newcommand{\inner}[2]{\langle #1, #2 \rangle}\)
\( \newcommand{\Span}{\mathrm{span}}\)
\( \newcommand{\id}{\mathrm{id}}\)
\( \newcommand{\Span}{\mathrm{span}}\)
\( \newcommand{\kernel}{\mathrm{null}\,}\)
\( \newcommand{\range}{\mathrm{range}\,}\)
\( \newcommand{\RealPart}{\mathrm{Re}}\)
\( \newcommand{\ImaginaryPart}{\mathrm{Im}}\)
\( \newcommand{\Argument}{\mathrm{Arg}}\)
\( \newcommand{\norm}[1]{\| #1 \|}\)
\( \newcommand{\inner}[2]{\langle #1, #2 \rangle}\)
\( \newcommand{\Span}{\mathrm{span}}\) \( \newcommand{\AA}{\unicode[.8,0]{x212B}}\)
\( \newcommand{\vectorA}[1]{\vec{#1}} % arrow\)
\( \newcommand{\vectorAt}[1]{\vec{\text{#1}}} % arrow\)
\( \newcommand{\vectorB}[1]{\overset { \scriptstyle \rightharpoonup} {\mathbf{#1}} } \)
\( \newcommand{\vectorC}[1]{\textbf{#1}} \)
\( \newcommand{\vectorD}[1]{\overrightarrow{#1}} \)
\( \newcommand{\vectorDt}[1]{\overrightarrow{\text{#1}}} \)
\( \newcommand{\vectE}[1]{\overset{-\!-\!\rightharpoonup}{\vphantom{a}\smash{\mathbf {#1}}}} \)
\( \newcommand{\vecs}[1]{\overset { \scriptstyle \rightharpoonup} {\mathbf{#1}} } \)
\(\newcommand{\longvect}{\overrightarrow}\)
\( \newcommand{\vecd}[1]{\overset{-\!-\!\rightharpoonup}{\vphantom{a}\smash {#1}}} \)
\(\newcommand{\avec}{\mathbf a}\) \(\newcommand{\bvec}{\mathbf b}\) \(\newcommand{\cvec}{\mathbf c}\) \(\newcommand{\dvec}{\mathbf d}\) \(\newcommand{\dtil}{\widetilde{\mathbf d}}\) \(\newcommand{\evec}{\mathbf e}\) \(\newcommand{\fvec}{\mathbf f}\) \(\newcommand{\nvec}{\mathbf n}\) \(\newcommand{\pvec}{\mathbf p}\) \(\newcommand{\qvec}{\mathbf q}\) \(\newcommand{\svec}{\mathbf s}\) \(\newcommand{\tvec}{\mathbf t}\) \(\newcommand{\uvec}{\mathbf u}\) \(\newcommand{\vvec}{\mathbf v}\) \(\newcommand{\wvec}{\mathbf w}\) \(\newcommand{\xvec}{\mathbf x}\) \(\newcommand{\yvec}{\mathbf y}\) \(\newcommand{\zvec}{\mathbf z}\) \(\newcommand{\rvec}{\mathbf r}\) \(\newcommand{\mvec}{\mathbf m}\) \(\newcommand{\zerovec}{\mathbf 0}\) \(\newcommand{\onevec}{\mathbf 1}\) \(\newcommand{\real}{\mathbb R}\) \(\newcommand{\twovec}[2]{\left[\begin{array}{r}#1 \\ #2 \end{array}\right]}\) \(\newcommand{\ctwovec}[2]{\left[\begin{array}{c}#1 \\ #2 \end{array}\right]}\) \(\newcommand{\threevec}[3]{\left[\begin{array}{r}#1 \\ #2 \\ #3 \end{array}\right]}\) \(\newcommand{\cthreevec}[3]{\left[\begin{array}{c}#1 \\ #2 \\ #3 \end{array}\right]}\) \(\newcommand{\fourvec}[4]{\left[\begin{array}{r}#1 \\ #2 \\ #3 \\ #4 \end{array}\right]}\) \(\newcommand{\cfourvec}[4]{\left[\begin{array}{c}#1 \\ #2 \\ #3 \\ #4 \end{array}\right]}\) \(\newcommand{\fivevec}[5]{\left[\begin{array}{r}#1 \\ #2 \\ #3 \\ #4 \\ #5 \\ \end{array}\right]}\) \(\newcommand{\cfivevec}[5]{\left[\begin{array}{c}#1 \\ #2 \\ #3 \\ #4 \\ #5 \\ \end{array}\right]}\) \(\newcommand{\mattwo}[4]{\left[\begin{array}{rr}#1 \amp #2 \\ #3 \amp #4 \\ \end{array}\right]}\) \(\newcommand{\laspan}[1]{\text{Span}\{#1\}}\) \(\newcommand{\bcal}{\cal B}\) \(\newcommand{\ccal}{\cal C}\) \(\newcommand{\scal}{\cal S}\) \(\newcommand{\wcal}{\cal W}\) \(\newcommand{\ecal}{\cal E}\) \(\newcommand{\coords}[2]{\left\{#1\right\}_{#2}}\) \(\newcommand{\gray}[1]{\color{gray}{#1}}\) \(\newcommand{\lgray}[1]{\color{lightgray}{#1}}\) \(\newcommand{\rank}{\operatorname{rank}}\) \(\newcommand{\row}{\text{Row}}\) \(\newcommand{\col}{\text{Col}}\) \(\renewcommand{\row}{\text{Row}}\) \(\newcommand{\nul}{\text{Nul}}\) \(\newcommand{\var}{\text{Var}}\) \(\newcommand{\corr}{\text{corr}}\) \(\newcommand{\len}[1]{\left|#1\right|}\) \(\newcommand{\bbar}{\overline{\bvec}}\) \(\newcommand{\bhat}{\widehat{\bvec}}\) \(\newcommand{\bperp}{\bvec^\perp}\) \(\newcommand{\xhat}{\widehat{\xvec}}\) \(\newcommand{\vhat}{\widehat{\vvec}}\) \(\newcommand{\uhat}{\widehat{\uvec}}\) \(\newcommand{\what}{\widehat{\wvec}}\) \(\newcommand{\Sighat}{\widehat{\Sigma}}\) \(\newcommand{\lt}{<}\) \(\newcommand{\gt}{>}\) \(\newcommand{\amp}{&}\) \(\definecolor{fillinmathshade}{gray}{0.9}\)Laboratory Activities and Assignment
Part 1: Review of the Digestive System
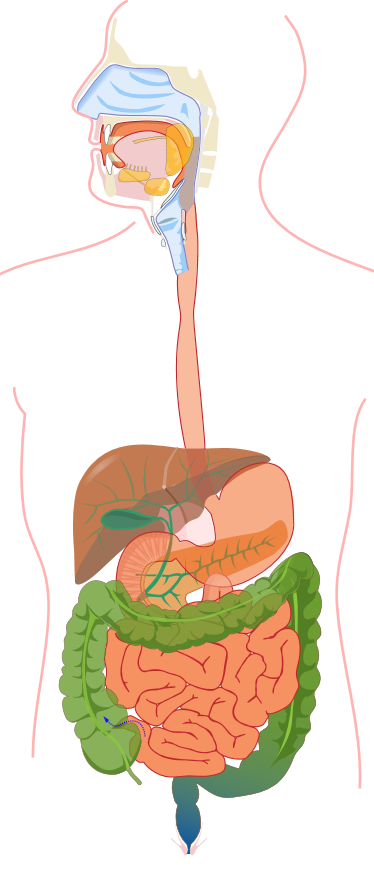
1. On the diagram below, label the following structures:
|
|
|
2. On the diagram below, label the following structures:
|
|
|
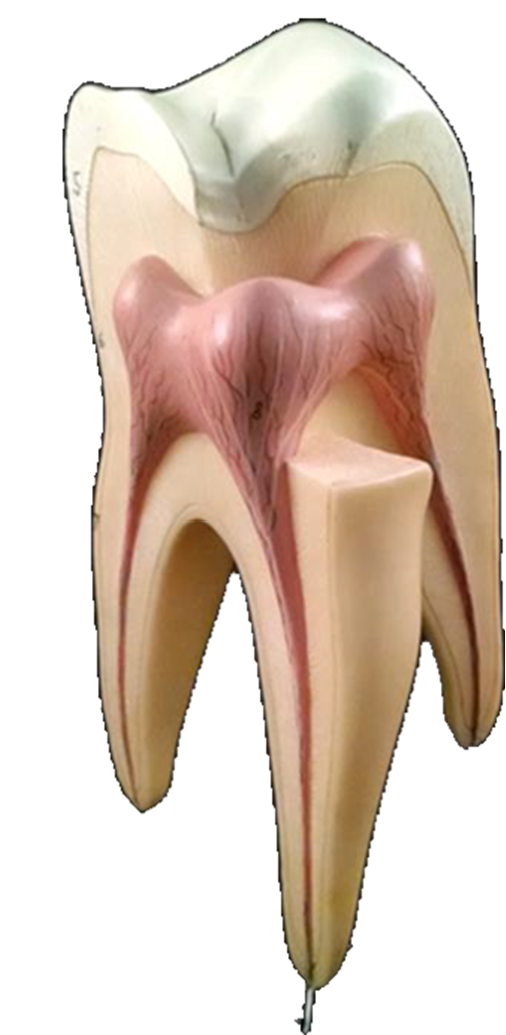
3. On the diagram below, label the following structures:
|
|

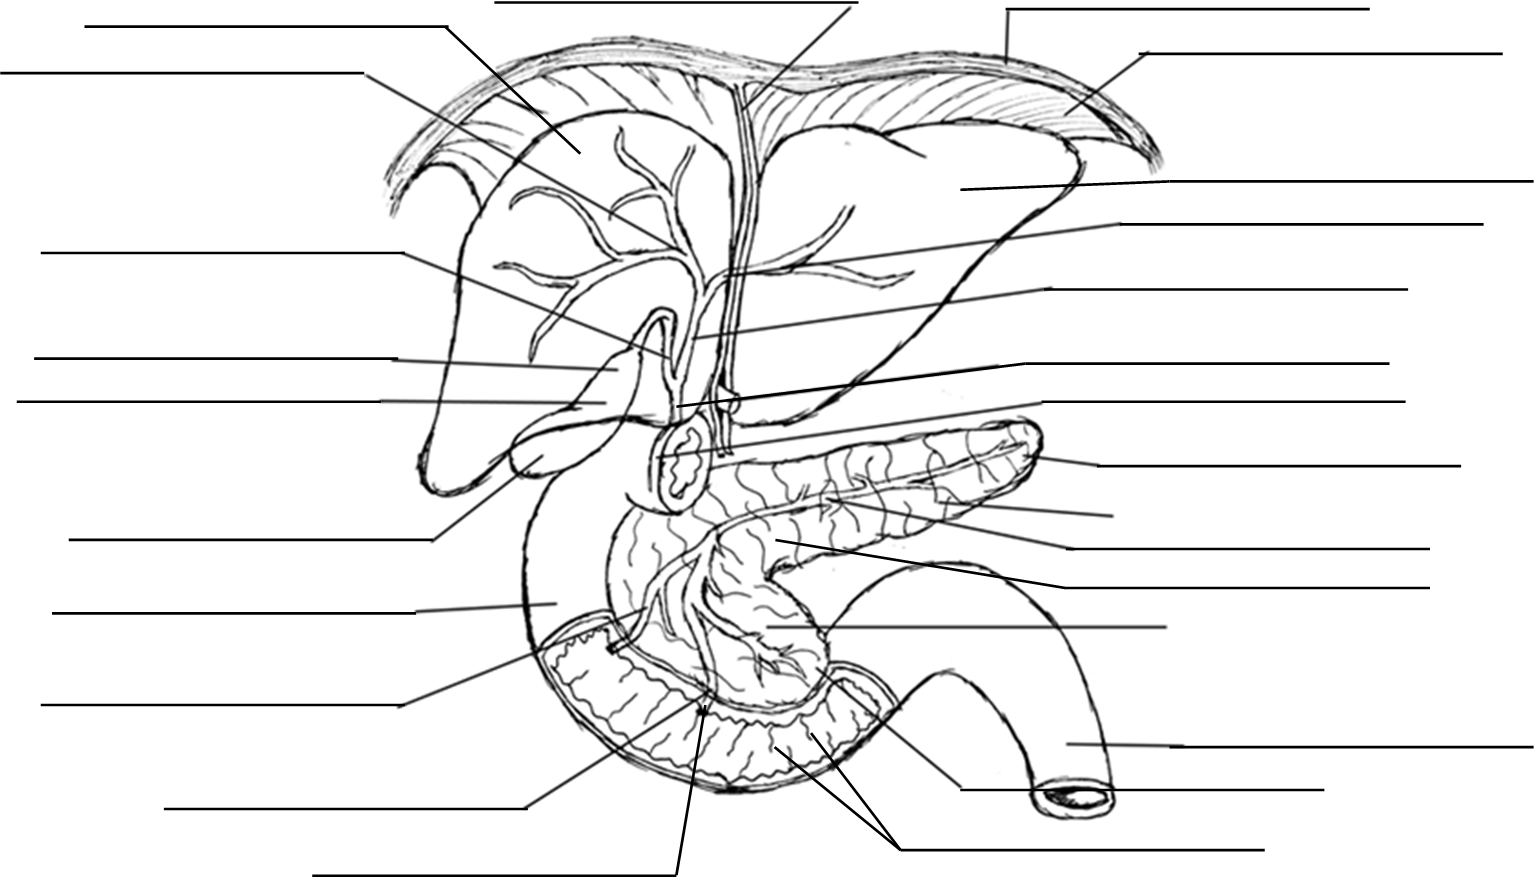
4. On the diagram below, label the following structures:
|
|
|
5. On the diagram below, label the following structures:
|
|
|
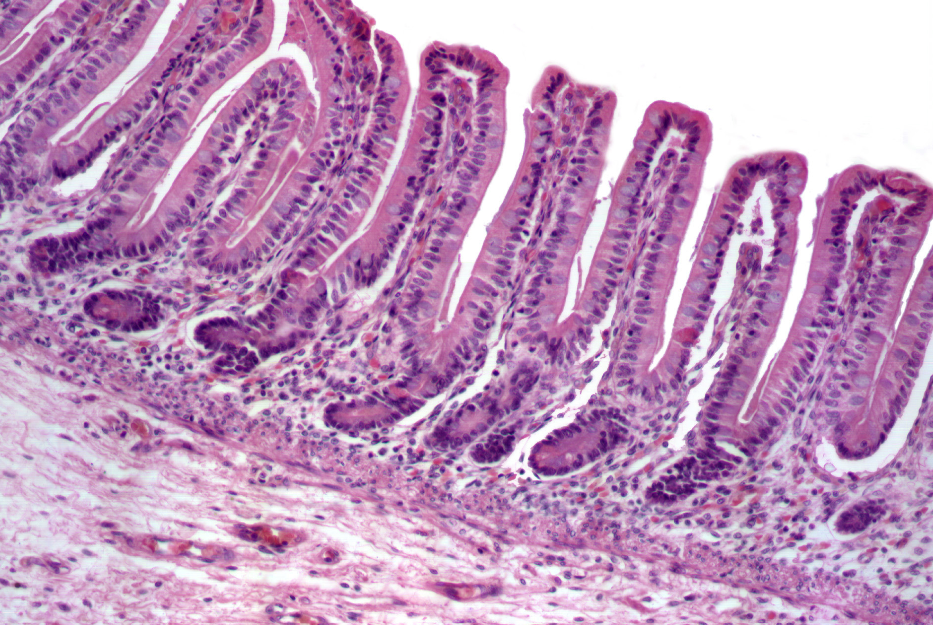
6. Below is a microscopic image of the tissue lining the inside of the large intestine, magnified by 400x. Label the following structures on the image:
|
|
|
Part 2: Histology of the Digestive System
- Obtain the slides listed below that are available for today’s lab.
- Focus on each sample and identify the structures listed for each type of tissue.
- Indicate the total magnification you make each illustration at in the space provided.
- Illustrate each tissue you observe with the microscope at the magnification you listed.
- Label each illustration with the structures listed for each.
Oral Cavity
Label the tissue with: stratified squamous epithelium, mucosa, lamina propria

Esophagus
Label the tissue with: mucosa, submucosa, muscularis externa, serosa, lumen, stratified squamous epithelium, lamina propria
Stomach
Make one illustration at a low magnification and another at a higher magnification to view structures in the mucosa.
Label the tissue with: mucosa, submucosa, muscularis externa, serosa, goblet cells, simple columnar epithelium lamina propria, gastric pits, gastric glands
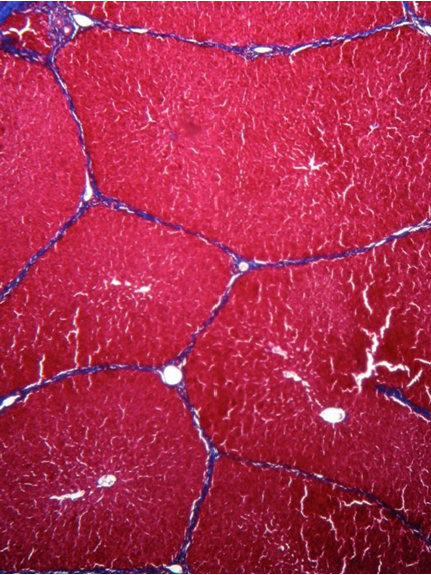
Liver
Label the tissue with: lobule, portal canals, central veins, hepatocytes, sinusoids
Small Intestine
Make one illustration at a low magnification and another at a higher magnification to view structures in the mucosa.
Label the tissue with: mucosa, submucosa, muscularis externa, serosa, plicae circulares (circular folds), villi, simple columnar epithelium, lamina propria, goblet cells, microvilli
Large Intestine
Make one illustration at a low magnification and another at a higher magnification to view structures in the mucosa.
Label the tissue with: mucosa, submucosa, muscularis externa, serosa, simple columnar epithelium, lamina propria, goblet cells, intestinal glands, muscularis mucosa
Part 3: Digestive System Laboratory Activities
Oral Cavity, Esophagus, and Stomach
- Use the anatomical models provided to your group in your group.
- As a group, identify the structures listed below.
- Write each of the following structures on masking tape or labeling tape (with correct spelling) and stick onto the model to label each structure.
|
|
|
4. When you are done, take photos of your labeled anatomical model(s). Ask your instructor to verify the labeling is correct.
Instructor Signature Confirming Correct Labeling: ________________
Liver, Gallbladder, and Pancreas
- Use the anatomical models provided to your group in your group.
- As a group, identify the structures listed below.
- Write each of the following structures on masking tape or labeling tape (with correct spelling) and stick onto the model to label each structure.
|
|
|
4. When you are done, take photos of your labeled anatomical model(s). Ask your instructor to verify the labeling is correct.
Instructor Signature Confirming Correct Labeling: ___________________
Small Intestine and Colon
- Use the anatomical models provided to your group in your group.
- As a group, identify the structures listed below.
- Write each of the following structures on masking tape or labeling tape (with correct spelling) and stick onto the model to label each structure.
|
|
|
4. When you are done, take photos of your labeled anatomical model(s). Ask your instructor to verify the labeling is correct.
Instructor Signature Confirming Correct Labeling: __________________
Flow of the Gastrointestinal Tract
1. As a group, determine the route a bolus/chyme/feces take through the digestive tract. List each structure of the alimentary canal in order. When the list is complete, show when it is called "bolus," when it is called "chyme," and when it is called "feces," by adding labels to your list.
Attributions
Part 1: Review of the Digestive System
- "Anatomy and Physiology Lab Homework" by Laird C Sheldahl is licensed under CC BY-SA 4.0
- "Digestive system without labels.svg" by Mariana Ruiz, Jmarchn is in the Public Domain
- "Digital Histology" by Department of Anatomy and Neurobiology and the Office of Faculty Affairs, Virginia Commonwealth University School of Medicine and the ALT Lab at Virginia Commonwealth University is licensed under CC BY 4.0
- "Human Anatomy Lab Manual" by Malgosia Wilk-Blaszczak, Mavs Open Press, University of Texas at Arlington is licensed under CC BY 4.0
- "Human dental arches.svg" by Kaligula is licensed under CC BY-SA 3.0
Part 2: Histology of the Digestive System
- "BIOL 250 Human Anatomy Lab Manual SU 19" by Yancy Aquino, Skyline College is licensed under CC BY-NC-SA 4.0
Part 3: Digestive System Laboratory Activities
- "Human Anatomy Lab Manual" by Malgosia Wilk-Blaszczak, Mavs Open Press, University of Texas at Arlington is licensed under CC BY 4.0