7.2: Exercise
- Page ID
- 105821
\( \newcommand{\vecs}[1]{\overset { \scriptstyle \rightharpoonup} {\mathbf{#1}} } \)
\( \newcommand{\vecd}[1]{\overset{-\!-\!\rightharpoonup}{\vphantom{a}\smash {#1}}} \)
\( \newcommand{\id}{\mathrm{id}}\) \( \newcommand{\Span}{\mathrm{span}}\)
( \newcommand{\kernel}{\mathrm{null}\,}\) \( \newcommand{\range}{\mathrm{range}\,}\)
\( \newcommand{\RealPart}{\mathrm{Re}}\) \( \newcommand{\ImaginaryPart}{\mathrm{Im}}\)
\( \newcommand{\Argument}{\mathrm{Arg}}\) \( \newcommand{\norm}[1]{\| #1 \|}\)
\( \newcommand{\inner}[2]{\langle #1, #2 \rangle}\)
\( \newcommand{\Span}{\mathrm{span}}\)
\( \newcommand{\id}{\mathrm{id}}\)
\( \newcommand{\Span}{\mathrm{span}}\)
\( \newcommand{\kernel}{\mathrm{null}\,}\)
\( \newcommand{\range}{\mathrm{range}\,}\)
\( \newcommand{\RealPart}{\mathrm{Re}}\)
\( \newcommand{\ImaginaryPart}{\mathrm{Im}}\)
\( \newcommand{\Argument}{\mathrm{Arg}}\)
\( \newcommand{\norm}[1]{\| #1 \|}\)
\( \newcommand{\inner}[2]{\langle #1, #2 \rangle}\)
\( \newcommand{\Span}{\mathrm{span}}\) \( \newcommand{\AA}{\unicode[.8,0]{x212B}}\)
\( \newcommand{\vectorA}[1]{\vec{#1}} % arrow\)
\( \newcommand{\vectorAt}[1]{\vec{\text{#1}}} % arrow\)
\( \newcommand{\vectorB}[1]{\overset { \scriptstyle \rightharpoonup} {\mathbf{#1}} } \)
\( \newcommand{\vectorC}[1]{\textbf{#1}} \)
\( \newcommand{\vectorD}[1]{\overrightarrow{#1}} \)
\( \newcommand{\vectorDt}[1]{\overrightarrow{\text{#1}}} \)
\( \newcommand{\vectE}[1]{\overset{-\!-\!\rightharpoonup}{\vphantom{a}\smash{\mathbf {#1}}}} \)
\( \newcommand{\vecs}[1]{\overset { \scriptstyle \rightharpoonup} {\mathbf{#1}} } \)
\( \newcommand{\vecd}[1]{\overset{-\!-\!\rightharpoonup}{\vphantom{a}\smash {#1}}} \)
Part 1: Bacterial Cells 
View a prepared slide of common bacterial cell types; prepare a wet mount of cyanobacteria and observe under the microscope.
Materials:
- Compound microscope
- Methylene blue
- Microscope slide
- Cover slip
- Transfer pipette
- Culture of Oscillatoria
Procedure:
A. Fixed Slide of Bacterial Types
- Examine the demonstration slide of mixed bacteria. There are 3 common shapes: round (coccus), rod (bacillus), and spiral (spirillum). The slide should have several of each type of bacteria.
- Draw each of the bacterial shapes in the spaces at right.
- Use the ocular micrometer to measure the length and width of a single cell for each type of bacteria. Record this using a "l x w" format next to each of your sketches.
B. Wet Mount of Oscillatoria
- Using the transfer pipette, transfer a drop of liquid culture onto a microscope slide.
- Place coverslip onto the slide.
- Use the SCANNING (4x) objective to focus. You are looking for very faint green thin filaments.
- Switch to low power (10x). You may be able to see lines going across the filaments, but the image will likely just look like green floss.
- Once you have centered and focused the image, switch to high power (40x) and refocus. The individual cells should be visible at this magnification; each filament is composed of cells stacked on top of each other. Remember, do NOT use the coarse adjustment knob at this point!
- Sketch the bacteria at low and high power. Label the cytoplasm and cell wall of a single cell. Draw your cells to scale.
Questions:
1. Why are nuclei not visible within the cells viewed?
2. The common name for species like Oscillatoria is "blue-green algae" (although they are classified as bacteria, not algae). This group of bacteria is capable of photosynthesizing. Do they contain chloroplasts? Explain.
Part 2: Animal Cells 
Prepare a wet mount of a human cheek cell and observe under the microscope.
Materials:
- Compound microscope
- Methylene blue
- Microscope slide
- Cover slip
- Toothpick
Procedure:
- Put a drop of methylene blue on the slide.
- Gently scrape the inside of your cheek with the flat side of a toothpick. Scrape lightly!
- Stir the end of the toothpick in the stain and throw the toothpick away.
- Place a coverslip onto the slide.
- Use the SCANNING (4x) objective to focus. You probably will not see the cells at this power.
- Switch to low power (10x). Cells should be visible, but they will be small and look like nearly clear purplish blobs. If you are looking at something very dark purple, it is probably not a cell.
- Once you think you have located a cell, switch to high power (40x) and refocus. Remember, do NOT use the coarse adjustment knob at this point!
- Sketch the cell at low and high power. Label the nucleus, cytoplasm, and cell membrane of a single cell. Draw your cells to scale.
Questions:
1. Why is methylene blue added?
2. The light microscope used in the lab is not powerful enough to view other organelles in the cheek cell.
a. What parts of the cell were visible?
b. List 2 organelles that were NOT visible but should have been in the cheek cell.
3. Is the cheek cell a eukaryote or prokaryote? How do you know?
4. Keeping in mind that the mouth is the first site of chemical digestion in a human. Your saliva starts the process of breaking down the food you eat. Keeping this in mind, what organelle do you think would be numerous inside the cells of your mouth? Explain.
Part 3: Plant Cells
Prepare wet mounts of an onion cell and an Elodea leaf cell and observe both under the microscope. 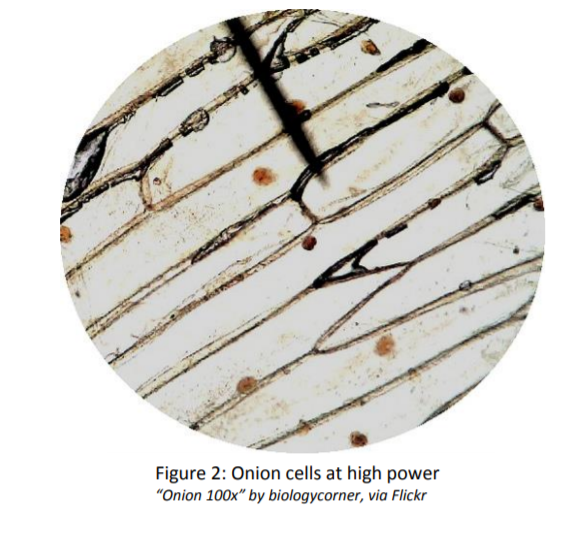
Materials:
- Compound microscope
- Microscope slide
- Cover slip
- Dropper bottle with dH2O
- Forceps
- Pre-cut onion bulb
- Culture of Elodea
- Dissecting needle
Procedure:
A. Wet Mount of an Onion Cell
- Put a drop of water onto the microscope slide.
- Using the forceps, gently peel off a small piece of the “membrane” of the onion (epidermis). It should be very thin and may curl up on itself.
- Place the onion sample into the drop of water on your slide. Try to unroll/straighten out the sample to view a single layer of cells. You may need to use the dissecting needle to do this.
- Place a coverslip onto the slide.
- Use the SCANNING (4x) objective to focus. You probably will not see the cells at this power.
- Switch to low power (10x). Cells walls should be visible: they will look like semi-clear grid lines.
- Once you think you have located a cell, switch to high power (40x) and refocus.
- Sketch the cell at low and high power. Label the nucleus, cytoplasm, and cell wall of a single cell. Draw your cells to scale.

B. Wet Mount of an Elodea Leaf Cell 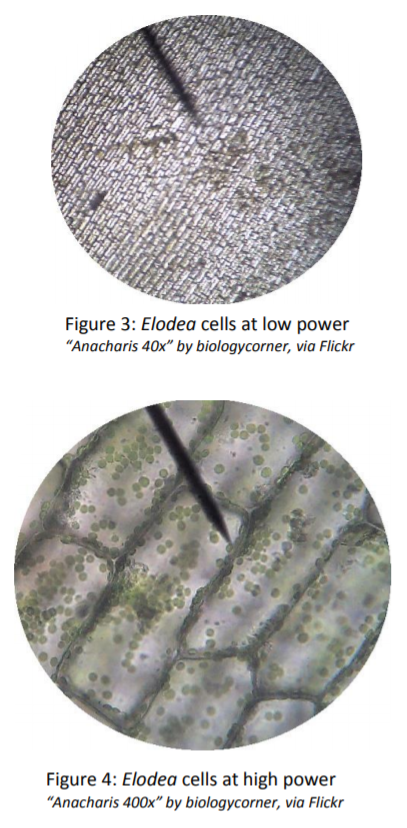
- Put a drop of water onto the microscope slide.
- Using the forceps, gently tear off a small piece of a leaf from Elodea.
- Place the Elodea leaf into the drop of water on your slide.
- Place a coverslip onto the slide.
- Use the SCANNING (4x) objective to focus. You probably will not see the cells at this power.
- Switch to low power (10x). Cells walls should be visible: they will look like dark grid lines.
- Once you think you have located a cell, switch to high power (40x) and refocus.
- Sketch the cell at low and high power. Label the chloroplasts, cytoplasm, and cell wall of a single cell. The nucleus may be visible as well—it will be a large, clear figure. Draw your cells to scale.
Questions:
1. Describe the shape and the location of chloroplasts.
2. Were chloroplasts observed in the onion cells? Why or why not?
3. “Animal cells have mitochondria; plant cells have chloroplasts.” Is this statement true or false? Explain.
4. Fill out the Venn diagram below to show the differences and similarities between the onion cells and the Elodea cells.