
2.5: Fluorescence, Confocal and Two-Photon Microscopes
- Page ID
- 160505

\( \newcommand{\vecs}[1]{\overset { \scriptstyle \rightharpoonup} {\mathbf{#1}} } \)
\( \newcommand{\vecd}[1]{\overset{-\!-\!\rightharpoonup}{\vphantom{a}\smash {#1}}} \)
\( \newcommand{\dsum}{\displaystyle\sum\limits} \)
\( \newcommand{\dint}{\displaystyle\int\limits} \)
\( \newcommand{\dlim}{\displaystyle\lim\limits} \)
\( \newcommand{\id}{\mathrm{id}}\) \( \newcommand{\Span}{\mathrm{span}}\)
( \newcommand{\kernel}{\mathrm{null}\,}\) \( \newcommand{\range}{\mathrm{range}\,}\)
\( \newcommand{\RealPart}{\mathrm{Re}}\) \( \newcommand{\ImaginaryPart}{\mathrm{Im}}\)
\( \newcommand{\Argument}{\mathrm{Arg}}\) \( \newcommand{\norm}[1]{\| #1 \|}\)
\( \newcommand{\inner}[2]{\langle #1, #2 \rangle}\)
\( \newcommand{\Span}{\mathrm{span}}\)
\( \newcommand{\id}{\mathrm{id}}\)
\( \newcommand{\Span}{\mathrm{span}}\)
\( \newcommand{\kernel}{\mathrm{null}\,}\)
\( \newcommand{\range}{\mathrm{range}\,}\)
\( \newcommand{\RealPart}{\mathrm{Re}}\)
\( \newcommand{\ImaginaryPart}{\mathrm{Im}}\)
\( \newcommand{\Argument}{\mathrm{Arg}}\)
\( \newcommand{\norm}[1]{\| #1 \|}\)
\( \newcommand{\inner}[2]{\langle #1, #2 \rangle}\)
\( \newcommand{\Span}{\mathrm{span}}\) \( \newcommand{\AA}{\unicode[.8,0]{x212B}}\)
\( \newcommand{\vectorA}[1]{\vec{#1}} % arrow\)
\( \newcommand{\vectorAt}[1]{\vec{\text{#1}}} % arrow\)
\( \newcommand{\vectorB}[1]{\overset { \scriptstyle \rightharpoonup} {\mathbf{#1}} } \)
\( \newcommand{\vectorC}[1]{\textbf{#1}} \)
\( \newcommand{\vectorD}[1]{\overrightarrow{#1}} \)
\( \newcommand{\vectorDt}[1]{\overrightarrow{\text{#1}}} \)
\( \newcommand{\vectE}[1]{\overset{-\!-\!\rightharpoonup}{\vphantom{a}\smash{\mathbf {#1}}}} \)
\( \newcommand{\vecs}[1]{\overset { \scriptstyle \rightharpoonup} {\mathbf{#1}} } \)
\(\newcommand{\longvect}{\overrightarrow}\)
\( \newcommand{\vecd}[1]{\overset{-\!-\!\rightharpoonup}{\vphantom{a}\smash {#1}}} \)
\(\newcommand{\avec}{\mathbf a}\) \(\newcommand{\bvec}{\mathbf b}\) \(\newcommand{\cvec}{\mathbf c}\) \(\newcommand{\dvec}{\mathbf d}\) \(\newcommand{\dtil}{\widetilde{\mathbf d}}\) \(\newcommand{\evec}{\mathbf e}\) \(\newcommand{\fvec}{\mathbf f}\) \(\newcommand{\nvec}{\mathbf n}\) \(\newcommand{\pvec}{\mathbf p}\) \(\newcommand{\qvec}{\mathbf q}\) \(\newcommand{\svec}{\mathbf s}\) \(\newcommand{\tvec}{\mathbf t}\) \(\newcommand{\uvec}{\mathbf u}\) \(\newcommand{\vvec}{\mathbf v}\) \(\newcommand{\wvec}{\mathbf w}\) \(\newcommand{\xvec}{\mathbf x}\) \(\newcommand{\yvec}{\mathbf y}\) \(\newcommand{\zvec}{\mathbf z}\) \(\newcommand{\rvec}{\mathbf r}\) \(\newcommand{\mvec}{\mathbf m}\) \(\newcommand{\zerovec}{\mathbf 0}\) \(\newcommand{\onevec}{\mathbf 1}\) \(\newcommand{\real}{\mathbb R}\) \(\newcommand{\twovec}[2]{\left[\begin{array}{r}#1 \\ #2 \end{array}\right]}\) \(\newcommand{\ctwovec}[2]{\left[\begin{array}{c}#1 \\ #2 \end{array}\right]}\) \(\newcommand{\threevec}[3]{\left[\begin{array}{r}#1 \\ #2 \\ #3 \end{array}\right]}\) \(\newcommand{\cthreevec}[3]{\left[\begin{array}{c}#1 \\ #2 \\ #3 \end{array}\right]}\) \(\newcommand{\fourvec}[4]{\left[\begin{array}{r}#1 \\ #2 \\ #3 \\ #4 \end{array}\right]}\) \(\newcommand{\cfourvec}[4]{\left[\begin{array}{c}#1 \\ #2 \\ #3 \\ #4 \end{array}\right]}\) \(\newcommand{\fivevec}[5]{\left[\begin{array}{r}#1 \\ #2 \\ #3 \\ #4 \\ #5 \\ \end{array}\right]}\) \(\newcommand{\cfivevec}[5]{\left[\begin{array}{c}#1 \\ #2 \\ #3 \\ #4 \\ #5 \\ \end{array}\right]}\) \(\newcommand{\mattwo}[4]{\left[\begin{array}{rr}#1 \amp #2 \\ #3 \amp #4 \\ \end{array}\right]}\) \(\newcommand{\laspan}[1]{\text{Span}\{#1\}}\) \(\newcommand{\bcal}{\cal B}\) \(\newcommand{\ccal}{\cal C}\) \(\newcommand{\scal}{\cal S}\) \(\newcommand{\wcal}{\cal W}\) \(\newcommand{\ecal}{\cal E}\) \(\newcommand{\coords}[2]{\left\{#1\right\}_{#2}}\) \(\newcommand{\gray}[1]{\color{gray}{#1}}\) \(\newcommand{\lgray}[1]{\color{lightgray}{#1}}\) \(\newcommand{\rank}{\operatorname{rank}}\) \(\newcommand{\row}{\text{Row}}\) \(\newcommand{\col}{\text{Col}}\) \(\renewcommand{\row}{\text{Row}}\) \(\newcommand{\nul}{\text{Nul}}\) \(\newcommand{\var}{\text{Var}}\) \(\newcommand{\corr}{\text{corr}}\) \(\newcommand{\len}[1]{\left|#1\right|}\) \(\newcommand{\bbar}{\overline{\bvec}}\) \(\newcommand{\bhat}{\widehat{\bvec}}\) \(\newcommand{\bperp}{\bvec^\perp}\) \(\newcommand{\xhat}{\widehat{\xvec}}\) \(\newcommand{\vhat}{\widehat{\vvec}}\) \(\newcommand{\uhat}{\widehat{\uvec}}\) \(\newcommand{\what}{\widehat{\wvec}}\) \(\newcommand{\Sighat}{\widehat{\Sigma}}\) \(\newcommand{\lt}{<}\) \(\newcommand{\gt}{>}\) \(\newcommand{\amp}{&}\) \(\definecolor{fillinmathshade}{gray}{0.9}\)- Explain the principle of fluorescence microscopy including the roles of excitation and emission light
- Interpret fluorescence images to evaluate the advantages of confocal and two-photon microscopy for visualizing structures in thick or live biological samples
Fluorescence Microscopes
A fluorescence microscope uses fluorescent chromophores called fluorochromes, which are capable of absorbing energy from a light source and then emitting this energy as visible light. Fluorochromes include naturally fluorescent substances (such as chlorophylls) as well as fluorescent stains that are added to the specimen to create contrast. Dyes such as Texas red and FITC are examples of fluorochromes. Other examples include the nucleic acid dyes 4’,6’-diamidino-2-phenylindole (DAPI) and acridine orange.
The microscope transmits an excitation light, generally a form of EMR with a short wavelength, such as ultraviolet or blue light, toward the specimen; the chromophores absorb the excitation light and emit visible light with longer wavelengths. The excitation light is then filtered out (in part because ultraviolet light is harmful to the eyes) so that only visible light passes through the ocular lens. This produces an image of the specimen in bright colors against a dark background.
Fluorescence microscopes are especially useful in clinical microbiology. They can be used to identify pathogens, to find particular species within an environment, or to find the locations of particular molecules and structures within a cell. Approaches have also been developed to distinguish living from dead cells using fluorescence microscopy based upon whether they take up particular fluorochromes. Sometimes, multiple fluorochromes are used on the same specimen to show different structures or features.
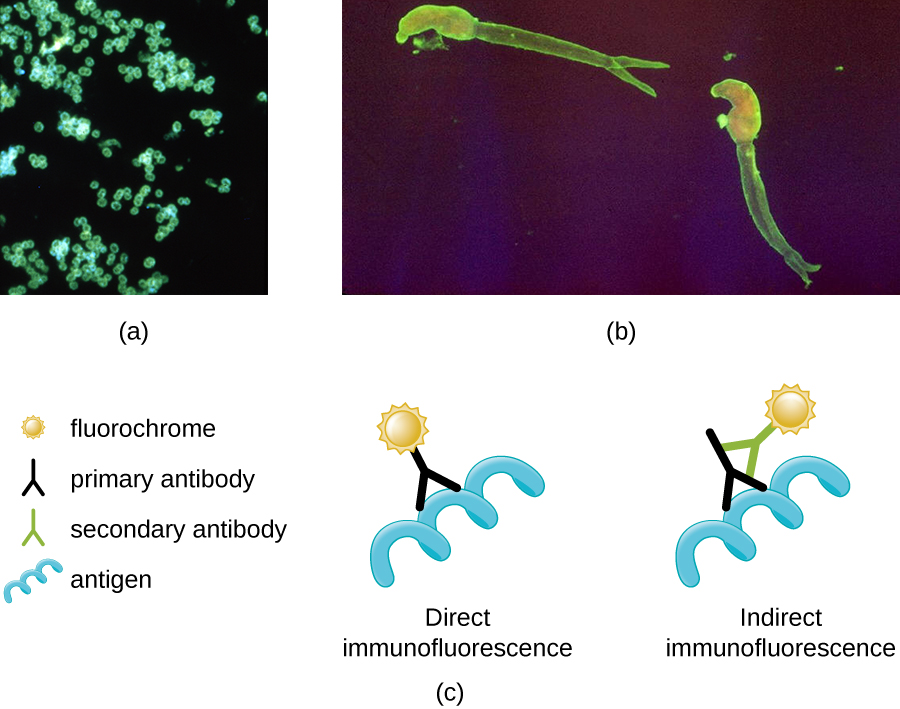
One of the most important applications of fluorescence microscopy is a technique called immunofluorescence, which is used to identify certain disease-causing microbes by observing whether antibodies bind to them. (Antibodies are protein molecules produced by the immune system that attach to specific pathogens to kill or inhibit them.) There are two approaches to this technique: direct immunofluorescence assay (DFA) and indirect immunofluorescence assay (IFA). In DFA, specific antibodies (e.g., those that the target the rabies virus) are stained with a fluorochrome. If the specimen contains the targeted pathogen, one can observe the antibodies binding to the pathogen under the fluorescent microscope. This is called a primary antibody stain because the stained antibodies attach directly to the pathogen.
In IFA, secondary antibodies are stained with a fluorochrome rather than primary antibodies. Secondary antibodies do not attach directly to the pathogen, but they do bind to primary antibodies. When the unstained primary antibodies bind to the pathogen, the fluorescent secondary antibodies can be observed binding to the primary antibodies. Thus, the secondary antibodies are attached indirectly to the pathogen. Since multiple secondary antibodies can often attach to a primary antibody, IFA increases the number of fluorescent antibodies attached to the specimen, making it easier visualize features in the specimen (Figure \(\PageIndex{8}\)).
Query \(\PageIndex{1}\)
Confocal Microscopes
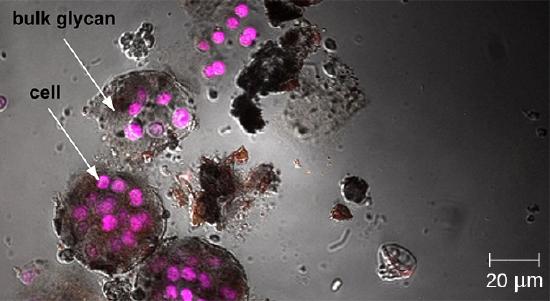
Whereas other forms of light microscopy create an image that is maximally focused at a single distance from the observer (the depth, or z-plane), a confocal microscope uses a laser to scan multiple z-planes successively. This produces numerous two-dimensional, high-resolution images at various depths, which can be constructed into a three-dimensional image by a computer. As with fluorescence microscopes, fluorescent stains are generally used to increase contrast and resolution. Image clarity is further enhanced by a narrow aperture that eliminates any light that is not from the z-plane. Confocal microscopes are thus very useful for examining thick specimens such as biofilms, which can be examined alive and unfixed (Figure \(\PageIndex{9}\)).
Query \(\PageIndex{1}\)
Two-Photon Microscopes
While the original fluorescent and confocal microscopes allowed better visualization of unique features in specimens, there were still problems that prevented optimum visualization. The effective sensitivity of fluorescence microscopy when viewing thick specimens was generally limited by out-of-focus flare, which resulted in poor resolution. This limitation was greatly reduced in the confocal microscope through the use of a confocal pinhole to reject out-of-focus background fluorescence with thin (<1 μm), unblurred optical sections. However, even the confocal microscopes lacked the resolution needed for viewing thick tissue samples. These problems were resolved with the development of the two-photon microscope, which uses a scanning technique, fluorochromes, and long-wavelength light (such as infrared) to visualize specimens. The low energy associated with the long-wavelength light means that two photons must strike a location at the same time to excite the fluorochrome. The low energy of the excitation light is less damaging to cells, and the long wavelength of the excitation light more easily penetrates deep into thick specimens. This makes the two-photon microscope useful for examining living cells within intact tissues—brain slices, embryos, whole organs, and even entire animals.
Currently, use of two-photon microscopes is limited to advanced clinical and research laboratories because of the high costs of the instruments. A single two-photon microscope typically costs between $300,000 and $500,000, and the lasers used to excite the dyes used on specimens are also very expensive. However, as technology improves, two-photon microscopes may become more readily available in clinical settings.
Key Concepts and Summary
- Light microscopy uses lenses to focus light on a specimen to produce an image. Commonly used light microscopes include brightfield, darkfield, phase-contrast, differential interference contrast, fluorescence, confocal, and two-photon microscopes.
Footnotes
- 1 “JEM-ARM200F Transmission Electron Microscope,” JEOL USA Inc, www.jeolusa.com/PRODUCTS/Tran...specifications. Accessed 8/28/2015.