
1.9: Simple Stain
- Page ID
- 79235

\( \newcommand{\vecs}[1]{\overset { \scriptstyle \rightharpoonup} {\mathbf{#1}} } \)
\( \newcommand{\vecd}[1]{\overset{-\!-\!\rightharpoonup}{\vphantom{a}\smash {#1}}} \)
\( \newcommand{\dsum}{\displaystyle\sum\limits} \)
\( \newcommand{\dint}{\displaystyle\int\limits} \)
\( \newcommand{\dlim}{\displaystyle\lim\limits} \)
\( \newcommand{\id}{\mathrm{id}}\) \( \newcommand{\Span}{\mathrm{span}}\)
( \newcommand{\kernel}{\mathrm{null}\,}\) \( \newcommand{\range}{\mathrm{range}\,}\)
\( \newcommand{\RealPart}{\mathrm{Re}}\) \( \newcommand{\ImaginaryPart}{\mathrm{Im}}\)
\( \newcommand{\Argument}{\mathrm{Arg}}\) \( \newcommand{\norm}[1]{\| #1 \|}\)
\( \newcommand{\inner}[2]{\langle #1, #2 \rangle}\)
\( \newcommand{\Span}{\mathrm{span}}\)
\( \newcommand{\id}{\mathrm{id}}\)
\( \newcommand{\Span}{\mathrm{span}}\)
\( \newcommand{\kernel}{\mathrm{null}\,}\)
\( \newcommand{\range}{\mathrm{range}\,}\)
\( \newcommand{\RealPart}{\mathrm{Re}}\)
\( \newcommand{\ImaginaryPart}{\mathrm{Im}}\)
\( \newcommand{\Argument}{\mathrm{Arg}}\)
\( \newcommand{\norm}[1]{\| #1 \|}\)
\( \newcommand{\inner}[2]{\langle #1, #2 \rangle}\)
\( \newcommand{\Span}{\mathrm{span}}\) \( \newcommand{\AA}{\unicode[.8,0]{x212B}}\)
\( \newcommand{\vectorA}[1]{\vec{#1}} % arrow\)
\( \newcommand{\vectorAt}[1]{\vec{\text{#1}}} % arrow\)
\( \newcommand{\vectorB}[1]{\overset { \scriptstyle \rightharpoonup} {\mathbf{#1}} } \)
\( \newcommand{\vectorC}[1]{\textbf{#1}} \)
\( \newcommand{\vectorD}[1]{\overrightarrow{#1}} \)
\( \newcommand{\vectorDt}[1]{\overrightarrow{\text{#1}}} \)
\( \newcommand{\vectE}[1]{\overset{-\!-\!\rightharpoonup}{\vphantom{a}\smash{\mathbf {#1}}}} \)
\( \newcommand{\vecs}[1]{\overset { \scriptstyle \rightharpoonup} {\mathbf{#1}} } \)
\(\newcommand{\longvect}{\overrightarrow}\)
\( \newcommand{\vecd}[1]{\overset{-\!-\!\rightharpoonup}{\vphantom{a}\smash {#1}}} \)
\(\newcommand{\avec}{\mathbf a}\) \(\newcommand{\bvec}{\mathbf b}\) \(\newcommand{\cvec}{\mathbf c}\) \(\newcommand{\dvec}{\mathbf d}\) \(\newcommand{\dtil}{\widetilde{\mathbf d}}\) \(\newcommand{\evec}{\mathbf e}\) \(\newcommand{\fvec}{\mathbf f}\) \(\newcommand{\nvec}{\mathbf n}\) \(\newcommand{\pvec}{\mathbf p}\) \(\newcommand{\qvec}{\mathbf q}\) \(\newcommand{\svec}{\mathbf s}\) \(\newcommand{\tvec}{\mathbf t}\) \(\newcommand{\uvec}{\mathbf u}\) \(\newcommand{\vvec}{\mathbf v}\) \(\newcommand{\wvec}{\mathbf w}\) \(\newcommand{\xvec}{\mathbf x}\) \(\newcommand{\yvec}{\mathbf y}\) \(\newcommand{\zvec}{\mathbf z}\) \(\newcommand{\rvec}{\mathbf r}\) \(\newcommand{\mvec}{\mathbf m}\) \(\newcommand{\zerovec}{\mathbf 0}\) \(\newcommand{\onevec}{\mathbf 1}\) \(\newcommand{\real}{\mathbb R}\) \(\newcommand{\twovec}[2]{\left[\begin{array}{r}#1 \\ #2 \end{array}\right]}\) \(\newcommand{\ctwovec}[2]{\left[\begin{array}{c}#1 \\ #2 \end{array}\right]}\) \(\newcommand{\threevec}[3]{\left[\begin{array}{r}#1 \\ #2 \\ #3 \end{array}\right]}\) \(\newcommand{\cthreevec}[3]{\left[\begin{array}{c}#1 \\ #2 \\ #3 \end{array}\right]}\) \(\newcommand{\fourvec}[4]{\left[\begin{array}{r}#1 \\ #2 \\ #3 \\ #4 \end{array}\right]}\) \(\newcommand{\cfourvec}[4]{\left[\begin{array}{c}#1 \\ #2 \\ #3 \\ #4 \end{array}\right]}\) \(\newcommand{\fivevec}[5]{\left[\begin{array}{r}#1 \\ #2 \\ #3 \\ #4 \\ #5 \\ \end{array}\right]}\) \(\newcommand{\cfivevec}[5]{\left[\begin{array}{c}#1 \\ #2 \\ #3 \\ #4 \\ #5 \\ \end{array}\right]}\) \(\newcommand{\mattwo}[4]{\left[\begin{array}{rr}#1 \amp #2 \\ #3 \amp #4 \\ \end{array}\right]}\) \(\newcommand{\laspan}[1]{\text{Span}\{#1\}}\) \(\newcommand{\bcal}{\cal B}\) \(\newcommand{\ccal}{\cal C}\) \(\newcommand{\scal}{\cal S}\) \(\newcommand{\wcal}{\cal W}\) \(\newcommand{\ecal}{\cal E}\) \(\newcommand{\coords}[2]{\left\{#1\right\}_{#2}}\) \(\newcommand{\gray}[1]{\color{gray}{#1}}\) \(\newcommand{\lgray}[1]{\color{lightgray}{#1}}\) \(\newcommand{\rank}{\operatorname{rank}}\) \(\newcommand{\row}{\text{Row}}\) \(\newcommand{\col}{\text{Col}}\) \(\renewcommand{\row}{\text{Row}}\) \(\newcommand{\nul}{\text{Nul}}\) \(\newcommand{\var}{\text{Var}}\) \(\newcommand{\corr}{\text{corr}}\) \(\newcommand{\len}[1]{\left|#1\right|}\) \(\newcommand{\bbar}{\overline{\bvec}}\) \(\newcommand{\bhat}{\widehat{\bvec}}\) \(\newcommand{\bperp}{\bvec^\perp}\) \(\newcommand{\xhat}{\widehat{\xvec}}\) \(\newcommand{\vhat}{\widehat{\vvec}}\) \(\newcommand{\uhat}{\widehat{\uvec}}\) \(\newcommand{\what}{\widehat{\wvec}}\) \(\newcommand{\Sighat}{\widehat{\Sigma}}\) \(\newcommand{\lt}{<}\) \(\newcommand{\gt}{>}\) \(\newcommand{\amp}{&}\) \(\definecolor{fillinmathshade}{gray}{0.9}\)- Define simple stain.
- Tell the purpose of simple staining and what bacterial feature(s) can and cannot be ascertained when using a simple stain.
- Prepare a bacterial smear and properly heat fix the smear.
- Tell the importance of fixation in preparing a bacterial sample for staining.
- Describe how bacterial smears are prepared differently when using a liquid culture versus using a solid culture.
- Prepare a simple stain.
- Examine the bacterial smear with a microscope and make an accurate illustration of the bacterial cells.
- Use the microscope to identify bacterial features (cell shape and cell arrangements).
- Identify bacterial cell shapes and cell arrangements given examples.
- Identify flaws in a simple stain and ascertain ways to improve future stains.
Simple Staining
Most types of cells do not have much natural pigment and are therefore difficult to see under the light microscope unless they are stained. Several types of stains can be used to make bacterial cells more visible. Some staining techniques can be used to determine the cells’ biochemical or structural properties, such as cell wall type and presence or absence of endospores. This type of information can help scientists identify and classify microorganisms, and can be used by health care providers to diagnose the cause of a bacterial infection.
One type of staining procedure that can be used is the simple stain, in which only one stain is used, and all types of bacteria appear as the color of that stain when viewed under the microscope. Some stains commonly used for simple staining include crystal violet, safranin, and methylene blue. Simple stains can be used to determine a bacterial species’ morphology (cell shape) and arrangement (single, chains, clusters, etc.), but they do not give any additional information. Other staining approaches utilize more than one stain (differential stains) and can be used to determine other differences of between different bacterial species (e.g. cell wall structures, presence or absence of endospores, presence or absence of capsules, presence or absence and arrangement of flagella, etc.). These features cannot be distingushed using a simple stain.

Figure 1: Methylene blue is a simple and direct stain used for determining bacterial morphology (shape and arrangement). It is a cationic dye (positive charge) which stains the cell a blue color. The presence of negatively charged molecules in the cell (like DNA & RNA) causes the cell to stain blue. The image to the right shows that the bacterial cell morphology is cocci (round) and the arrangement is in clusters or bunches, often distinguished with the prefix staphylo- (putting these two terms together, these bacteria can be described as staphylococci indicating they are round-shaped bacteria that occur in clusters or bunches.
Table 1: Common simple stain types include basic stains (high pH stains), acidic stains (low pH stains), and negative stains (stains the surroundings of cells instead of the cells themselves). Basic stains include methylene blue, crystal violet, malachite green, basic fuchsin, carbolfuchsin, and safranin. Acidic stains include eosin, acid fuchsin, rose bengal, and congo red. Basic stains are attracted to negatively charged molecules in the cell including nucleic acids (DNA and RNA) and some proteins. Acidic stains can be positive stains (stain the cells) or they can be negative stains (stain the background and not the cells). Acidic stains can stain positively charged molecules in cells including some proteins. Negative stains include India ink and nigrosin. Negative stains produce a darker background and cells appear light and unstained. When a simple stain is done, only one stain is applied to the cells to better see the cells using the microscope.

A good stained smear should be somewhat difficult to see with the naked eye on the surface of a microscope slide. If there is a dark spot of color visible, it means that the bacteria are stacked too densely for adequate evaluation. This is a common mistake made by students learning to make bacterial smears.
Bacterial Cell Morphology & Arrangement
Two characteristics that can be used to distinguish different types of bacteria is their microscopic shapes and their microscopic arrangements. Identification of these features can lead to a diagnosis and aid in treatment of a patient. The cell shape describes the overall shape of a single bacterial cell. Arrangements describe how bacterial cells are grouped (or not grouped) with each other. Both of these characteristics must be determined using a microscope and typically occurs after staining the cells.
Table 2: Summary of the most common bacterial cell shapes and bacterial cell arrangements with cartoon-like illustrations of each, descriptions, and microscopic images.
|
Cell Shape (singular / plural) |
Cell Arrangement (singular / plural) |
Illustration
|
Description
|
Image (color of cells is based on the type of stain used) |
|---|---|---|---|---|
| coccus / cocci | single or solitary |  |
Cells are alone and round or spherical. | 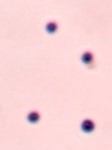 |
| coccus / cocci | diplococcus / diplococci |  |
Cells are in pairs and round or spherical. | 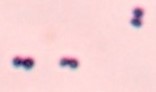 |
| coccus / cocci | tetrad | 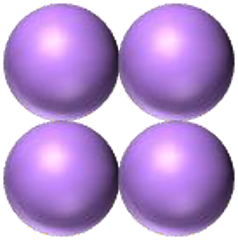 |
Cells are grouped in fours and are round or spherical. | 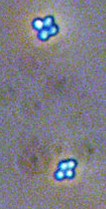 |
| coccus / cocci | sarcina | 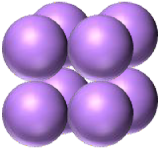 |
Cells are group in eights as two groups of four on top of each other. Cells are round. |  |
| coccus / cocci | streptococcus / streptococci |  |
Cells are in a chain and are round or spherical. | 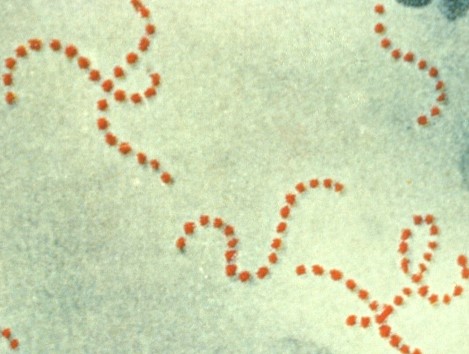 |
| coccus / cocci | staphylococcus / staphylococci | 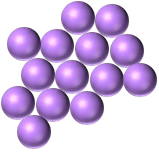 |
Cells are in bunches or clusters and are round or spherical. | 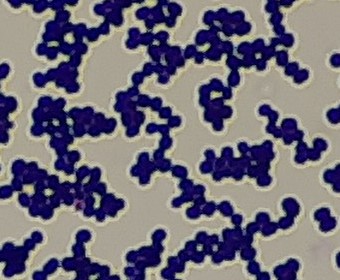 |
| spirochete / spirochetes | single or solitary |  |
Cells are alone and long and thin with a three-dimensional corkscrew forming a helical shape. | 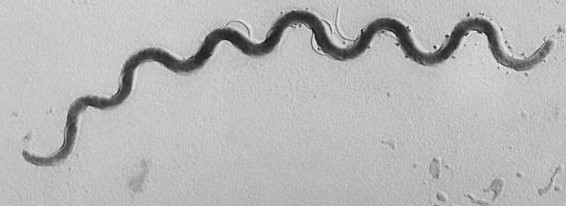 |
| spirillum / spirilla | single or solitary |  |
Cells are alone and long and thin with a wavy appearance but are not helical in shape. | 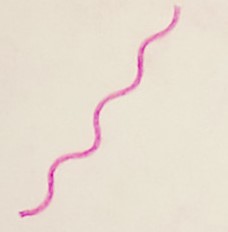 |
| vibrio / vibrios | single or solitary |  |
Cells are alone and have a rod shape with an arch or curve. | 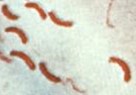 |
| bacillus / bacilli | single or solitary |  |
Cells are alone and rod shaped. |  |
| bacillus / bacilli | diplobacillus / diplobacilli |  |
Cells are in pairs and are rod shaped. |  |
| bacillus / bacilli | streptobacillus / streptobacilli |  |
Cells are in chains and are rod shaped. | 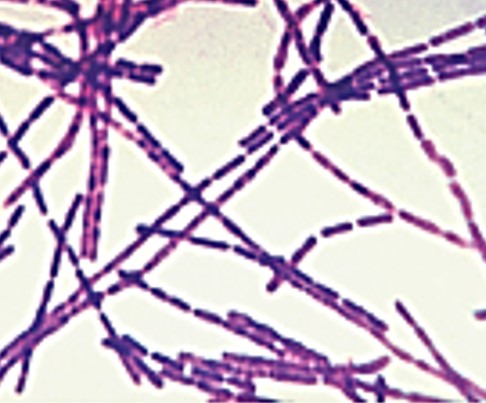 |
| bacillus / bacilli | palisades |  |
Cells are rod shaped and lined up with each other long-ways resembling the pickets in a picket fence. | 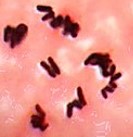 |
| coccobacillus / coccobacilli | single or solitary |  |
Cells are alone and are short rods. |  |
There are other less common bacterial morphologies (e.g., filamentous, squares, etc.) that are not shown here.
It may be difficult to tell the difference between spirochetes and spirilla using a common light microscope. The difference is more obvious with an electron microscope (see images below) or using other types of light microscopes. Please note that spirilla typically have one flagellum at each end or pole of the cell. The spirilla image does not show flagella.

To learn more about comparing spirilla and spirochetes, see this article Difference Between Spirilla and Spirochetes.
Preparing Bacteria for Staining (Bacterial Smear and Fixation)
Bacterial Smear
Prior to staining bacterial cells they first must be applied to the microscope slide in what is called a bacterial smear. If bacteria are transferred from a liquid culture, a loopful of culture can be aseptically removed from the culture and then spread on the surface of the microscope slide. If bacteria are transferred from a solid culture such as a slant or a petri plate, a single drop of DI or distilled water is added to a microscope slide and then a small amount of growth is obtained aseptically with a loop. The loop is then used to spread the water drop around the slide so it becomes a thin layer of water containing bacteria.
Chunks of bacteria on the microscope slide surface means that too much bacterial growth was transferred to the slide and it will be difficult to distinguish individual cells when viewing the sample with a microscope.
After bacteria have been applied to a microscope slide, the smear is dried thoroughly before fixation. The smear can be allowed to air dry or can be put on a slide warmer to speed up the drying process.
After preparation of the smear you must fix the sample (see the Fixation section below). The bacteria will wash off the slide during staining if you do not fix them to the slide.
Fixation
Before cells are stained with a dye, they must be fixed to the slide so that they do not wash away with the excess stain. The “fixing” of a sample refers to the process of attaching cells to a slide. In addition to adhering the specimen to the slide, fixation also kills microorganisms in the specimen, stopping their movement and metabolism while preserving the integrity of their cellular components for observation.
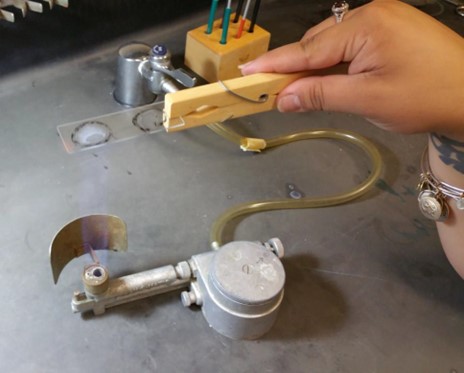
Figure 2: A microscope slide with a bacterial smear is being heat fixed. The underside of the microscope slide is passed briefly into the flame of a Bunsen burner to heat fix. For safety, the person who is heat fixing the smear is holding a wooden clip that grips the microscope slide. This way the person heat fixing can keep their hands away from the flame and are not at risk of being burned from the hot microscope slide.
Fixation is often achieved either by heating (heat fixing) or chemically treating the specimen. To heat-fix a sample, after a thin layer of the specimen is spread on the slide (called a smear or emulsion), and the slide is then briefly heated over a heat source. Done correctly, this will attach cells to the microscope slide and kill the cells.
A heat-fixed slide can be stained immediately or kept for months. If you wish to keep heat-fixed, unstained slides for further work, you can wrap the slides in a paper towel or put them in a slide box and store them in your lab drawer.
Laboratory Instructions
Prepare a Bacterial Smear
You may find it helpful to draw a circle (wax pencil is best) on the opposite side of the slide where you will spread your smear. This will help you later in locating the smear. The wax pencil is better than a marker because it will not wash off easily from the glass.
If you are using a liquid culture, gently mix the culture until you get an even, cloudy mixture (it should look somewhat like skim milk). If you mix too aggressively, you will lose the bacterial morphology.
- Prepare a bacterial smear on the slide:
- If you are taking bacteria from a solid culture (slant or petri plate), place a small drop (only 1 drop) of saline, deionized (DI) water, or distilled water onto a microscope slide and use a loop to aseptically add bacteria to the water (avoid taking a large chunk of bacteria since the cells will be too dense to view individual cells). Use the loop to spread the bacteria in the water drop and to spread the water drop out to make it thinner (it will dry faster).
- If you are taking a bacteria from a a liquid culture (broth), place 1 or 2 loopfuls of bacteria directly onto a microscope slide (no saline or water added).
- Allow the slide(s) to air dry on the slide warmer (or air dry if a slide warmer is not available).
Heat Fix the Bacterial Smear
Once the liquid has completely evaporated on the surface of the slide, heat fix by passing the slide:
- Attach a wooden clip to the microscope slide to hold it.
- Pass the underside of the microscope slide through a flame three times.
- Allow the slide to cool and then continue with your staining protocol.
If you heat fix too little, the bacteria will wash off the slide. If you heat fix too much, you will cook the bacteria and denature them.
Simple Stain
- Use the slide(s) that you already prepared when creating bacterial smears and heat fixing (see above).
- Grip the microscope slide in wood clip over a waste container bucket.
- Add methylene blue stain to the heat-fixed smear. There is no reason to cover the entire slide with stain. Just make sure to cover the smear with stain.
- Set a timer for 1.5 or 2 minutes. The stain will remain on the smear during this time.
- Angle the slide and gently rinse the slide with DI or distilled water using a squirt bottle. Water is not applied directly to the smear. Instead, apply the water to the area of the slide just above the smear so that water will rinse across the smear and into the waste bucket. Continue rinsing until water running off the slide appears clear.
- Blot gently with bibulous paper. Do not wipe. Just gently blot with bibulous paper to get rid of excess water.
- Place the stained slide on a microscope and examine. Be sure to begin at the lowest power (look for the blue color of the methylene blue dye). Focus at lowest power and then increase one objective magnification at a time.
Results & Questions

- Draw the cells you observe after the simple stain in the space above.
-
Critique your cell drawings:
-
Does the drawing accurately show how the cells appear when you look into the microscope (including cell shape and arrangement)?
-
Does the drawing accurately show the cell size you see in the microscope?
-
Does the drawing accurately show the color(s) you see in the microscope?
-
-
What microbial characteristics can one ascertain from a simple stain?
-
What were the shapes of the cells you observed? Use microbiological terminology.
-
What was the arrangement of the cells you observed? Use microbiological terminology.
-
A successful simple stain would enable you to observe individual cells (cells not on top of each other) and a sample where you can clearly see the cells, their undistorted shapes, and their undistorted arrangements. Reflect on your results. In what way(s) could your simple stain be improved?
-
What might you do to improve the results of the simple stain as mentioned in 6.
-
Fixing a bacterial smear is an essential step in preparing for staining. Why? What might happen if cells are not fixed to the microscope slide?
-
Fixing also has another effect on the cells other than your answer to 8. What is it?
-
Define simple stain.
-
How is the procedure different when taking cells from a solid medium compared to taking cells from a liquid medium? Why is it important that your smear be thin?
Attributions
- Bacillus subtilis Gram.jpg by Y tambe is licenced under GNU Free Documentation License
- Chapter Image: Clostridium septicum 01.jpg by CDC is in the public domain
- Diptheroids, on Microscopy (15243084146).jpg by Iqbal Osman1 is licensed under CC BY 2.0
- General Microbiology Lab Manual (Pakpour & Horgan) by Nazzy Pakpour & Sharon Horgan is licensed under CC BY-SA 4.0
- Haemophilus influenzae sputum 1000x edited.jpg by Microman12345 is licensed under CC BY-SA 4.0
- Image 5773 by CDC/ Dr. Patricia Fields, Dr. Collette Fitzgerald is in the public domain.
- Image 14969 by CDC/ Susan Lindsley is in the public domain.
- Image 16900 by CDC/ Dr. V.R. Dowell is in the public domain.
- Klamm’s Microbiology Laboratory Manual by Loretta Sanderson Klamm is licensed under CC BY-NC-SA 4.0
- Laboratory Exercises in Microbiology: Discovering the Unseen World Through Hands-On Investigation by Joan Petersen and Susan McLaughlin is licensed under CC BY-NC-SA 4.0
- Leptospira scanning micrograph.jpg by CDC/ Rob Weyant is in the public domain.
- M.l..jpg by Alonnardi is licensed under CC BY-SA 3.0
- Microbiology by OpenStax is licensed under CC BY 4.0
- Red Mountain Microbiology by Jill Raymond Ph.D.; Graham Boorse, Ph.D.; Anne Mason M.S. is licensed under CC BY-NC 4.0
- Sarcina Arrangement by Gary E. Kaiser, Ph.D. is licensed under CC BY 3.0
- Spirillum volutans 1,000x 3 by Marc Perkins is licensed under CC BY-NC 2.0
- Staphylococcus in Magnification of 4000X.jpg by Ajay Kumar Chaurasiya is licensed under CC BY-SA 4.0
- Streptococcus pyogenes.jpg by Centers for Disease Control and Prevention's Public Health Image Library is in the public domain.
- The bacteriology of the eye (1908) (14743354466).jpg by Axenfeld, Theodor and Macnab, Angus is in the public domain.
- Vibrio cholerae gram stain CDC.jpg by CDC is in the public domain.