
1.5: Get to Know the Microscope and Microbes
- Page ID
- 91160

\( \newcommand{\vecs}[1]{\overset { \scriptstyle \rightharpoonup} {\mathbf{#1}} } \)
\( \newcommand{\vecd}[1]{\overset{-\!-\!\rightharpoonup}{\vphantom{a}\smash {#1}}} \)
\( \newcommand{\dsum}{\displaystyle\sum\limits} \)
\( \newcommand{\dint}{\displaystyle\int\limits} \)
\( \newcommand{\dlim}{\displaystyle\lim\limits} \)
\( \newcommand{\id}{\mathrm{id}}\) \( \newcommand{\Span}{\mathrm{span}}\)
( \newcommand{\kernel}{\mathrm{null}\,}\) \( \newcommand{\range}{\mathrm{range}\,}\)
\( \newcommand{\RealPart}{\mathrm{Re}}\) \( \newcommand{\ImaginaryPart}{\mathrm{Im}}\)
\( \newcommand{\Argument}{\mathrm{Arg}}\) \( \newcommand{\norm}[1]{\| #1 \|}\)
\( \newcommand{\inner}[2]{\langle #1, #2 \rangle}\)
\( \newcommand{\Span}{\mathrm{span}}\)
\( \newcommand{\id}{\mathrm{id}}\)
\( \newcommand{\Span}{\mathrm{span}}\)
\( \newcommand{\kernel}{\mathrm{null}\,}\)
\( \newcommand{\range}{\mathrm{range}\,}\)
\( \newcommand{\RealPart}{\mathrm{Re}}\)
\( \newcommand{\ImaginaryPart}{\mathrm{Im}}\)
\( \newcommand{\Argument}{\mathrm{Arg}}\)
\( \newcommand{\norm}[1]{\| #1 \|}\)
\( \newcommand{\inner}[2]{\langle #1, #2 \rangle}\)
\( \newcommand{\Span}{\mathrm{span}}\) \( \newcommand{\AA}{\unicode[.8,0]{x212B}}\)
\( \newcommand{\vectorA}[1]{\vec{#1}} % arrow\)
\( \newcommand{\vectorAt}[1]{\vec{\text{#1}}} % arrow\)
\( \newcommand{\vectorB}[1]{\overset { \scriptstyle \rightharpoonup} {\mathbf{#1}} } \)
\( \newcommand{\vectorC}[1]{\textbf{#1}} \)
\( \newcommand{\vectorD}[1]{\overrightarrow{#1}} \)
\( \newcommand{\vectorDt}[1]{\overrightarrow{\text{#1}}} \)
\( \newcommand{\vectE}[1]{\overset{-\!-\!\rightharpoonup}{\vphantom{a}\smash{\mathbf {#1}}}} \)
\( \newcommand{\vecs}[1]{\overset { \scriptstyle \rightharpoonup} {\mathbf{#1}} } \)
\(\newcommand{\longvect}{\overrightarrow}\)
\( \newcommand{\vecd}[1]{\overset{-\!-\!\rightharpoonup}{\vphantom{a}\smash {#1}}} \)
\(\newcommand{\avec}{\mathbf a}\) \(\newcommand{\bvec}{\mathbf b}\) \(\newcommand{\cvec}{\mathbf c}\) \(\newcommand{\dvec}{\mathbf d}\) \(\newcommand{\dtil}{\widetilde{\mathbf d}}\) \(\newcommand{\evec}{\mathbf e}\) \(\newcommand{\fvec}{\mathbf f}\) \(\newcommand{\nvec}{\mathbf n}\) \(\newcommand{\pvec}{\mathbf p}\) \(\newcommand{\qvec}{\mathbf q}\) \(\newcommand{\svec}{\mathbf s}\) \(\newcommand{\tvec}{\mathbf t}\) \(\newcommand{\uvec}{\mathbf u}\) \(\newcommand{\vvec}{\mathbf v}\) \(\newcommand{\wvec}{\mathbf w}\) \(\newcommand{\xvec}{\mathbf x}\) \(\newcommand{\yvec}{\mathbf y}\) \(\newcommand{\zvec}{\mathbf z}\) \(\newcommand{\rvec}{\mathbf r}\) \(\newcommand{\mvec}{\mathbf m}\) \(\newcommand{\zerovec}{\mathbf 0}\) \(\newcommand{\onevec}{\mathbf 1}\) \(\newcommand{\real}{\mathbb R}\) \(\newcommand{\twovec}[2]{\left[\begin{array}{r}#1 \\ #2 \end{array}\right]}\) \(\newcommand{\ctwovec}[2]{\left[\begin{array}{c}#1 \\ #2 \end{array}\right]}\) \(\newcommand{\threevec}[3]{\left[\begin{array}{r}#1 \\ #2 \\ #3 \end{array}\right]}\) \(\newcommand{\cthreevec}[3]{\left[\begin{array}{c}#1 \\ #2 \\ #3 \end{array}\right]}\) \(\newcommand{\fourvec}[4]{\left[\begin{array}{r}#1 \\ #2 \\ #3 \\ #4 \end{array}\right]}\) \(\newcommand{\cfourvec}[4]{\left[\begin{array}{c}#1 \\ #2 \\ #3 \\ #4 \end{array}\right]}\) \(\newcommand{\fivevec}[5]{\left[\begin{array}{r}#1 \\ #2 \\ #3 \\ #4 \\ #5 \\ \end{array}\right]}\) \(\newcommand{\cfivevec}[5]{\left[\begin{array}{c}#1 \\ #2 \\ #3 \\ #4 \\ #5 \\ \end{array}\right]}\) \(\newcommand{\mattwo}[4]{\left[\begin{array}{rr}#1 \amp #2 \\ #3 \amp #4 \\ \end{array}\right]}\) \(\newcommand{\laspan}[1]{\text{Span}\{#1\}}\) \(\newcommand{\bcal}{\cal B}\) \(\newcommand{\ccal}{\cal C}\) \(\newcommand{\scal}{\cal S}\) \(\newcommand{\wcal}{\cal W}\) \(\newcommand{\ecal}{\cal E}\) \(\newcommand{\coords}[2]{\left\{#1\right\}_{#2}}\) \(\newcommand{\gray}[1]{\color{gray}{#1}}\) \(\newcommand{\lgray}[1]{\color{lightgray}{#1}}\) \(\newcommand{\rank}{\operatorname{rank}}\) \(\newcommand{\row}{\text{Row}}\) \(\newcommand{\col}{\text{Col}}\) \(\renewcommand{\row}{\text{Row}}\) \(\newcommand{\nul}{\text{Nul}}\) \(\newcommand{\var}{\text{Var}}\) \(\newcommand{\corr}{\text{corr}}\) \(\newcommand{\len}[1]{\left|#1\right|}\) \(\newcommand{\bbar}{\overline{\bvec}}\) \(\newcommand{\bhat}{\widehat{\bvec}}\) \(\newcommand{\bperp}{\bvec^\perp}\) \(\newcommand{\xhat}{\widehat{\xvec}}\) \(\newcommand{\vhat}{\widehat{\vvec}}\) \(\newcommand{\uhat}{\widehat{\uvec}}\) \(\newcommand{\what}{\widehat{\wvec}}\) \(\newcommand{\Sighat}{\widehat{\Sigma}}\) \(\newcommand{\lt}{<}\) \(\newcommand{\gt}{>}\) \(\newcommand{\amp}{&}\) \(\definecolor{fillinmathshade}{gray}{0.9}\)- Determine/calculate total magnification for each objective lens.
- Identify the structures of a light microscope.
- Identify the functions of the structures of a light microscope.
- Successfully use and care for a light microscope.
- Successfully examine different classifications of microbes using a light microscope.
- Illustrate different classifications of microbes.
- Compare the appearances of different classifications of microbes that were examined and illustrated using a light microscope.
Introduction
Learning to use a microscope is critical to your success in microbiology. This tool will provide the magnification and clarity necessary for you to observe and record quality images of microbes that cannot ordinarily be viewed with the naked eye.
Total Magnification
To better understand the compound light microscope (brightfield), it is important to have an understanding of magnification. Commonly, compound microscopes have 4 different objective lenses:
- 4X
- 10X
- 40X
- 100X
The object lens magnification is increased by the ocular lenses (located in the eyepieces), which has a 10X magnification. To calculate the total magnification at each objective, multiple the ocular lens magnification with the objective lens magnification.
When the 10X objective lens is used, what is the total magnification of the light microscope?
When the 40X objective lens is used, what is the total magnification of the light microscope?
When the 100X objective lens is used, what is the total magnification of the light microscope?
Whenever you make an illustration or take a photo of a magnified specimen, the total magnification used should be given with the image. You can expect when you examine microscopic images that the magnification of the image is given as the total magnification (not the objective lens magnification).

Figure 1: Escherichia coli is a bacterial species magnified by 100X using a compound microscope appears as tiny specks (left). The magnification reported is 100X, meaning that the 10X objective was used and in combination with the ocular lens (10X), the total magnification was 100X. (Right) E. coli (a bacterial species; appears pink and rod-shaped) and Staphylococcus aureus (a different bacterial species; appears purple and round) can be seen close enough to distinguish cell shapes at 1000X magnification. This magnification uses the 100X objective lens in combination with the ocular lens (10X) to produce a total magnification of 1000X.
Identify Parts of the Light Microscope
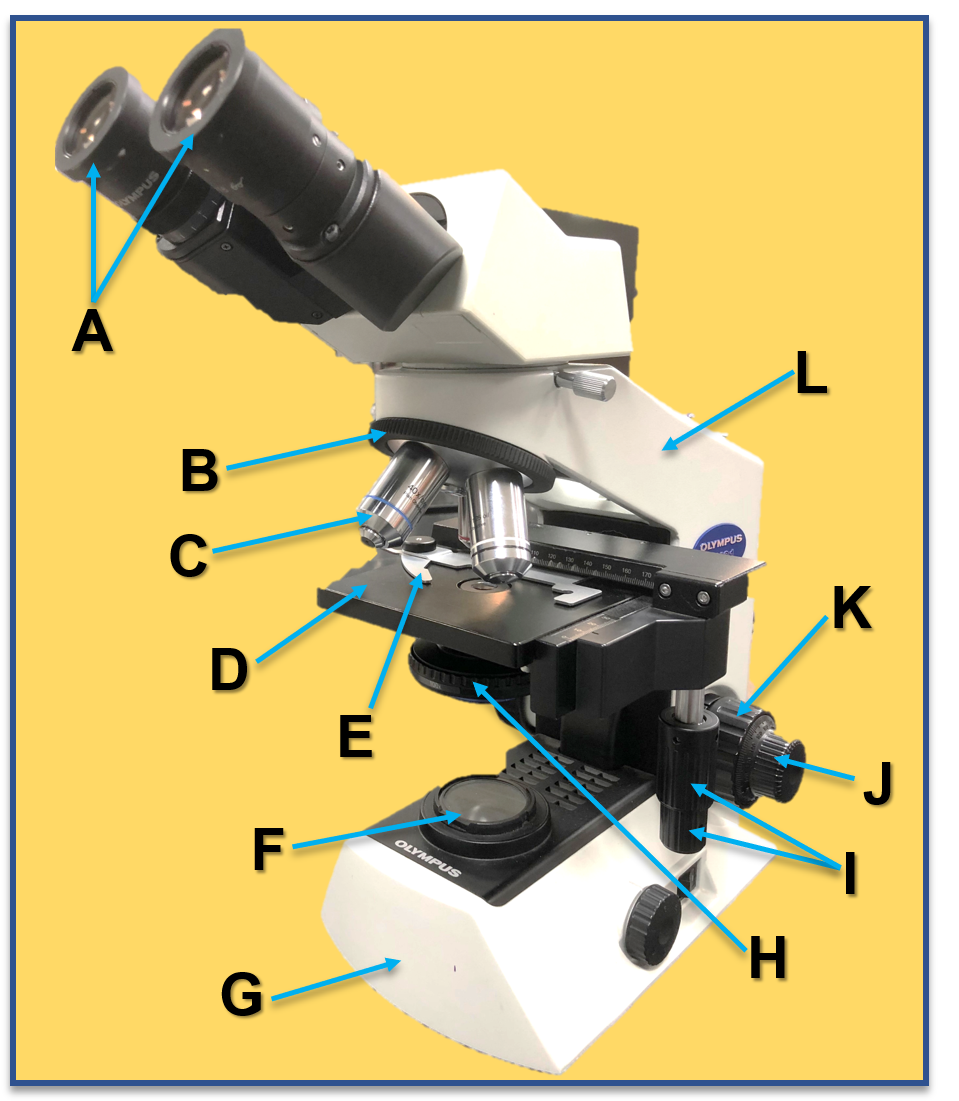
Match the Functions of the Parts of the Light Microscope
Match the parts of the light microscope with their functions.
| ocular lens | A. Adjusts the position of a slide on the stage. |
| revolving nosepiece | B. Adjusts the focus of the microscope by moving the stage up and down in large increments. |
| arm | C. A surface where a slide is positioned under the objective lens and over the light source. |
| stage control | D. A structure capable of rotating to change the objective lens being used to magnify the sample. |
| base | E. A magnifying lens located inside the microscope part where a person looks into the microscope. |
| coarse focus | F. Provides light that shines on the sample and carries the image of the specimen through the magnifying lenses. |
| fine focus | G. A structure capable of changing the amount of light passing through the specimen. |
| light source / illuminator | H. A structural component that serves to support the weight of the microscope from underneath. |
| objective lens | I. Secures a slide in place on the microscope. |
| stage | J. Where the microscope user looks into the microscope to view a magnified image of the specimen. |
| stage clip | K. Adjusts the focus of the microscope by moving the stage up and down in smaller increments. |
| diaphragm | L. A structural component that serves to support the eyepiece, revolving nosepiece, and stage. |
| eyepiece | M. A magnifying lens which increases magnification of the specimen that can easily be changed by rotating between lenses of different magnifications. |
Examine Specimen with Low Magnification
Place The letter ‘e’ slide on the microscope stage and focus the slide using the 4x objective.
- Draw the ‘e’ as you see it on the slide with the naked eye (not looking through the microscope).
- Look through the microscope and now draw the ‘e’ as you see.
- In addition to being able to see the 'e' larger and with more detail, what else about the image of the 'e' has changed when comparing your illustration from 1. and from 2.?
Examine Microbes at Higher Magnifications
"Microbes" include viruses, bacteria, archaea, fungi, protozoa, and helminths. Viruses are too small to see with the light microscope and must be imaged with an electron microscope (not used in class). Bacteria and archaea appear as tiny specks at the highest magnifications with a light microscope, protozoa and fungi and their details can be clearly imaged with a light microscope, and helminths (worms) can, depending on the species, be too long to see the entire worm at once with the light microscope.
Today, you will examine an example of a helminth, a fungus, protozoa, and bacteria. Choose the magnification the enables you to view the microbe well and clearly. Remember the relative sizes of these microbes. Smaller microbes will require higher magnifications.
Helminth
Examine an example of a species of helminth. Illustrate the magnified sample in detail, write down the name of the specimen, and indicate the total magnification you made the illustration at. The goal is to distinguish the different categories of microbes based on your illustrations.

Fungus
Examine an example of a species of fungus. Illustrate the magnified sample in detail, write down the name of the specimen, and indicate the total magnification you made the illustration at. The goal is to distinguish the different categories of microbes based on your illustrations.
Protozoa
Examine an example of a species of protozoa. Illustrate the magnified sample in detail, write down the name of the specimen, and indicate the total magnification you made the illustration at. The goal is to distinguish the different categories of microbes based on your illustrations.
Bacteria
Examine an example of a species of bacteria. Illustrate the magnified sample in detail, write down the name of the specimen, and indicate the total magnification you made the illustration at. The goal is to distinguish the different categories of microbes based on your illustrations.
Compare and Contrast Different Types of Microbes
- What were some notable similarities among the different microbe classifications examined with the light microscope?
- What were some notable differences among the different microbe classifications examined with the light microscope?
- Do all microbes have the same structure? Explain your answer.
Attributions
- Chapter Image: 20180501paramecium13stack (41837085141).jpg by MostlyDross is licensed under CC BY 2.0
- Chapter Image: CDC Image 22870 by CDC is in the public domain
- File:Escherichia coli and Staph. aureus (6500465759).jpg by Michael R Francisco is licensed under CC BY 2.0
- File:Microbiology gram stain.jpg by Sunil is licensed under CC BY 4.0