8: Bacterial Colony Morphology
- Page ID
- 3484
\( \newcommand{\vecs}[1]{\overset { \scriptstyle \rightharpoonup} {\mathbf{#1}} } \)
\( \newcommand{\vecd}[1]{\overset{-\!-\!\rightharpoonup}{\vphantom{a}\smash {#1}}} \)
\( \newcommand{\dsum}{\displaystyle\sum\limits} \)
\( \newcommand{\dint}{\displaystyle\int\limits} \)
\( \newcommand{\dlim}{\displaystyle\lim\limits} \)
\( \newcommand{\id}{\mathrm{id}}\) \( \newcommand{\Span}{\mathrm{span}}\)
( \newcommand{\kernel}{\mathrm{null}\,}\) \( \newcommand{\range}{\mathrm{range}\,}\)
\( \newcommand{\RealPart}{\mathrm{Re}}\) \( \newcommand{\ImaginaryPart}{\mathrm{Im}}\)
\( \newcommand{\Argument}{\mathrm{Arg}}\) \( \newcommand{\norm}[1]{\| #1 \|}\)
\( \newcommand{\inner}[2]{\langle #1, #2 \rangle}\)
\( \newcommand{\Span}{\mathrm{span}}\)
\( \newcommand{\id}{\mathrm{id}}\)
\( \newcommand{\Span}{\mathrm{span}}\)
\( \newcommand{\kernel}{\mathrm{null}\,}\)
\( \newcommand{\range}{\mathrm{range}\,}\)
\( \newcommand{\RealPart}{\mathrm{Re}}\)
\( \newcommand{\ImaginaryPart}{\mathrm{Im}}\)
\( \newcommand{\Argument}{\mathrm{Arg}}\)
\( \newcommand{\norm}[1]{\| #1 \|}\)
\( \newcommand{\inner}[2]{\langle #1, #2 \rangle}\)
\( \newcommand{\Span}{\mathrm{span}}\) \( \newcommand{\AA}{\unicode[.8,0]{x212B}}\)
\( \newcommand{\vectorA}[1]{\vec{#1}} % arrow\)
\( \newcommand{\vectorAt}[1]{\vec{\text{#1}}} % arrow\)
\( \newcommand{\vectorB}[1]{\overset { \scriptstyle \rightharpoonup} {\mathbf{#1}} } \)
\( \newcommand{\vectorC}[1]{\textbf{#1}} \)
\( \newcommand{\vectorD}[1]{\overrightarrow{#1}} \)
\( \newcommand{\vectorDt}[1]{\overrightarrow{\text{#1}}} \)
\( \newcommand{\vectE}[1]{\overset{-\!-\!\rightharpoonup}{\vphantom{a}\smash{\mathbf {#1}}}} \)
\( \newcommand{\vecs}[1]{\overset { \scriptstyle \rightharpoonup} {\mathbf{#1}} } \)
\(\newcommand{\longvect}{\overrightarrow}\)
\( \newcommand{\vecd}[1]{\overset{-\!-\!\rightharpoonup}{\vphantom{a}\smash {#1}}} \)
\(\newcommand{\avec}{\mathbf a}\) \(\newcommand{\bvec}{\mathbf b}\) \(\newcommand{\cvec}{\mathbf c}\) \(\newcommand{\dvec}{\mathbf d}\) \(\newcommand{\dtil}{\widetilde{\mathbf d}}\) \(\newcommand{\evec}{\mathbf e}\) \(\newcommand{\fvec}{\mathbf f}\) \(\newcommand{\nvec}{\mathbf n}\) \(\newcommand{\pvec}{\mathbf p}\) \(\newcommand{\qvec}{\mathbf q}\) \(\newcommand{\svec}{\mathbf s}\) \(\newcommand{\tvec}{\mathbf t}\) \(\newcommand{\uvec}{\mathbf u}\) \(\newcommand{\vvec}{\mathbf v}\) \(\newcommand{\wvec}{\mathbf w}\) \(\newcommand{\xvec}{\mathbf x}\) \(\newcommand{\yvec}{\mathbf y}\) \(\newcommand{\zvec}{\mathbf z}\) \(\newcommand{\rvec}{\mathbf r}\) \(\newcommand{\mvec}{\mathbf m}\) \(\newcommand{\zerovec}{\mathbf 0}\) \(\newcommand{\onevec}{\mathbf 1}\) \(\newcommand{\real}{\mathbb R}\) \(\newcommand{\twovec}[2]{\left[\begin{array}{r}#1 \\ #2 \end{array}\right]}\) \(\newcommand{\ctwovec}[2]{\left[\begin{array}{c}#1 \\ #2 \end{array}\right]}\) \(\newcommand{\threevec}[3]{\left[\begin{array}{r}#1 \\ #2 \\ #3 \end{array}\right]}\) \(\newcommand{\cthreevec}[3]{\left[\begin{array}{c}#1 \\ #2 \\ #3 \end{array}\right]}\) \(\newcommand{\fourvec}[4]{\left[\begin{array}{r}#1 \\ #2 \\ #3 \\ #4 \end{array}\right]}\) \(\newcommand{\cfourvec}[4]{\left[\begin{array}{c}#1 \\ #2 \\ #3 \\ #4 \end{array}\right]}\) \(\newcommand{\fivevec}[5]{\left[\begin{array}{r}#1 \\ #2 \\ #3 \\ #4 \\ #5 \\ \end{array}\right]}\) \(\newcommand{\cfivevec}[5]{\left[\begin{array}{c}#1 \\ #2 \\ #3 \\ #4 \\ #5 \\ \end{array}\right]}\) \(\newcommand{\mattwo}[4]{\left[\begin{array}{rr}#1 \amp #2 \\ #3 \amp #4 \\ \end{array}\right]}\) \(\newcommand{\laspan}[1]{\text{Span}\{#1\}}\) \(\newcommand{\bcal}{\cal B}\) \(\newcommand{\ccal}{\cal C}\) \(\newcommand{\scal}{\cal S}\) \(\newcommand{\wcal}{\cal W}\) \(\newcommand{\ecal}{\cal E}\) \(\newcommand{\coords}[2]{\left\{#1\right\}_{#2}}\) \(\newcommand{\gray}[1]{\color{gray}{#1}}\) \(\newcommand{\lgray}[1]{\color{lightgray}{#1}}\) \(\newcommand{\rank}{\operatorname{rank}}\) \(\newcommand{\row}{\text{Row}}\) \(\newcommand{\col}{\text{Col}}\) \(\renewcommand{\row}{\text{Row}}\) \(\newcommand{\nul}{\text{Nul}}\) \(\newcommand{\var}{\text{Var}}\) \(\newcommand{\corr}{\text{corr}}\) \(\newcommand{\len}[1]{\left|#1\right|}\) \(\newcommand{\bbar}{\overline{\bvec}}\) \(\newcommand{\bhat}{\widehat{\bvec}}\) \(\newcommand{\bperp}{\bvec^\perp}\) \(\newcommand{\xhat}{\widehat{\xvec}}\) \(\newcommand{\vhat}{\widehat{\vvec}}\) \(\newcommand{\uhat}{\widehat{\uvec}}\) \(\newcommand{\what}{\widehat{\wvec}}\) \(\newcommand{\Sighat}{\widehat{\Sigma}}\) \(\newcommand{\lt}{<}\) \(\newcommand{\gt}{>}\) \(\newcommand{\amp}{&}\) \(\definecolor{fillinmathshade}{gray}{0.9}\)Objectives
- Describe features of colonies.
- See variations in colonial morphology among various species of bacteria.
Bacteria grow on solid media as colonies. A colony is defined as a visible mass of microorganisms all originating from a single mother cell, therefore a colony constitutes a clone of bacteria all genetically alike.
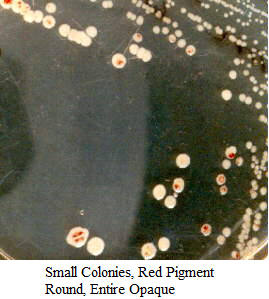
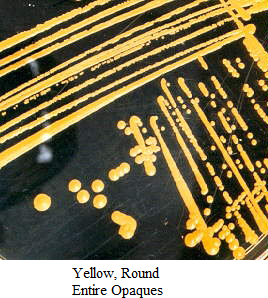
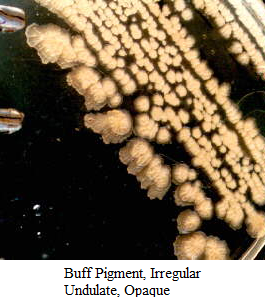
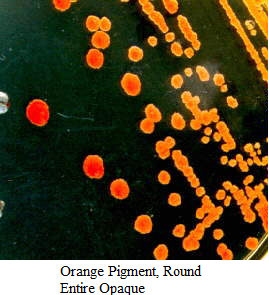
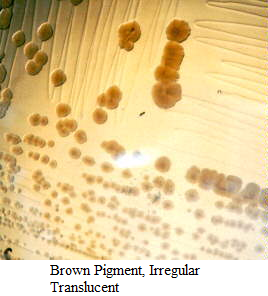
In the identification of bacteria and fungi much weight is placed on how the organism grows in or on media. This exercise will help you identify the cultural characteristics of a bacterium on an agar plate - called colony morphology. Although one might not necessarily see the importance of colonial morphology at first, it really can be important when identifying the bacterium. Features of the colonies may help to pinpoint the identity of the bacterium. Different species of bacteria can produce very different colonies.

In the above picture of a mixed culture, an agar plate that has been exposed to the air and many different colony morphologies can be identified. Nine obviously different colonies are numbered: some colony types recur in various areas of the plate (note # 3 and # 4). Not only are pigment differences seen, but also size, edge, pattern, opacity, and shine. Two circles have been drawn around merging colonies, where the species of the 2 colonies are different. Trying to pick a bit of one of those adjacent colonies increases the chances of picking up another mixed culture, consisting of the 2 species that were merged together. ALWAYS pick a well-isolated colony when subculturing.
WHOLE SHAPE OF COLONY
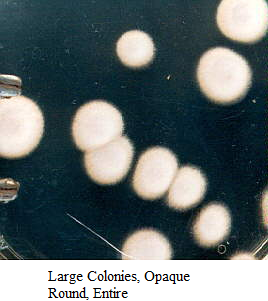
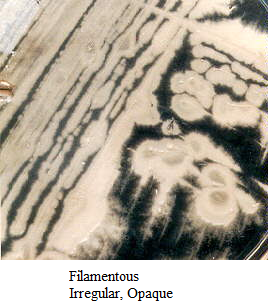
Varies from round to irregular to filamentous and rhizoid (root-like)
SIZE OF COLONY
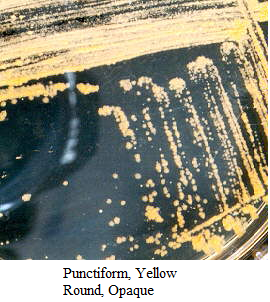
Can vary from large colonies to tiny colonies less than 1 mm = punctiform (pin-point). Measure with a millimeter rule.
EDGE/MARGIN OF COLONY
Magnified edge shape (use a dissecting microscope to see the margin edge well)
CHROMOGENESIS
- Color of colonies, pigmentation: white, buff, red, purple, etc.
- Some pigments are water-soluble, others are not.
- If you take a large inoculum and place it in a tube of water or saline, do you see color?
- Do you see any pigment if the organism is growing in a broth medium?
- Does incubation temperature affect the color?
- Does the entire colony have the color, or is it more like a bull’s eye?
OPACITY OF COLONY
Is the colony transparent (clear), opaque (not transparent or clear), translucent (almost clear, but distorted vision–like looking through frosted glass), iridescent (changing colors in reflected light)?
ELEVATION OF COLONY
How much does the colony rise above the agar (turn the plate on end to determine height)?
SURFACE OF COLONY
Smooth, glistening, rough, dull (opposite of glistening), rugose (wrinkled)
CONSISTENCY or TEXTURE
Butyrous (buttery), viscid (sticks to loop, hard to get off), brittle/friable (dry, breaks apart), mucoid (sticky, mucus-like)
MATERIALS NEEDED
- agar plates of various bacteria (examples = Pseudomonas, Chromobacterium, Micrococcus, Bacillus, Streptomyces, Streptococcus, and Neisseria)
- agar plates from sponge dilutions and cultures from last period
THE PROCEDURE
- Use a plate which has well-isolated colonies. Look at the largest colonies with the naked eye to determine general shape and chromogenesis.
- Use a dissecting/stereoscopic microscope for more detail. Place the plate RIGHTSIDE UP on the stage, leaving the petri dish cover ON (Otherwise, your culture will become contaminated.) There are 2 lenses on our scopes—10X and 20X - the black lens knob is on the right side of the head of the microscope. The magnification is especially helpful for the study of elevation, surface, opacity, size, and edge. There are 2 lights on these microscopes that you might find helpful, either using one at a time, or both, or even sometimes without them. Two small black rotating knobs on either side of the base control the 2 lights, one light from above and one light from below the stage.
- Or you may want to use the Quebec colony counter since it has a magnifying glass, and a light behind the plate stage. Make sure that the dish is right-side up.
- If you see water condensation on the lid cover, take a KimWipe and carefully remove the water from the cover, then quickly replacing the cover on the dish.
- In order to determine CONSISTENCY, you need to use your inoculating loop or needle to pick up the colony and determine the consistency of the inoculum material as the loop leaves the agar medium.

Images of Bacterial Colonies


