5: Bacterial Isolates from a Sponge
- Page ID
- 3255
\( \newcommand{\vecs}[1]{\overset { \scriptstyle \rightharpoonup} {\mathbf{#1}} } \)
\( \newcommand{\vecd}[1]{\overset{-\!-\!\rightharpoonup}{\vphantom{a}\smash {#1}}} \)
\( \newcommand{\dsum}{\displaystyle\sum\limits} \)
\( \newcommand{\dint}{\displaystyle\int\limits} \)
\( \newcommand{\dlim}{\displaystyle\lim\limits} \)
\( \newcommand{\id}{\mathrm{id}}\) \( \newcommand{\Span}{\mathrm{span}}\)
( \newcommand{\kernel}{\mathrm{null}\,}\) \( \newcommand{\range}{\mathrm{range}\,}\)
\( \newcommand{\RealPart}{\mathrm{Re}}\) \( \newcommand{\ImaginaryPart}{\mathrm{Im}}\)
\( \newcommand{\Argument}{\mathrm{Arg}}\) \( \newcommand{\norm}[1]{\| #1 \|}\)
\( \newcommand{\inner}[2]{\langle #1, #2 \rangle}\)
\( \newcommand{\Span}{\mathrm{span}}\)
\( \newcommand{\id}{\mathrm{id}}\)
\( \newcommand{\Span}{\mathrm{span}}\)
\( \newcommand{\kernel}{\mathrm{null}\,}\)
\( \newcommand{\range}{\mathrm{range}\,}\)
\( \newcommand{\RealPart}{\mathrm{Re}}\)
\( \newcommand{\ImaginaryPart}{\mathrm{Im}}\)
\( \newcommand{\Argument}{\mathrm{Arg}}\)
\( \newcommand{\norm}[1]{\| #1 \|}\)
\( \newcommand{\inner}[2]{\langle #1, #2 \rangle}\)
\( \newcommand{\Span}{\mathrm{span}}\) \( \newcommand{\AA}{\unicode[.8,0]{x212B}}\)
\( \newcommand{\vectorA}[1]{\vec{#1}} % arrow\)
\( \newcommand{\vectorAt}[1]{\vec{\text{#1}}} % arrow\)
\( \newcommand{\vectorB}[1]{\overset { \scriptstyle \rightharpoonup} {\mathbf{#1}} } \)
\( \newcommand{\vectorC}[1]{\textbf{#1}} \)
\( \newcommand{\vectorD}[1]{\overrightarrow{#1}} \)
\( \newcommand{\vectorDt}[1]{\overrightarrow{\text{#1}}} \)
\( \newcommand{\vectE}[1]{\overset{-\!-\!\rightharpoonup}{\vphantom{a}\smash{\mathbf {#1}}}} \)
\( \newcommand{\vecs}[1]{\overset { \scriptstyle \rightharpoonup} {\mathbf{#1}} } \)
\(\newcommand{\longvect}{\overrightarrow}\)
\( \newcommand{\vecd}[1]{\overset{-\!-\!\rightharpoonup}{\vphantom{a}\smash {#1}}} \)
\(\newcommand{\avec}{\mathbf a}\) \(\newcommand{\bvec}{\mathbf b}\) \(\newcommand{\cvec}{\mathbf c}\) \(\newcommand{\dvec}{\mathbf d}\) \(\newcommand{\dtil}{\widetilde{\mathbf d}}\) \(\newcommand{\evec}{\mathbf e}\) \(\newcommand{\fvec}{\mathbf f}\) \(\newcommand{\nvec}{\mathbf n}\) \(\newcommand{\pvec}{\mathbf p}\) \(\newcommand{\qvec}{\mathbf q}\) \(\newcommand{\svec}{\mathbf s}\) \(\newcommand{\tvec}{\mathbf t}\) \(\newcommand{\uvec}{\mathbf u}\) \(\newcommand{\vvec}{\mathbf v}\) \(\newcommand{\wvec}{\mathbf w}\) \(\newcommand{\xvec}{\mathbf x}\) \(\newcommand{\yvec}{\mathbf y}\) \(\newcommand{\zvec}{\mathbf z}\) \(\newcommand{\rvec}{\mathbf r}\) \(\newcommand{\mvec}{\mathbf m}\) \(\newcommand{\zerovec}{\mathbf 0}\) \(\newcommand{\onevec}{\mathbf 1}\) \(\newcommand{\real}{\mathbb R}\) \(\newcommand{\twovec}[2]{\left[\begin{array}{r}#1 \\ #2 \end{array}\right]}\) \(\newcommand{\ctwovec}[2]{\left[\begin{array}{c}#1 \\ #2 \end{array}\right]}\) \(\newcommand{\threevec}[3]{\left[\begin{array}{r}#1 \\ #2 \\ #3 \end{array}\right]}\) \(\newcommand{\cthreevec}[3]{\left[\begin{array}{c}#1 \\ #2 \\ #3 \end{array}\right]}\) \(\newcommand{\fourvec}[4]{\left[\begin{array}{r}#1 \\ #2 \\ #3 \\ #4 \end{array}\right]}\) \(\newcommand{\cfourvec}[4]{\left[\begin{array}{c}#1 \\ #2 \\ #3 \\ #4 \end{array}\right]}\) \(\newcommand{\fivevec}[5]{\left[\begin{array}{r}#1 \\ #2 \\ #3 \\ #4 \\ #5 \\ \end{array}\right]}\) \(\newcommand{\cfivevec}[5]{\left[\begin{array}{c}#1 \\ #2 \\ #3 \\ #4 \\ #5 \\ \end{array}\right]}\) \(\newcommand{\mattwo}[4]{\left[\begin{array}{rr}#1 \amp #2 \\ #3 \amp #4 \\ \end{array}\right]}\) \(\newcommand{\laspan}[1]{\text{Span}\{#1\}}\) \(\newcommand{\bcal}{\cal B}\) \(\newcommand{\ccal}{\cal C}\) \(\newcommand{\scal}{\cal S}\) \(\newcommand{\wcal}{\cal W}\) \(\newcommand{\ecal}{\cal E}\) \(\newcommand{\coords}[2]{\left\{#1\right\}_{#2}}\) \(\newcommand{\gray}[1]{\color{gray}{#1}}\) \(\newcommand{\lgray}[1]{\color{lightgray}{#1}}\) \(\newcommand{\rank}{\operatorname{rank}}\) \(\newcommand{\row}{\text{Row}}\) \(\newcommand{\col}{\text{Col}}\) \(\renewcommand{\row}{\text{Row}}\) \(\newcommand{\nul}{\text{Nul}}\) \(\newcommand{\var}{\text{Var}}\) \(\newcommand{\corr}{\text{corr}}\) \(\newcommand{\len}[1]{\left|#1\right|}\) \(\newcommand{\bbar}{\overline{\bvec}}\) \(\newcommand{\bhat}{\widehat{\bvec}}\) \(\newcommand{\bperp}{\bvec^\perp}\) \(\newcommand{\xhat}{\widehat{\xvec}}\) \(\newcommand{\vhat}{\widehat{\vvec}}\) \(\newcommand{\uhat}{\widehat{\uvec}}\) \(\newcommand{\what}{\widehat{\wvec}}\) \(\newcommand{\Sighat}{\widehat{\Sigma}}\) \(\newcommand{\lt}{<}\) \(\newcommand{\gt}{>}\) \(\newcommand{\amp}{&}\) \(\definecolor{fillinmathshade}{gray}{0.9}\)Learning Objectives
- Determine the number of bacteria per gram of sponge using both spread and pour techniques.
- Look at the variation in bacterial species.
- Use differential and selective media to differentiate among bacteria.
- Use the sponge cultures for staining and motility procedures.
Your environment is packed with more microorganisms than you can possibly guess. There will are a variety of bacterial species found in a common kitchen/bathroom sponge, and you will be quantifying and isolating several species in this lab exercise. Bacteria that you isolate from the spongewill be used during the staining labs.
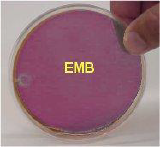
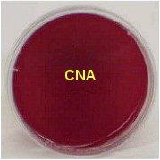
You are using a general purpose medium, called plate count agar (PCA), which will give you total bacterial counts, as well as 2 selective media—EMB and CNA. Eosin Methylene Blue (EMB) is a selective medium that inhibits Gram + bacteria. Columbia naladixic acid (CNA) is a selective blood agar which has inhibits Gram - bacteria. In addition to these 2 media being selective, they are also both differential. EMB will differentiate lactose fermenters from nonfermenters: CNA will show hemolytic reactions. More information on these media can be found in the documents called EMB and CNA.
Note
Although these two media are both inhibitory, SOME bacteria (that you would not expect to grow) may grow--although not well--particularly if you let cultures sit for more than a couple of days.
MATERIALS NEEDED
The following materials are needed per table
- scissors
- a sponge that has been used in the kitchen for at least 2 weeks
- blender
- 2 bottles of phosphate buffer, 99ml
- 6-empty tubes
- weight scale + weigh boats
- blue and green pi-pumps (for 1ml and 10ml pipettes)
- nonsterile 10ml + 1 ml pipets or 1.1ml pipets (allows 0.1ml sample and 1.0ml sample from same pipet)
- 6 plate count agar (PCA) plates
- 5 EMB agar plates
- 5 CNA blood plates
- hockey sticks
- ethanol in a dish
- Vortex for mixing dilution tubes
- pipette disposal jar
THE PROCEDURE: per table
- Use your best ASEPTIC TECHNIQUE
- Label ALL petri dishes and agar plates BEFORE you inoculate them.
- Be sure to use a DIFFERENT PIPET between dilutions, so as not to carry over organisms and make our counts inaccurate
- TO MAKE SPREAD PLATES WITH AGLASS HOCKEY STICK
- Place the short part of the glass hockey stick into the alcohol and then into the flame so that the alcohol catches on fire. Do not HOLD the stick in the flame, just run it through catching it on fire. The glass is now sterile and can be used as a spreader (repeat this with every spread plate).
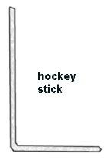 To distribute the dilution specimens, take a sterile glass hockey stick and push the specimen around with the flat, short area of the glass. Be sure that you move the hockey stick around multiple times. The specimen will soak into the agar.
- TO MAKE SPREAD PLATES WITH AGLASS HOCKEY STICK
- SHAKE each dilution container WELL.
Note
Do discard the dilutions until COMPLETELY FINISHED WITH THE LAB
- Set up dilution containers with phosphate buffer as follows: 1 bottle with 99 ml , 6 tubes with 9 ml each.
- Each table has brought a sponge to lab. Weigh out 1 gram on the scale, using a weigh boat. Place the 1 gram of sponge into the blender, along with about a third of the contents of the 99 ml phosphate buffer container.
- Blend the sponge for 30 seconds. This is your 1/100 (= 1/102 = 10-2 dilution).
- Pour the contents of the blender back into the buffer's plastic bottle. Wash out the blender with lots of water for the next table to use and replace on table.
- From the 1/102 dilution of the sponge, transfer 1 ml into a 9 ml phosphate buffer container. Mix this container well. It is the 1/103 dilution.
- Using the 1/103 dilution, transfer 1 ml into a 2nd tube, mixing well. It is the 1/104 dilution.
- Repeat step 6 using the 1/104 dilution . Mix this container well. It is the 1/105 dilution.
- Repeat step 7 using the 1/105 dilution . Mix this container well. It is the 1/106 dilution.
- Repeat step 6 using the 1/106 dilution . Mix this container well. It is the 1/107 dilution.
- Repeat step 6 using the 1/107 dilution . Mix this container well. It is the 1/108 dilution.
- You now have the dilutions of the sponge ready to make spread plates.
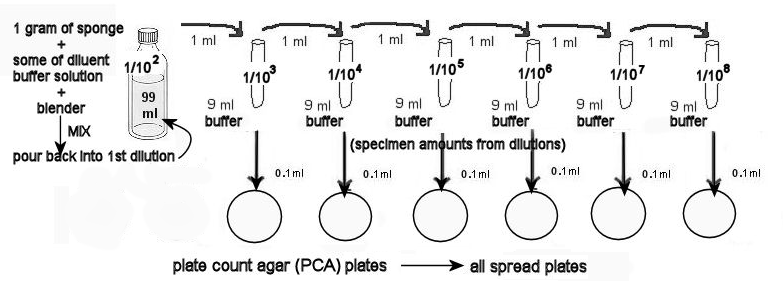
12. MAKING THE PCA SPREAD PLATES.
a. Label the 6 PCA plates (on the smaller, bottom dish sides) with the dilution of the tube.
b. From the 1/103 dilution remove a sample and SLOWLYaliquot 0.1 ml onto the first PCA plate, labeled 1/103 . Use the procedure above—TO MAKE SPREAD PLATESWITH AHOCKEY STICK. Use the glass stick to well-distribute the dilutions on the agar.
c. Using the 1/104 through1/108 dilutions.
d. Let the plates solidify for about 10 minutes. Stack them, and hold them together with masking tape.
e. Incubate in the room temperature 25ºC incubator for at least 2 days.
13. MAKING THE CNA AND EMB SPREAD PLATES:
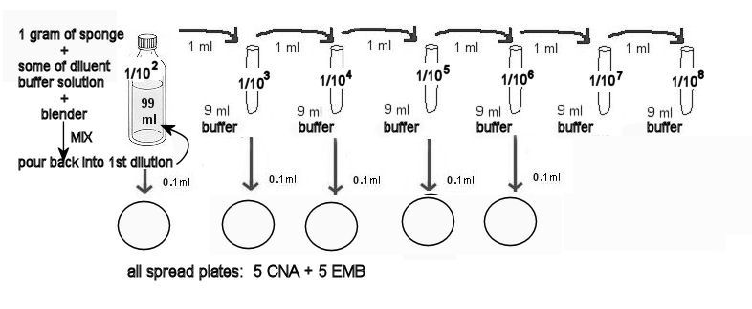
a. Label 5 CNA and the 5 EMB 1/102 through 1/106. The diagram above illustrates which dilutions will be used for these plates.
b. Aliquot the correct amounts from these dilutions ONTO the EMB and CNA agar plates.
c. Use the procedure above - TO MAKE SPREAD PLATES WITH A HOCKEY STICK. Use the glass stick to well-distribute the dilutions on the agar.
d. Stack the plates, and hold them together with masking tape. Incubate in the room temperature 25ºC incubator for at least 2 days
INTERPRETATION--THE NEXT LAB PERIOD
- Place the PCA plates in order on the table, from least dilution to greatest dilution. Do the same with the CNA and EMB plates.
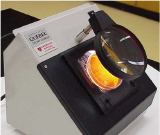
- Visually guesstimate the plate with 30-300 colonies on it, take it over to a Quebec colony counter (use the magnifying glass and the light to illuminate the colonies well), and count the colonies on the plate. Do the same with the CNA and EMB plates that have 30-300 colonies.
- Determine the total number of bacteria per gram of the sponge, as well as the Gram negative bacteria and the Gram + bacteria (if you do NOT have plates with 30-300 colonies, use the plate with the closest count to it).
- The class will compare the number of bacteria from the various sponges.
- USE YOUR PLATES FOR THE EXERCISE ON GRAM STAIN AND COLONY MORPHOLOGY. DO NOT DISCARD YOUR PLATES: PUT THEM IN THE REFRIGERATOR.
QUESTIONS
- What is a selective medium?
- What color colonies will lactose-fermenters be on EMB?
- What is a colony?
- HOW is a spread plate different from a pour plate?


