12: Oral Biofilms
- Page ID
- 3486
\( \newcommand{\vecs}[1]{\overset { \scriptstyle \rightharpoonup} {\mathbf{#1}} } \)
\( \newcommand{\vecd}[1]{\overset{-\!-\!\rightharpoonup}{\vphantom{a}\smash {#1}}} \)
\( \newcommand{\dsum}{\displaystyle\sum\limits} \)
\( \newcommand{\dint}{\displaystyle\int\limits} \)
\( \newcommand{\dlim}{\displaystyle\lim\limits} \)
\( \newcommand{\id}{\mathrm{id}}\) \( \newcommand{\Span}{\mathrm{span}}\)
( \newcommand{\kernel}{\mathrm{null}\,}\) \( \newcommand{\range}{\mathrm{range}\,}\)
\( \newcommand{\RealPart}{\mathrm{Re}}\) \( \newcommand{\ImaginaryPart}{\mathrm{Im}}\)
\( \newcommand{\Argument}{\mathrm{Arg}}\) \( \newcommand{\norm}[1]{\| #1 \|}\)
\( \newcommand{\inner}[2]{\langle #1, #2 \rangle}\)
\( \newcommand{\Span}{\mathrm{span}}\)
\( \newcommand{\id}{\mathrm{id}}\)
\( \newcommand{\Span}{\mathrm{span}}\)
\( \newcommand{\kernel}{\mathrm{null}\,}\)
\( \newcommand{\range}{\mathrm{range}\,}\)
\( \newcommand{\RealPart}{\mathrm{Re}}\)
\( \newcommand{\ImaginaryPart}{\mathrm{Im}}\)
\( \newcommand{\Argument}{\mathrm{Arg}}\)
\( \newcommand{\norm}[1]{\| #1 \|}\)
\( \newcommand{\inner}[2]{\langle #1, #2 \rangle}\)
\( \newcommand{\Span}{\mathrm{span}}\) \( \newcommand{\AA}{\unicode[.8,0]{x212B}}\)
\( \newcommand{\vectorA}[1]{\vec{#1}} % arrow\)
\( \newcommand{\vectorAt}[1]{\vec{\text{#1}}} % arrow\)
\( \newcommand{\vectorB}[1]{\overset { \scriptstyle \rightharpoonup} {\mathbf{#1}} } \)
\( \newcommand{\vectorC}[1]{\textbf{#1}} \)
\( \newcommand{\vectorD}[1]{\overrightarrow{#1}} \)
\( \newcommand{\vectorDt}[1]{\overrightarrow{\text{#1}}} \)
\( \newcommand{\vectE}[1]{\overset{-\!-\!\rightharpoonup}{\vphantom{a}\smash{\mathbf {#1}}}} \)
\( \newcommand{\vecs}[1]{\overset { \scriptstyle \rightharpoonup} {\mathbf{#1}} } \)
\(\newcommand{\longvect}{\overrightarrow}\)
\( \newcommand{\vecd}[1]{\overset{-\!-\!\rightharpoonup}{\vphantom{a}\smash {#1}}} \)
\(\newcommand{\avec}{\mathbf a}\) \(\newcommand{\bvec}{\mathbf b}\) \(\newcommand{\cvec}{\mathbf c}\) \(\newcommand{\dvec}{\mathbf d}\) \(\newcommand{\dtil}{\widetilde{\mathbf d}}\) \(\newcommand{\evec}{\mathbf e}\) \(\newcommand{\fvec}{\mathbf f}\) \(\newcommand{\nvec}{\mathbf n}\) \(\newcommand{\pvec}{\mathbf p}\) \(\newcommand{\qvec}{\mathbf q}\) \(\newcommand{\svec}{\mathbf s}\) \(\newcommand{\tvec}{\mathbf t}\) \(\newcommand{\uvec}{\mathbf u}\) \(\newcommand{\vvec}{\mathbf v}\) \(\newcommand{\wvec}{\mathbf w}\) \(\newcommand{\xvec}{\mathbf x}\) \(\newcommand{\yvec}{\mathbf y}\) \(\newcommand{\zvec}{\mathbf z}\) \(\newcommand{\rvec}{\mathbf r}\) \(\newcommand{\mvec}{\mathbf m}\) \(\newcommand{\zerovec}{\mathbf 0}\) \(\newcommand{\onevec}{\mathbf 1}\) \(\newcommand{\real}{\mathbb R}\) \(\newcommand{\twovec}[2]{\left[\begin{array}{r}#1 \\ #2 \end{array}\right]}\) \(\newcommand{\ctwovec}[2]{\left[\begin{array}{c}#1 \\ #2 \end{array}\right]}\) \(\newcommand{\threevec}[3]{\left[\begin{array}{r}#1 \\ #2 \\ #3 \end{array}\right]}\) \(\newcommand{\cthreevec}[3]{\left[\begin{array}{c}#1 \\ #2 \\ #3 \end{array}\right]}\) \(\newcommand{\fourvec}[4]{\left[\begin{array}{r}#1 \\ #2 \\ #3 \\ #4 \end{array}\right]}\) \(\newcommand{\cfourvec}[4]{\left[\begin{array}{c}#1 \\ #2 \\ #3 \\ #4 \end{array}\right]}\) \(\newcommand{\fivevec}[5]{\left[\begin{array}{r}#1 \\ #2 \\ #3 \\ #4 \\ #5 \\ \end{array}\right]}\) \(\newcommand{\cfivevec}[5]{\left[\begin{array}{c}#1 \\ #2 \\ #3 \\ #4 \\ #5 \\ \end{array}\right]}\) \(\newcommand{\mattwo}[4]{\left[\begin{array}{rr}#1 \amp #2 \\ #3 \amp #4 \\ \end{array}\right]}\) \(\newcommand{\laspan}[1]{\text{Span}\{#1\}}\) \(\newcommand{\bcal}{\cal B}\) \(\newcommand{\ccal}{\cal C}\) \(\newcommand{\scal}{\cal S}\) \(\newcommand{\wcal}{\cal W}\) \(\newcommand{\ecal}{\cal E}\) \(\newcommand{\coords}[2]{\left\{#1\right\}_{#2}}\) \(\newcommand{\gray}[1]{\color{gray}{#1}}\) \(\newcommand{\lgray}[1]{\color{lightgray}{#1}}\) \(\newcommand{\rank}{\operatorname{rank}}\) \(\newcommand{\row}{\text{Row}}\) \(\newcommand{\col}{\text{Col}}\) \(\renewcommand{\row}{\text{Row}}\) \(\newcommand{\nul}{\text{Nul}}\) \(\newcommand{\var}{\text{Var}}\) \(\newcommand{\corr}{\text{corr}}\) \(\newcommand{\len}[1]{\left|#1\right|}\) \(\newcommand{\bbar}{\overline{\bvec}}\) \(\newcommand{\bhat}{\widehat{\bvec}}\) \(\newcommand{\bperp}{\bvec^\perp}\) \(\newcommand{\xhat}{\widehat{\xvec}}\) \(\newcommand{\vhat}{\widehat{\vvec}}\) \(\newcommand{\uhat}{\widehat{\uvec}}\) \(\newcommand{\what}{\widehat{\wvec}}\) \(\newcommand{\Sighat}{\widehat{\Sigma}}\) \(\newcommand{\lt}{<}\) \(\newcommand{\gt}{>}\) \(\newcommand{\amp}{&}\) \(\definecolor{fillinmathshade}{gray}{0.9}\)Learning Objectives
- Analyze biofilms of the mouth.
- Compare bacteria in plaque and on a toothbrush.
- Identify some of the common bacteria in this biofilm community.
Most of the time in the microbiology lab, we study free-floating bacteria in broths or bacteria in colony forms, and generally in pure culture. However, in the real world bacteria are usually interacting with other species in pretty sophisticated ecosystems. This assemblage of various organisms attached to a surface is called a biofilm , and the organisms that comprise it can include bacteria, plants, fungi, protozoa, and even multicellular animals, depending on where the biofilm is.
These biofilm communities attach to teeth, to the inside of a toilet, on a sponge, in a catheter, inside of a blood vessel, in the middle ear, on contact lenses, metal pipes, and so on. Interacting microorganisms act differently than if the microbes were living independent to each other. Different chemical by-products are produced and the surfaces that they grow on can be damaged by these physical and chemical interactions among the various species. In addition, interacting species can produce infections that are difficult to eliminate, possibly because the physical architecture of the biofilm protects the individual organisms from antibiotics (like schooling fish are protected by moving closely around together) or because there is no ONE microbe causing the infection. In the body, the biofilm community can produce inflammation and discomfort.
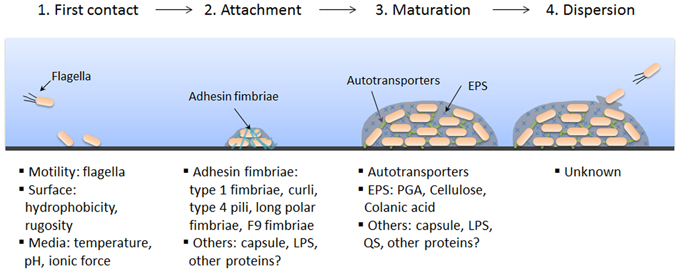
In this lab exercise, we are interested in oral biofilms---on teeth and on toothbrushes. Plaque is a protective layer that the bacteria live within, and, in fact, produce: It consists of bacteria, and the slime layers that they have around their cells and food particles. Within the plaque they are protected, and they are also free to metabolize and produce erosive by-products which then cause tooth decay, destroying the dentin of the teeth. If the plaque is not eliminated, becoming harder and denser, it causes the gum to recede and the tooth can lose attachment to the jawbone. This is periodontal disease.
You will need to bring a sample of plaque, as well as a used toothbrush. The plaque should be scraped off into a plastic boat (take one home from lab) first thing in the morning, BEFORE brushing your teeth. The toothbrush has to have been used for a couple of months, but don't treat it any differently than normal.
In the procedure below, you may notice the specimens are not as diluted for the toothbrush as those for plaque, mainly because some oral microorganism will not live as long on the brush. Also note that for some of the media, the sample being spread on the plate is not very dilute. That is because we are using some very selective media that will inhibit most of the bacteria.
- Mitis-salivarious agar for isolation of oral Streptococcus species
- Mannitol salt agar for isolation of halophiles like Staphylococcus and some of the Strep sepcies
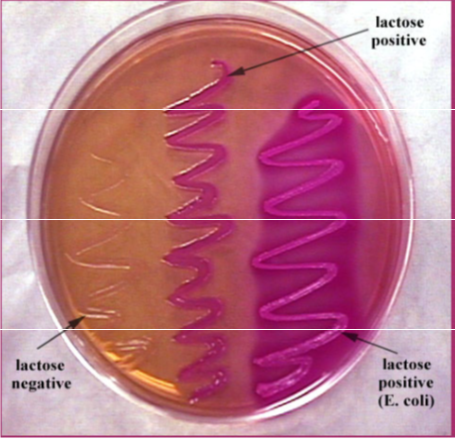
- MacConkey’s agar for the gram – bacilli like E. coli
For more information on Biofilms refer to the following website:
MATERIALS NEEDED: per table
- a regular toothbrush, used for at least 2 months
- plaque scraped from teeth first thing in morning, before brushing teeth
- sonicator
- plastic toothpicks
- sterile mortar and pestle
- 2 glass hockey sticks (for use in spread plates)
- ethanol containers for flaming glass sticks
- bottle of phosphate buffer solution (~125 ml)
- 9 sterile tubes
- 2 - 10 ml pipettes
- 10 - 1 ml pipettes
- 2 sizes of pi-pumps
- 10 blood agar (or BHI may be used)
- 2 mannitol salt agar
- 2 MacConkey's agar (in Photo Atlas)
- 2 Mitis-salivarius agar plate
- triple-beam balance
THE PROCEDURES
- Dispense 9ml of phosphate buffer solution into 9 sterile tubes.
- 5 will be used for the plaque dilutions, 4 for the toothbrush dilutions.
PLAQUE
- Using a toothpick, remove as much plaque as possible from between your molars. The sample will be placed into a weigh boat (be sure to get it off of the toothpick).
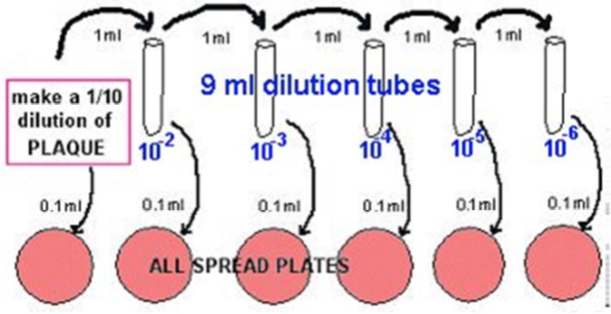
- Make a 1/10 dilution of the plaque in phosphate buffer solution by adding 10ml of the diluent to the weight boat and mixing it well.
- Pour the 1/10 dilution + plaque into a mortar and pestle and crush well to make an even suspension.
- Make 10 fold dilutions by using 9ml phosphate buffer solution dilutions. Be SURE to mix each dilution well, and use new pipettes.
- Transfer 1 ml of the 1/10 into 9 ml phosphate buffer, using a fresh pipette: This is a 10-2.
- Transfer 1 ml of the 10-2 into 9 ml phosphate buffer, using a fresh pipette: This is a 10-3.
- Transfer 1 ml of the 10-3 into 9 ml phosphate buffer, using a fresh pipette: This is a 10-4.
- Transfer 1 ml of the 10-4 into 9 ml phosphate buffer, using a fresh pipette: This is a 10-5.
- Transfer 1 ml of the 10-5 into 9 ml phosphate buffer, using a fresh pipette: This is a 10-6.
- Plate out 0.1 ml aliquots using the spread plate method, using alcohol-flamed glass hockey sticks.
- Make blood plates (or BHI agar plates) from the dilutions labelled 10-2, 10-3, 10-4 , 10-5, and 10-6, as shown in the diagram below.
- Make mannitol salt agar plates from the 1/10 dilutions.
- Make MacConkey's plates from the 1/10 dilution.
- Make Mitis-salivarius plates from the 1/10 dilution.
- Make blood plates (or BHI agar plates) from the dilutions labelled 10-2, 10-3, 10-4 , 10-5, and 10-6, as shown in the diagram below.
TOOTHBRUSH
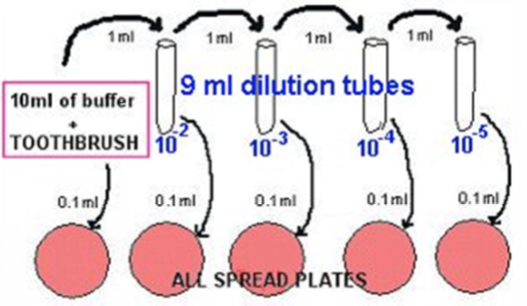
- Cut the top off of the toothbrush with a pair of pliers and cutters or diagonal cutters, allowing it to drop into the glass container. Dispense 10 ml of phosphate buffer solution into the bottle with the toothbrush head. This is your 1/10 dilution.
- The sonicator is filled 2/3 with water, so place the bottle into the sonicator, and turn on for 30 seconds. Be sure to hold the bottle sonicator while it is sonicating.
- Make 10 fold dilutions by using 9ml phosphate buffer solution dilutions. Be SURE to mix each dilution well, and use new pipettes.
- Transfer 1 ml of the 1/10 into 9 ml phosphate buffer, using a fresh pipette: This is a 10-2.
- Transfer 1 ml of the 10-2 into 9 ml phosphate buffer, using a fresh pipette: This is a 10-3.
- Transfer 1 ml of the 10-3 into 9 ml phosphate buffer, using a fresh pipette: This is a 10-4.
- Transfer 1 ml of the 10-4 into 9 ml phosphate buffer, using a fresh pipette: This is a 10-5.
- Plate out 0.1 ml aliquots using the spread plate method (use alcohol-flamed hockey sticks).
- Make blood plates (or BHI agar plates) from the dilutions labelled 1/10, 10-2, 10-3, 10-4, and 10-5, as shown in the diagram below.
- Make mannitol salt agar plates from the 1/10 dilution.
- Make MacConkey's plates from the 1/10 dilution.
- Make Mitis-salivarius plates from the 1/10 dilution.
- Make blood plates (or BHI agar plates) from the dilutions labelled 1/10, 10-2, 10-3, 10-4, and 10-5, as shown in the diagram below.
Note
Incubate all plaque plates and toothbrush plates in 37ºC incubator as follows
- All BAP (or BHI) and Mitis-salivarius plates in candle jars
- Mannitol salt in ambient air incubator
- MacConkey's in ambient air incubator
INTERPRETATION
- Remove all plates from the incubators, and separate them into 2 groups---plaque or toothbrush.
- Determine the number of bacteria per plaque sample. This will not be per gram since you had much less than a gram sample of plaque.
- Determine the number of bacteria per toothbrush head, using counts from blood or BHI.
- Analyze each type of medium for bacteria for BOTH toothbrush and plaque:
- BAP or BHI -for total count of facultatives and aerobes
- Mannitol salt -for salt-resistant Staphylococcus species, Staph aureus turns yellow (see exercise in lab manual)
- MacConkey's - for enteric gram - rods, coliforms turn red and non-coliforms are clearish
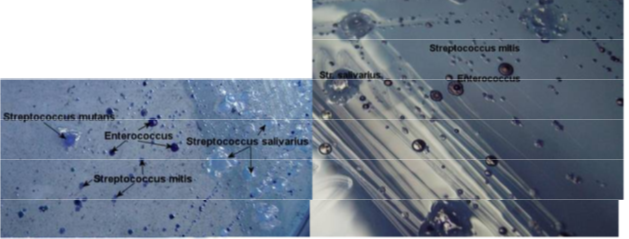
- Mitis-salivarius agar - small blue colonies (Strep mitis), blue gumdrop-like colonies (Strep salivarius) and dark blue/black, shiny colonies (Enterococcus faecalis)
- Determine the number of bacteria per toothbrush head for each group of bacteria, based on each individual media type.
- Gram stain at least one colony on each type of medium and record the gram reaction, arrangement, and shape.
- Report the following results last day of lab:
- Data presentation and various bacterial counts.
- Were your dilutions adequate for the bacterial counts on the different media?
- How did the counts for plaque vary from those of the toothbrushes?
IMAGES OF ORAL BIOFILM
credit to Dr. JOANNA VERRAN Manchester Metropolitan University
QUESTIONS
- What is the purpose of each kind of medium?
- Would you expect more or less anaerobes than aerobes? Why?
- What is the significance of biofilm presence in medical equipment?
Contributors and Attributions
Jackie Reynolds, Professor of Biology (Richland College)

