
1.8: Plating on Petri Plates for Isolation
- Page ID
- 79234

\( \newcommand{\vecs}[1]{\overset { \scriptstyle \rightharpoonup} {\mathbf{#1}} } \)
\( \newcommand{\vecd}[1]{\overset{-\!-\!\rightharpoonup}{\vphantom{a}\smash {#1}}} \)
\( \newcommand{\dsum}{\displaystyle\sum\limits} \)
\( \newcommand{\dint}{\displaystyle\int\limits} \)
\( \newcommand{\dlim}{\displaystyle\lim\limits} \)
\( \newcommand{\id}{\mathrm{id}}\) \( \newcommand{\Span}{\mathrm{span}}\)
( \newcommand{\kernel}{\mathrm{null}\,}\) \( \newcommand{\range}{\mathrm{range}\,}\)
\( \newcommand{\RealPart}{\mathrm{Re}}\) \( \newcommand{\ImaginaryPart}{\mathrm{Im}}\)
\( \newcommand{\Argument}{\mathrm{Arg}}\) \( \newcommand{\norm}[1]{\| #1 \|}\)
\( \newcommand{\inner}[2]{\langle #1, #2 \rangle}\)
\( \newcommand{\Span}{\mathrm{span}}\)
\( \newcommand{\id}{\mathrm{id}}\)
\( \newcommand{\Span}{\mathrm{span}}\)
\( \newcommand{\kernel}{\mathrm{null}\,}\)
\( \newcommand{\range}{\mathrm{range}\,}\)
\( \newcommand{\RealPart}{\mathrm{Re}}\)
\( \newcommand{\ImaginaryPart}{\mathrm{Im}}\)
\( \newcommand{\Argument}{\mathrm{Arg}}\)
\( \newcommand{\norm}[1]{\| #1 \|}\)
\( \newcommand{\inner}[2]{\langle #1, #2 \rangle}\)
\( \newcommand{\Span}{\mathrm{span}}\) \( \newcommand{\AA}{\unicode[.8,0]{x212B}}\)
\( \newcommand{\vectorA}[1]{\vec{#1}} % arrow\)
\( \newcommand{\vectorAt}[1]{\vec{\text{#1}}} % arrow\)
\( \newcommand{\vectorB}[1]{\overset { \scriptstyle \rightharpoonup} {\mathbf{#1}} } \)
\( \newcommand{\vectorC}[1]{\textbf{#1}} \)
\( \newcommand{\vectorD}[1]{\overrightarrow{#1}} \)
\( \newcommand{\vectorDt}[1]{\overrightarrow{\text{#1}}} \)
\( \newcommand{\vectE}[1]{\overset{-\!-\!\rightharpoonup}{\vphantom{a}\smash{\mathbf {#1}}}} \)
\( \newcommand{\vecs}[1]{\overset { \scriptstyle \rightharpoonup} {\mathbf{#1}} } \)
\(\newcommand{\longvect}{\overrightarrow}\)
\( \newcommand{\vecd}[1]{\overset{-\!-\!\rightharpoonup}{\vphantom{a}\smash {#1}}} \)
\(\newcommand{\avec}{\mathbf a}\) \(\newcommand{\bvec}{\mathbf b}\) \(\newcommand{\cvec}{\mathbf c}\) \(\newcommand{\dvec}{\mathbf d}\) \(\newcommand{\dtil}{\widetilde{\mathbf d}}\) \(\newcommand{\evec}{\mathbf e}\) \(\newcommand{\fvec}{\mathbf f}\) \(\newcommand{\nvec}{\mathbf n}\) \(\newcommand{\pvec}{\mathbf p}\) \(\newcommand{\qvec}{\mathbf q}\) \(\newcommand{\svec}{\mathbf s}\) \(\newcommand{\tvec}{\mathbf t}\) \(\newcommand{\uvec}{\mathbf u}\) \(\newcommand{\vvec}{\mathbf v}\) \(\newcommand{\wvec}{\mathbf w}\) \(\newcommand{\xvec}{\mathbf x}\) \(\newcommand{\yvec}{\mathbf y}\) \(\newcommand{\zvec}{\mathbf z}\) \(\newcommand{\rvec}{\mathbf r}\) \(\newcommand{\mvec}{\mathbf m}\) \(\newcommand{\zerovec}{\mathbf 0}\) \(\newcommand{\onevec}{\mathbf 1}\) \(\newcommand{\real}{\mathbb R}\) \(\newcommand{\twovec}[2]{\left[\begin{array}{r}#1 \\ #2 \end{array}\right]}\) \(\newcommand{\ctwovec}[2]{\left[\begin{array}{c}#1 \\ #2 \end{array}\right]}\) \(\newcommand{\threevec}[3]{\left[\begin{array}{r}#1 \\ #2 \\ #3 \end{array}\right]}\) \(\newcommand{\cthreevec}[3]{\left[\begin{array}{c}#1 \\ #2 \\ #3 \end{array}\right]}\) \(\newcommand{\fourvec}[4]{\left[\begin{array}{r}#1 \\ #2 \\ #3 \\ #4 \end{array}\right]}\) \(\newcommand{\cfourvec}[4]{\left[\begin{array}{c}#1 \\ #2 \\ #3 \\ #4 \end{array}\right]}\) \(\newcommand{\fivevec}[5]{\left[\begin{array}{r}#1 \\ #2 \\ #3 \\ #4 \\ #5 \\ \end{array}\right]}\) \(\newcommand{\cfivevec}[5]{\left[\begin{array}{c}#1 \\ #2 \\ #3 \\ #4 \\ #5 \\ \end{array}\right]}\) \(\newcommand{\mattwo}[4]{\left[\begin{array}{rr}#1 \amp #2 \\ #3 \amp #4 \\ \end{array}\right]}\) \(\newcommand{\laspan}[1]{\text{Span}\{#1\}}\) \(\newcommand{\bcal}{\cal B}\) \(\newcommand{\ccal}{\cal C}\) \(\newcommand{\scal}{\cal S}\) \(\newcommand{\wcal}{\cal W}\) \(\newcommand{\ecal}{\cal E}\) \(\newcommand{\coords}[2]{\left\{#1\right\}_{#2}}\) \(\newcommand{\gray}[1]{\color{gray}{#1}}\) \(\newcommand{\lgray}[1]{\color{lightgray}{#1}}\) \(\newcommand{\rank}{\operatorname{rank}}\) \(\newcommand{\row}{\text{Row}}\) \(\newcommand{\col}{\text{Col}}\) \(\renewcommand{\row}{\text{Row}}\) \(\newcommand{\nul}{\text{Nul}}\) \(\newcommand{\var}{\text{Var}}\) \(\newcommand{\corr}{\text{corr}}\) \(\newcommand{\len}[1]{\left|#1\right|}\) \(\newcommand{\bbar}{\overline{\bvec}}\) \(\newcommand{\bhat}{\widehat{\bvec}}\) \(\newcommand{\bperp}{\bvec^\perp}\) \(\newcommand{\xhat}{\widehat{\xvec}}\) \(\newcommand{\vhat}{\widehat{\vvec}}\) \(\newcommand{\uhat}{\widehat{\uvec}}\) \(\newcommand{\what}{\widehat{\wvec}}\) \(\newcommand{\Sighat}{\widehat{\Sigma}}\) \(\newcommand{\lt}{<}\) \(\newcommand{\gt}{>}\) \(\newcommand{\amp}{&}\) \(\definecolor{fillinmathshade}{gray}{0.9}\)- Define "colony" and describe how colonies arise.
- Successfully identify isolated colonies.
- Characterize colony appearances and distinguish different microbial species based on colony appearance.
- Successfully execute a zig-zag streak plate and describe how and when this approach is used.
- Successfully execute a quadrant streak plate and describe how and when this approach is used.
- Describe and interpret how streak plate approaches result in the petri plate growth patterns.
Bacterial Colonies
If a single bacterial cell is placed on the surface of a TSA agar plate and allowed to multiply for 24 to 48 hours, it would grow into a mass of cells visible to the human eye called a colony. Colonies formed by the same microbial species growing on the same medium will all look alike. This is because the cell shape, pigmentation, division plane, rate of cell division and other characteristics of the organism result in the progeny cells stacking on one another in a pattern resulting in a characteristic colony form.
When identifying unknown microorganisms, to separate a mixture of microbial species, an isolated colony must be obtained. Since a single colony began with the growth of a single cell, all of the cells in that colony should be of a single species. Therefore, an isolated colony can be transferred to a sterile medium to isolate the species at the beginning of the identification process. Isolated colonies are found on their own away from other growth. A colony that is touching other colonies is not considered isolated (see Figure 1).
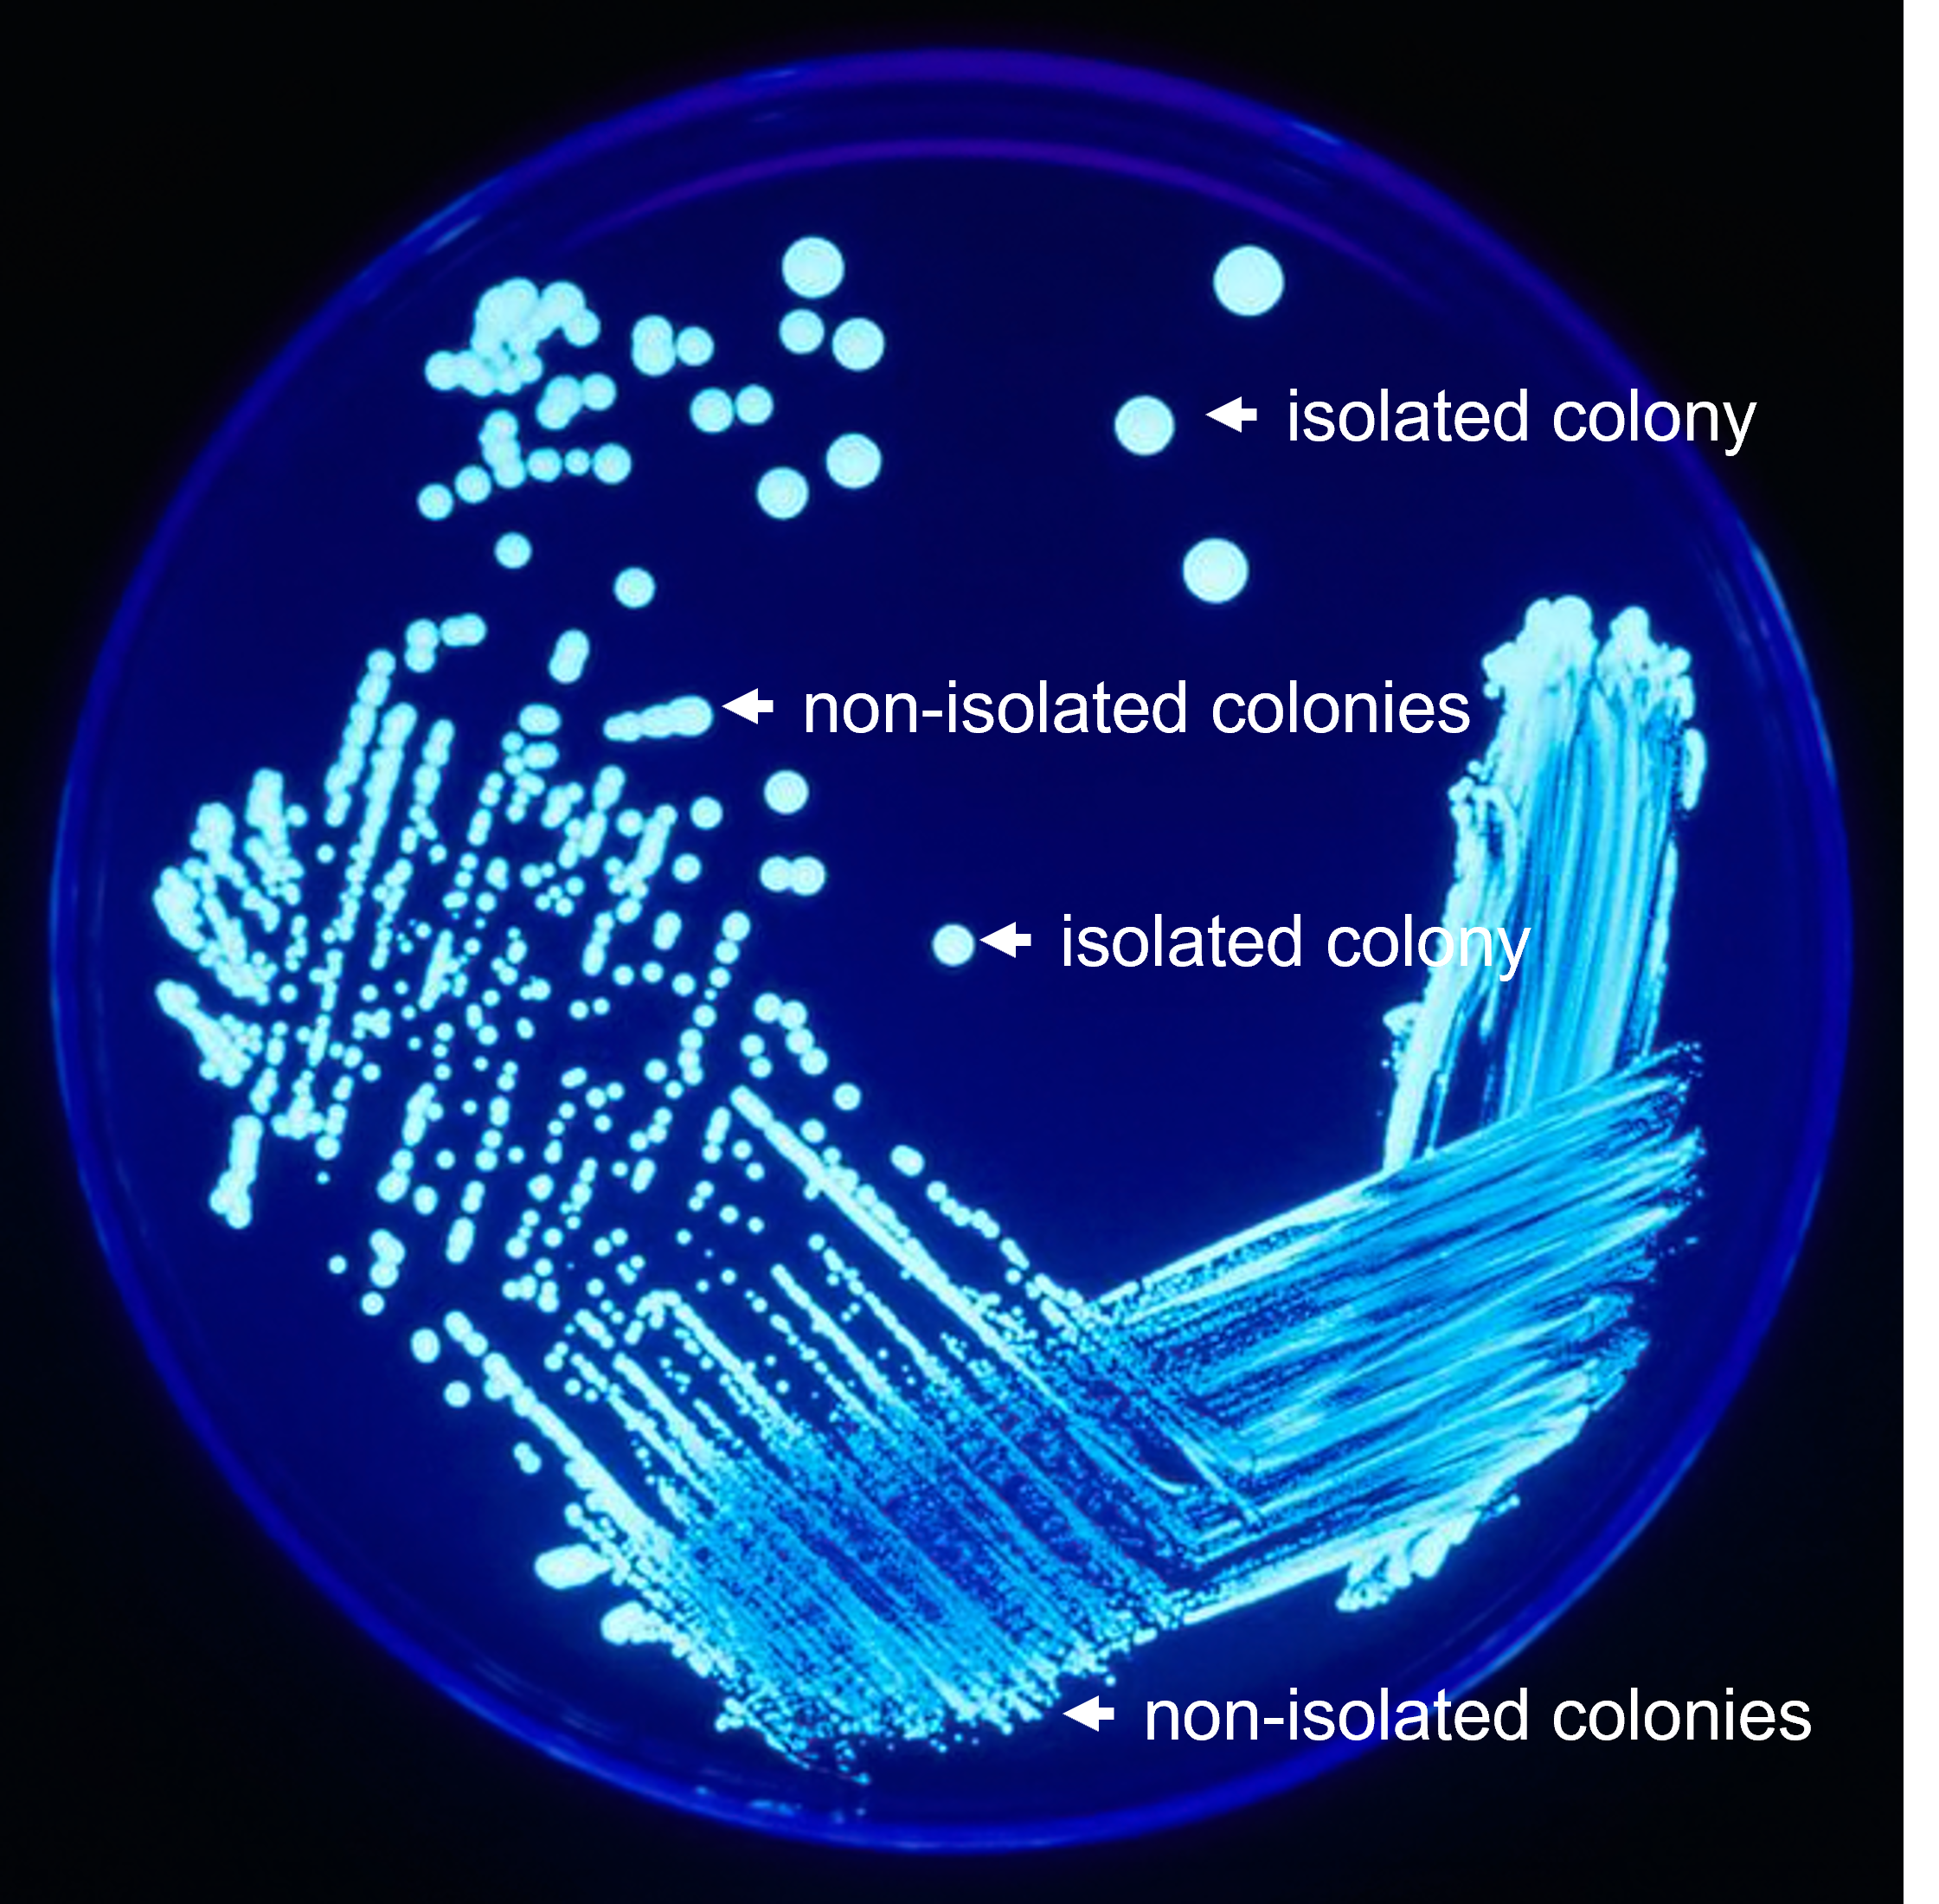
Figure 1: A petri plate with bacterial growth showing the distinction between isolated colonies and non-isolated colonies.
Characteristics of Colonies on a Petri Plates
Even on general purpose growth media, bacteria can exhibit characteristic patterns of growth. Some examples are shown below. While these growth patterns are an important piece of information when identifying a bacterial species, they are not sufficient for a positive identification. Staining procedures and metabolic tests must be used for a definitive identification.
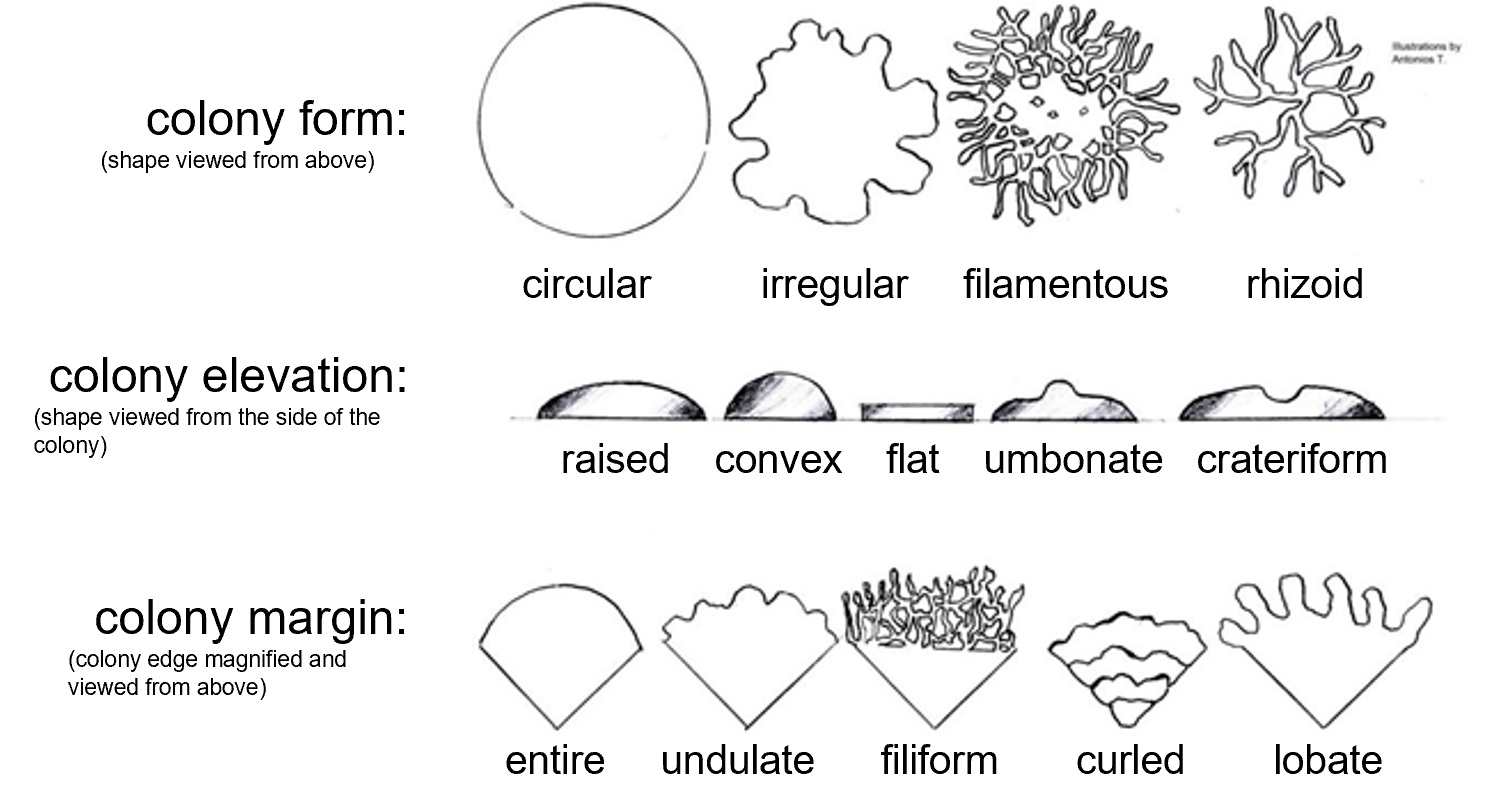
Figure 2: A guide for classifying colony characteristics. Colony form is the overall shape of the colony (circular, irregular, filamentous, or rhizoid) when viewed from above. Colony elevation examines the height and shape of the growth above the surface of the petri plate agar (raised, convex, flat, umbonate, or crateriform) and is best determined by viewing the colony from its side. Colony margin examines the shape of the edge of the colony when magnified (entire, undulate, filiform, curled, or lobate).
Zig Zag Streak Plate
If you swab a door handle, where bacteria are likely to be present, and then pass the swab across the surface of a TSA plate, cells would be deposited onto the surface from the swab. Initially, the swab may have a fairly high concentration of cells and the area touched by it will have lots of different cell types placed close together. After these grow up, the cells’ progeny will crowd together and overlap with other cells’ progeny forming areas called confluent growth.
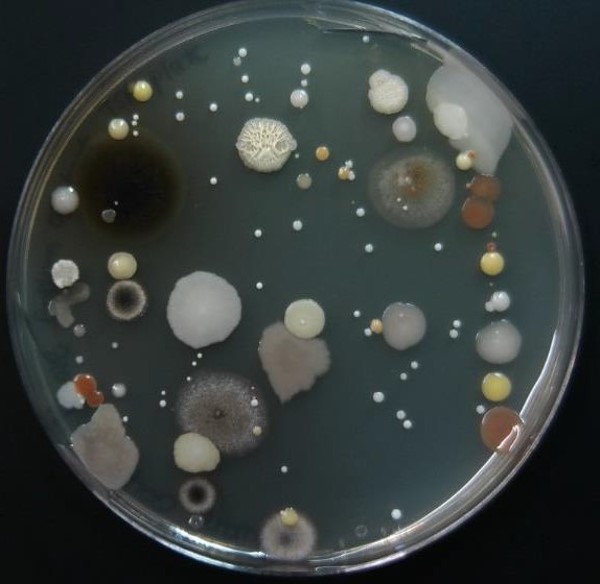
Figure 3: Zig zag streak plate of an environmental sample. The colonies have diverse colors, textures, and forms. This diversity is because different microbial species produce different colony characteristics. Environmental samples will contain mixtures of microbial species.
As the swab moves across the agar leaving cells on the agar in a zig zag pattern as shown in Figure 4, regions touched later in the process will have fewer and fewer cells. Individual cells are far enough apart that each one would grow into a discrete isolated colony. The result may look something like Figure 3. Because the door handle likely has a variety of microbes on it, there are numerous colony forms. This technique is called a zig zag streak plate and is one type of isolation streak method.

Figure 4: The zig zag streaking pattern uses streak directions moving left to right, then right to left by snaking across the petri plate. The entire petri plate surface is used. The result is bacterial growth that is dense (confluent) at the location of the first "zig" and becomes successively less dense as the streak snakes across the petri plate. Ideally, individual colonies are present at the end of the streaking pattern.
The steps of the zig zag streak plate are:
- Aseptically obtain a sample using an inoculating loop or sterile cotton swab.
- Turn the agar plate right-side-up.
- Hold the plate lid so that it acts as a shield protecting the agar surface from microbes falling from the air.
- Starting the streak on the side of the plate farthest from your dominant hand, pass the loop on the surface of the agar in a zig zag pattern filling the surface of the plate. See Figure 4.
- Replace the lid, and immediately incinerate the loop or dispose of the cotton swab.
- Place the plate upside-down for incubation.
Some tips for a good zigzag streak: Use as much of the agar surface as you can. Make broad strokes that span the width of the plate.
Quadrant Streak Plate
Now consider streaking a sample from a pure TSA broth culture prepared for you. If there is visible turbidity, there will be a high density of cells. If you used the same zig zag streaking pattern, the cells would never be reduced in concentration such that you could get isolated colonies. In order to reduce the cell density on the surface of the plate, we can use a quadrant streak plate.
The quadrant streak plate reduces or dilutes the number of cells using successive streaking zones on the petri plate and flaming the inoculation loop between zones. The petri plate is divided into four sections or zones. Bacteria are deposited in the first section at full strength from the source. Then the inoculating loop is sterilized. From this point on, no additional cells are added to the agar surface. The sterile loop is used to spread out cells that have already been placed on the plate. After spreading cells from the first area to the second, the loop is sterilized again. This eliminates extra cells from the loop. The sterile loop is used to spread some cells from the second area into the third area diluting them further. Cells are spread into a fourth area from the third area after the loop is sterilized. After all the regions have been inoculated, the hope is that in the last section cells are far enough apart so that they grow up into isolated colonies.
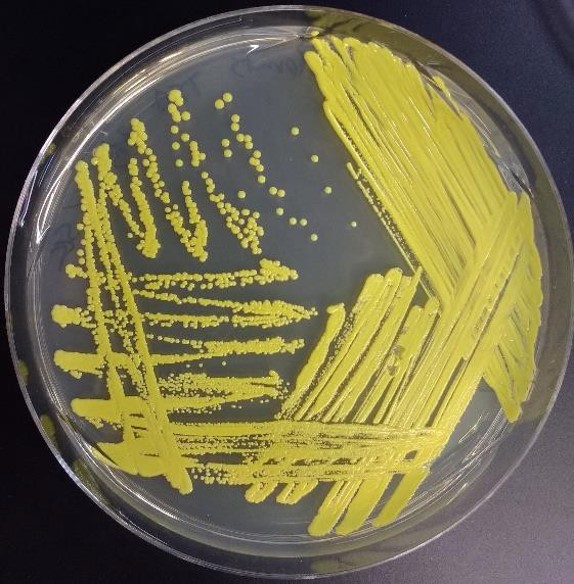
Figure 5: Bacteria growth on a petri plate streaked using the quadrant streak plate technique. Four zones of growth are apparent with successively less growth in each area/zone. Isolated colonies are present in the fourth area/zone streaked.
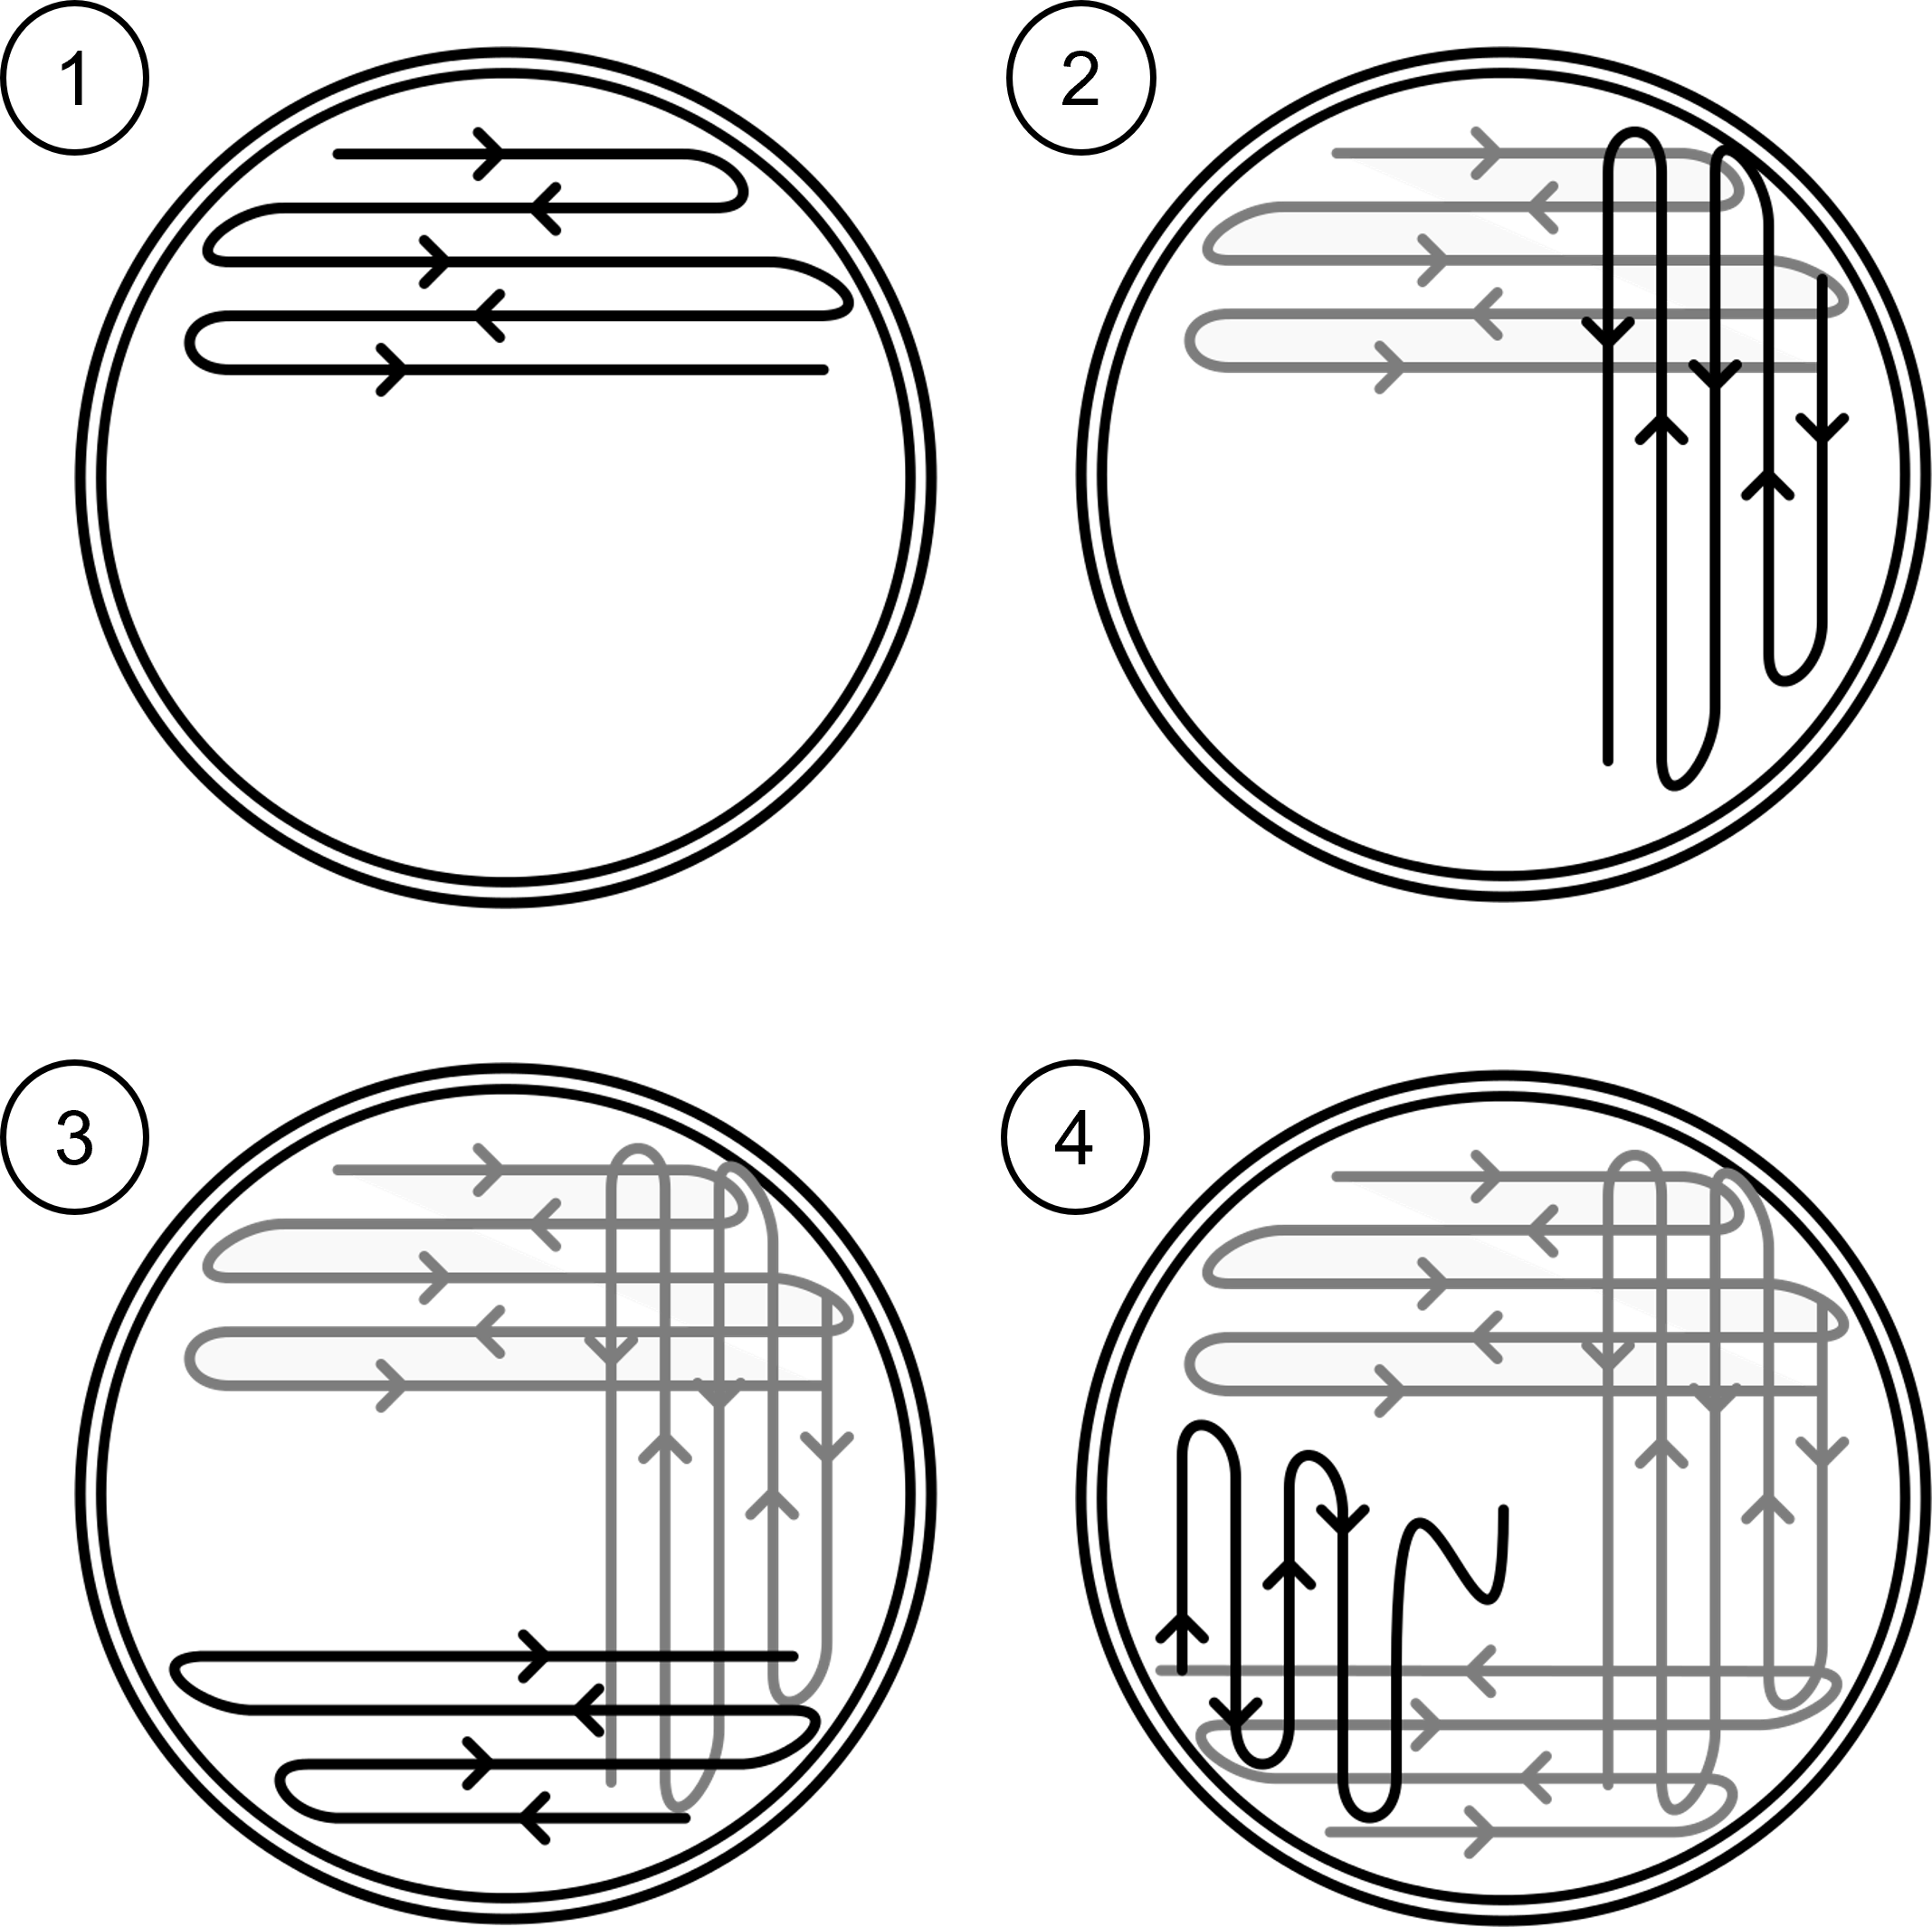
Figure 6: Quadrant streak plate technique to create four areas/zones with successively less growth. (1) Zone one occupies one fourth of the petri plate with the inoculating loop snaking back and forth in that quadrant. After zone one is completed, the inoculating loop is flamed to kill all microbes. (2) Zone two occupies a separate quarter of the petri plate and takes bacteria streaked from the first area/zone rather than collecting more bacteria from the original culture. After zone two is completed, the inoculating loop is flamed to kill all microbes. (3) Zone three occupies a separate quarter of the petri plate and takes bacteria streaked from the second area/zone. After zone three is completed, the inoculating loop is flamed to kill all microbes. (4) Zone four pulls bacteria from the third zone.
This quadrant streak plate technique allows one to observe isolated colonies and characterize them and determine if your observations are consistent with our expectations for the organism you are working with. If you are working with a pure culture, you would expect that all the colonies would look the same, similar size, color, shape etc. One or more different looking colonies indicates your culture was contaminated or you created contamination by poor aseptic technique.
The steps of the quadrant streak plate technique are as follows:
- Aseptically obtain a loopful of the culture and set the tube back in a rack.
- Turn the plate right-side up and place it on a piece of white scratch paper so that the lines can be seen.
- Rotate the plate so that area/zone 1 is farthest from your dominate hand.
- Holding the plate lid so that it acts as a shield protecting the agar surface from microbes falling from the air, pass the loop on the surface of the agar in area 1 in the pattern shown.
- Replace the plate lid on the petri plate.
- Flame the loop and allow it to cool.
- Rotate the petri plate.
- Spread the cells already on the petri plate agar surface in area/zone 1 with the sterile loop by streaking in the pattern shown. This step pulls highly concentrated cells from area/zone 1 into area/zone 2 spreading them out.
- Replace the plate lid on the petri plate.
- Flame the loop and allow it to cool.
- Rotate the petri plate.
- Again, spread some of the cells from area/zone 2 into area/zone 3 by streaking in the pattern shown.
- Replace the plate lid on the petri plate.
- Flame the loop and allow it to cool.
- Rotate the petri plate.
- Again, spread some of the cells from area/zone 3 into area/zone 4 by streaking in the pattern shown.
- Replace the plate lid and flame the loop again before setting it down.
- Turn the plate upside-down for incubation and storage.
In this technique it is essential that you flame the loop after each area is inoculated. This is what reduces the cell density because you are spreading cells already on the plate. You are not adding additional cells by using a loop with cells on it. You eliminate additional cells by flaming. After incubation, the goal is at least 3 well isolated colonies.
Keep in mind that you want to use as much of the agar surface as possible. Your streaks should span the width of the plate. If you keep touching the previous high density streak, you will pull too many cells into the next area and will not reduce the number enough to get isolated colonies. If you do not cross over the previous area enough, you will not have enough cells in the next one.
If you choose to cool your loop in the agar, always use a spot close to the edge and away from any previous streak. The resulting growth pattern should be dense growth in area/zone 1, more diffuse in area/zone 2 and less growth in area/zone 3, and the least growth in area/zone 4.
Lab Instructions
- Each person will label 1 TSA plate with their name, “quadrant streak plate,” and with the bacterial sample they will be streaking (one of the following - divide the following three cultures so that each person in your group does a streak plate of a different culture):
- Escherichia coli
- Serratia marcescens
- Escherichia coli & Serratia marcescens (mixture)
- Follow the instructions above for the quadrant streak plate technique.
- Invert the Petri plate and incubate at 30 °C.
- Next class, examine the colonies and characterize the colony form, elevation, margin, diameter, and color.
- Either make a drawing of the plates of your group or take photos of the plates.
Streak Plate Results
- Fill out the table below to describe the types of colonies observed:
|
Escherichia coli & Serratia marcescens |
||||
|---|---|---|---|---|
|
Escherichia coli |
Serratia marcescens |
Colony type 1 |
Colony type 2 |
|
|
Colony form |
||||
|
Colony elevation |
||||
|
Colony margin |
||||
|
Colony color |
||||
|
Colony diameter (mm) |
||||
2. Make detailed drawings of your plates (using color). Alternatively, you can take images of the plates and attach them below.
- Did you obtain isolated colonies on each of the plates?
Escherichia coli:
Serratia marcescens:
Escherichia coli & Serratia marcescens (mixture):
- Explain how the streak-plate technique dilutes and spreads out microorganisms to form individual colonies.
- Considering how you streaked the plates, which area of the streak plate will always contain:
the greatest amount of growth:
the least amount of growth:
- Does each individual colony represent the growth of one cell? Explain your answer.
- Why can a single colony on a plate be used to start a pure culture?
Works Cited
Franklund, C. (n.d.). Microbiology Laboratory Manual, Observing and Recording the Microbial World. Farris State University. Retrieved 2018, from https://github.com/WeeBeasties/microbiology- laboratory-manual
Attributions
- Chapter Image: Legionella Plate 01.png by CDC/James Gathany is in the public domain.
- Klamm’s Microbiology Laboratory Manual by Loretta Sanderson Klamm is licensed under CC BY-NC-SA 4.0
- Laboratory Exercises in Microbiology: Discovering the Unseen World Through Hands-On Investigation by Joan Petersen and Susan McLaughlin is licensed under CC BY-NC-SA 4.0
- Streak plates 1.svg by Reytan is in the public domain.
- Streak plates 2.svg by Reytan is in the public domain.
- Streak plates 3.svg by Reytan is in the public domain.
- Streak plates 4.svg by Reytan is in the public domain.
- Streak plates 5.svg by Reytan is in the public domain.
- Streak plates 6.svg by Reytan is in the public domain.