
12.8: Laboratory Activities and Assignment
- Page ID
- 53691

\( \newcommand{\vecs}[1]{\overset { \scriptstyle \rightharpoonup} {\mathbf{#1}} } \)
\( \newcommand{\vecd}[1]{\overset{-\!-\!\rightharpoonup}{\vphantom{a}\smash {#1}}} \)
\( \newcommand{\id}{\mathrm{id}}\) \( \newcommand{\Span}{\mathrm{span}}\)
( \newcommand{\kernel}{\mathrm{null}\,}\) \( \newcommand{\range}{\mathrm{range}\,}\)
\( \newcommand{\RealPart}{\mathrm{Re}}\) \( \newcommand{\ImaginaryPart}{\mathrm{Im}}\)
\( \newcommand{\Argument}{\mathrm{Arg}}\) \( \newcommand{\norm}[1]{\| #1 \|}\)
\( \newcommand{\inner}[2]{\langle #1, #2 \rangle}\)
\( \newcommand{\Span}{\mathrm{span}}\)
\( \newcommand{\id}{\mathrm{id}}\)
\( \newcommand{\Span}{\mathrm{span}}\)
\( \newcommand{\kernel}{\mathrm{null}\,}\)
\( \newcommand{\range}{\mathrm{range}\,}\)
\( \newcommand{\RealPart}{\mathrm{Re}}\)
\( \newcommand{\ImaginaryPart}{\mathrm{Im}}\)
\( \newcommand{\Argument}{\mathrm{Arg}}\)
\( \newcommand{\norm}[1]{\| #1 \|}\)
\( \newcommand{\inner}[2]{\langle #1, #2 \rangle}\)
\( \newcommand{\Span}{\mathrm{span}}\) \( \newcommand{\AA}{\unicode[.8,0]{x212B}}\)
\( \newcommand{\vectorA}[1]{\vec{#1}} % arrow\)
\( \newcommand{\vectorAt}[1]{\vec{\text{#1}}} % arrow\)
\( \newcommand{\vectorB}[1]{\overset { \scriptstyle \rightharpoonup} {\mathbf{#1}} } \)
\( \newcommand{\vectorC}[1]{\textbf{#1}} \)
\( \newcommand{\vectorD}[1]{\overrightarrow{#1}} \)
\( \newcommand{\vectorDt}[1]{\overrightarrow{\text{#1}}} \)
\( \newcommand{\vectE}[1]{\overset{-\!-\!\rightharpoonup}{\vphantom{a}\smash{\mathbf {#1}}}} \)
\( \newcommand{\vecs}[1]{\overset { \scriptstyle \rightharpoonup} {\mathbf{#1}} } \)
\( \newcommand{\vecd}[1]{\overset{-\!-\!\rightharpoonup}{\vphantom{a}\smash {#1}}} \)
Laboratory Activities and Assignment
Part 1: Review of the Head and Anterior Neck Muscles
1. Label the muscles in the diagram below by placing the name of each muscle listed below in the corresponding blank space on the figure below.
|
|
|
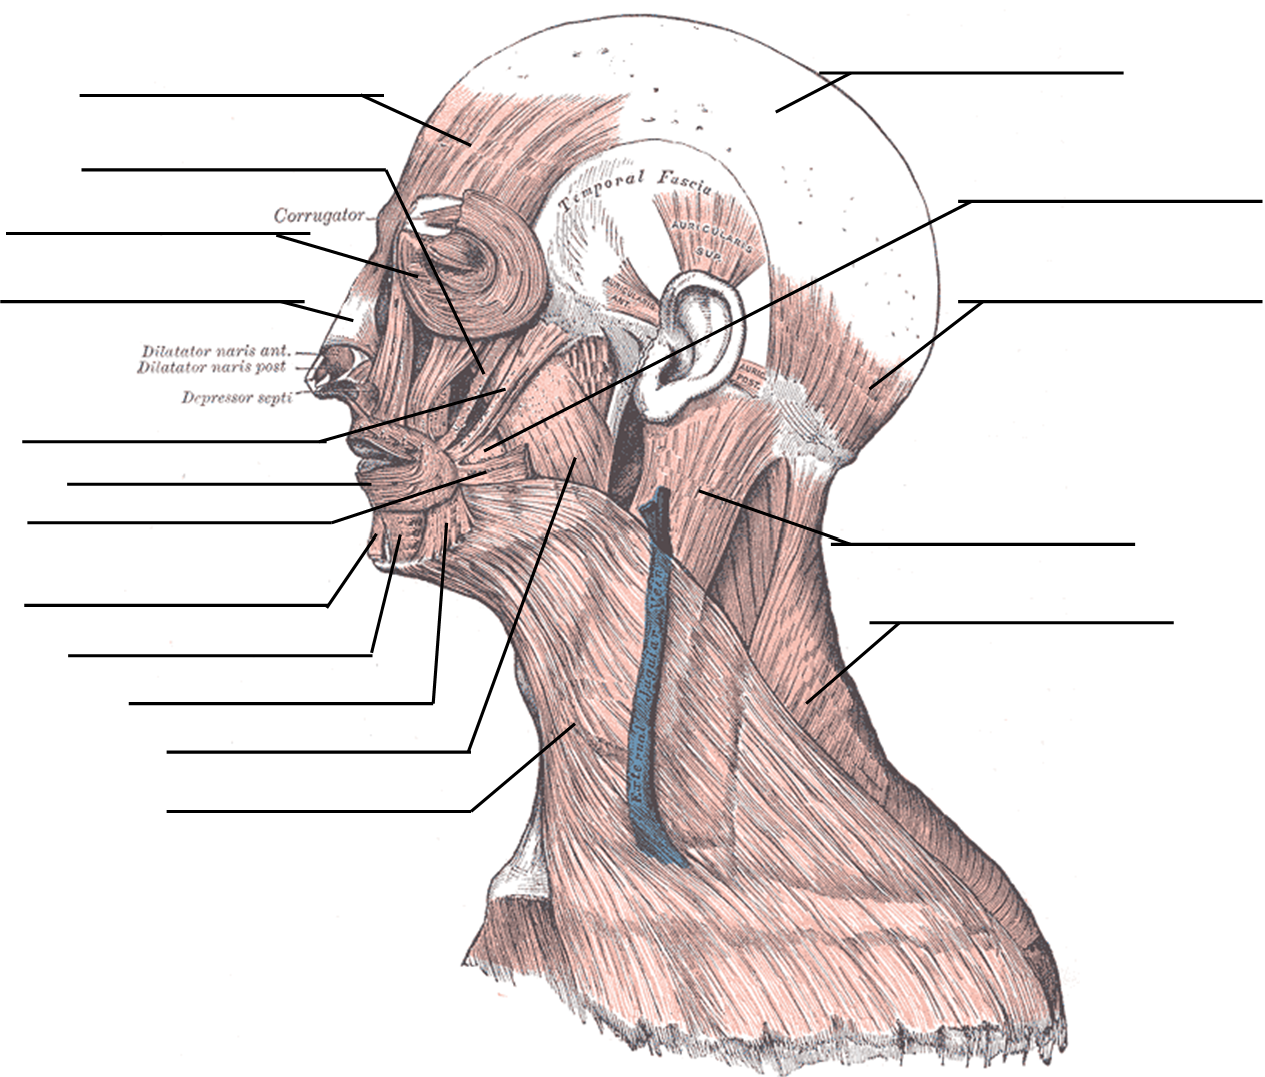
2. Label the muscles in the diagram below by placing the name of each muscle listed below in the corresponding blank space on the figure below.
|
|
|

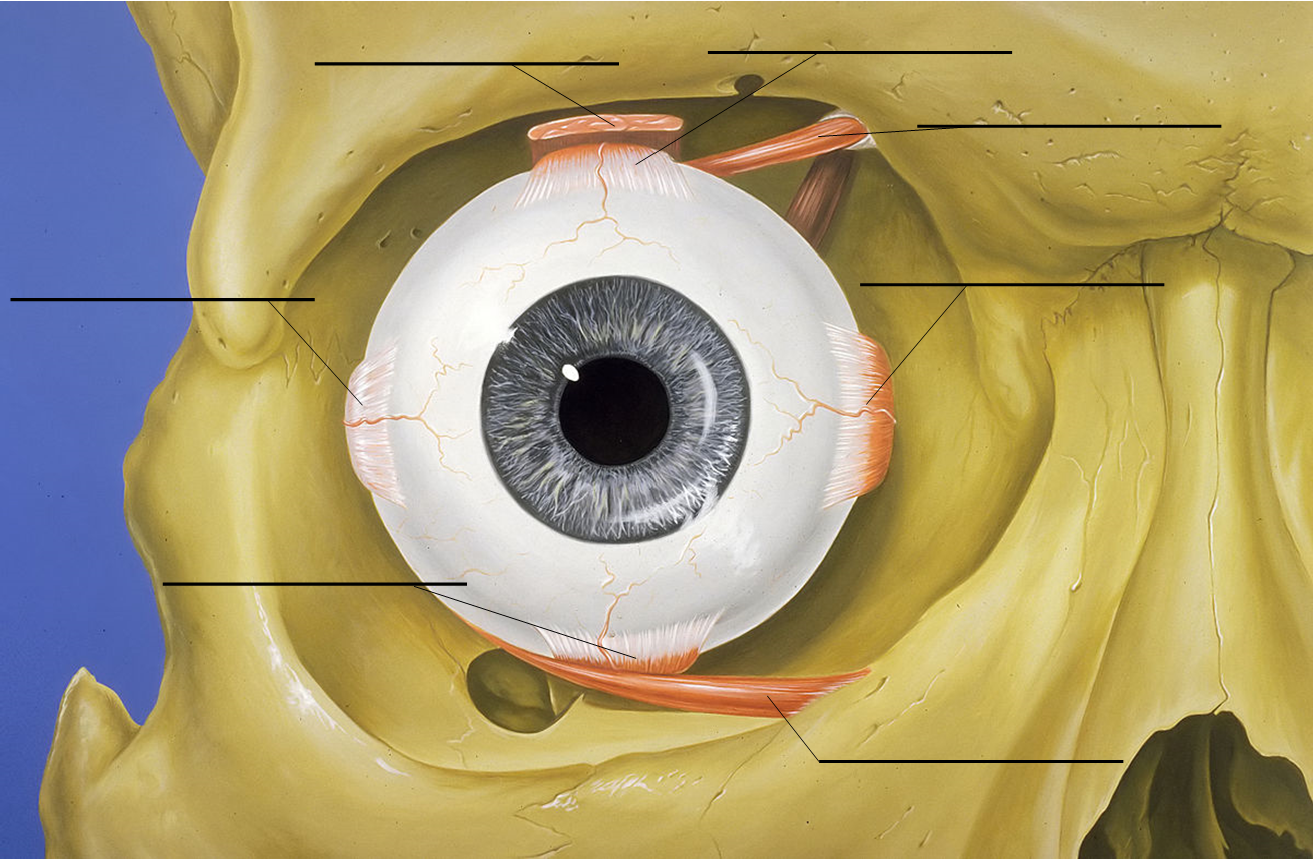
3. Label the muscles that move the eye and eyelid by placing the name of each muscle listed below in the corresponding blank space on the figure below.
|
|
|
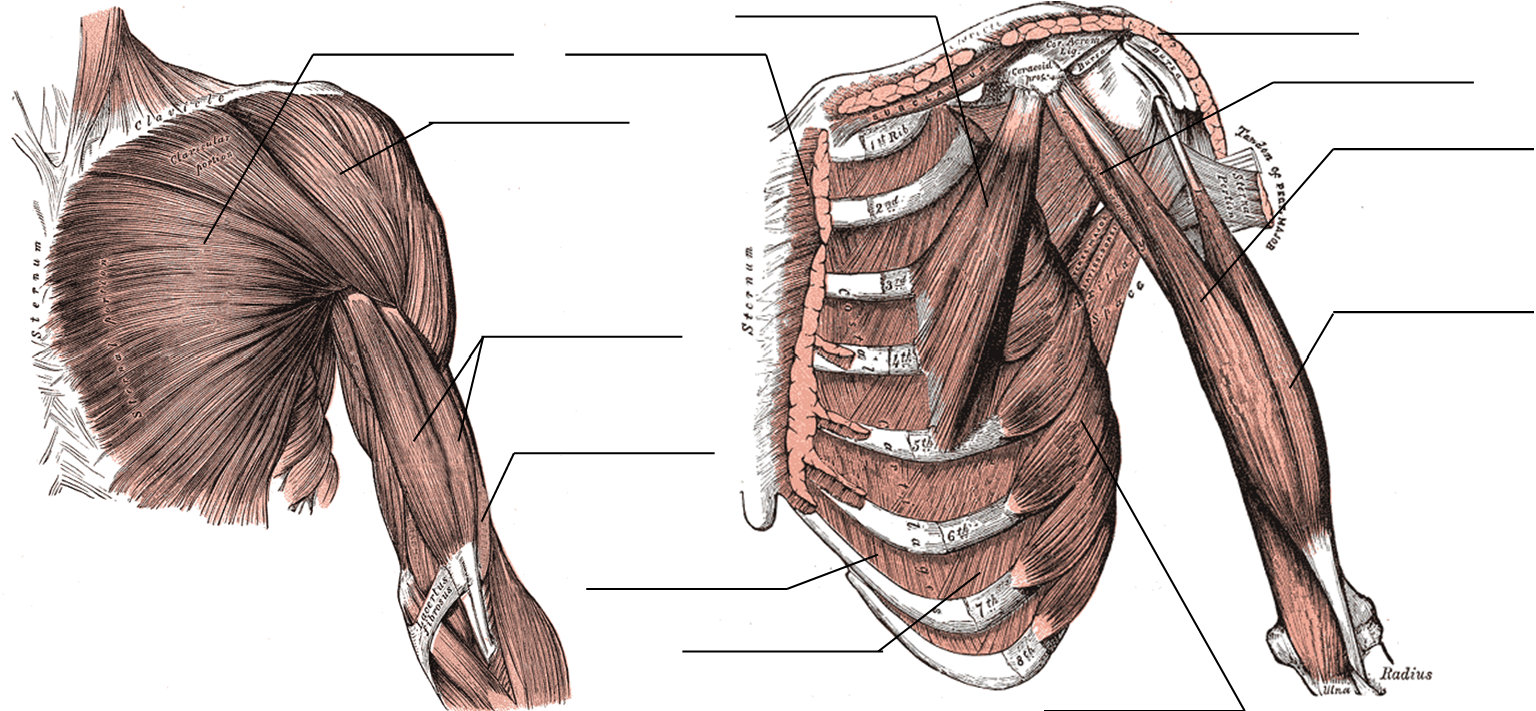
Part 2: Review of Trunk and Posterior Neck Muscles
1. Label the muscles in the diagram below by placing the name of each muscle listed below in the corresponding blank space on the figure below (left shows superficial muscles of anterior thorax and arm and right shows deeper muscles of anterior thorax and arm).
|
|
|
2. Label the muscles in the diagram below by placing the name of each muscle listed below in the corresponding blank space on the figure below (top left shows superficial anterior abdominal muscles, top right is one layer deeper than top left, bottom right shows one layer deeper than top right, and bottom left shows a cut through the multiple abdominal layers).
|
|
|


3. Label the muscles in the diagram below by placing the name of each muscle listed below in the corresponding blank space on the figure below (left side shows superficial muscles and right side shows deeper muscles of the posterior trunk and neck).
|
|
|

4. Label the muscles in the diagram below by placing the name of each muscle listed below in the corresponding blank space on the figure below (figure mostly shows only one of each of the paired muscles of the deep posterior trunk - focus on lateral positions of the long vertebral muscles in relation to each other and whether the muscles are associated with the cervical vertebrae, thoracic vertebrae, lumbar vertebrae, or the skull).
|
|
|

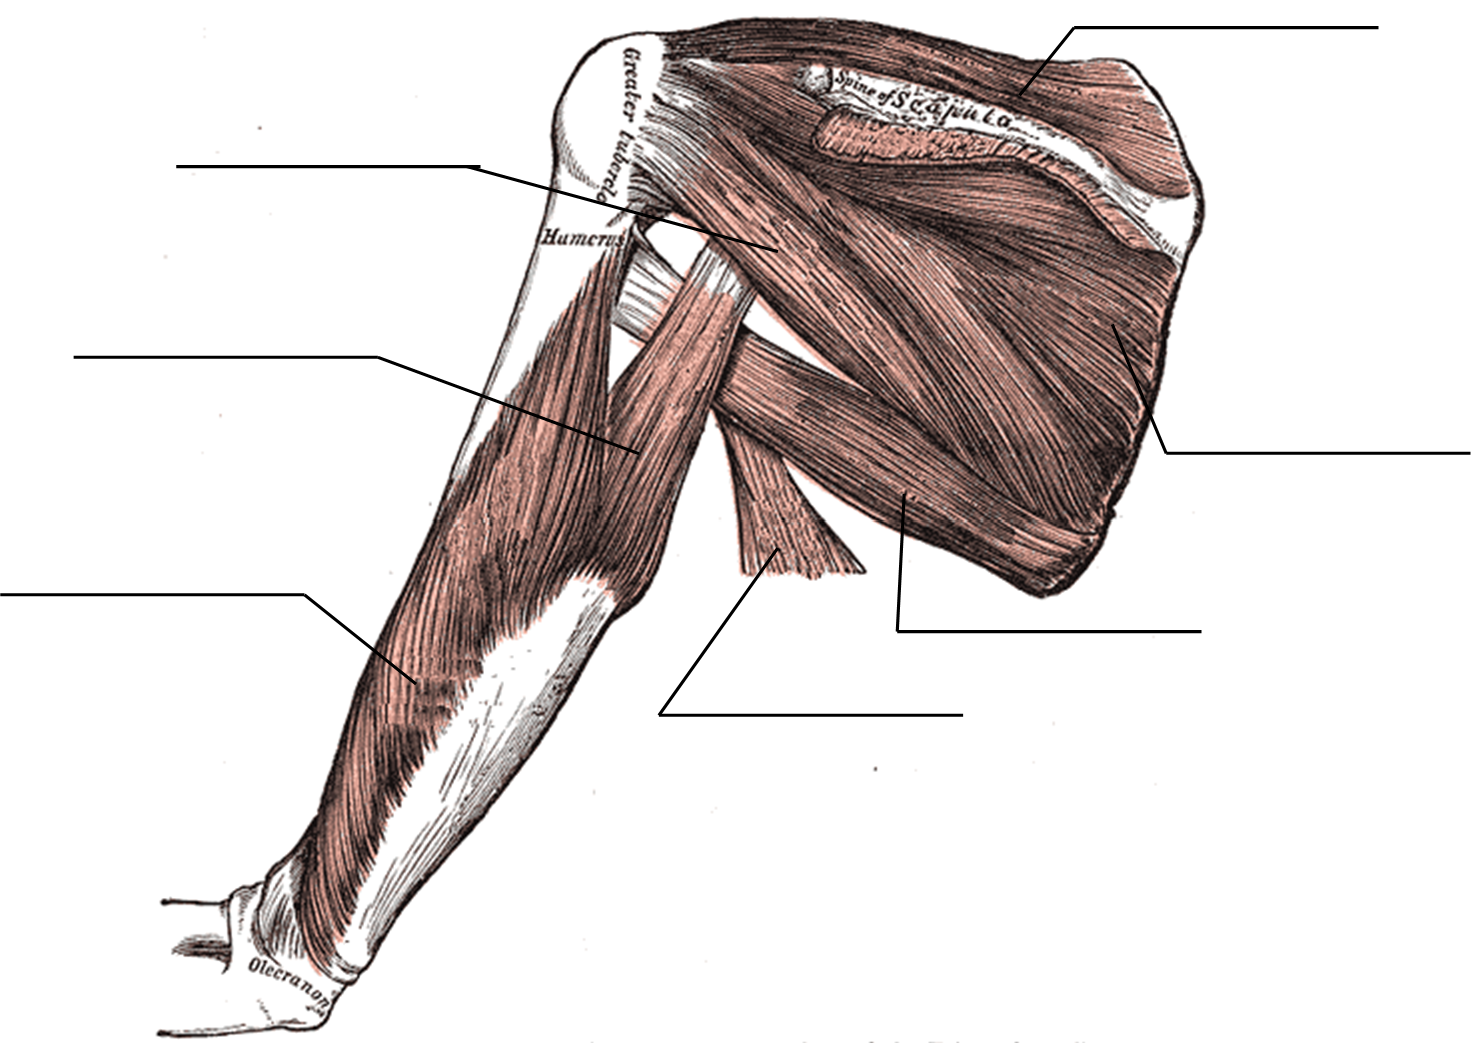
Part 3: Review of Rotator Cuff and Upper Limb Muscles
1. Label the muscles in the diagram below by placing the name of each muscle listed below in the corresponding blank space on the figure below (figure shows posterior view of the arm and the scapula).
|
|
|
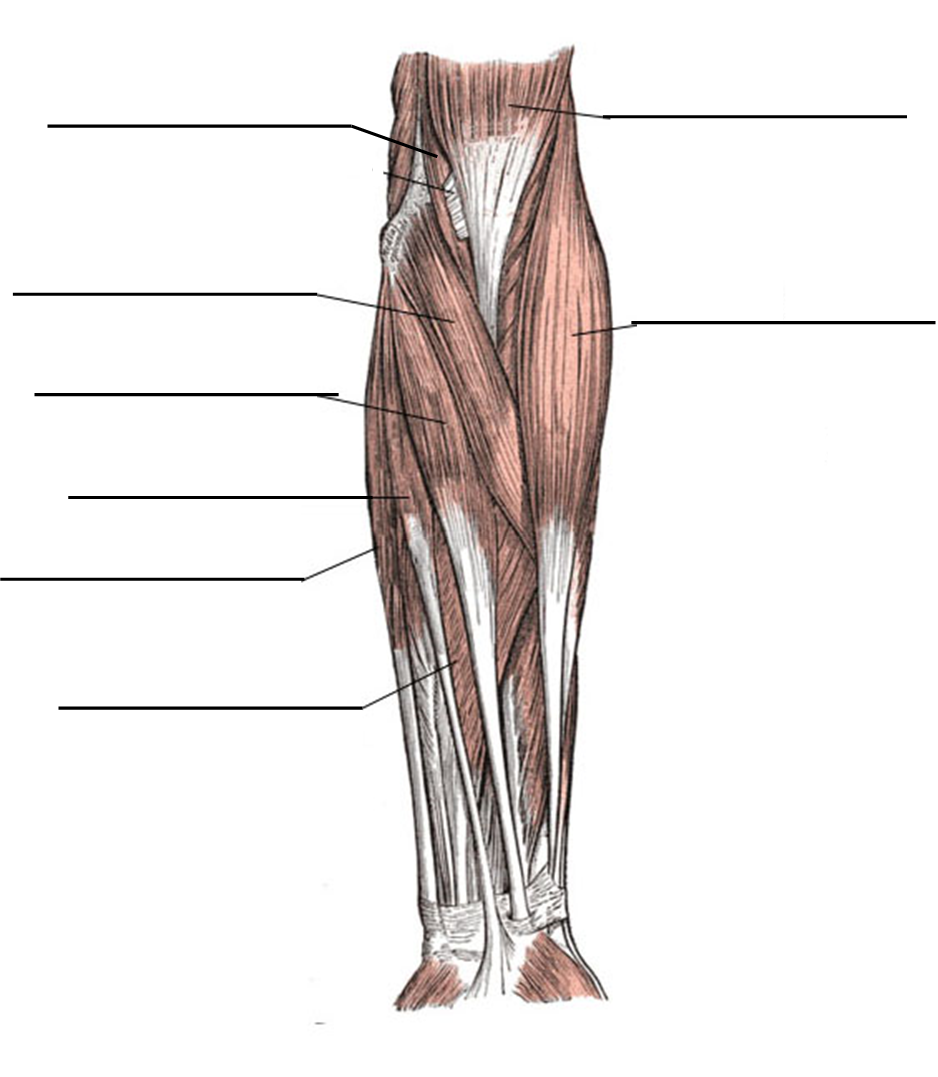
2. Label the muscles of the left superficial anterior antebrachium (forearm) by placing the name of each muscle listed below in the corresponding blank space on the figure below.
|
|
|
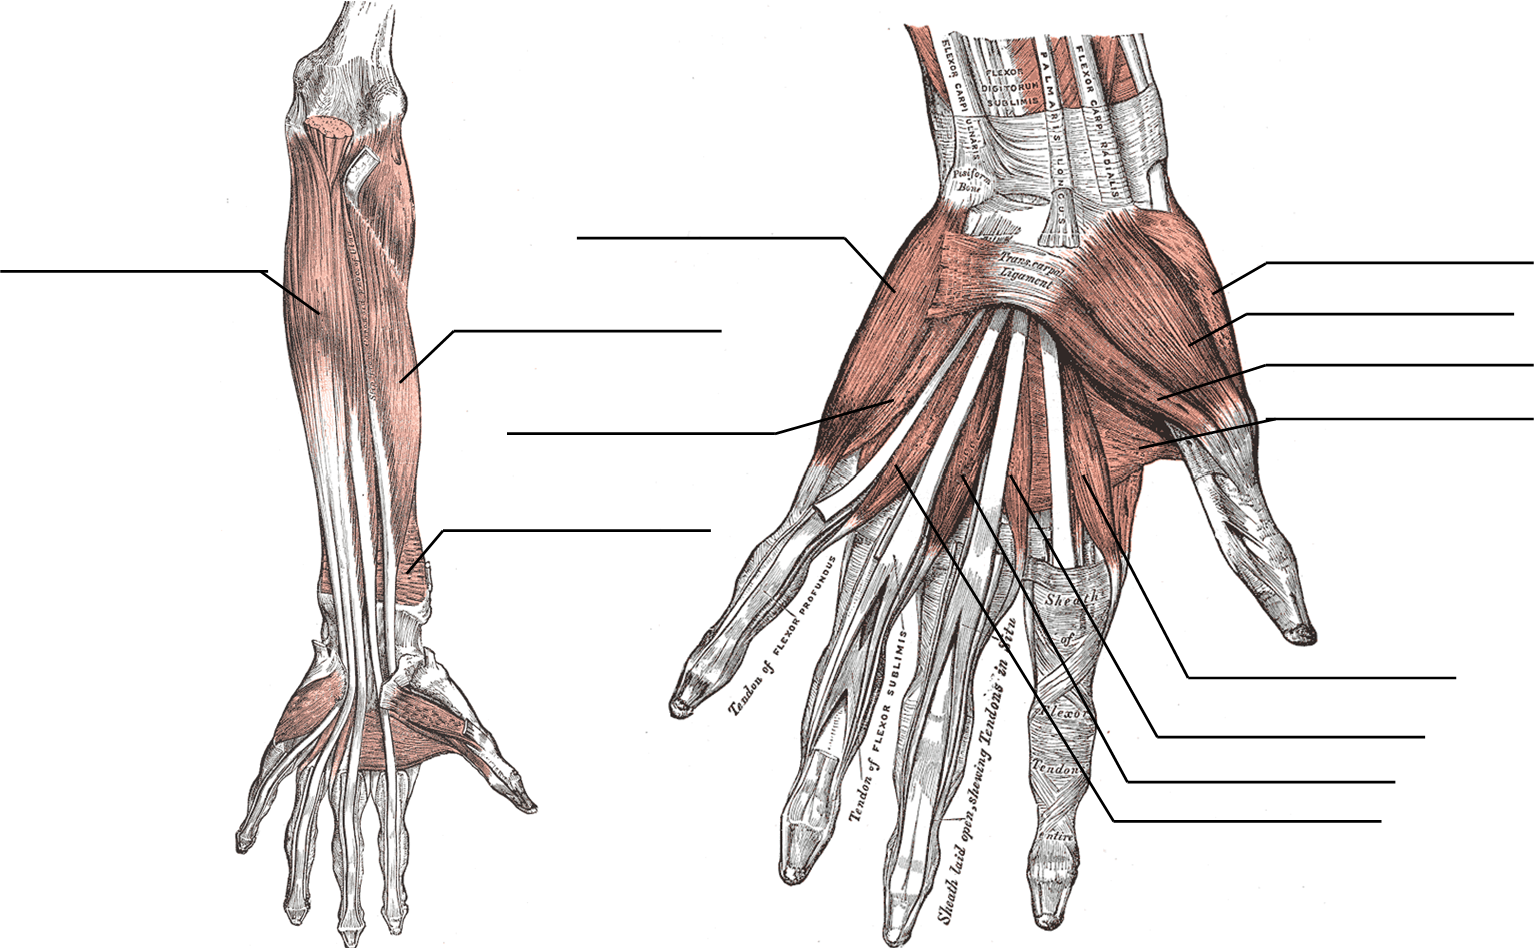
3. Label the muscles in the diagram below by placing the name of each muscle listed below in the corresponding blank space on the figure below (diagrams show the deeper muscles of the anterior left forearm and superficial palmar muscles of the left hand).
|
|
|
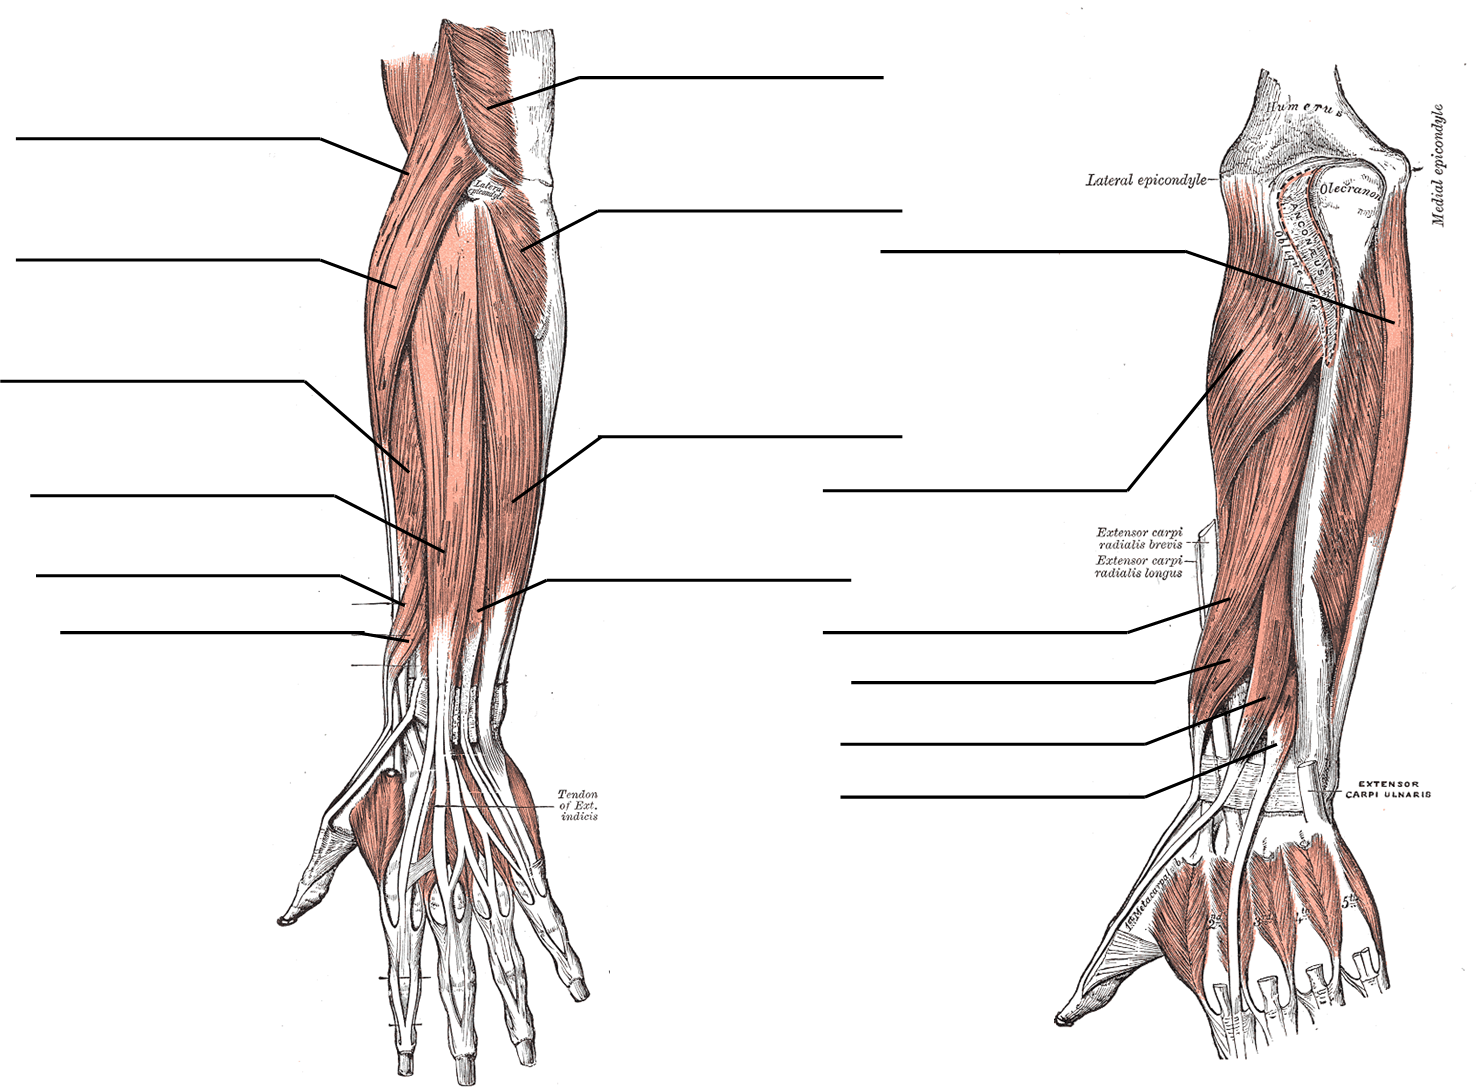
4. Label the muscles in the diagram below by placing the name of each muscle listed below in the corresponding blank space on the figure below.
|
|
|
Part 4: Review of Hip and Lower Limb Muscles
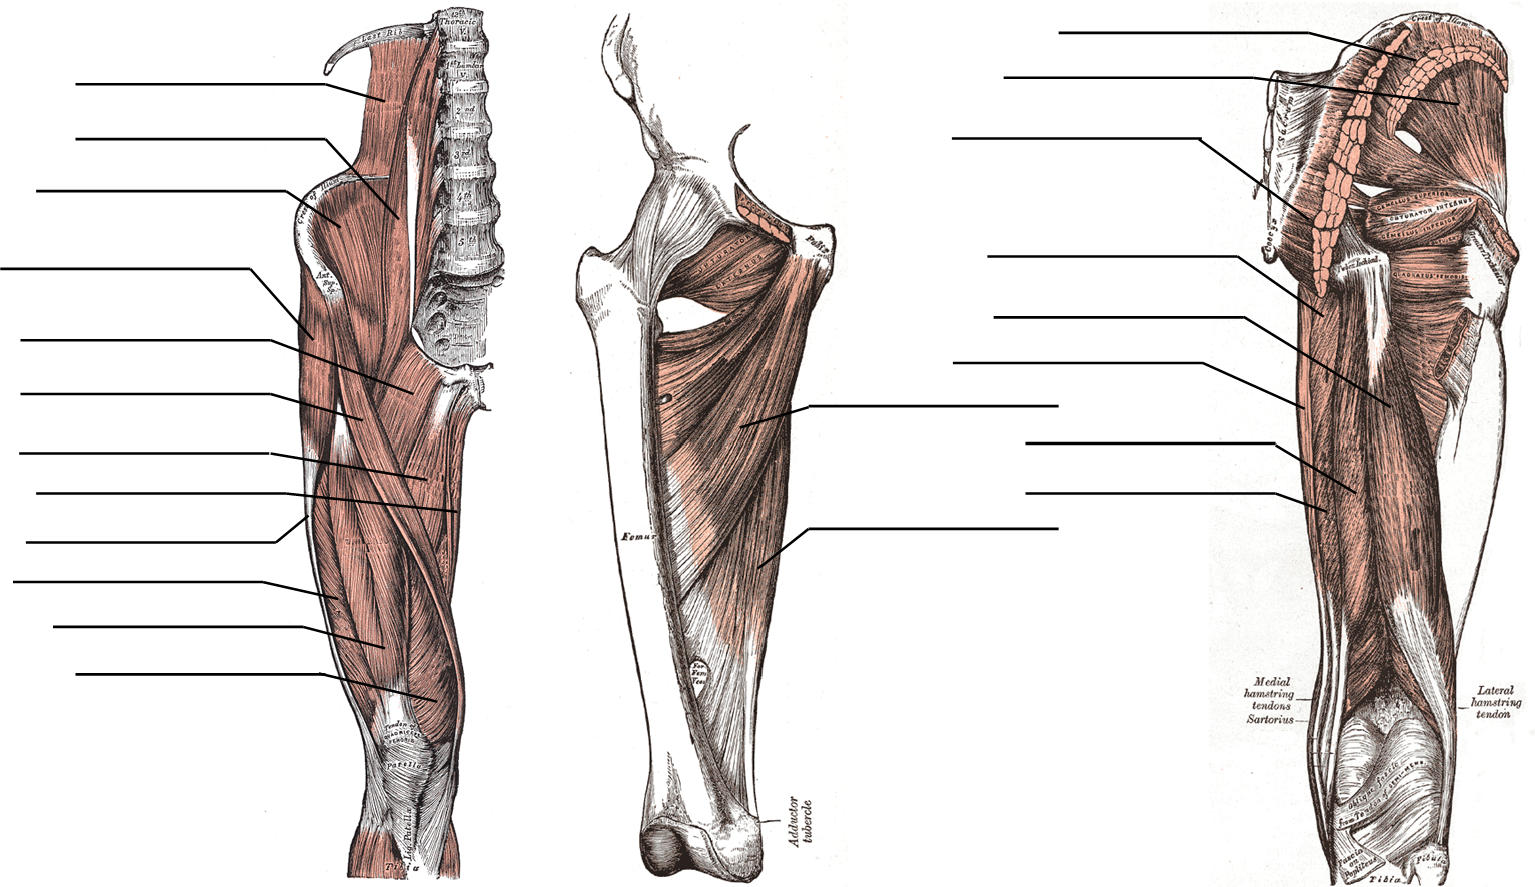
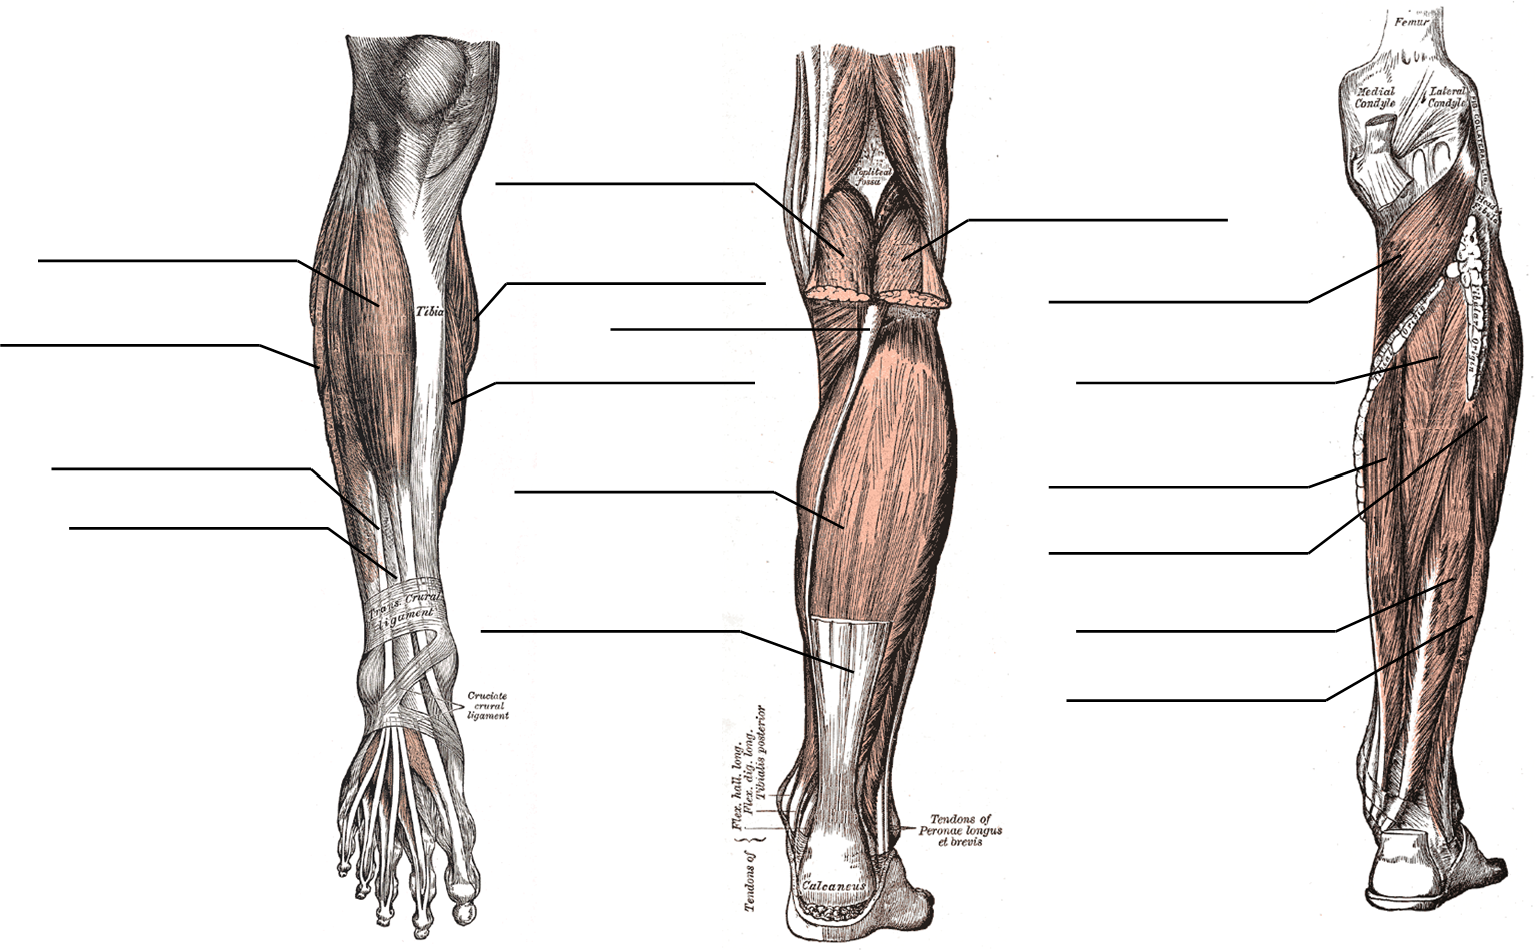
1. Label the muscles in the diagram below by placing the name of each muscle listed below in the corresponding blank space on the figure below (left shows superficial muscles of the anterior right hip and thigh, middle shows the deep muscles of the anterior right thigh, and right shows the superficial and deep muscles of the posterior thigh with superficial gluteal muscles cut away).
|
|
|
2. Label the muscles in the diagram below by placing the name of each muscle listed below in the corresponding blank space on the figure below.
|
|
|
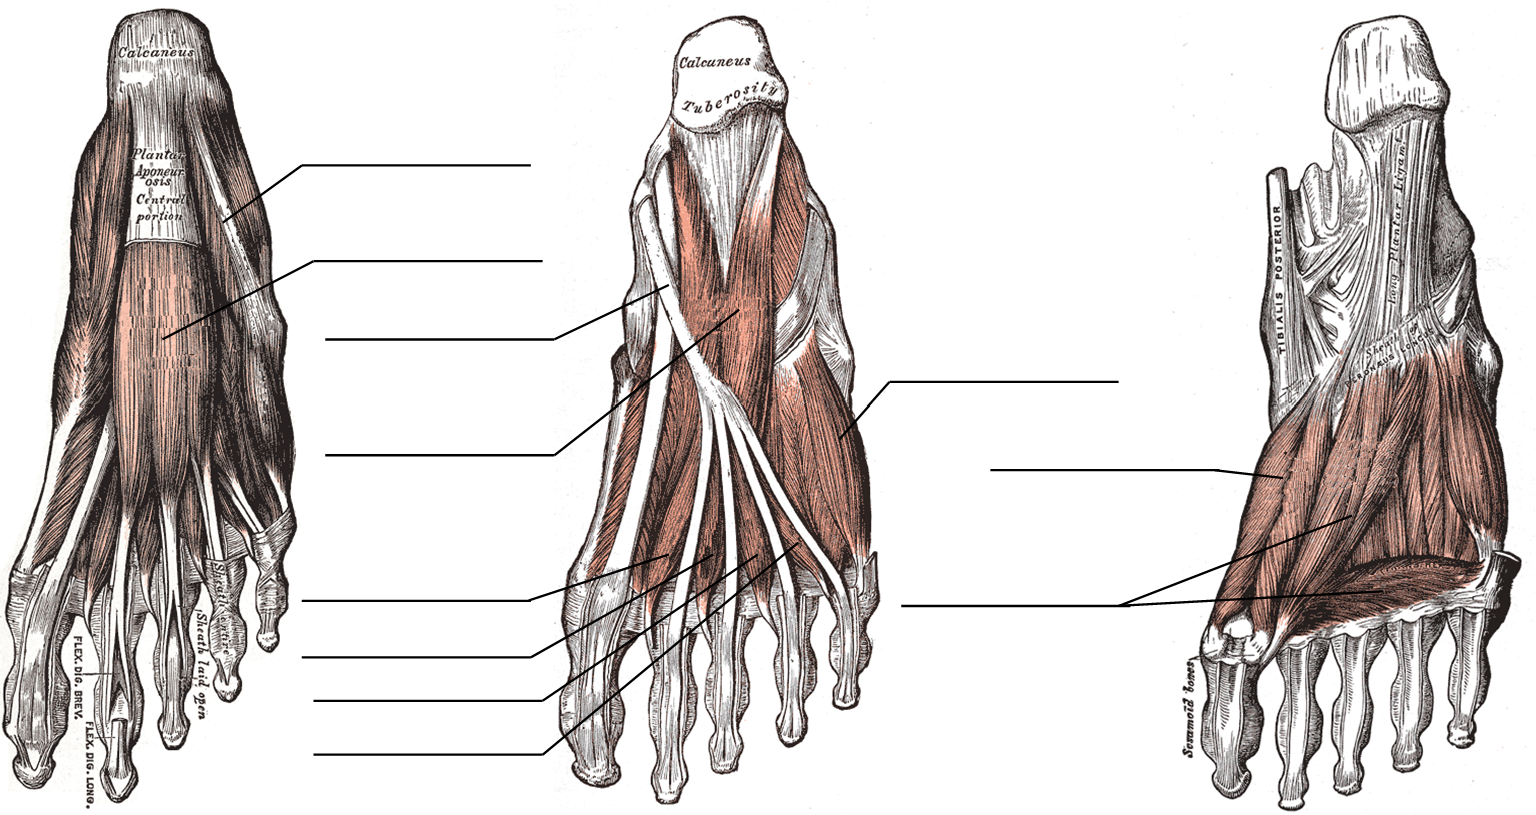
3. Label the muscles in the diagram below by placing the name of each muscle listed below in the corresponding blank space on the figure below (figure shows left to right superficial to deep muscles of plantar (sole of the foot)).
|
|
|
Part 5: Head and Anterior Neck Muscles Laboratory Activities
1. The following are muscles of facial expression. For each, identify it on a laboratory model, give its location, and describe its action when it contracts.
|
Muscle |
Location |
Action when contracted |
|---|---|---|
|
epicranius frontal belly |
||
|
epicranius occipital belly |
||
|
orbicularis oculi |
||
|
zygomaticus major |
||
|
zygomaticus minor |
||
|
buccinator |
||
|
orbicularis oris |
||
|
platysma |
||
|
depressor labii inferioris |
||
|
depressor anguli oris |
||
|
risorius |
||
|
nasalis |
2. The following are muscles of mastication (chewing). For each, identify it on a laboratory model (where possible), give its location, and describe its action when it contracts.
|
Muscle |
Location |
Action when contracted |
|---|---|---|
|
masseter |
||
|
temporalis |
||
|
medial pterygoid |
||
|
lateral pterygoid |
3. Navigate to zygotebody.com. Use the slide bar on the left of the screen to remove the skin but leave the superficial layers of muscle. Click the following head and neck muscles on the ZygoteBody model. For each, indicate whether this muscle is superficial, deep, or intermediate to other muscles (hold ctrl on the keyboard [or command on a Mac] and click on a muscle to make it disappear – when you then click without holding control, it will restore all of the hidden items). Describe each muscle as being "superficial" (no muscles on top of it), "intermediate" (muscles on top of it and deep to it), or "deep" (muscles on top of it but none underneath it). List the muscles that are either superficial or deep to each of these muscles in the table below as applicable.
|
Muscle |
Superficial, intermediate, or deep |
Muscle(s) Deep to This Muscle |
Muscle(s) Superficial to This Muscle |
|---|---|---|---|
|
platysma |
|
|
|
|
masseter |
|
|
|
|
sternocleidomastoid |
|
|
|
|
trapezius |
|
|
|
|
temporalis |
|
|
|
|
zygomaticus |
|
|
|
|
orbicularis oculi |
|
|
|
|
orbicularis oris |
|
|
|
Part 6: Trunk and Posterior Neck Muscles Laboratory Activities
1. The following are muscles that move the pectoral girdle. For each, identify it on a laboratory model, give its location, and describe its action when it contracts.
|
Muscle |
Location |
Action when contracted |
|---|---|---|
|
trapezius |
||
|
pectoralis minor |
||
|
serratus anterior |
2. The following are muscles that move the arm. For each, identify it on a laboratory model, give its location, and describe its action when it contracts.
|
Muscle |
Location |
Action when contracted |
|---|---|---|
|
pectoralis major |
||
|
latissimus dorsi |
||
|
deltoid |
3. The following are muscles of the abdominal wall. For each, identify it on a laboratory model, give its location and describe its action when it contracts.
|
Muscle |
Location |
Action when contracted |
|---|---|---|
|
rectus abdominis |
||
|
external oblique |
||
|
internal oblique |
||
|
transversus abdominis |
4. Navigate to zygotebody.com. Use the slide bar on the left of the screen to remove the skin but leave the superficial layers of muscle. Click the following anterior trunk muscles on the ZygoteBody model. For each, indicate whether this muscle is superficial, deep, or intermediate to other muscles (hold ctrl on the keyboard [or command on a Mac] and click on a muscle to make it disappear – when you then click without holding control, it will restore all of the hidden items). Describe each muscle as being "superficial" (no muscles on top of it), "intermediate" (muscles on top of it and deep to it), or "deep" (muscles on top of it but none underneath it). List the muscles that are either superficial or deep to each of these muscles in the table below as applicable.
|
Muscle |
Superficial, intermediate, or deep |
Muscle(s) Deep to This Muscle |
Muscle(s) Superficial to This Muscle |
|---|---|---|---|
|
pectoralis major |
|
|
|
|
pectoralis minor |
|
|
|
|
serratus anterior |
|
|
|
|
external intercostal |
|
|
|
|
internal intercostal |
|
|
|
|
innermost intercostal |
|||
|
transverse abdominis |
|
|
|
|
external oblique |
|
|
|
|
internal oblique |
|
|
|
|
psoas major |
|
|
|
5. Navigate to zygotebody.com. Use the slide bar on the left of the screen to remove the skin but leave the superficial layers of muscle. Click the following posterior trunk muscles on the ZygoteBody model. For each, indicate whether this muscle is superficial, deep, or intermediate to other muscles (hold ctrl on the keyboard [or command on a Mac] and click on a muscle to make it disappear – when you then click without holding control, it will restore all of the hidden items). Describe each muscle as being "superficial" (no muscles on top of it), "intermediate" (muscles on top of it and deep to it), or "deep" (muscles on top of it but none underneath it). List the muscles that are either superficial or deep to each of these muscles in the table below as applicable.
|
Muscle |
Superficial, intermediate, or deep |
Muscle(s) Deep to This Muscle |
Muscle(s) Superficial to This Muscle |
|---|---|---|---|
|
trapezius |
|
|
|
|
latissimus dorsi |
|
|
|
|
spinalis thoracis |
|
|
|
|
levator scapularis |
|||
|
longissimus thoracis |
|
|
|
|
iliocostalis |
|
|
|
|
supraspinatus |
|
|
|
|
multifidus |
|||
|
infraspinatus |
|
|
|
|
teres major |
|
|
|
|
teres minor |
|
|
|
|
longissimus capitis |
|||
|
rhomboid major |
|
|
|
|
rhomboid minor |
|
|
|
|
serratus posterior superior |
|||
|
serratus posterior inferior |
|||
|
splenius capitis |
|||
|
splenius cervicis |
|||
|
semispinalis capitis |
|||
|
semispinalis thoracis |
Part 7: Rotator Cuff and Upper Limb Muscles Laboratory Activities
1. The following are muscles of arm rotation and adduction. For each, identify it on a laboratory model, give its location, action when contracted, and whether or not it is part of the rotator cuff.
|
Muscle |
Location |
Action when contracted |
Part of rotator cuff? |
|---|---|---|---|
|
subscapularis |
|||
|
supraspinatus |
|||
|
infraspinatus |
|||
|
teres major |
|||
|
teres minor |
|||
|
deltoid |
2. The following are muscles of arm rotation and adduction. For each, identify it on a laboratory model, give its location, and its action when contracted.
|
Muscle |
Location |
Action when contracted |
|---|---|---|
|
biceps brachii |
||
|
brachialis |
||
|
triceps brachii |
3. Write down the muscles of the forearm selected by your instructor and, for each, identify it on a laboratory model, give the location of that muscle, and what effect contracting that muscle has.
|
Muscle |
Location |
Action when contracted |
|---|---|---|
4. Navigate to zygotebody.com. Use the slide bar on the left of the screen to remove the skin but leave the superficial layers of muscle. Click the following upper limb and rotator cuff muscles on the ZygoteBody model. For each, indicate whether this muscle is superficial, deep, or intermediate to other muscles (hold ctrl on the keyboard [or command on a Mac] and click on a muscle to make it disappear – when you then click without holding control, it will restore all of the hidden items). Describe each muscle as being "superficial" (no muscles on top of it), "intermediate" (muscles on top of it and deep to it), or "deep" (muscles on top of it but none underneath it). List the muscles that are either superficial or deep to each of these muscles in the table below as applicable.
|
Muscle |
Superficial, intermediate, or deep |
Muscle(s) Deep to This Muscle |
Muscle(s) Superficial to This Muscle |
|---|---|---|---|
|
subscapularis |
|||
|
supraspinatus |
|||
|
infraspinatus |
|||
|
teres minor |
|||
|
deltoid |
|
|
|
|
biceps brachii |
|
|
|
|
brachialis |
|
|
|
|
tricep (long head) |
|
|
|
|
tricep (lateral head) |
|
|
|
|
tricep (medial head) |
|
|
|
|
brachioradialis |
|
|
|
|
extensor carpi radialis longus |
|
|
|
|
extensor carpi radialis brevis |
|
|
|
|
extensor digitorum |
|
|
|
|
extensor carpi ulnaris |
|
|
|
|
pronator teres |
|
|
|
|
flexor carpi radialis |
|
|
|
|
flexor digitorum superficialis |
|
|
|
|
palmaris longus |
|
|
|
|
flexor carpi ulnaris |
|
|
|
Part 8: Hip and Lower Limb Muscles Laboratory Activities
1. Write down the muscles of the hip, thigh, and gluteal regions in the table below and, for each, identify it on a laboratory model, give the location of that muscle, and what effect contracting that muscle has.
|
Muscle |
Location |
Action when contracted |
|---|---|---|
|
rectus femoris |
||
|
vastus intermedius |
||
|
vastus medialis |
||
|
vastus lateralis |
||
|
sartorius |
||
|
gracilis |
||
|
semimembranosus |
||
|
semitendinosus |
||
|
biceps femoris |
||
|
gluteus maximus |
||
|
gluteus medius |
||
|
gluteus minimus |
||
|
iliacus |
||
|
psoas major |
||
|
quadratus lumborum |
||
|
tensor fascia latae |
2. For each of the muscles of the leg, identify it on a laboratory model, give the location of that muscle, and what effect contracting that muscle has.
|
Muscles |
Location |
Action when contracted |
|---|---|---|
|
gastrocnemius |
||
|
soleus |
||
|
tibialis anterior |
||
|
fibularis longus |
||
|
flexor digitorum longus |
||
|
extensor digitorum longus |
3. Navigate to zygotebody.com. Use the slide bar on the left of the screen to remove the skin but leave the superficial layers of muscle. Click the following lower limb and gluteal muscles on the ZygoteBody model. For each, indicate whether this muscle is superficial, deep, or intermediate to other muscles (hold ctrl on the keyboard [or command on a Mac] and click on a muscle to make it disappear – when you then click without holding control, it will restore all of the hidden items). Describe each muscle as being "superficial" (no muscles on top of it), "intermediate" (muscles on top of it and deep to it), or "deep" (muscles on top of it but none underneath it). List the muscles that are either superficial or deep to each of these muscles in the table below as applicable.
|
Muscle |
Superficial, intermediate, or deep |
Muscle(s) Deep to This Muscle |
Muscle(s) Superficial to This Muscle |
|---|---|---|---|
|
gluteus maximus |
|
|
|
|
gluteus medius |
|
|
|
|
gluteus minimus |
|
|
|
|
rectus femoris |
|
|
|
|
vastus medialis |
|
|
|
|
vastus lateralis |
|
|
|
|
vastus intermedius |
|
|
|
|
sartorius |
|
|
|
|
gracilis |
|
|
|
|
pectineus |
|
|
|
|
adductor longus |
|
|
|
|
adductor magnus |
|
|
|
|
biceps femoris (longus) |
|
|
|
|
biceps femoris (short) |
|
|
|
|
semitendinosus |
|
|
|
|
semimembranosus |
|
|
|
|
gastrocnemius |
|
|
|
|
soleus |
|
|
|
|
tibialis anterior |
|
|
|
|
extensor digitorum |
|
|
|
|
fibularis (peroneus) longus |
|||
|
tibialis posterior |
Attributions
Part 1: Review of Head and Anterior Neck Muscles
- "Eye orbit anatomy anterior2.jpg" by Patrick J. Lynch is licensed under CC BY 2.5
- "Gray's Anatomy plates" by Henry Vandyke Carte is in the Public Domain
Part 2: Review of Trunk and Posterior Neck Muscles
- "Gray's Anatomy plates" by Henry Vandyke Carte is in the Public Domain
Part 3: Review of Rotator Cuff and Upper Limb Muscles
- "Gray's Anatomy plates" by Henry Vandyke Carte is in the Public Domain
- "Sup. forearm.jpg" by Rafael Di Marco Barros is in the Public Domain / A derivative from the original work
Part 4: Review of Hip and Lower Limb Muscles
- "Gray's Anatomy plates" by Henry Vandyke Carte is in the Public Domain
Part 5: Head and Anterior Neck Muscles Laboratory Activities
- "BIOL 250 Human Anatomy Lab Manual SU 19" by Yancy Aquino, Skyline College is licensed under CC BY-NC-SA 4.0
Part 6: Trunk and Posterior Neck Muscles Laboratory Activities
- "BIOL 250 Human Anatomy Lab Manual SU 19" by Yancy Aquino, Skyline College is licensed under CC BY-NC-SA 4.0
Part 7: Rotator Cuff and Upper Limb Muscles Laboratory Activities
- "BIOL 250 Human Anatomy Lab Manual SU 19" by Yancy Aquino, Skyline College is licensed under CC BY-NC-SA 4.0
Part 8: Hip and Lower Limb Muscles Laboratory Activities
- "BIOL 250 Human Anatomy Lab Manual SU 19" by Yancy Aquino, Skyline College is licensed under CC BY-NC-SA 4.0