
2.5: Use of Compound Light Microscopes for Anatomy Laboratories
- Page ID
- 53535

Use of the Compound Light Microscope for Anatomy Laboratories
Learning microscopy is very important for human anatomy, to examine different types of cells and tissues and make correlations between their structure and function. We can also compare normal and disease state cells, as changes in the normal structure are part of a particular disease process.
Transport of a Compound Light Microscope
To take the microscope out of the cabinet or off of the cart use the following instructions:
- Use your dominant hand to hold the arm of the microscope, and your non-dominant hand to hold the base of the microscope.
- Carry the microscope upright. That way the ocular lenses located in the eyepiece do not fall out.
- Make sure the electrical cord is wrapped or removed from the microscope, avoid tripping on the cord.
To return the microscope to the cabinet or to the cart use the following instructions:
- Turn off the microscope.
- Turn the revolving nosepiece to have lowest magnification objective, usually 4X.
- Disconnect from power source.
- Wrap cord around the microscope.
- If you used oil immersion, (the 100x objective), use lens paper only to remove any remnant of immersion oil on the 100x objective lens.
- Place the microscope back in the cabinet or on the cart using the transport instructions above.
Focusing Procedure for a Compound Light Microscope
- Place the microscope on a table in front of you and plug it in such that the cord does not create a trip hazard for you or others in the laboratory.
- Turn the revolving nosepiece to have lowest magnification objective in place, usually 4x. The objective should click when properly in place.
- Place the slide on the stage of the microscope and properly position the stage clips such that the clips "hug" the slide on either side and are NOT on top of the slide since this could crack the slide (NOTE: there are some models of microscopes where stage clips DO sit on top of the slide - ask your instructor about proper use of the stage clips for the model of microscope you are using).
- Turn on the microscope and confirm that the light is on.
- Move the stage control knobs to position the specimen on the slide directly over the path of the light.
- With the 4x objective in place, turn the coarse focus knob to bring the stage as close to the objective lens as possible.
- Look through the microscope and use the coarse focus knob to focus on the sample. Make sure the slide is in very sharp focus before moving on. Check with your instructor if you are uncertain.
- To focus on the specimen using higher magnification than 40x (use of the 4x objective magnifies the specimen by 40x), use the next steps:
- With the specimen focused at 40x, re-center the specimen using the stage adjustment knobs. DO NOT CHANGE THE FOCUS!
- Change to the next highest objective lens without changing any other settings on the microscope.
- Use ONLY the fine focus knob to modify the focus. The specimen should mostly be in focus and only minor adjustments should be necessary. Continue focusing until the image is sharp and clear.
- Re-center the specimen using the stage adjustment knobs. DO NOT CHANGE THE FOCUS!
- If moving to the next highest objective lens, change to the objective lens to the next highest without changing any other settings on the microscope.
- Use ONLY the fine focus knob to adjust the focus. Continue focusing until the image is sharp and clear.
**If you get lost on your sample, go back to 40x magnification (objective says ‘4x’), re-focus, and follow the steps above again.**
Parts of the Compound Light Microscope

Above: Parts of compound light microscopes. Some models are slightly different. Here, two different models are shown and labeled to indicate the parts of each.
Description and Function of the Parts of the Microscope
|
Microscope Part |
Description and Function of Microscope Part |
|
eyepiece |
removable, holds ocular lenses. Typically, these lenses magnify the image 10X |
|
revolving nosepiece |
contains the objective lenses |
|
objective lenses |
mounted in the revolving nosepiece, typically a microscope has 4, the 4X, 10X, 40X and 100X |
|
stage clips |
located in the Stage, their function is to hold the slide in place |
|
stage |
platform located below the objectives where the slide is placed |
|
stage controls |
moves the slide held by stage clips around the stage to position the specimen in the desired position |
|
mechanical stage |
holds the slide in place (with clamp), can be moved using the adjusting knobs |
|
iris-diaphragm |
located beneath the condenser, regulate the amount of light by opening or closing its aperture |
|
light source |
a light source, usually a bulb built in the base of the microscope - there may be a dial to regulate the intensity of light depending on the model of microscope |
|
condenser |
located below the stage, contains a lens that condense light through the specimen |
|
arm |
the area of the microscope that connects the base to the head, it can be straight or curved depending on the microscope |
|
head |
upper part, contains the ocular lenses and the rotating nosepiece with the objective lenses |
|
base |
the wide bottom of the apparatus, it supports the microscope |
|
coarse focus |
large knob located on each side of the microscope toward the base, it moves the stage up or down quickly, used for coarse focusing |
|
fine focus |
small knob located on each side of the microscope, usually inside the coarse knob, used for precision focusing |
Calculating Magnification
The total magnification is determined by multiplying the ocular lens power by the objective lens power:
Total Magnification = Ocular Magnification x Objective Magnification
Relationship Between Magnification, Working Distance, and Field of View
There is an inverse relationship between the objective lens magnification and the working distance, field of view and intensity of the light (shown in the figure below).
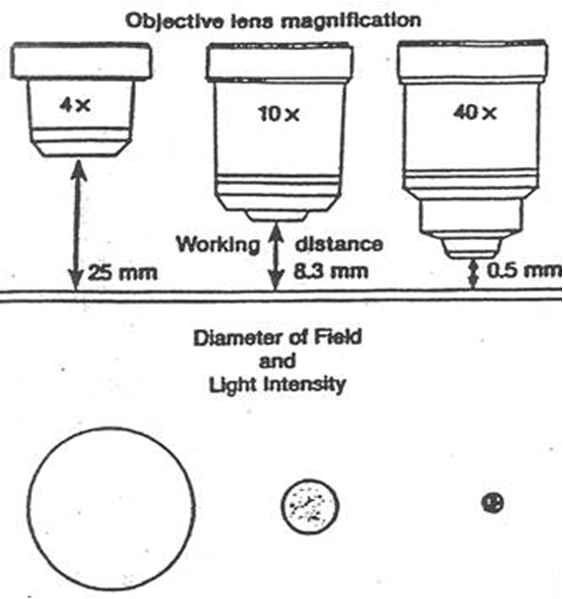
Above: Relationship between the objective lens magnification, working distance, and diameter of the field of view and light intensity.
Attributions
- "Anatomy and Physiology I Lab" by Victoria Vidal is licensed under CC BY 4.0
- "BIOL 250 Human Anatomy Lab Manual SU 19" by Yancy Aquino, Skyline College is licensed under CC BY-NC-SA 4.0