
1.2: Anatomical Terminology and Identification
- Page ID
- 53230
\( \newcommand{\vecs}[1]{\overset { \scriptstyle \rightharpoonup} {\mathbf{#1}} } \)
\( \newcommand{\vecd}[1]{\overset{-\!-\!\rightharpoonup}{\vphantom{a}\smash {#1}}} \)
\( \newcommand{\dsum}{\displaystyle\sum\limits} \)
\( \newcommand{\dint}{\displaystyle\int\limits} \)
\( \newcommand{\dlim}{\displaystyle\lim\limits} \)
\( \newcommand{\id}{\mathrm{id}}\) \( \newcommand{\Span}{\mathrm{span}}\)
( \newcommand{\kernel}{\mathrm{null}\,}\) \( \newcommand{\range}{\mathrm{range}\,}\)
\( \newcommand{\RealPart}{\mathrm{Re}}\) \( \newcommand{\ImaginaryPart}{\mathrm{Im}}\)
\( \newcommand{\Argument}{\mathrm{Arg}}\) \( \newcommand{\norm}[1]{\| #1 \|}\)
\( \newcommand{\inner}[2]{\langle #1, #2 \rangle}\)
\( \newcommand{\Span}{\mathrm{span}}\)
\( \newcommand{\id}{\mathrm{id}}\)
\( \newcommand{\Span}{\mathrm{span}}\)
\( \newcommand{\kernel}{\mathrm{null}\,}\)
\( \newcommand{\range}{\mathrm{range}\,}\)
\( \newcommand{\RealPart}{\mathrm{Re}}\)
\( \newcommand{\ImaginaryPart}{\mathrm{Im}}\)
\( \newcommand{\Argument}{\mathrm{Arg}}\)
\( \newcommand{\norm}[1]{\| #1 \|}\)
\( \newcommand{\inner}[2]{\langle #1, #2 \rangle}\)
\( \newcommand{\Span}{\mathrm{span}}\) \( \newcommand{\AA}{\unicode[.8,0]{x212B}}\)
\( \newcommand{\vectorA}[1]{\vec{#1}} % arrow\)
\( \newcommand{\vectorAt}[1]{\vec{\text{#1}}} % arrow\)
\( \newcommand{\vectorB}[1]{\overset { \scriptstyle \rightharpoonup} {\mathbf{#1}} } \)
\( \newcommand{\vectorC}[1]{\textbf{#1}} \)
\( \newcommand{\vectorD}[1]{\overrightarrow{#1}} \)
\( \newcommand{\vectorDt}[1]{\overrightarrow{\text{#1}}} \)
\( \newcommand{\vectE}[1]{\overset{-\!-\!\rightharpoonup}{\vphantom{a}\smash{\mathbf {#1}}}} \)
\( \newcommand{\vecs}[1]{\overset { \scriptstyle \rightharpoonup} {\mathbf{#1}} } \)
\(\newcommand{\longvect}{\overrightarrow}\)
\( \newcommand{\vecd}[1]{\overset{-\!-\!\rightharpoonup}{\vphantom{a}\smash {#1}}} \)
\(\newcommand{\avec}{\mathbf a}\) \(\newcommand{\bvec}{\mathbf b}\) \(\newcommand{\cvec}{\mathbf c}\) \(\newcommand{\dvec}{\mathbf d}\) \(\newcommand{\dtil}{\widetilde{\mathbf d}}\) \(\newcommand{\evec}{\mathbf e}\) \(\newcommand{\fvec}{\mathbf f}\) \(\newcommand{\nvec}{\mathbf n}\) \(\newcommand{\pvec}{\mathbf p}\) \(\newcommand{\qvec}{\mathbf q}\) \(\newcommand{\svec}{\mathbf s}\) \(\newcommand{\tvec}{\mathbf t}\) \(\newcommand{\uvec}{\mathbf u}\) \(\newcommand{\vvec}{\mathbf v}\) \(\newcommand{\wvec}{\mathbf w}\) \(\newcommand{\xvec}{\mathbf x}\) \(\newcommand{\yvec}{\mathbf y}\) \(\newcommand{\zvec}{\mathbf z}\) \(\newcommand{\rvec}{\mathbf r}\) \(\newcommand{\mvec}{\mathbf m}\) \(\newcommand{\zerovec}{\mathbf 0}\) \(\newcommand{\onevec}{\mathbf 1}\) \(\newcommand{\real}{\mathbb R}\) \(\newcommand{\twovec}[2]{\left[\begin{array}{r}#1 \\ #2 \end{array}\right]}\) \(\newcommand{\ctwovec}[2]{\left[\begin{array}{c}#1 \\ #2 \end{array}\right]}\) \(\newcommand{\threevec}[3]{\left[\begin{array}{r}#1 \\ #2 \\ #3 \end{array}\right]}\) \(\newcommand{\cthreevec}[3]{\left[\begin{array}{c}#1 \\ #2 \\ #3 \end{array}\right]}\) \(\newcommand{\fourvec}[4]{\left[\begin{array}{r}#1 \\ #2 \\ #3 \\ #4 \end{array}\right]}\) \(\newcommand{\cfourvec}[4]{\left[\begin{array}{c}#1 \\ #2 \\ #3 \\ #4 \end{array}\right]}\) \(\newcommand{\fivevec}[5]{\left[\begin{array}{r}#1 \\ #2 \\ #3 \\ #4 \\ #5 \\ \end{array}\right]}\) \(\newcommand{\cfivevec}[5]{\left[\begin{array}{c}#1 \\ #2 \\ #3 \\ #4 \\ #5 \\ \end{array}\right]}\) \(\newcommand{\mattwo}[4]{\left[\begin{array}{rr}#1 \amp #2 \\ #3 \amp #4 \\ \end{array}\right]}\) \(\newcommand{\laspan}[1]{\text{Span}\{#1\}}\) \(\newcommand{\bcal}{\cal B}\) \(\newcommand{\ccal}{\cal C}\) \(\newcommand{\scal}{\cal S}\) \(\newcommand{\wcal}{\cal W}\) \(\newcommand{\ecal}{\cal E}\) \(\newcommand{\coords}[2]{\left\{#1\right\}_{#2}}\) \(\newcommand{\gray}[1]{\color{gray}{#1}}\) \(\newcommand{\lgray}[1]{\color{lightgray}{#1}}\) \(\newcommand{\rank}{\operatorname{rank}}\) \(\newcommand{\row}{\text{Row}}\) \(\newcommand{\col}{\text{Col}}\) \(\renewcommand{\row}{\text{Row}}\) \(\newcommand{\nul}{\text{Nul}}\) \(\newcommand{\var}{\text{Var}}\) \(\newcommand{\corr}{\text{corr}}\) \(\newcommand{\len}[1]{\left|#1\right|}\) \(\newcommand{\bbar}{\overline{\bvec}}\) \(\newcommand{\bhat}{\widehat{\bvec}}\) \(\newcommand{\bperp}{\bvec^\perp}\) \(\newcommand{\xhat}{\widehat{\xvec}}\) \(\newcommand{\vhat}{\widehat{\vvec}}\) \(\newcommand{\uhat}{\widehat{\uvec}}\) \(\newcommand{\what}{\widehat{\wvec}}\) \(\newcommand{\Sighat}{\widehat{\Sigma}}\) \(\newcommand{\lt}{<}\) \(\newcommand{\gt}{>}\) \(\newcommand{\amp}{&}\) \(\definecolor{fillinmathshade}{gray}{0.9}\)Objectives:
At the end of this lab, you will be able to…
1. Use correct anatomical language when describing areas and regions of the body
2. Determine anatomical sides and cuts of the body, based on the concept of anatomical mirroring
Pre-Lab Exercise:
After reading through the lab activities prior to lab, complete the following before you start your lab
- The anatomical planes include the sagittal plane that divides the body into a .
- True/False. The purpose of using anatomical references is to ensure that everyone knows what you are discussing or identifying. .
- When looking at someone in anatomical position, the palms of their hands should be oriented .
- Color the images for use as a reference for identifying.
Materials:
- Clay
- Knife/Scalpel
- Torso Models
- Stickers
- Felt Pens
The study of human anatomy and physiology is filled with terminology that has at its root in classical words, word fragments and meanings. These terms extend into the closely related disciplines within the medical fields. As such, it is expected that students of anatomy and physiology will be excessively exposed to these words and word fragments in their classical language forms (Greek and Latin). In particular, as they are extensively used to name structures and concepts so as to ensure these structures and concepts can be internationally understood during studying anatomy. Therefore, we need to take time to review the meanings behind the technical terms used in the study of anatomy and used by professionals across medical, science and health professions.
Activity 1: Planes and Organization of the Body
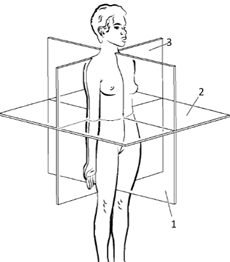
When discussing anatomical terms, the references that we use will depend on where you are attempting to reference. the development of three reference planes that generally used to divide the body, or regions of the body, about the imaginary geometric axis. These planes are the CORONAL (FRONTAL) PLANE, that divides along the X-axis of the body, the TRANSVERSE (CROSS-SECTIONAL, TRANSAXIAL) PLANE that divides along the Z-axis of the body, and the SAGITTAL PLANE, that divides along the Y-axis. There is a special case within the sagittal plane (MID-SAGITTAL) that divides evenly into two halves. Finally, there is a plane that will cut an angle to the geometric axis of the body, the OBLIQUE PLAN.
Methods:
- Obtain clay, knife/scalpel from your instructor
- Turn your clay into a column or cube
- Using the image, indicate the three principal anatomical planes of the body
|
Anatomical Planes: 1= Sagittal Plane 2= Transverse Plane 3= Frontal (Coronal) Plane Use you colored pencils to color each plane in a different color |
4. Using your pencil trace the cuts of the anatomical planes into the clay
5. After tracing the Sagittal Plane, cut the clay along the Sagittal plane.
a. Question: How will this divide your clay?
6. Following the Sagittal Plane cut, cut one half of the clay along the Transverse Plane.
a. Question: How will this divide your clay?
7. Following the Transverse Plane cut, use the other half of the clay from the Sagittal Plane cut and cut the clay along the Coronal (Frontal) Plane.
a. Question: How will this divide your clay?
8. Compare cuts with your lab group.
9. Discuss with your lab group: Why is it important to understand the planes of the body? Share your thoughts with your instructor
10. Make the clay whole again and clean-up your area.
Activity 2: Orientational and Localization Terminology
There are also references as to the position of a structure relative to other parts of the body, or body segments. This type of reference is dependent upon the point of reference that is being taken in explaining the location of the structure of interest. With that in mind, we must discuss the anatomical terminology based on reference to the body as a whole or based on a regional area of the body or body segment.
Terms and Definitions:
VENTRAL: Toward the Stomach side of the body (front of the body)
DORSAL: Toward the Vertebral side of the body (back of the body)
CRANIAL: Toward the head
CAUDAL: Toward the tail/feet
IPSILATERAL: On the same side of the body
CONTRALATERAL: On the opposite side of the body
ANTERIOR: Toward the front side of the region, organ, or limb
POSTERIOR: Toward the back side of the region, organ, or limb
PROXIMAL: Closer to the torso
DISTAL: Further from the torso
LATERAL: Away from the midline of the long axis of the body or region of the body
MEDIAL: Closer to the midline of the long axis of the body or region of the body
SUPERIOR: Region is above along the long axis of the body or region of the body
INFERIOR: Region is below along the long axis of the body or region of the body
SUPERFICIAL: Closest to the outer surface
DEEP: Furthest from the outer surface
|
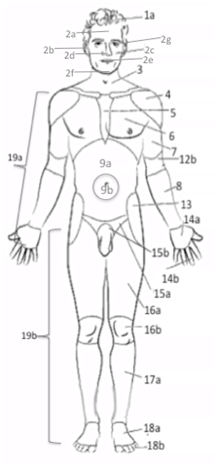
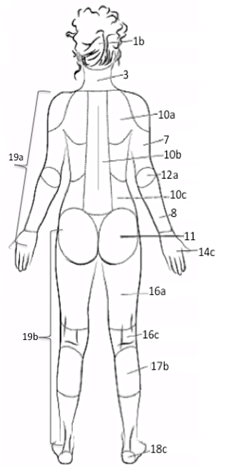
References: 1= Dorsal 2= Ventral 3= Caudal 4=Cranial 5=Proximal 6=Distal 7=Superior 8= Inferior 9=Medial 10=Lateral 11=Anterior 12=Posterior Use you colored pencils to color each term in a different color to assist with identification |

|
Cavities of the body and Regions of the Abdominopelvic Cavity: 1= Ventral Cavities 2= Dorsal Cavities 3=Abdominopelvic Cavity 4= Cranial Cavity 5= Vertebral (Spinal) Cavity 6= Diaphragm 7= Thoracic Cavity 8= Abdominal Cavity 9= Pelvic Cavity 10= Right Hypochondriac 11= Epigastric 12=Left Hypochondriac 13= Right Lumbar 14= Umbilical 15= Left Lumbar 16= Right Iliac 17= Hypogastric 18= Left Iliac Use you colored pencils to color each cavity and region in a different color to assist with identification. |

1. Obtain torso models, stickers and felt pen from instructor
2. Using the reference images, indicate the correct terms for orientation and localization of body parts
3. Using the models as a reference. Write the orientational reference terms in the blanks to label the anatomical models to correctly indicate the relationship between:
a. The elbow is to the shoulder.
b. The nose is to the ears.
c. The shoulder is to the hips.
d. The sternum is to the neck.
e. The right knee is to the left foot.
f. The scalp is to the skull.
4. Write the abdominopelvic region terms on the stickers
5. Using the anatomical model correctly label the regions and indicate an organ that might be found in that region
6. After labeling the models have your instructor check your work.
7. Clean-up your area
Activity 3: Anatomical Identifications and Translation
There are also references that allows for us to name and identify the various parts of the body, or body segments. This type of reference is independent of the point of reference or the plane of the body that is being used. That is unless we were to be referencing a specific side (right or left) on the person. Especially when we are doing locations when facing the person. Whenever you face the person, there is a phenomenon called anatomical mirroring that comes into play with identification. The mirroring indicates that what would be in our right side is actually the person’s left and what is in our left side is actually the person’s right. With that in mind, we must discuss the anatomical terminology based on structures of the body as a whole or based on a regional area of the body or body segment.
|
Common Phrase |
Anatomical Term |
ID on Image |
Common Phrase |
Anatomical Term |
ID on Image |
|
Nose |
Nasal |
2d |
Shoulder |
Deltoid |
4 |
|
Mouth |
Oral |
2e |
Collar Bone |
Clavicle (Clavicular) |
|
|
Neck |
Cervical |
3 |
Top of Shoulder |
Acromial |
|
|
Head |
Cephalic |
1a |
Armpit |
Axillary |
|
|
Inside of Head |
Cranial |
Arm |
Brachial |
7 |
|
|
Head (Brain) |
(Cranium) |
Forearm |
Antebrachial |
8 |
|
|
Forehead |
Frontal |
2a |
Front of Elbow |
Antecubital |
12b |
|
Eye |
Orbital (Ocular) |
2g |
Back of Elbow |
Olecranon |
12a |
|
Cheek |
Buccal |
2c |
Wrist |
Carpal |
|
|
Mental |
Chin |
2f |
Hand |
Manus |
|
|
Ear |
Auricle (Otic) |
2b |
Palm of Hand |
Palmar |
14a |
|
Side of Head |
Temporal |
Back of Hand |
Dorsum |
14c |
|
|
Back of Head |
Occipital |
1b |
Fingers |
Digits |
14b |
|
Rib |
Costal |
Thumb |
Pollex (Polis) |
||
|
Sternum |
Sternal |
5 |
Hip |
Coxal |
13 |
|
Breast |
Mammary |
Buttock |
Gluteal |
11 |
|
|
Chest |
Pectoral |
6 |
Thigh |
Femoral |
16a |
|
Spinal Column |
Vertebrae |
10b |
Kneecap |
Patellar |
16b |
|
Low Back |
Lumbar |
10c |
Back of Knee |
Popliteal |
16c |
|
Tail Bone |
Sacral/Coccygeal |
Calf |
Sural |
17b |
|
|
Belly Button (Navel) |
Umbilicus |
9b |
Leg (shin) |
Crural |
17a |
|
Abdomen (Stomach) |
Abdominal |
9a |
Ankle |
Tarsal |
|
|
Abdomen (Gut or lower Abdomen) |
Pelvic (Bowl) |
Heel |
Calcaneal |
18c |
|
|
Genitals |
Pubic |
15b |
Foot |
Pes |
|
|
Outside of Shin |
Fibular |
Top of foot |
Dorsum |
18a |
|
|
Area around Anus |
Perineal |
Sole of foot |
Plantar |
||
|
Crotch/Groin |
Inguinal |
15b |
Toes |
Digits |
18b |
|
Arm |
Upper Extremity |
19a |
Big Toe |
Hallux |
|
|
Leg |
Lower Extremity |
19b |
Using colored pencils, shade the various regions and structures in the image:
1. Obtain torso models, stickers and felt pen from instructor
2. Write the anatomical terms on stickers
3. Taking tuns within your group, correctly label the anatomical model
4. Have your instructor check your work.
5. After checking your work, remove the stickers (but don’t throw them away).
a. Select one member of your group to be the “leader” the group and one member to “model” for your group
b. The leader will use the term sheet and ask other members to correct label the model one person at a time. If the identification is correct, the next person will label. However, if the leader must correct the label that person will go again until they correctly label the model.
c. After three rotations through your group, switch roles with the leader and the model now labeling and the labelers being the leader and the model.
d. Continue switching roles until you have no more structures to label.
6. Discuss in your group. Question: Why is important to know the anatomical terms and the concept of anatomical mirroring? Share your response with your instructor
7. One of the things that we will have to do routinely in our careers is change our speech based the audience that we are talking with. This becomes even more problematic when are constantly going between medical charts and our patients. To make sure that you are able to do this transition, translate the following kid’s sing-along into correct anatomical terminology:
Head and shoulders knees and toes
Knees and toes
Head and shoulders knees and toes
Knees and toes
And eyes and ears
And mouth and nose
Head and shoulders knees and toes
Knees and toes
Feet and tummies arms and chins
Arms and chins
Feet and tummies arms and chins
Arms and chins
And eyes and ears
And mouth and shins
Feet and tummies arms and chins
Arms and chins
Hands and fingers legs and lips
Legs and lips
Hands and fingers legs and lips
Legs and lips
And eyes and ears
And mouth and hips
Hands and fingers legs and lips
Legs and lips
Head and shoulders knees and toes
Knees and toes
Head and shoulders knees and toes
Knees and toes
And eyes and ears
And mouth and nose
Head and shoulders knees and toes
Knees and toes