
Activity 3-1 - Identifying Genetically Modified Organisms Through DNA Analysis
- Page ID
- 158617

\( \newcommand{\vecs}[1]{\overset { \scriptstyle \rightharpoonup} {\mathbf{#1}} } \)
\( \newcommand{\vecd}[1]{\overset{-\!-\!\rightharpoonup}{\vphantom{a}\smash {#1}}} \)
\( \newcommand{\dsum}{\displaystyle\sum\limits} \)
\( \newcommand{\dint}{\displaystyle\int\limits} \)
\( \newcommand{\dlim}{\displaystyle\lim\limits} \)
\( \newcommand{\id}{\mathrm{id}}\) \( \newcommand{\Span}{\mathrm{span}}\)
( \newcommand{\kernel}{\mathrm{null}\,}\) \( \newcommand{\range}{\mathrm{range}\,}\)
\( \newcommand{\RealPart}{\mathrm{Re}}\) \( \newcommand{\ImaginaryPart}{\mathrm{Im}}\)
\( \newcommand{\Argument}{\mathrm{Arg}}\) \( \newcommand{\norm}[1]{\| #1 \|}\)
\( \newcommand{\inner}[2]{\langle #1, #2 \rangle}\)
\( \newcommand{\Span}{\mathrm{span}}\)
\( \newcommand{\id}{\mathrm{id}}\)
\( \newcommand{\Span}{\mathrm{span}}\)
\( \newcommand{\kernel}{\mathrm{null}\,}\)
\( \newcommand{\range}{\mathrm{range}\,}\)
\( \newcommand{\RealPart}{\mathrm{Re}}\)
\( \newcommand{\ImaginaryPart}{\mathrm{Im}}\)
\( \newcommand{\Argument}{\mathrm{Arg}}\)
\( \newcommand{\norm}[1]{\| #1 \|}\)
\( \newcommand{\inner}[2]{\langle #1, #2 \rangle}\)
\( \newcommand{\Span}{\mathrm{span}}\) \( \newcommand{\AA}{\unicode[.8,0]{x212B}}\)
\( \newcommand{\vectorA}[1]{\vec{#1}} % arrow\)
\( \newcommand{\vectorAt}[1]{\vec{\text{#1}}} % arrow\)
\( \newcommand{\vectorB}[1]{\overset { \scriptstyle \rightharpoonup} {\mathbf{#1}} } \)
\( \newcommand{\vectorC}[1]{\textbf{#1}} \)
\( \newcommand{\vectorD}[1]{\overrightarrow{#1}} \)
\( \newcommand{\vectorDt}[1]{\overrightarrow{\text{#1}}} \)
\( \newcommand{\vectE}[1]{\overset{-\!-\!\rightharpoonup}{\vphantom{a}\smash{\mathbf {#1}}}} \)
\( \newcommand{\vecs}[1]{\overset { \scriptstyle \rightharpoonup} {\mathbf{#1}} } \)
\(\newcommand{\longvect}{\overrightarrow}\)
\( \newcommand{\vecd}[1]{\overset{-\!-\!\rightharpoonup}{\vphantom{a}\smash {#1}}} \)
\(\newcommand{\avec}{\mathbf a}\) \(\newcommand{\bvec}{\mathbf b}\) \(\newcommand{\cvec}{\mathbf c}\) \(\newcommand{\dvec}{\mathbf d}\) \(\newcommand{\dtil}{\widetilde{\mathbf d}}\) \(\newcommand{\evec}{\mathbf e}\) \(\newcommand{\fvec}{\mathbf f}\) \(\newcommand{\nvec}{\mathbf n}\) \(\newcommand{\pvec}{\mathbf p}\) \(\newcommand{\qvec}{\mathbf q}\) \(\newcommand{\svec}{\mathbf s}\) \(\newcommand{\tvec}{\mathbf t}\) \(\newcommand{\uvec}{\mathbf u}\) \(\newcommand{\vvec}{\mathbf v}\) \(\newcommand{\wvec}{\mathbf w}\) \(\newcommand{\xvec}{\mathbf x}\) \(\newcommand{\yvec}{\mathbf y}\) \(\newcommand{\zvec}{\mathbf z}\) \(\newcommand{\rvec}{\mathbf r}\) \(\newcommand{\mvec}{\mathbf m}\) \(\newcommand{\zerovec}{\mathbf 0}\) \(\newcommand{\onevec}{\mathbf 1}\) \(\newcommand{\real}{\mathbb R}\) \(\newcommand{\twovec}[2]{\left[\begin{array}{r}#1 \\ #2 \end{array}\right]}\) \(\newcommand{\ctwovec}[2]{\left[\begin{array}{c}#1 \\ #2 \end{array}\right]}\) \(\newcommand{\threevec}[3]{\left[\begin{array}{r}#1 \\ #2 \\ #3 \end{array}\right]}\) \(\newcommand{\cthreevec}[3]{\left[\begin{array}{c}#1 \\ #2 \\ #3 \end{array}\right]}\) \(\newcommand{\fourvec}[4]{\left[\begin{array}{r}#1 \\ #2 \\ #3 \\ #4 \end{array}\right]}\) \(\newcommand{\cfourvec}[4]{\left[\begin{array}{c}#1 \\ #2 \\ #3 \\ #4 \end{array}\right]}\) \(\newcommand{\fivevec}[5]{\left[\begin{array}{r}#1 \\ #2 \\ #3 \\ #4 \\ #5 \\ \end{array}\right]}\) \(\newcommand{\cfivevec}[5]{\left[\begin{array}{c}#1 \\ #2 \\ #3 \\ #4 \\ #5 \\ \end{array}\right]}\) \(\newcommand{\mattwo}[4]{\left[\begin{array}{rr}#1 \amp #2 \\ #3 \amp #4 \\ \end{array}\right]}\) \(\newcommand{\laspan}[1]{\text{Span}\{#1\}}\) \(\newcommand{\bcal}{\cal B}\) \(\newcommand{\ccal}{\cal C}\) \(\newcommand{\scal}{\cal S}\) \(\newcommand{\wcal}{\cal W}\) \(\newcommand{\ecal}{\cal E}\) \(\newcommand{\coords}[2]{\left\{#1\right\}_{#2}}\) \(\newcommand{\gray}[1]{\color{gray}{#1}}\) \(\newcommand{\lgray}[1]{\color{lightgray}{#1}}\) \(\newcommand{\rank}{\operatorname{rank}}\) \(\newcommand{\row}{\text{Row}}\) \(\newcommand{\col}{\text{Col}}\) \(\renewcommand{\row}{\text{Row}}\) \(\newcommand{\nul}{\text{Nul}}\) \(\newcommand{\var}{\text{Var}}\) \(\newcommand{\corr}{\text{corr}}\) \(\newcommand{\len}[1]{\left|#1\right|}\) \(\newcommand{\bbar}{\overline{\bvec}}\) \(\newcommand{\bhat}{\widehat{\bvec}}\) \(\newcommand{\bperp}{\bvec^\perp}\) \(\newcommand{\xhat}{\widehat{\xvec}}\) \(\newcommand{\vhat}{\widehat{\vvec}}\) \(\newcommand{\uhat}{\widehat{\uvec}}\) \(\newcommand{\what}{\widehat{\wvec}}\) \(\newcommand{\Sighat}{\widehat{\Sigma}}\) \(\newcommand{\lt}{<}\) \(\newcommand{\gt}{>}\) \(\newcommand{\amp}{&}\) \(\definecolor{fillinmathshade}{gray}{0.9}\)- Define what genetically modified organisms (GMOs) are and explain how they are created.
- Describe the purpose of common genetic elements found in GM crops (e.g., 35S promoter, NOS terminator).
- Understand the societal context and global regulation of GMO labeling.
- Outline the steps required to detect GMOs in food using DNA extraction, PCR, and gel electrophoresis.
- Interpret why specific primers are used in the detection of GM markers.
- Prepare PCR-ready primer dilutions and determine how to calculate and normalize DNA concentration for reactions.
- Genetically Modified Organism (GMO): An organism whose genome has been altered using recombinant DNA technology to express traits like pest resistance or improved nutrition.
- 35S Promoter: A regulatory sequence from the Cauliflower Mosaic Virus that drives strong gene expression in plant cells. Common in GM crops.
- NOS Terminator: A sequence from Agrobacterium tumefaciens that signals the end of transcription; used to terminate transgene expression.
- PCR (Polymerase Chain Reaction): A technique to amplify specific DNA sequences, making millions of copies of a target region.
- Primer: A short strand of nucleotides that serves as a starting point for DNA synthesis during PCR.
- SYBR Safe Dye: A fluorescent dye that binds DNA and allows visualization under UV or blue light during gel electrophoresis.
- DNA Extraction: The process of isolating DNA from a biological sample.
- Nanodrop Spectrophotometry: A method to measure DNA concentration and purity using absorbance at 260 nm.
- GMO Marker: A DNA sequence specifically inserted into GM organisms, often targeted for detection (e.g., 35S, NOS, selectable markers).
- Control Reaction: A reaction used to confirm that your PCR or extraction worked (positive) or to check for contamination (negative).

Image created by Victor Pham, Ph.D. via NotebookLM.
Abstract
This laboratory guide details the scientific process of detecting genetically modified organisms (GMOs) in common food products using molecular biology techniques. The curriculum involves a multi-stage procedure where students perform DNA extraction, use PCR amplification to target specific genetic markers like the 35S promoter, and utilize gel electrophoresis to visualize their results. Beyond technical skills, the text explores the global regulatory landscape of food labeling and the differing standards between the United States and other nations. Students are also encouraged to evaluate the environmental and ethical implications of biotechnology, such as the development of pest-resistant crops and potential ecological risks. By combining hands-on experimentation with critical analysis, the material provides a comprehensive look at how genetic engineering impacts the modern food supply.
Are You Eating Genetically Modified Foods?
Genetically modified (GM) foods are derived from organisms whose DNA has been altered using genetic engineering techniques. These modifications are often made to improve crop yield, pest resistance, or nutritional content. In the United States, food products must be labeled as containing GMOs only if more than 5% of their content is genetically modified. For instance, a breakfast cereal made primarily from genetically engineered corn would be labeled only if the GM content exceeds that threshold. Interestingly, the term “GMO-free” can still be used if the food contains less than 5% GM ingredients. By contrast, many countries in Europe and Asia have stricter policies, requiring labeling for GM content exceeding just 1%. This variation in global standards highlights the ongoing debate around transparency and consumer rights when it comes to food labeling.
The central goal of this lab is to engage students in a real-world application of molecular biology: detecting GMOs in common foods. Students will collect plant-based items from a grocery store—like corn chips, soy milk, tofu, or veggie burgers—and analyze them in the lab to see if they contain genetically modified DNA. The investigation unfolds through five key stages:
- Food Collection – Students select processed or raw plant-based food items suspected of containing GM ingredients.
- DNA Extraction – Genetic material is extracted from the food samples using a simple lysis buffer and ethanol precipitation method.
- PCR Amplification – Specific DNA sequences associated with GMOs are amplified using the polymerase chain reaction (PCR).
- Gel Electrophoresis – Amplified DNA fragments are separated and visualized to confirm the presence or absence of GMO-specific sequences.
- RT-qPCR (Reverse Transcription & Quantitative PCR) – An advanced analysis is optionally performed to quantify gene expression levels or detect RNA transcripts, particularly useful if the GM trait involves a transgene under active expression in the plant.
This activity introduces students to a variety of sophisticated molecular biology techniques, reinforcing both theoretical and practical concepts:
- Genetic Engineering and Transformation: GMOs are created by inserting new genes into an organism’s genome. For example, Bt corn contains a gene from the bacterium Bacillus thuringiensis that produces a protein toxic to insect pests. The lab helps students understand how these genes are introduced and expressed.
- DNA Transcription and Translation: If a plant is genetically modified to produce a protein (e.g., a pest-resistant enzyme), its DNA is first transcribed into mRNA, then translated into the protein. RT-qPCR can help detect these transcripts, showing active expression of the transgene.
- Gene Regulation: Not all genes are turned on all the time. GM traits often include regulatory sequences like promoters to control when and where a gene is active. The presence of a promoter like the cauliflower mosaic virus 35S promoter (CaMV 35S) is a common target in GMO detection.
- DNA Replication and PCR: PCR is a technique that mimics natural DNA replication but in a controlled, amplified way. Using primers specific to known GM sequences, students can selectively copy parts of the genome to see if their food contains those sequences.
- Plant Development and Physiology: Understanding which plant tissues are best for DNA extraction, and how gene expression varies in different plant parts, gives students insight into basic plant biology.
- Agricultural and Environmental Science: The project connects lab science to agricultural practices—why certain GM crops are developed, how they’re used in farming, and what the broader ecological consequences might be.
GMO Detection Guided Approach
The GMO detection kit used in this activity encourages a guided inquiry-based learning method. This means students follow structured protocols but also make critical decisions along the way—like choosing appropriate controls, troubleshooting PCR issues, and interpreting gel results. Students will ask questions like:
- Was DNA extraction successful? A control PCR reaction targeting a plant gene (e.g., tubulin or rbcL) ensures the sample contains amplifiable plant DNA.
- Did PCR work as expected? Positive and negative controls help interpret results. A successful PCR will show clear bands on a gel, while no bands could suggest failed amplification.
- Is there contamination? Contamination can lead to false positives. Students will use sterile technique and proper controls to validate their results.
GM Crops
The experiment doesn’t end at the gel. Students are encouraged to explore the broader implications of GMO technology by engaging in a structured debate on its risks and benefits.
Concerns About GM Crops:
- Super-Weeds: When herbicide-resistant crops like “Roundup Ready” soybeans cross-pollinate with wild relatives, the result can be herbicide-resistant weeds that are harder to control.
- Super-Bugs: Insects exposed to Bt crops over many generations may evolve resistance, rendering the Bt trait ineffective.
- Allergic Reactions: Introducing new genes can lead to the expression of novel proteins. If these proteins resemble allergens, they could pose a health risk to sensitive individuals.
- Antibiotic Resistance: Some GM crops use antibiotic resistance genes as markers during development. There is concern these genes could be transferred to gut bacteria, potentially contributing to antibiotic resistance.
- Public Health Risks: While most GMOs are considered safe, critics argue that long-term health effects have not been fully studied, particularly for traits affecting metabolism or protein expression.
Benefits of GM Crops:
- Environmental Impact: GM crops that require fewer chemical pesticides reduce environmental pollution and protect beneficial insect populations.
- Soil Conservation: Crops engineered for drought resistance or pest resistance can grow in less-than-ideal soil, reducing the need to clear additional farmland.
- Nutritional Benefits: “Golden rice,” genetically engineered to produce beta-carotene, helps combat vitamin A deficiency in regions where rice is a staple food.
- Agricultural Expansion: GM technology enables farming in areas previously unsuitable for agriculture due to poor soil or harsh climates, improving food security.
Through this lab, students develop a comprehensive understanding of how molecular biology can be applied to everyday problems—like verifying the presence of GMOs in food. They not only learn lab techniques like DNA extraction, PCR, and gel electrophoresis, but also explore the real-world implications of genetic engineering. By combining technical skills with ethical and environmental discussions, this activity fosters critical thinking and gives students the tools to make informed decisions about biotechnology and its role in our global food system.
Objective
Test store-bought plant-based foods (like corn chips or veggie burgers) to check for the presence of genetically modified organisms (GMOs) using DNA extraction, PCR, and gel electrophoresis.

Image of a flow chart summarizing the GMO DNA Fingerprinting. Image created by Victor Pham, Ph.D. via NotebookLM.

Primer gene targets. Image created by Victor Pham, Ph.D. via NotebookLM.

GMO or not. Image created by Victor Pham, Ph.D. via NotebookLM.
Day 1 - Part 1 – Primer Prep
Diluting Primers (Stock Prep - Instructor will do this)
- For every 1 nmol of dried primer, add 10 µL of distilled water (diH₂O).
- → This creates a 100 µM stock solution (also called 100X).
Make a Primer Master Mix Stock (for each primer set - Students will do)
- Obtain 6 centrifuge tubes and label each of them with: 10X, Gene Name, "Master", and Group Name
- For example: 10X Zss Master, Vp
- List of gene names:
- Zss (Control)
- Lectin
- 35S
- NOS
- Invertase
- SPS
- In each tube, add the following to obtain a 2 µM solution (10X primer mix)
- Mix:
- 240 µL diH₂O
- 5 µL Forward primer (of that specific gene)
- 5 µL Reverse primer (of that specific gene)
- Mix:
Primer Selection
There are five different GMO-related primer sets available (plus one control).
⚠️ Important Note:
- If your sample tests positive for any of these GMO markers, that means the food contains a GMO sequence.
- However, if your result is negative, that does not mean the food is organic — it may still contain GMOs that we aren’t testing for.
- We are only using a limited number of primers, so a negative result simply means that none of the specific sequences tested were found.
Primer Options
- (REQUIRED) Plant Master Mix (Control)
- Purpose: This is not a GMO marker. It’s a positive control to confirm your DNA extraction worked and that plant DNA is present in your sample.
- Why it’s used: If this doesn't show a band in PCR, it means your extraction or PCR failed — not that the food is GMO-free.
- Invertase
- Purpose: Detects the invertase gene, which helps plants break down sucrose into glucose and fructose.
- Sucrose Phosphate Synthase (SPS)
- Purpose: SPS is involved in the biosynthesis of sucrose, an important sugar in plants.
- Lectin
- Purpose: Detects the lectin gene, a natural antimicrobial gene.
- 35S Promoter
- Purpose: This sequence comes from the Cauliflower Mosaic Virus and is used to turn on genes in GMO crops.
- Why it's engineered: It acts like an "on-switch" to make sure inserted GMO genes are actively expressed in the plant. It’s one of the most common elements in GMO crops.
- NOS Terminator
- Purpose: This sequence comes from the nopaline synthase gene in Agrobacterium tumefaciens.
- Why it's engineered: It acts like a "stop sign" for transcription, making sure the inserted GMO gene turns off properly after it's expressed. It’s often paired with the 35S promoter in GMO constructs.

Image of a flow chart summarizing Primer Prep. Image created by Dr. Victor Pham's student, Diana Valdovinos.
Day 1 - Part 2 – DNA Extraction
Materials:
- Food sample (individually done), distilled water, grinder, microcentrifuge tubes
Procedures
- Weigh 1 gram of your plant-based food sample.
- Freeze down another 1 gram of your plant-based food for RT-PCR (Next lab).
- Add 5 mL of distilled water.
- Grind or mash the sample for 2 minutes until well mixed.
- Transfer 500 μL into a tube labeled “For PCR”
- Add 1 mL of InstaGene solution to your “For PCR” tube, and then mix by inverting at least 6 times.
- Boil this sample for 15 minutes via heat block at 95°C (or hot boiling water on a heatblock)
- Spin the tube in a microcentrifuge machine for 5 minutes.
- Carefully transfer the clear supernatant to a new tube and label it “For PCR, plant name, initial, date”
- You can discard the original tube with the pellet.
- Use the Nanodrop to measure your DNA concentration.
- Record the purity: 260/280 _____ and 260/230 ______
- Record the concentration: _______________ ng/µL. (Write this concentration on your tube)
- If your sample is more concentrated than 100 ng/µL (or 0.1µg/uL), dilute it:
- Add diH₂O to bring the concentration down to 100 ng/µL.
- If the concentration is already less than 100 ng/µL, no dilution is needed
- If your sample is more concentrated than 100 ng/µL (or 0.1µg/uL), dilute it:
- Freeze down your sample

Image of a flow chart summarizing DNA Extraction. Image created by Dr. Victor Pham's student, Diana Valdovinos.
Day 2 - Part 1 – PCR Prep (Individual Work)
- Obtain six PCR tubes with cap.
- Label each tube clearly:
- Primer gene names on the side
- Initial or name on the top
- Label each tube clearly:
- Add ___ µL of DNA (you need 200ng) into each PCR tube.
- Volume calculation for DNA Example: If you have DNA is 50 ng/µL → 200ng ÷ 50ng/µL = 4 µL needed
- Add enough water to bring the total to 12 µL (i.e., If 4 µL DNA, add 8 µL water)
- Into each PCR tube, use DIFFERENT pipet tips to add:
- 10 µL of 2X Master Mix
- 8 µL of your 2 µM primer Master (from Part 1)
- You should have 6 tubes in total, each having different primers
Note: The total volume should be 30 uL. Run PCR immediately.
Day 2 - Part 2 – PCR Reaction
- Please place them in the thermal cycler (PCR machine).
- Set the machine to the following cycle:
| Step | Temperature | Time |
|---|---|---|
| Initial denaturation | 95°C | 2 min |
| Denaturation | 95°C | 1 min |
| Annealing | 59°C | 1 min |
| Extension | 72°C | 2 min |
| Repeat steps 2–4 for 40 cycles | ||
| Final extension | 72°C | 10 min |
| Hold | 4°C | ∞ |

Image of a flow chart summarizing PCR Prep. Image created by Dr. Victor Pham's student, Diana Valdovinos.

PCR Reaction. Image created by Victor Pham, Ph.D. via NotebookLM.
Day 3 - Part 1 – Agarose Gel (To Visualize PCR Results)
Materials:
- Agarose, TAE buffer, SYBR dye, gel box, loading dye, UV transilluminator
Procedures:
- Prepare a 0.8% agarose gel:
- Mix 0.24 g of agarose into 30 mL of 1X TAE buffer.
- Microwave until fully dissolved.
- Let it cool (warm to the touch), then add:
- 3 µL of 10,000X SYBR Safe dye (for DNA visualization)
- This should be added before the gel solidifies!
- Pour the gel into a casting tray and let it set in the dark.
- Mix your samples before loading:
- 20 µL of your PCR sample
- 4 µL of 6X DNA loading dye
- Carefully load your samples into the gel wells.
- Run the gel in 1X TAE buffer for 30–45 minutes, in the dark.
- Visualize your results under UV light or a blue light transilluminator.
- Compare your bands to the GMO-positive and GMO-negative controls.
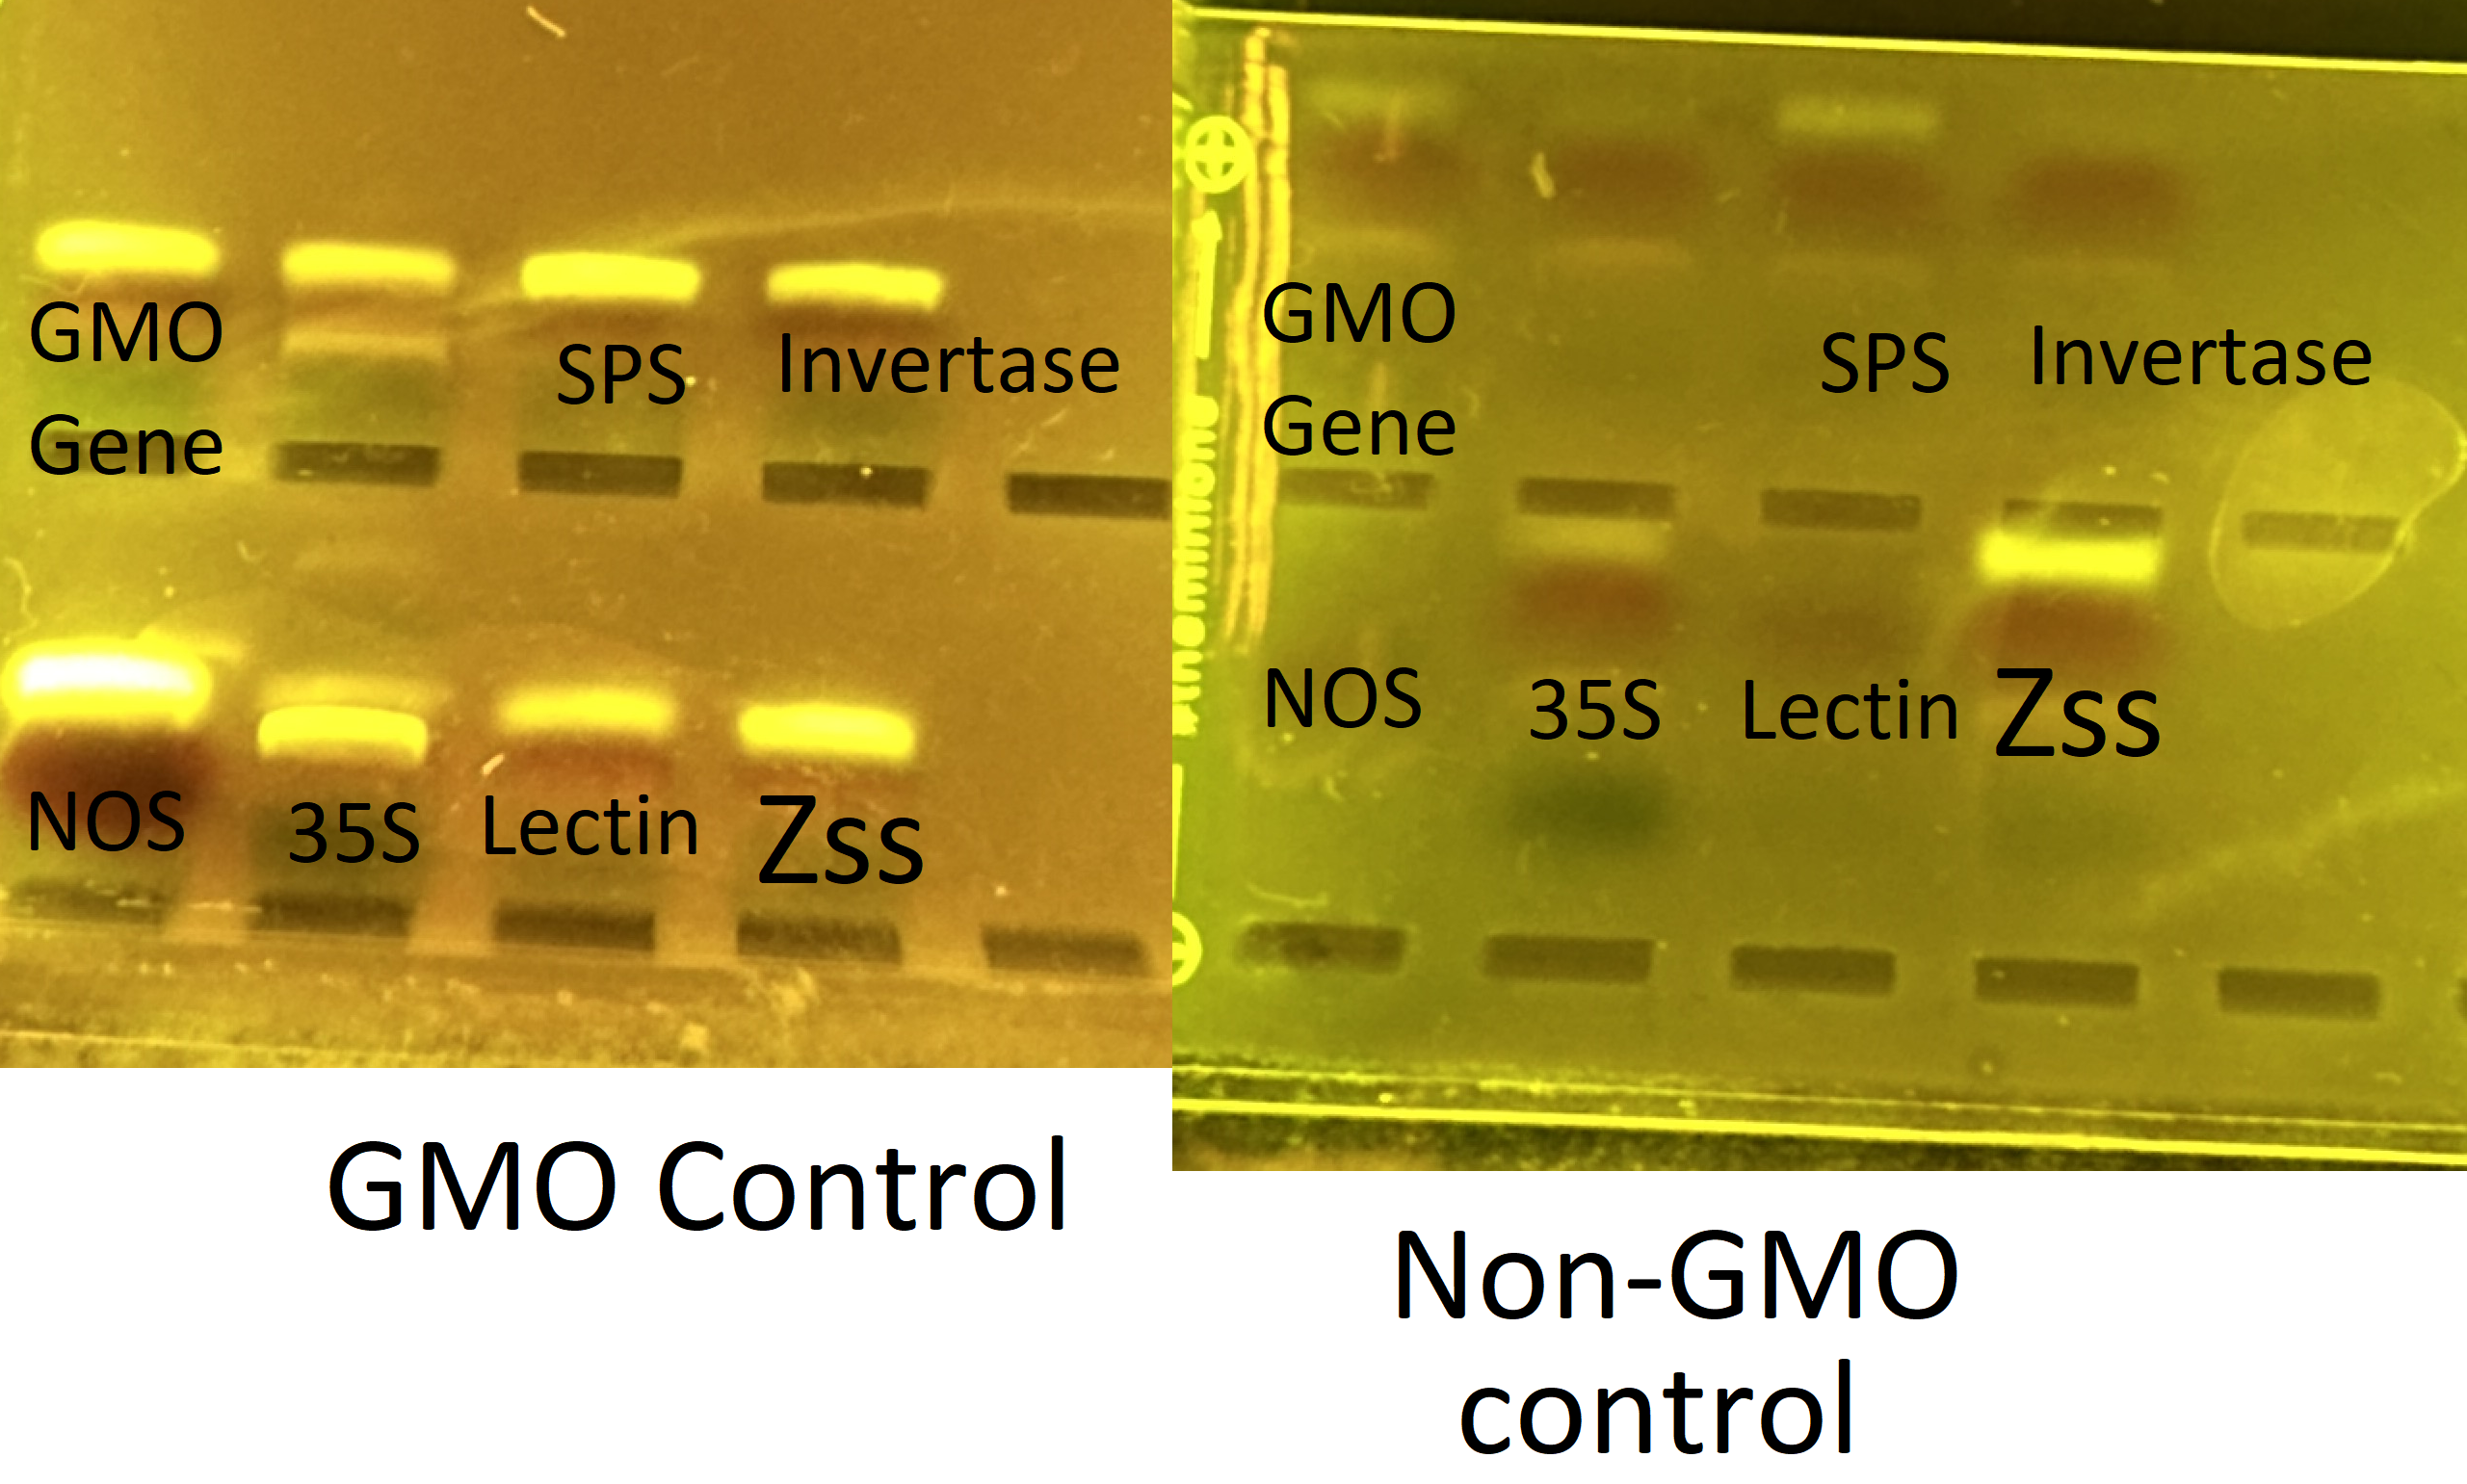 Image from Dr. Victor Pham's Lab Results

Summarizing Agarose Gel Electrophoresis. Image created by Victor Pham, Ph.D. via NotebookLM.
- Analyze gel electrophoresis results to determine whether their food sample contains GMO DNA.
- Explain the function of the genetic elements detected by their chosen primers (e.g., what role the 35S promoter plays).
- Evaluate the reliability of their PCR data using positive and negative controls.
- Identify potential sources of error in DNA extraction or PCR and propose troubleshooting steps.
- Interpret why a negative result doesn't necessarily indicate a GMO-free food sample.
- Discuss the implications of GMO use from agricultural, environmental, and ethical perspectives.
- What did your gel results indicate about the food sample you tested?
- Did your control primers (plant master mix) work? What does this tell you?
- What factors could cause a false negative in your PCR test?
- Should GMO foods be labeled more clearly in your country? Why or why not?
- What do you think is the most compelling argument for or against GMO foods based on what you’ve learned?