
2: The Microscope
- Page ID
- 152047
\( \newcommand{\vecs}[1]{\overset { \scriptstyle \rightharpoonup} {\mathbf{#1}} } \)
\( \newcommand{\vecd}[1]{\overset{-\!-\!\rightharpoonup}{\vphantom{a}\smash {#1}}} \)
\( \newcommand{\dsum}{\displaystyle\sum\limits} \)
\( \newcommand{\dint}{\displaystyle\int\limits} \)
\( \newcommand{\dlim}{\displaystyle\lim\limits} \)
\( \newcommand{\id}{\mathrm{id}}\) \( \newcommand{\Span}{\mathrm{span}}\)
( \newcommand{\kernel}{\mathrm{null}\,}\) \( \newcommand{\range}{\mathrm{range}\,}\)
\( \newcommand{\RealPart}{\mathrm{Re}}\) \( \newcommand{\ImaginaryPart}{\mathrm{Im}}\)
\( \newcommand{\Argument}{\mathrm{Arg}}\) \( \newcommand{\norm}[1]{\| #1 \|}\)
\( \newcommand{\inner}[2]{\langle #1, #2 \rangle}\)
\( \newcommand{\Span}{\mathrm{span}}\)
\( \newcommand{\id}{\mathrm{id}}\)
\( \newcommand{\Span}{\mathrm{span}}\)
\( \newcommand{\kernel}{\mathrm{null}\,}\)
\( \newcommand{\range}{\mathrm{range}\,}\)
\( \newcommand{\RealPart}{\mathrm{Re}}\)
\( \newcommand{\ImaginaryPart}{\mathrm{Im}}\)
\( \newcommand{\Argument}{\mathrm{Arg}}\)
\( \newcommand{\norm}[1]{\| #1 \|}\)
\( \newcommand{\inner}[2]{\langle #1, #2 \rangle}\)
\( \newcommand{\Span}{\mathrm{span}}\) \( \newcommand{\AA}{\unicode[.8,0]{x212B}}\)
\( \newcommand{\vectorA}[1]{\vec{#1}} % arrow\)
\( \newcommand{\vectorAt}[1]{\vec{\text{#1}}} % arrow\)
\( \newcommand{\vectorB}[1]{\overset { \scriptstyle \rightharpoonup} {\mathbf{#1}} } \)
\( \newcommand{\vectorC}[1]{\textbf{#1}} \)
\( \newcommand{\vectorD}[1]{\overrightarrow{#1}} \)
\( \newcommand{\vectorDt}[1]{\overrightarrow{\text{#1}}} \)
\( \newcommand{\vectE}[1]{\overset{-\!-\!\rightharpoonup}{\vphantom{a}\smash{\mathbf {#1}}}} \)
\( \newcommand{\vecs}[1]{\overset { \scriptstyle \rightharpoonup} {\mathbf{#1}} } \)
\(\newcommand{\longvect}{\overrightarrow}\)
\( \newcommand{\vecd}[1]{\overset{-\!-\!\rightharpoonup}{\vphantom{a}\smash {#1}}} \)
\(\newcommand{\avec}{\mathbf a}\) \(\newcommand{\bvec}{\mathbf b}\) \(\newcommand{\cvec}{\mathbf c}\) \(\newcommand{\dvec}{\mathbf d}\) \(\newcommand{\dtil}{\widetilde{\mathbf d}}\) \(\newcommand{\evec}{\mathbf e}\) \(\newcommand{\fvec}{\mathbf f}\) \(\newcommand{\nvec}{\mathbf n}\) \(\newcommand{\pvec}{\mathbf p}\) \(\newcommand{\qvec}{\mathbf q}\) \(\newcommand{\svec}{\mathbf s}\) \(\newcommand{\tvec}{\mathbf t}\) \(\newcommand{\uvec}{\mathbf u}\) \(\newcommand{\vvec}{\mathbf v}\) \(\newcommand{\wvec}{\mathbf w}\) \(\newcommand{\xvec}{\mathbf x}\) \(\newcommand{\yvec}{\mathbf y}\) \(\newcommand{\zvec}{\mathbf z}\) \(\newcommand{\rvec}{\mathbf r}\) \(\newcommand{\mvec}{\mathbf m}\) \(\newcommand{\zerovec}{\mathbf 0}\) \(\newcommand{\onevec}{\mathbf 1}\) \(\newcommand{\real}{\mathbb R}\) \(\newcommand{\twovec}[2]{\left[\begin{array}{r}#1 \\ #2 \end{array}\right]}\) \(\newcommand{\ctwovec}[2]{\left[\begin{array}{c}#1 \\ #2 \end{array}\right]}\) \(\newcommand{\threevec}[3]{\left[\begin{array}{r}#1 \\ #2 \\ #3 \end{array}\right]}\) \(\newcommand{\cthreevec}[3]{\left[\begin{array}{c}#1 \\ #2 \\ #3 \end{array}\right]}\) \(\newcommand{\fourvec}[4]{\left[\begin{array}{r}#1 \\ #2 \\ #3 \\ #4 \end{array}\right]}\) \(\newcommand{\cfourvec}[4]{\left[\begin{array}{c}#1 \\ #2 \\ #3 \\ #4 \end{array}\right]}\) \(\newcommand{\fivevec}[5]{\left[\begin{array}{r}#1 \\ #2 \\ #3 \\ #4 \\ #5 \\ \end{array}\right]}\) \(\newcommand{\cfivevec}[5]{\left[\begin{array}{c}#1 \\ #2 \\ #3 \\ #4 \\ #5 \\ \end{array}\right]}\) \(\newcommand{\mattwo}[4]{\left[\begin{array}{rr}#1 \amp #2 \\ #3 \amp #4 \\ \end{array}\right]}\) \(\newcommand{\laspan}[1]{\text{Span}\{#1\}}\) \(\newcommand{\bcal}{\cal B}\) \(\newcommand{\ccal}{\cal C}\) \(\newcommand{\scal}{\cal S}\) \(\newcommand{\wcal}{\cal W}\) \(\newcommand{\ecal}{\cal E}\) \(\newcommand{\coords}[2]{\left\{#1\right\}_{#2}}\) \(\newcommand{\gray}[1]{\color{gray}{#1}}\) \(\newcommand{\lgray}[1]{\color{lightgray}{#1}}\) \(\newcommand{\rank}{\operatorname{rank}}\) \(\newcommand{\row}{\text{Row}}\) \(\newcommand{\col}{\text{Col}}\) \(\renewcommand{\row}{\text{Row}}\) \(\newcommand{\nul}{\text{Nul}}\) \(\newcommand{\var}{\text{Var}}\) \(\newcommand{\corr}{\text{corr}}\) \(\newcommand{\len}[1]{\left|#1\right|}\) \(\newcommand{\bbar}{\overline{\bvec}}\) \(\newcommand{\bhat}{\widehat{\bvec}}\) \(\newcommand{\bperp}{\bvec^\perp}\) \(\newcommand{\xhat}{\widehat{\xvec}}\) \(\newcommand{\vhat}{\widehat{\vvec}}\) \(\newcommand{\uhat}{\widehat{\uvec}}\) \(\newcommand{\what}{\widehat{\wvec}}\) \(\newcommand{\Sighat}{\widehat{\Sigma}}\) \(\newcommand{\lt}{<}\) \(\newcommand{\gt}{>}\) \(\newcommand{\amp}{&}\) \(\definecolor{fillinmathshade}{gray}{0.9}\)By the end of this lab period you will be able to:
- Set up the microscope, and use it to visualize specimens under 4x, 10x, and 40x magnifications
- Calculate the total magnification for each objective
- Use the 4x objective to scan the entire specimen
- Apply the concept of “depth of focus” to determine which silk fiber is on the top, middle, and bottom of a crossed fibers slide.
- Focus on fixed specimens of common free-living protozoa such as paramecium, euglena, and amoeba.
Introduction
Most of life on earth is invisible! Our exploration of tiny organisms began with the first light microscopes developed by Robert Hooke and Antonie van Leeuwenhoek. Believe it or not, these first simple microscopes work in much the same way as the compound light microscopes that you will be using extensively this semester in our microbiology laboratory.
There are a variety of different types of microscopes in use today, including phase contrast, fluorescence, and dark-field microscopes. We will be using bright-field microscopes in our introductory course, and in fact, these are the most common microscopes used in clinical laboratories as well.
The Compound Microscope - Basics
A microscope works by passing light through a specimen (usually on a glass slide), which travels through lenses that magnify the image (like a magnifying glass) and then to your eye. It’s referred to as a “compound microscope” because the light passes through a series of lenses that refract light and magnify the final virtual image that you see when you look through the ocular lenses (Figure \(\PageIndex{2}\)). You can control the amount of light passing through the image by adjusting the light intensity knob or by adjusting the width of the opening of the substage iris diaphragm (Figure \(\PageIndex{1}\)).

Microscope Lenses and Magnification
The light from the bulb at the base of the microscope first passes through a condenser, which focuses a cone of light right onto the specimen. The light then passes through the specimen into the objective lens which magnifies the image by either 4x, 10x, 40x, or 100x, depending on which objective is in the light path. Finally, the light travels through the 10x ocular lenses and is focused on the back of your retina, where your brain can interpret the virtual, magnified image.

The total magnification of the image is determined by multiplying the magnification of the objective lens and the ocular lens.
|
Lens |
Total magnification with oculars |
Alternate Name |
Best for: |
|---|---|---|---|
|
4x |
40x |
Scanning objective |
Scanning the entire slide to decide the best spots to focus on, low-power observation |
|
10x |
100x |
Medium power observations |
|
|
40x |
400x |
High dry |
High power observations |
|
100x |
1000x |
Oil immersion lens |
Highest power observations - needed for very small organisms such as bacteria |
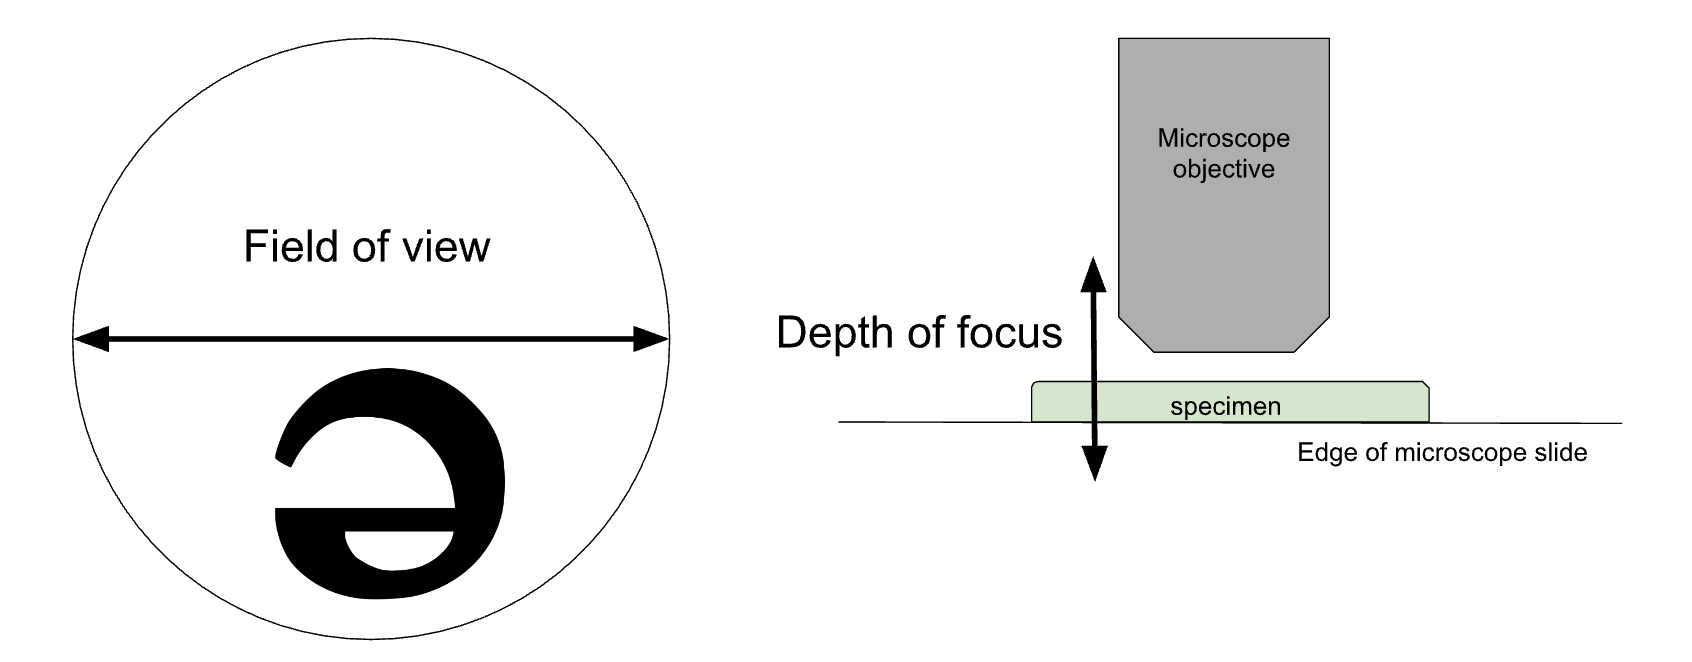
Field of View
The field of view is the circular area that is visible when you look through the microscope (Figure \(\PageIndex{3}\)) As you increase magnification, the field of view decreases, that is, you see LESS of your specimen. You will be exploring the field of view with the “Letter E” slide.
Depth of Focus
The depth of focus refers to the thickness of a specimen entirely in focus under a microscope (Figure \(\PageIndex{3}\)). As you increase the magnification the depth of focus decreases. At very high magnifications, only thin slices of your specimen are in focus at any one time. You will be exploring the depth of focus with the crossed silk threads slide.
Resolution vs. Magnification
Just because the image is larger, doesn’t mean that you can see much! It’s possible to increase magnification, without increasing resolution. In this case, the image would be blurry, and even though it was large, you wouldn’t be able to see very much.
The word “resolution” in microscopy refers to the distance that two points in the image must be apart in order to be distinguished from each other. Resolving power is related to the wavelength of light that is used to illuminate the image. The smaller the wavelength of light, the better the resolving power. Resolving power is also impacted by the numerical aperture of the objective lens that is being used to magnify the specimen.
An electron has a much shorter wavelength than even the shortest wavelength visible light (blue light). This is why the resolving power of an electron microscope is so much greater than a light microscope! The best compound light microscopes have a resolving power of about 200 nanometers (nm). However, an electron microscope can resolve between points on an image that are only 0.5 nm apart. Unfortunately, an electron microscope is very expensive and very large! It requires complex sample preparation and a vacuum source. The good news is that we can still see bacteria quite well with a compound light microscope. Bacteria have a wide range of sizes and shapes, but many are around 10 micrometers (10,000 nm). So our compound light microscopes have sufficient resolving power to work with. Unfortunately, smaller microbes such as viruses are too small for our microscopes.
Parfocal Lenses
Our microscopes are parfocal. What does this mean? Once you have focused on any of the objectives (we always start with 4x), the other objectives will also be (mostly) in focus. You do not need to make major focus adjustments after changing objectives - usually the fine focus knob can be used to make small adjustments and obtain a crisp, clear image. In fact, you should never use the coarse focus once you've obtained an in-focus image using the 4x objective.
Materials
- Compound Light Microscope
- Lens paper
- Letter “e” slide
- Crossed threads slide
- Prepared slides of Amoeba, Euglena, and Paramecium
- Your bound lab notebook
Experiment
Letter “e”
Your instructor will walk you through the use of the microscope during this lab. Here are the steps that you will go through, using the “Letter E” slide.
- Note your station/cabinet number. This will be the number of the microscope that you use all semester. Remove your microscope from the cabinet being sure to grasp it firmly by supporting the microscope base and holding onto the microscope arm.
- Bring the microscope to your lab bench, and set it carefully down.
- Make sure the microscope power switch is turned “off” and the light intensity is turned all the way down (counterclockwise).
- Raise the substage condenser so that it is even with or just a few millimeters below the stage. Open the condenser's iris diaphragm all the way.
- Remove the cord from the back of the microscope, and plug the power cord into both the outlet and the back of the microscope.
- Turn the power on, and increase the light intensity until you can see light coming through the substage condenser from the top of the stage.
- Your microscope should have the 4x objective lens in place above the stage. If not, rotate the revolving nosepiece to place the 4x objective into position.
- Place the letter “e” slide onto the microscope stage, securing it with the stage clips.
- Using the knobs on the side of the stage, move the slide so that the letter “e” is directly over the light.
- Look through both ocular lenses with both eyes open. Adjust the binocular lenses so that when looking with both eyes open, you see a single image.
- Bring the letter “e” into focus by adjusting the coarse adjustment knob.
- Fine-tune the focus of the letter “e” using the fine focus knob. Adjust the brightness by adjusting both the light intensity knob and the condenser’s iris diaphragm until you have a crisp, clear image.
- Using the knobs on the side of the stage, adjust the position of the letter “e” until it is perfectly centered in the middle of the image.
- When you have finished drawing/observing the letter “e” under 40x total magnification, move the 10x objective lens into place by rotating the revolving nosepiece.
- As you get ready to move to a higher magnification, recall that our microscopes are “parfocal” which means that you do not need to significantly readjust the focus each time you change the magnification.
- Using only the FINE FOCUS KNOB, adjust the focus so that the letter “e” comes back into focus. When you have finished drawing/observing the letter “e” under 100x total magnification, move the 40x objective lens into place by rotating the revolving nosepiece.
- Using only the FINE FOCUS KNOB, adjust the focus so that the letter “e” comes back into focus. At this higher magnification, only a part of the letter “e” will be visible. When you have finished drawing/observing the letter “e” under 400x total magnification
- When you are done observing the letter “e” at all three magnification levels, you can remove it from the stage and return it to the slide box in the correct orientation.
Crossed Silk Fibers
The crossed silk fiber slides consist of blue, yellow, and red silk fibers that are crossed in the center. Under low magnification, they appear to be in the same focal plane, but under higher magnification, it’s possible to determine which color fibers are on the top, in the middle, and on the bottom of the stack.

- Following the same steps as you used for the letter “e”, visualize the crossed fibers using the 4x, 10x, and 40x objectives (Figure \(\PageIndex{4}\)).
- Be sure to explore how adjusting both the light intensity and aperture of the condenser iris diaphragm impacts the quality of the image at each magnification.
- Using the fine focus knob, move up and down in the Z-direction through the fibers at each magnification.
- At which magnification are some fibers in focus while others are not? Use this magnification to determine the order the fibers have been placed on the slide. Note that all these slides are different! So your lab partner’s slides may have silk fibers that are in a different order than yours.
Prepared Slides of Free Living Protozoans
- As time permits, continue to practice using the microscope by viewing prepared slides of stained protists - Amoeba, Paramecium, and Euglena.
- Explore how the quality of the image changes as you increase the magnification
- Explore the effect of opening and closing the iris diaphragm while also adjusting the light intensity.
- Draw one picture of each organism in your lab notebook using the magnification where you are happiest with the image quality.
Data
Complete the Data Table below:
|
Objective |
Alternate name |
Magnification of Objective |
Magnification of Oculars |
Total Magnification |
When would you use this objective? |
|---|---|---|---|---|---|
|
4x |
|||||
|
10x |
|||||
|
40x |
|||||
|
100x |
Sketch/record your observations in your lab notebook
- Letter E slide - Draw at 40, 100 and 400x
- Protozoa slides - sketch the protozoa that you view under the microscope. In each case, indicate which objective you chose that gave you the best image.
Silk Fibers Slide - Put the crossed fibers in order:
| Silk Fiber | Your result |
|---|---|
| Top (closest to the objective) | |
| Middle | |
| Bottom (closest to the stage) |