
10: Carbohydrate Metabolism of Unknowns
- Page ID
- 110866
\( \newcommand{\vecs}[1]{\overset { \scriptstyle \rightharpoonup} {\mathbf{#1}} } \)
\( \newcommand{\vecd}[1]{\overset{-\!-\!\rightharpoonup}{\vphantom{a}\smash {#1}}} \)
\( \newcommand{\id}{\mathrm{id}}\) \( \newcommand{\Span}{\mathrm{span}}\)
( \newcommand{\kernel}{\mathrm{null}\,}\) \( \newcommand{\range}{\mathrm{range}\,}\)
\( \newcommand{\RealPart}{\mathrm{Re}}\) \( \newcommand{\ImaginaryPart}{\mathrm{Im}}\)
\( \newcommand{\Argument}{\mathrm{Arg}}\) \( \newcommand{\norm}[1]{\| #1 \|}\)
\( \newcommand{\inner}[2]{\langle #1, #2 \rangle}\)
\( \newcommand{\Span}{\mathrm{span}}\)
\( \newcommand{\id}{\mathrm{id}}\)
\( \newcommand{\Span}{\mathrm{span}}\)
\( \newcommand{\kernel}{\mathrm{null}\,}\)
\( \newcommand{\range}{\mathrm{range}\,}\)
\( \newcommand{\RealPart}{\mathrm{Re}}\)
\( \newcommand{\ImaginaryPart}{\mathrm{Im}}\)
\( \newcommand{\Argument}{\mathrm{Arg}}\)
\( \newcommand{\norm}[1]{\| #1 \|}\)
\( \newcommand{\inner}[2]{\langle #1, #2 \rangle}\)
\( \newcommand{\Span}{\mathrm{span}}\) \( \newcommand{\AA}{\unicode[.8,0]{x212B}}\)
\( \newcommand{\vectorA}[1]{\vec{#1}} % arrow\)
\( \newcommand{\vectorAt}[1]{\vec{\text{#1}}} % arrow\)
\( \newcommand{\vectorB}[1]{\overset { \scriptstyle \rightharpoonup} {\mathbf{#1}} } \)
\( \newcommand{\vectorC}[1]{\textbf{#1}} \)
\( \newcommand{\vectorD}[1]{\overrightarrow{#1}} \)
\( \newcommand{\vectorDt}[1]{\overrightarrow{\text{#1}}} \)
\( \newcommand{\vectE}[1]{\overset{-\!-\!\rightharpoonup}{\vphantom{a}\smash{\mathbf {#1}}}} \)
\( \newcommand{\vecs}[1]{\overset { \scriptstyle \rightharpoonup} {\mathbf{#1}} } \)
\( \newcommand{\vecd}[1]{\overset{-\!-\!\rightharpoonup}{\vphantom{a}\smash {#1}}} \)
\(\newcommand{\avec}{\mathbf a}\) \(\newcommand{\bvec}{\mathbf b}\) \(\newcommand{\cvec}{\mathbf c}\) \(\newcommand{\dvec}{\mathbf d}\) \(\newcommand{\dtil}{\widetilde{\mathbf d}}\) \(\newcommand{\evec}{\mathbf e}\) \(\newcommand{\fvec}{\mathbf f}\) \(\newcommand{\nvec}{\mathbf n}\) \(\newcommand{\pvec}{\mathbf p}\) \(\newcommand{\qvec}{\mathbf q}\) \(\newcommand{\svec}{\mathbf s}\) \(\newcommand{\tvec}{\mathbf t}\) \(\newcommand{\uvec}{\mathbf u}\) \(\newcommand{\vvec}{\mathbf v}\) \(\newcommand{\wvec}{\mathbf w}\) \(\newcommand{\xvec}{\mathbf x}\) \(\newcommand{\yvec}{\mathbf y}\) \(\newcommand{\zvec}{\mathbf z}\) \(\newcommand{\rvec}{\mathbf r}\) \(\newcommand{\mvec}{\mathbf m}\) \(\newcommand{\zerovec}{\mathbf 0}\) \(\newcommand{\onevec}{\mathbf 1}\) \(\newcommand{\real}{\mathbb R}\) \(\newcommand{\twovec}[2]{\left[\begin{array}{r}#1 \\ #2 \end{array}\right]}\) \(\newcommand{\ctwovec}[2]{\left[\begin{array}{c}#1 \\ #2 \end{array}\right]}\) \(\newcommand{\threevec}[3]{\left[\begin{array}{r}#1 \\ #2 \\ #3 \end{array}\right]}\) \(\newcommand{\cthreevec}[3]{\left[\begin{array}{c}#1 \\ #2 \\ #3 \end{array}\right]}\) \(\newcommand{\fourvec}[4]{\left[\begin{array}{r}#1 \\ #2 \\ #3 \\ #4 \end{array}\right]}\) \(\newcommand{\cfourvec}[4]{\left[\begin{array}{c}#1 \\ #2 \\ #3 \\ #4 \end{array}\right]}\) \(\newcommand{\fivevec}[5]{\left[\begin{array}{r}#1 \\ #2 \\ #3 \\ #4 \\ #5 \\ \end{array}\right]}\) \(\newcommand{\cfivevec}[5]{\left[\begin{array}{c}#1 \\ #2 \\ #3 \\ #4 \\ #5 \\ \end{array}\right]}\) \(\newcommand{\mattwo}[4]{\left[\begin{array}{rr}#1 \amp #2 \\ #3 \amp #4 \\ \end{array}\right]}\) \(\newcommand{\laspan}[1]{\text{Span}\{#1\}}\) \(\newcommand{\bcal}{\cal B}\) \(\newcommand{\ccal}{\cal C}\) \(\newcommand{\scal}{\cal S}\) \(\newcommand{\wcal}{\cal W}\) \(\newcommand{\ecal}{\cal E}\) \(\newcommand{\coords}[2]{\left\{#1\right\}_{#2}}\) \(\newcommand{\gray}[1]{\color{gray}{#1}}\) \(\newcommand{\lgray}[1]{\color{lightgray}{#1}}\) \(\newcommand{\rank}{\operatorname{rank}}\) \(\newcommand{\row}{\text{Row}}\) \(\newcommand{\col}{\text{Col}}\) \(\renewcommand{\row}{\text{Row}}\) \(\newcommand{\nul}{\text{Nul}}\) \(\newcommand{\var}{\text{Var}}\) \(\newcommand{\corr}{\text{corr}}\) \(\newcommand{\len}[1]{\left|#1\right|}\) \(\newcommand{\bbar}{\overline{\bvec}}\) \(\newcommand{\bhat}{\widehat{\bvec}}\) \(\newcommand{\bperp}{\bvec^\perp}\) \(\newcommand{\xhat}{\widehat{\xvec}}\) \(\newcommand{\vhat}{\widehat{\vvec}}\) \(\newcommand{\uhat}{\widehat{\uvec}}\) \(\newcommand{\what}{\widehat{\wvec}}\) \(\newcommand{\Sighat}{\widehat{\Sigma}}\) \(\newcommand{\lt}{<}\) \(\newcommand{\gt}{>}\) \(\newcommand{\amp}{&}\) \(\definecolor{fillinmathshade}{gray}{0.9}\)By the end of this lab (2 lab periods) you will be able to:
- Describe the pattern of carbohydrate metabolism for each of your organisms for the tests that we completed.
- Articulate how pH indicators such as phenol red, Bromothymol blue, methyl red, etc. are used to track carbohydrate utilization.
- Explain how differences in the expression of specific enzymes (such as amylase, citrate permease, catalase, etc.) can be used to differentiate between bacteria species.
Introduction
Now that you have isolated your two unknowns, the next step is to work on figuring out which two organisms you were assigned! The first step will be to perform a series of tests that are based on the utilization of carbohydrates. While all bacteria can use glucose as a source of energy, not all bacteria can ferment glucose or other simple carbohydrates. Those that can ferment carbohydrates often produce different fermentation products that can be used to distinguish between organisms.
The tests that we will be setting up today are:
- Phenol red broths containing
- Glucose
- Lactose
- Sucrose
- Mannitol
- Methyl Red Test and Voges-Proskauer (MR-VP) tests
- Citrate utilization
- Starch hydrolysis
- Catalase
Phenol Red Broths
As we’ve learned in the lecture, many bacteria can undergo fermentation. In fermentation, glucose is first broken down into pyruvate. To regenerate NAD+ for repeated rounds of glycolysis, these bacteria undergo fermentation producing products such as lactic acid and/or ethanol and CO2.
When bacteria are “fed” sugars other than glucose, the bacteria need to be able to change them into either glucose or into other intermediates that are part of the glycolytic pathway. For a molecule like sucrose, which is a disaccharide composed of glucose and fructose, the enzyme invertase, found in some bacteria, can break the bond between glucose and fructose. The glucose enters glycolysis directly, and the fructose is phosphorylated and enters a few steps down the pathway. This means that the bacteria only need a few extra enzymes in order to use sucrose for food - they don’t need entirely new pathways. However, not all bacteria have all of these “extra” enzymes, so determining which of these carbohydrates can be fermented by your unknown bacteria can be very helpful in determining which one you’ve got.

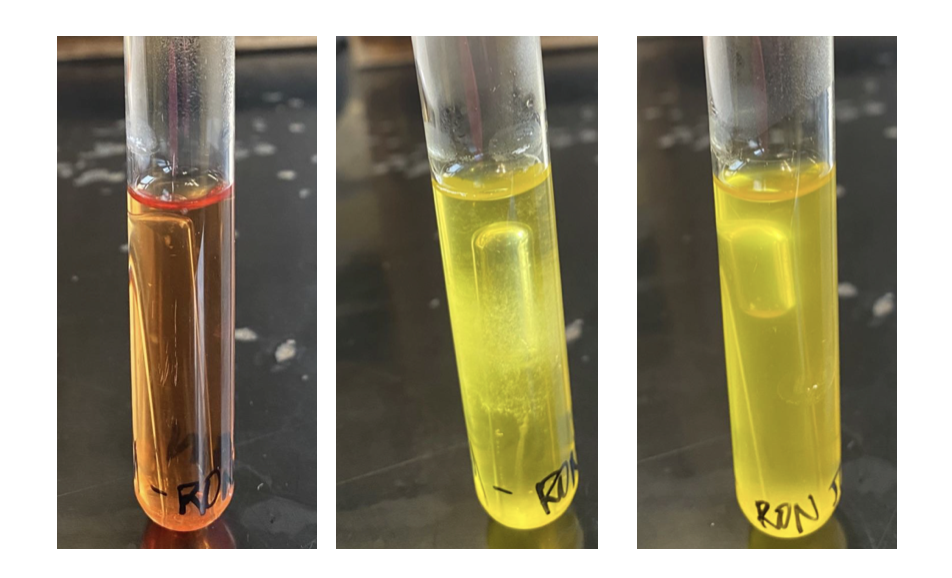
Each phenol red broth contains ONE of the four sugars (glucose, lactose, sucrose or mannitol) soluble protein and phenol red indicator. Phenol red is a dye that is red between pH 6.8 and 7.4 and yellow below pH 6.8. The indicator will turn pink as the pH increases above 7.4. If acid is produced by fermentation of the sugar, the broths will turn yellow after 24-48 hours of incubation.
Phenol red broths also contain a small upside down test-tube called a Durham tube. The purpose of the Durham tube is to capture any gas that might be produced by fermentation. Some of our organisms that can ferment sugars produce only acid, but some can produce acid AND gas. You will want to look at the Durham tube carefully after incubation to determine if gas has been produced.
MR-VP
The Methyl red (MR) and Voges Proskauer (VP) tests are done by first inoculating one tube of MR-VP media and incubating for 24-48 hours. The resulting culture is then split into 2 tubes and one is tested with methyl red, the other with VP reagents. So we tend to refer to them as “MR-VP”, but in fact, there are two tests here!
Methyl Red (MR)
Not all bacteria produce lactic acid and ethanol/CO2 as byproducts of fermentation. Some bacteria are also heterofermentative, meaning they can produce more than one fermentation product! The methyl-red test allows us to identify organisms that produce a variety of acids also called “mixed-acid” fermentation. In this case, pyruvate is also converted to acetic acid, formic acid, and succinic acid. These acids are capable of lowering the pH below 4.4, where the methyl red indicator will turn red. If the acids are not produced, the pH will remain above 4.4 and there will not be a color change.

Voges-Proskauer (VP)
Some organisms produce a different molecule called acetoin as an intermediate during 2,3 butanediol fermentation. The VP reagents (VP Reagent 1 and VP Reagent 2) react with the acetoin and other media components to produce a red color.

Citrate Utilization
You probably recall that citrate is an intermediate in the Krebs Cycle. It is formed when oxaloacetate reacts with Acetyl CoA. It turns out that bacteria can and will use citrate as a source of food if glucose is not available, but only IF the citrate can be brought into the cell. This is accomplished when the organism can make an enzyme called citrate permease.
Simmons citrate agar contains citrate as the only source of carbon (food) and ammonium phosphate as the only source of nitrogen. For an organism to survive on this medium, it must possess the citrate permease enzyme. When citrate is used, basic byproducts including sodium carbonate are produced, increasing the pH. The organisms also convert the ammonium phosphate in the medium to ammonia and ammonium hydroxide, both of which also increase the pH of the agar. To detect this increase in pH, a dye called Bromothymol blue is also added to the medium. At a pH of 7.6, the medium changes color from green to a brilliant, sapphire blue.

Starch Hydrolysis Test
Think back to early in the semester when we discussed monomers and polymers. We learned that starch is a very large polymeric molecule composed of thousands of tiny glucose molecules linked together by alpha 1,4- and alpha 1,6-glycosidic bonds. Recall that starch is enormous and far too big to cross into a bacterial cell. However, some bacteria secrete enzymes into the environment which can break starch down into glucose molecules. These molecules can easily pass into the cell.
To determine if an organism produces these enzymes, we grow organisms on a starch plate. Starch molecules can be detected by adding Lugol’s iodine to the plate surface. The iodine will react with starch and turn it a dark blue/black. If bacteria secrete the enzymes that digest starch, then all of the starch around the bacterial growth will be digested and there will be a clear “zone” around the growth. This zone is easy to see by holding the plate up to the light or observing the plate over a lightbox.

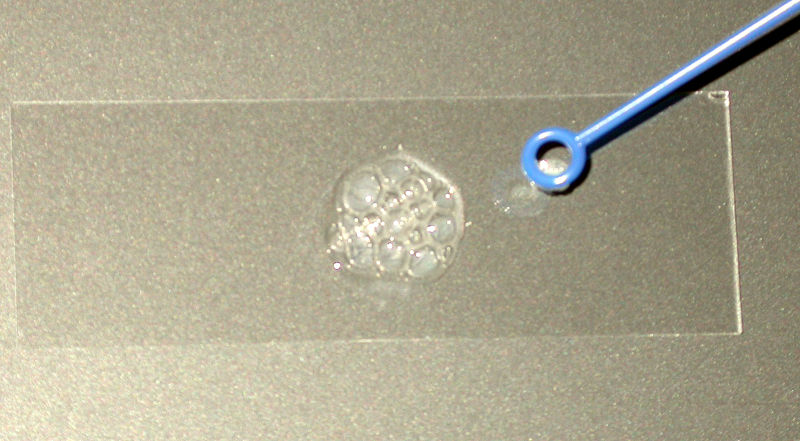
Catalase Test
You will recall that the enzyme catalase is found in obligate aerobes and facultative anaerobes. It converts hydrogen peroxide, which is an oxidizing agent, into water and oxygen gas. Hydrogen peroxide is often formed as a byproduct of aerobic respiration, and it is quite toxic to cells if it is not broken down.
Because oxygen gas is produced when catalase breaks down hydrogen peroxide, it is very easy to detect organisms that produce catalase by simply using a 3% hydrogen peroxide solution that can be purchased at the grocery or drug store.
Materials
- Two phenol red broths for each of the following carbohydrates:
- Glucose
- Sucrose
- Lactose
- Mannitol
- Two MR-VP broths
- Two Simmon’s Citrate slants
- One starch plate
- One or two TSA plates (depending on your organisms - if you have a swarmer that will take over the plate, use two)
- Two fresh TSA slants for subculturing your unknowns
Experiment
Day 1 - Inoculations
- Using your isolated cultures, inoculate each type of media with your gram-positive and your gram-negative organisms (each one gets its own tube!). Use an aseptic technique and be very careful not to contaminate your isolated cultures.
- For the phenol red broths, MR-VP broth, and citrate slants use an inoculating loop to inoculate each type of media with your organism. You will do two of each - one for your G+ and one for your G-.
- For the starch test, perform a line inoculum with your gram-positive down the very center of the plate. Do not cover the entire plate with your inoculation!
- For the catalase test, take one TSA plate and using a sharpie, draw a line down the center. Perform a line inoculum with your gram-positive on one side and your gram-negative on the other. Note - if you have a swarmer that will take over the plate, put each organism on its own plate so that they don’t grow on top of each other.
- Place all freshly inoculated media in a 35-37 oC incubator, and incubate for 48 hours.
- Each week during the ID project you should be making fresh subcultures of your organisms and verifying purity by gram staining. Depending on how old your TSA slants are this can be done on Day 1 OR Day 2.
- If the purity of your newest slants has not been confirmed by Gram-staining, be sure to do that today.
Day 2 - Data Collection
- Remove all of your cultures from the incubator. Carefully inspect each phenol red broth and citrate slant and note whether the result was positive, negative, or indeterminate.
- Sometimes a result is weakly positive - make a note of this!
- Use the photos in the introduction to this lab as a reference for what a positive and a negative result should look like.
- It can often help to compare your results to an uninoculated control. Your instructor will be happy to get some of those for you to do a comparison.
- For the MR VP test, you will be dividing each individual broth into two tubes. One tube will be used for the Methyl Red test. The other tube will be used for the Voges-Proskauer test. The tubes do not need to be sterile, and you do not need to use aseptic technique as we will be disposing of these cultures and the test tubes at the end of this lab.
.jpeg?revision=1)
- For the Methyl Red test, add three drops of methyl red to the tube and read the result immediately.
- For the VP test, add 15 drops of reagent A - mix well, but be sure not to splash any. Then add 5 drops of reagent B. Carefully mix well again to oxygenate the medium. Place the VP tubes in a test tube rack and observe for the development of red color at regular intervals starting at 10 minutes for up to 1 hour. Mix again periodically to oxygenate the medium.
- For the starch test, add several drops of Lugol’s iodine solution to the surface of the plate. You need to add enough to saturate the media, but not so much that the culture becomes loosened from the plate surface. Observe if there is clearing around the culture using a lightbox.
- For the catalase test, place a small amount of growth from your culture onto a clean microscope slide. Add a few drops of H2O2 onto the smear, and add a coverslip. A positive result is the rapid production of O2 gas as evidenced by bubbling. A weak positive will have minor small bubble formation with cell dispersal into the liquid. A negative result is no bubbles or only a few scattered bubbles.
- Take a photograph and/or draw a picture of EVERY result. Be sure to keep track of which photo is for which media and organism.
- It might help to photograph the tubes with a written label that is visible in the photo.
- Sometimes student take their photos against a white background such as a clean sheet of paper or the whiteboard.
- Each week during the ID project you should be making fresh subcultures of your organisms and verifying purity by gram staining. Depending on how old your TSA slants are this can be done on Day 1 OR Day 2.
- Remember that if your cultures (such as TSA slants) will be incubated for MORE than 48 hours, they need to go in a 30oC incubator to prevent cells from entering the “death phase” due to overgrowth.
Data
Questions
Your primary goal as you leave lab today is to have a complete and well-documented record of the results you collected today. Here are a few questions that might help you as you begin to identify your organisms.
- At this point, we have done two different tests for lactose fermentation. What were they? Did you get the same results for both tests? If not, how will this impact how you use this test result in identifying your bacteria?
- Name one test where you obtained a clear, unambiguous positive result.
- Name one test where you obtained a clear, unambiguous negative result.
- Name one test where your test was inconclusive. Would it make sense to use this test to try to identify which organism you have?
- Once you have the results of your carbohydrate tests, you may want to consider (or be assigned) the task of beginning to “key out” your organism by creating a dichotomous key.
Creating a Dichotomous Key
Dichotomous keys are used to identify plants, animals, and bacteria based on their unique characteristics. The key leads the user to the correct identification by going through a series of choices. It’s a little like playing 20 questions! Each choice either INCLUDES or EXCLUDES the organism as a possible candidate. A dichotomous key always presents you with two choices.
By completing the many tests we’ve done so far, we’ve answered a lot of questions about our organisms. For example, we’ve asked what shape(s) your organisms are (by gram staining and looking at morphology). We’ve asked if they express citrate permease, and whether or not they ferment a variety of different sugars. This is a good time to use a few of these questions to begin to narrow down which of the unknown organisms you were assigned.
|
Test |
Test results for my organism! |
|---|---|
|
Is it a coccus or bacillus? |
coccus |
|
Does it reduce nitrate? |
no |

You can use the “starter” keys below to begin developing your key. Remember to select tests where you had a clear, definitive result. All of the Gram-negative bacteria we are working with are bacillus, but you can separate the Gram-positive bacteria by shape as they are a mixture of coccus and bacillus.
Gram Positive Two Step Dichotomous Key
Gram Negative Two Step Dichotomous Key
