
2.3: Instruments of Microscopy- Brightfield Microscopes
- Page ID
- 142378

\( \newcommand{\vecs}[1]{\overset { \scriptstyle \rightharpoonup} {\mathbf{#1}} } \)
\( \newcommand{\vecd}[1]{\overset{-\!-\!\rightharpoonup}{\vphantom{a}\smash {#1}}} \)
\( \newcommand{\dsum}{\displaystyle\sum\limits} \)
\( \newcommand{\dint}{\displaystyle\int\limits} \)
\( \newcommand{\dlim}{\displaystyle\lim\limits} \)
\( \newcommand{\id}{\mathrm{id}}\) \( \newcommand{\Span}{\mathrm{span}}\)
( \newcommand{\kernel}{\mathrm{null}\,}\) \( \newcommand{\range}{\mathrm{range}\,}\)
\( \newcommand{\RealPart}{\mathrm{Re}}\) \( \newcommand{\ImaginaryPart}{\mathrm{Im}}\)
\( \newcommand{\Argument}{\mathrm{Arg}}\) \( \newcommand{\norm}[1]{\| #1 \|}\)
\( \newcommand{\inner}[2]{\langle #1, #2 \rangle}\)
\( \newcommand{\Span}{\mathrm{span}}\)
\( \newcommand{\id}{\mathrm{id}}\)
\( \newcommand{\Span}{\mathrm{span}}\)
\( \newcommand{\kernel}{\mathrm{null}\,}\)
\( \newcommand{\range}{\mathrm{range}\,}\)
\( \newcommand{\RealPart}{\mathrm{Re}}\)
\( \newcommand{\ImaginaryPart}{\mathrm{Im}}\)
\( \newcommand{\Argument}{\mathrm{Arg}}\)
\( \newcommand{\norm}[1]{\| #1 \|}\)
\( \newcommand{\inner}[2]{\langle #1, #2 \rangle}\)
\( \newcommand{\Span}{\mathrm{span}}\) \( \newcommand{\AA}{\unicode[.8,0]{x212B}}\)
\( \newcommand{\vectorA}[1]{\vec{#1}} % arrow\)
\( \newcommand{\vectorAt}[1]{\vec{\text{#1}}} % arrow\)
\( \newcommand{\vectorB}[1]{\overset { \scriptstyle \rightharpoonup} {\mathbf{#1}} } \)
\( \newcommand{\vectorC}[1]{\textbf{#1}} \)
\( \newcommand{\vectorD}[1]{\overrightarrow{#1}} \)
\( \newcommand{\vectorDt}[1]{\overrightarrow{\text{#1}}} \)
\( \newcommand{\vectE}[1]{\overset{-\!-\!\rightharpoonup}{\vphantom{a}\smash{\mathbf {#1}}}} \)
\( \newcommand{\vecs}[1]{\overset { \scriptstyle \rightharpoonup} {\mathbf{#1}} } \)
\( \newcommand{\vecd}[1]{\overset{-\!-\!\rightharpoonup}{\vphantom{a}\smash {#1}}} \)
\(\newcommand{\avec}{\mathbf a}\) \(\newcommand{\bvec}{\mathbf b}\) \(\newcommand{\cvec}{\mathbf c}\) \(\newcommand{\dvec}{\mathbf d}\) \(\newcommand{\dtil}{\widetilde{\mathbf d}}\) \(\newcommand{\evec}{\mathbf e}\) \(\newcommand{\fvec}{\mathbf f}\) \(\newcommand{\nvec}{\mathbf n}\) \(\newcommand{\pvec}{\mathbf p}\) \(\newcommand{\qvec}{\mathbf q}\) \(\newcommand{\svec}{\mathbf s}\) \(\newcommand{\tvec}{\mathbf t}\) \(\newcommand{\uvec}{\mathbf u}\) \(\newcommand{\vvec}{\mathbf v}\) \(\newcommand{\wvec}{\mathbf w}\) \(\newcommand{\xvec}{\mathbf x}\) \(\newcommand{\yvec}{\mathbf y}\) \(\newcommand{\zvec}{\mathbf z}\) \(\newcommand{\rvec}{\mathbf r}\) \(\newcommand{\mvec}{\mathbf m}\) \(\newcommand{\zerovec}{\mathbf 0}\) \(\newcommand{\onevec}{\mathbf 1}\) \(\newcommand{\real}{\mathbb R}\) \(\newcommand{\twovec}[2]{\left[\begin{array}{r}#1 \\ #2 \end{array}\right]}\) \(\newcommand{\ctwovec}[2]{\left[\begin{array}{c}#1 \\ #2 \end{array}\right]}\) \(\newcommand{\threevec}[3]{\left[\begin{array}{r}#1 \\ #2 \\ #3 \end{array}\right]}\) \(\newcommand{\cthreevec}[3]{\left[\begin{array}{c}#1 \\ #2 \\ #3 \end{array}\right]}\) \(\newcommand{\fourvec}[4]{\left[\begin{array}{r}#1 \\ #2 \\ #3 \\ #4 \end{array}\right]}\) \(\newcommand{\cfourvec}[4]{\left[\begin{array}{c}#1 \\ #2 \\ #3 \\ #4 \end{array}\right]}\) \(\newcommand{\fivevec}[5]{\left[\begin{array}{r}#1 \\ #2 \\ #3 \\ #4 \\ #5 \\ \end{array}\right]}\) \(\newcommand{\cfivevec}[5]{\left[\begin{array}{c}#1 \\ #2 \\ #3 \\ #4 \\ #5 \\ \end{array}\right]}\) \(\newcommand{\mattwo}[4]{\left[\begin{array}{rr}#1 \amp #2 \\ #3 \amp #4 \\ \end{array}\right]}\) \(\newcommand{\laspan}[1]{\text{Span}\{#1\}}\) \(\newcommand{\bcal}{\cal B}\) \(\newcommand{\ccal}{\cal C}\) \(\newcommand{\scal}{\cal S}\) \(\newcommand{\wcal}{\cal W}\) \(\newcommand{\ecal}{\cal E}\) \(\newcommand{\coords}[2]{\left\{#1\right\}_{#2}}\) \(\newcommand{\gray}[1]{\color{gray}{#1}}\) \(\newcommand{\lgray}[1]{\color{lightgray}{#1}}\) \(\newcommand{\rank}{\operatorname{rank}}\) \(\newcommand{\row}{\text{Row}}\) \(\newcommand{\col}{\text{Col}}\) \(\renewcommand{\row}{\text{Row}}\) \(\newcommand{\nul}{\text{Nul}}\) \(\newcommand{\var}{\text{Var}}\) \(\newcommand{\corr}{\text{corr}}\) \(\newcommand{\len}[1]{\left|#1\right|}\) \(\newcommand{\bbar}{\overline{\bvec}}\) \(\newcommand{\bhat}{\widehat{\bvec}}\) \(\newcommand{\bperp}{\bvec^\perp}\) \(\newcommand{\xhat}{\widehat{\xvec}}\) \(\newcommand{\vhat}{\widehat{\vvec}}\) \(\newcommand{\uhat}{\widehat{\uvec}}\) \(\newcommand{\what}{\widehat{\wvec}}\) \(\newcommand{\Sighat}{\widehat{\Sigma}}\) \(\newcommand{\lt}{<}\) \(\newcommand{\gt}{>}\) \(\newcommand{\amp}{&}\) \(\definecolor{fillinmathshade}{gray}{0.9}\)- Identify and describe the parts of a brightfield microscope
- Calculate total magnification for a compound microscope
- Describe the distinguishing features and typical uses for various types of light microscopes, electron microscopes, and scanning probe microscopes
The early pioneers of microscopy opened a window into the invisible world of microorganisms. But microscopy continued to advance in the centuries that followed. In 1830, Joseph Jackson Lister created an essentially modern light microscope. The 20th century saw the development of microscopes that leveraged nonvisible light, such as fluorescence microscopy, which uses an ultraviolet light source, and electron microscopy, which uses short-wavelength electron beams. These advances led to major improvements in magnification, resolution, and contrast. By comparison, the relatively rudimentary microscopes of van Leeuwenhoek and his contemporaries were far less powerful than even the most basic microscopes in use today. In this section, we will survey the broad range of modern microscopic technology and common applications for each type of microscope.
Light Microscopy
Many types of microscopes fall under the category of light microscopes, which use light to visualize images. Examples of light microscopes include brightfield microscopes, darkfield microscopes, phase-contrast microscopes, differential interference contrast microscopes, fluorescence microscopes, confocal scanning laser microscopes, and two-photon microscopes. These various types of light microscopes can be used to complement each other in diagnostics and research.
Brightfield Microscopes
The brightfield microscope, perhaps the most commonly used type of microscope, is a compound microscope with two or more lenses that produce a dark image on a bright background. Some brightfield microscopes are monocular (having a single eyepiece), though most newer brightfield microscopes are binocular (having two eyepieces), like the one shown in Figure \(\PageIndex{1}\); in either case, each eyepiece contains a lens called an ocular lens. The ocular lenses typically magnify images 10 times (10⨯). At the other end of the body tube are a set of objective lenses on a rotating nosepiece. The magnification of these objective lenses typically ranges from 4⨯ to 100⨯, with the magnification for each lens designated on the metal casing of the lens. The ocular and objective lenses work together to create a magnified image. The total magnification is the product of the ocular magnification times the objective magnification:
\[\text{ocular magnification} \times \text{objective magnification} \nonumber\]
For example, if a \(40 \times\) objective lens is selected and the ocular lens is \(10\times\), the total magnification would be
\[(40×)(10×)=400× \nonumber\]
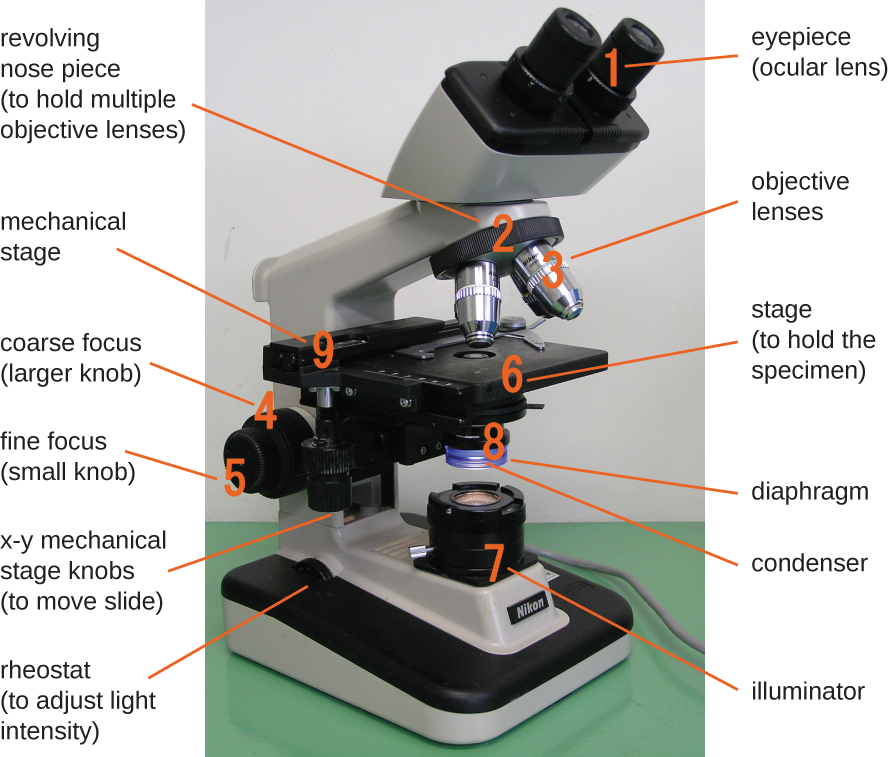
Components of a typical brightfield microscope.
The item being viewed is called a specimen. The specimen is placed on a glass slide, which is then clipped into place on the stage(a platform) of the microscope. Once the slide is secured, the specimen on the slide is positioned over the light using the x-y mechanical stage knobs. These knobs move the slide on the surface of the stage, but do not raise or lower the stage. Once the specimen is centered over the light, the stage position can be raised or lowered to focus the image. The coarse focusing knob is used for large-scale movements with 4⨯ and 10⨯ objective lenses; the fine focusing knob is used for small-scale movements, especially with 40⨯ or 100⨯ objective lenses.
When images are magnified, they become dimmer because there is less light per unit area of image. Highly magnified images produced by microscopes, therefore, require intense lighting. In a brightfield microscope, this light is provided by an illuminator, which is typically a high-intensity bulb below the stage. Light from the illuminator passes up through condenser lens (located below the stage), which focuses all of the light rays on the specimen to maximize illumination. The position of the condenser can be optimized using the attached condenser focus knob; once the optimal distance is established, the condenser should not be moved to adjust the brightness. If less-than-maximal light levels are needed, the amount of light striking the specimen can be easily adjusted by opening or closing a diaphragm between the condenser and the specimen. In some cases, brightness can also be adjusted using the rheostat, a dimmer switch that controls the intensity of the illuminator.
A brightfield microscope creates an image by directing light from the illuminator at the specimen; this light is differentially transmitted, absorbed, reflected, or refracted by different structures. Different colors can behave differently as they interact withchromophores (pigments that absorb and reflect particular wavelengths of light) in parts of the specimen. Often, chromophores are artificially added to the specimen using stains, which serve to increase contrast and resolution. In general, structures in the specimen will appear darker, to various extents, than the bright background, creating maximally sharp images at magnifications up to about 1000⨯. Further magnification would create a larger image, but without increased resolution. This allows us to see objects as small as bacteria, which are visible at about 400⨯ or so, but not smaller objects such as viruses.
Query \(\PageIndex{1}\)
Query \(\PageIndex{1}\)
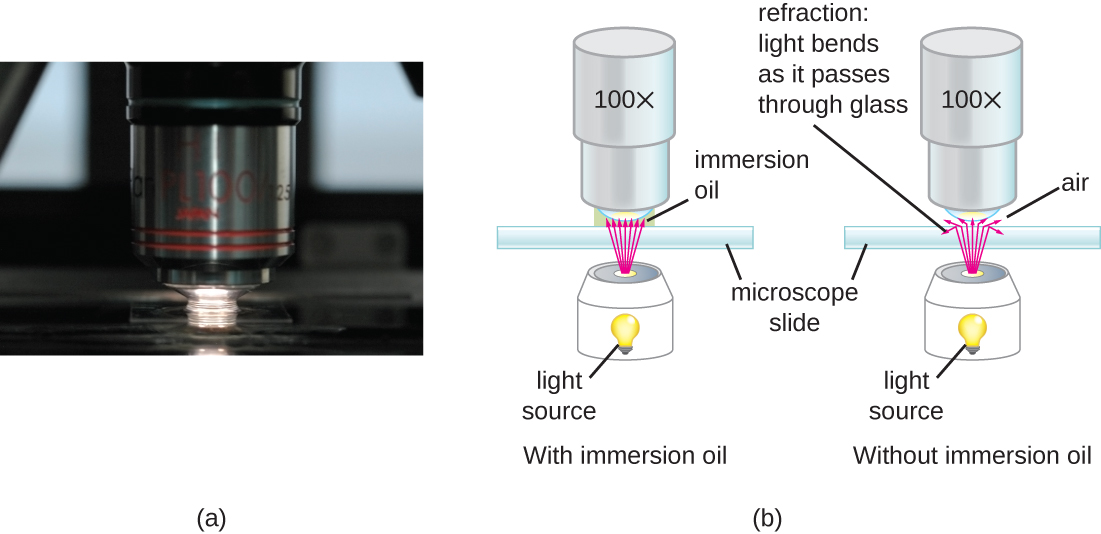
At very high magnifications, resolution may be compromised when light passes through the small amount of air between the specimen and the lens. This is due to the large difference between the refractive indices of air and glass; the air scatters the light rays before they can be focused by the lens. To solve this problem, a drop of oil can be used to fill the space between the specimen and an oil immersion lens, a special lens designed to be used with immersion oils. Since the oil has a refractive index very similar to that of glass, it increases the maximum angle at which light leaving the specimen can strike the lens. This increases the light collected and, thus, the resolution of the image (Figure \(\PageIndex{2}\)). A variety of oils can be used for different types of light.
Query \(\PageIndex{1}\)
Even a very powerful microscope cannot deliver high-resolution images if it is not properly cleaned and maintained. Since lenses are carefully designed and manufactured to refract light with a high degree of precision, even a slightly dirty or scratched lens will refract light in unintended ways, degrading the image of the specimen. In addition, microscopes are rather delicate instruments, and great care must be taken to avoid damaging parts and surfaces. Among other things, proper care of a microscope includes the following:
- cleaning the lenses with lens paper
- not allowing lenses to contact the slide (e.g., by rapidly changing the focus)
- protecting the bulb (if there is one) from breakage
- not pushing an objective into a slide
- not using the coarse focusing knob when using the 40⨯ or greater objective lenses
- only using immersion oil with a specialized oil objective, usually the 100⨯ objective
- cleaning oil from immersion lenses after using the microscope
- cleaning any oil accidentally transferred from other lenses
- covering the microscope or placing it in a cabinet when not in use
Query \(\PageIndex{1}\)
Key Concepts and Summary
- Numerous types of microscopes use various technologies to generate micrographs. Most are useful for a particular type of specimen or application.
- Light microscopy uses lenses to focus light on a specimen to produce an image. Commonly used light microscopes include brightfield, darkfield, phase-contrast, differential interference contrast, fluorescence, confocal, and two-photon microscopes.
Footnotes
- 1 “JEM-ARM200F Transmission Electron Microscope,” JEOL USA Inc, www.jeolusa.com/PRODUCTS/Tran...specifications. Accessed 8/28/2015.