
11.7: Sheep Brain Dissection
- Page ID
- 59421

\( \newcommand{\vecs}[1]{\overset { \scriptstyle \rightharpoonup} {\mathbf{#1}} } \)
\( \newcommand{\vecd}[1]{\overset{-\!-\!\rightharpoonup}{\vphantom{a}\smash {#1}}} \)
\( \newcommand{\dsum}{\displaystyle\sum\limits} \)
\( \newcommand{\dint}{\displaystyle\int\limits} \)
\( \newcommand{\dlim}{\displaystyle\lim\limits} \)
\( \newcommand{\id}{\mathrm{id}}\) \( \newcommand{\Span}{\mathrm{span}}\)
( \newcommand{\kernel}{\mathrm{null}\,}\) \( \newcommand{\range}{\mathrm{range}\,}\)
\( \newcommand{\RealPart}{\mathrm{Re}}\) \( \newcommand{\ImaginaryPart}{\mathrm{Im}}\)
\( \newcommand{\Argument}{\mathrm{Arg}}\) \( \newcommand{\norm}[1]{\| #1 \|}\)
\( \newcommand{\inner}[2]{\langle #1, #2 \rangle}\)
\( \newcommand{\Span}{\mathrm{span}}\)
\( \newcommand{\id}{\mathrm{id}}\)
\( \newcommand{\Span}{\mathrm{span}}\)
\( \newcommand{\kernel}{\mathrm{null}\,}\)
\( \newcommand{\range}{\mathrm{range}\,}\)
\( \newcommand{\RealPart}{\mathrm{Re}}\)
\( \newcommand{\ImaginaryPart}{\mathrm{Im}}\)
\( \newcommand{\Argument}{\mathrm{Arg}}\)
\( \newcommand{\norm}[1]{\| #1 \|}\)
\( \newcommand{\inner}[2]{\langle #1, #2 \rangle}\)
\( \newcommand{\Span}{\mathrm{span}}\) \( \newcommand{\AA}{\unicode[.8,0]{x212B}}\)
\( \newcommand{\vectorA}[1]{\vec{#1}} % arrow\)
\( \newcommand{\vectorAt}[1]{\vec{\text{#1}}} % arrow\)
\( \newcommand{\vectorB}[1]{\overset { \scriptstyle \rightharpoonup} {\mathbf{#1}} } \)
\( \newcommand{\vectorC}[1]{\textbf{#1}} \)
\( \newcommand{\vectorD}[1]{\overrightarrow{#1}} \)
\( \newcommand{\vectorDt}[1]{\overrightarrow{\text{#1}}} \)
\( \newcommand{\vectE}[1]{\overset{-\!-\!\rightharpoonup}{\vphantom{a}\smash{\mathbf {#1}}}} \)
\( \newcommand{\vecs}[1]{\overset { \scriptstyle \rightharpoonup} {\mathbf{#1}} } \)
\(\newcommand{\longvect}{\overrightarrow}\)
\( \newcommand{\vecd}[1]{\overset{-\!-\!\rightharpoonup}{\vphantom{a}\smash {#1}}} \)
\(\newcommand{\avec}{\mathbf a}\) \(\newcommand{\bvec}{\mathbf b}\) \(\newcommand{\cvec}{\mathbf c}\) \(\newcommand{\dvec}{\mathbf d}\) \(\newcommand{\dtil}{\widetilde{\mathbf d}}\) \(\newcommand{\evec}{\mathbf e}\) \(\newcommand{\fvec}{\mathbf f}\) \(\newcommand{\nvec}{\mathbf n}\) \(\newcommand{\pvec}{\mathbf p}\) \(\newcommand{\qvec}{\mathbf q}\) \(\newcommand{\svec}{\mathbf s}\) \(\newcommand{\tvec}{\mathbf t}\) \(\newcommand{\uvec}{\mathbf u}\) \(\newcommand{\vvec}{\mathbf v}\) \(\newcommand{\wvec}{\mathbf w}\) \(\newcommand{\xvec}{\mathbf x}\) \(\newcommand{\yvec}{\mathbf y}\) \(\newcommand{\zvec}{\mathbf z}\) \(\newcommand{\rvec}{\mathbf r}\) \(\newcommand{\mvec}{\mathbf m}\) \(\newcommand{\zerovec}{\mathbf 0}\) \(\newcommand{\onevec}{\mathbf 1}\) \(\newcommand{\real}{\mathbb R}\) \(\newcommand{\twovec}[2]{\left[\begin{array}{r}#1 \\ #2 \end{array}\right]}\) \(\newcommand{\ctwovec}[2]{\left[\begin{array}{c}#1 \\ #2 \end{array}\right]}\) \(\newcommand{\threevec}[3]{\left[\begin{array}{r}#1 \\ #2 \\ #3 \end{array}\right]}\) \(\newcommand{\cthreevec}[3]{\left[\begin{array}{c}#1 \\ #2 \\ #3 \end{array}\right]}\) \(\newcommand{\fourvec}[4]{\left[\begin{array}{r}#1 \\ #2 \\ #3 \\ #4 \end{array}\right]}\) \(\newcommand{\cfourvec}[4]{\left[\begin{array}{c}#1 \\ #2 \\ #3 \\ #4 \end{array}\right]}\) \(\newcommand{\fivevec}[5]{\left[\begin{array}{r}#1 \\ #2 \\ #3 \\ #4 \\ #5 \\ \end{array}\right]}\) \(\newcommand{\cfivevec}[5]{\left[\begin{array}{c}#1 \\ #2 \\ #3 \\ #4 \\ #5 \\ \end{array}\right]}\) \(\newcommand{\mattwo}[4]{\left[\begin{array}{rr}#1 \amp #2 \\ #3 \amp #4 \\ \end{array}\right]}\) \(\newcommand{\laspan}[1]{\text{Span}\{#1\}}\) \(\newcommand{\bcal}{\cal B}\) \(\newcommand{\ccal}{\cal C}\) \(\newcommand{\scal}{\cal S}\) \(\newcommand{\wcal}{\cal W}\) \(\newcommand{\ecal}{\cal E}\) \(\newcommand{\coords}[2]{\left\{#1\right\}_{#2}}\) \(\newcommand{\gray}[1]{\color{gray}{#1}}\) \(\newcommand{\lgray}[1]{\color{lightgray}{#1}}\) \(\newcommand{\rank}{\operatorname{rank}}\) \(\newcommand{\row}{\text{Row}}\) \(\newcommand{\col}{\text{Col}}\) \(\renewcommand{\row}{\text{Row}}\) \(\newcommand{\nul}{\text{Nul}}\) \(\newcommand{\var}{\text{Var}}\) \(\newcommand{\corr}{\text{corr}}\) \(\newcommand{\len}[1]{\left|#1\right|}\) \(\newcommand{\bbar}{\overline{\bvec}}\) \(\newcommand{\bhat}{\widehat{\bvec}}\) \(\newcommand{\bperp}{\bvec^\perp}\) \(\newcommand{\xhat}{\widehat{\xvec}}\) \(\newcommand{\vhat}{\widehat{\vvec}}\) \(\newcommand{\uhat}{\widehat{\uvec}}\) \(\newcommand{\what}{\widehat{\wvec}}\) \(\newcommand{\Sighat}{\widehat{\Sigma}}\) \(\newcommand{\lt}{<}\) \(\newcommand{\gt}{>}\) \(\newcommand{\amp}{&}\) \(\definecolor{fillinmathshade}{gray}{0.9}\)Background Information:
The sheep brain is remarkably similar to the human brain. One major difference, however, is in proportion. For example, the sheep brain has a proportionately smaller cerebrum. Another difference is in orientation of the spinal cord. The sheep spinal cord is orientated anterior to posterior, as in any four-legged animal. The human spinal cord is orientated superior to inferior. This orientation difference has a major affect on the location of the brain stem. The sheep brain stem is located more towards the rear (posteriorly). The sheep skull, in order to compensate for this, has the foramen magnum located more towards the rear of the skull. In humans, since we walk upright (bipedalism), the spinal cord is in a more vertical plane, thus the foramen magnum is located centrally on the bottom of the skull (inferiorly). By observing the movement of this major skull feature from the rear (as in very early human ancestors) to the current location (modern humans), scientists have been able to determine when the human species began to walk upright on two legs.
Dissection Instructions:
- Obtain a preserved sheep brain from the bucket in the front of the classroom. Place this on your dissection tray.
- You will need the following dissection tools to properly perform this lab:
- scalpel
- scissors
- probes
3. The sheep brain is enclosed in a tough outer covering called the dura mater. You can still see some structures on the brain before you remove the dura mater. Take special note of the pituitary gland and the optic chiasma. These two structures will likely be pulled off when you remove the dura mater.
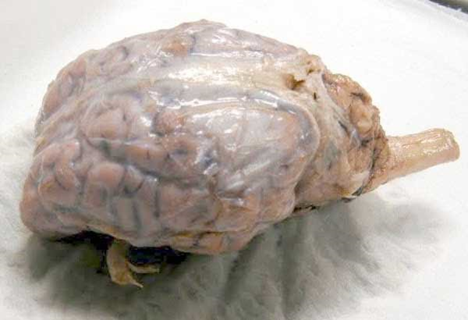
Figure \(\PageIndex{1}\): Brain with Dura Mater Intact
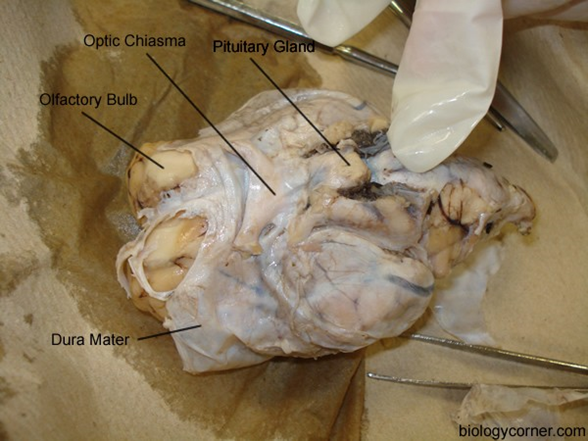

4. This image shows the ventral surface of the sheep's brain with most of the dura mater removed. The pituitary gland and the optic chiasma are still intact. (A = pituitary gland, B = optic chiasma, C = olfactory bulb)
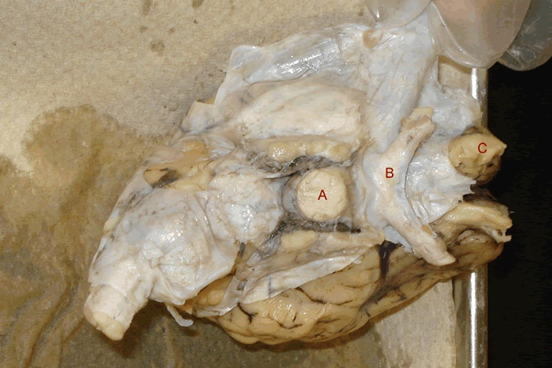
Figure \(\PageIndex{3}\): A = pituitary gland, B = optic chiasma, C = olfactory bulb
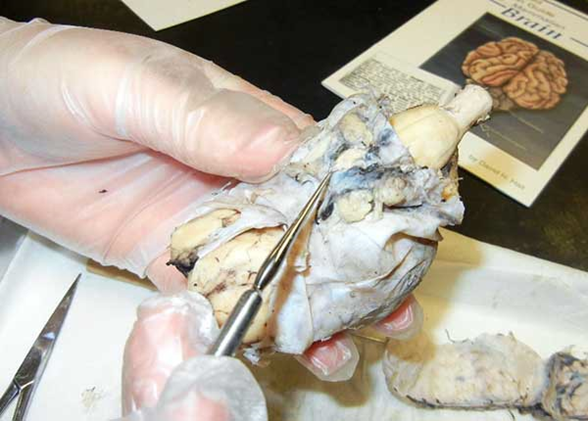
5. On this image, the dura mater has been completely removed, you can still see the optic chiasma but the pituitary gland is missing. The infundibulum (pituitary stalk) is now visible in the center. Careful dissection also reveals two other large nerves: the oculomotor nerves (C.2). Often these two nerves are removed with the dura mater, but in this image they are still intact.
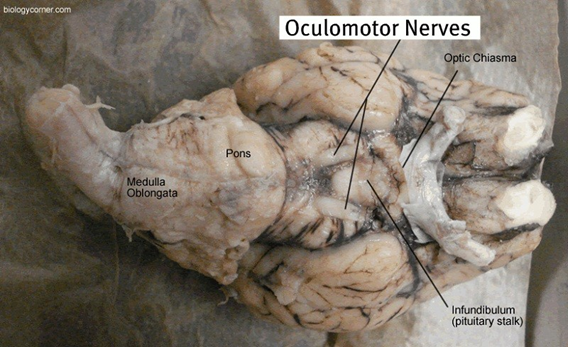
Figure \(\PageIndex{4}\): Ventral view of the brain with dura mater removed
These two figures show the fissures located on the surface of the brain. Longitudinal fissure Transverse fissure

Figure \(\PageIndex{5}\): These two figures show the fissures located on the surface of the brain with the longitudinal fissure on the left and the transverse fissure on the right
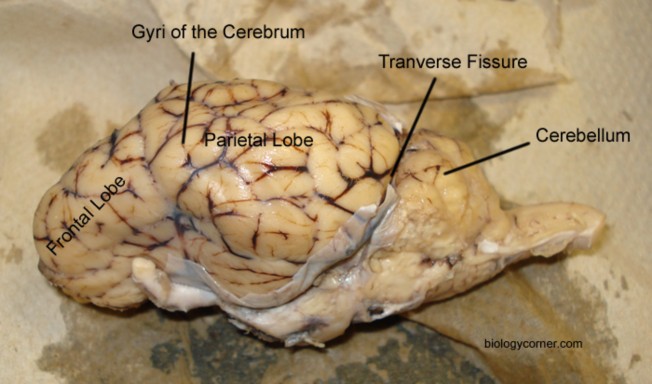
6. If you flip the brain over to the other side, you can see the cerebellum, it will be loosely attached to the cerebrum in most cases. If you did not carefully remove the dura mater you may have accidentally pulled the entire cerebellum away from the brain. The lobes of the brain are visible, as well as the transverse fissure, which separates the cerebrum from the cerebellum. The convolutions of the brain are also visible as bumps (gyri) and grooves (sulci).
7. The gap between the cerebrum and the cerebellum at the transverse fissure can reveal some internal parts of the brain. In this image, a student is bending the cerebellum down to show the superior and inferior colliculi. Just behind the colliculi, the pineal gland is just barely visible.

Figure \(\PageIndex{7}\): the superior and inferior colliculi
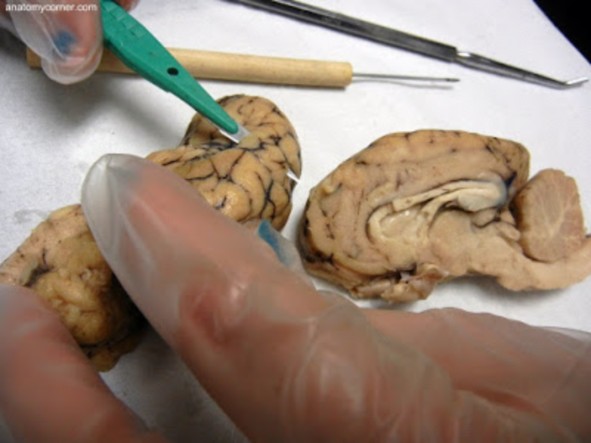
8. Using a scalpel and the longitudinal fissure as a guide, the brain is separated into the left and the right hemispheres. Sharp scalpels work best for this procedure. Always leave the specimen in the dissecting tray when cutting it, do NOT hold it in your hand!
If you are very careful, you will cleanly cut the brain into two halves and can see the internal structures, the most visible of them being the corpus callosum, which divides the left and right hemispheres. The cerebrum will still be visible as a wrinkled structrure, and you can even locate the "bumps" of the superior and inferior colliculi. Remember, you located those structures by pulling down the cerebellum.
The cerebellum, when cut will have a very distinct tree-like white area within it. This is called the arbor vitae, or the tree of life.
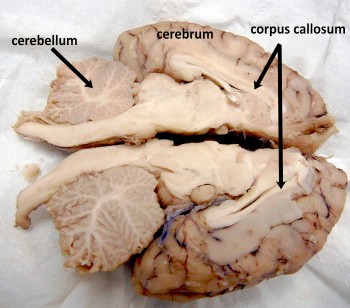
Figure \(\PageIndex{8}\): The cut cerebellum exposing the arbor vitae
9. In the image below, a probe indicates the location of the lateral ventricle.

Figure \(\PageIndex{9}\): The probe indicates the location of the lateral ventricle.
10. Once the brain is cut this way, the colliculi can also be seen from the inside and the pineal gland is revealed only if you made a very careful incision.
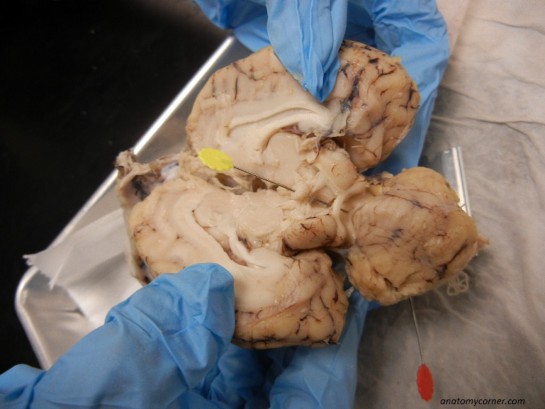
Figure \(\PageIndex{10}\): On this image, the pineal is pinned in yellow and the pin continues on to where the colliculi have been bisected.
11. Other major structures are visible, here the probe indicates the arbor vitae (tree of life) found within the cerebellum. The fissure between the cerebrum and the cerebellum is called the transverse fissure. The cerebellum only loosely connects to the rest of the brain when the dura is removed.
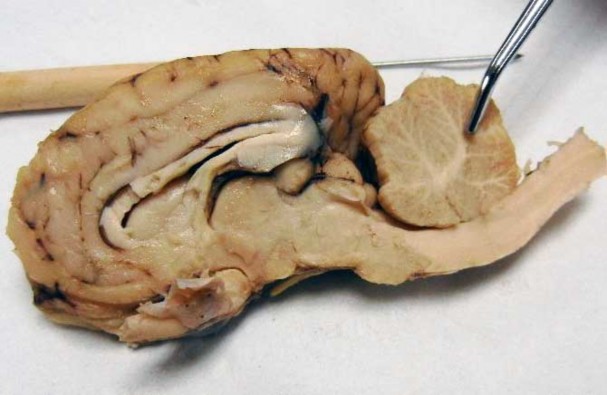
Figure \(\PageIndex{11}\): The probe indicates the arbor vitae
12. This brain is pinned to show the pineal gland (blue pin), thalamus (red pin) and lateral ventricle (green pin).

Figure \(\PageIndex{12}\): The pineal gland (blue pin), thalamus (red pin) and lateral ventricle (green pin)
13. The image below shows a cleanly separated brain with the major internal structures visible and labeled.
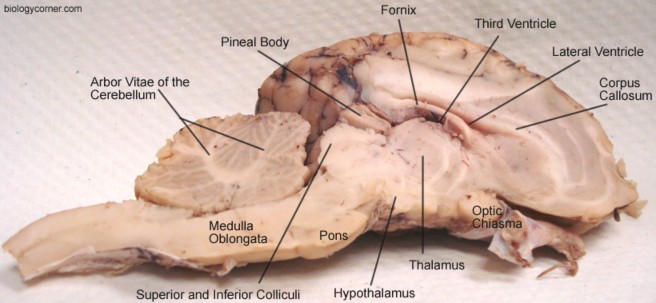
Figure \(\PageIndex{13}\): The major internal structures visible and labeled
14. Finally, a section of the brain is cut to examine the difference between white matter and gray matter.
15. Once you have made the cut like in the above diagram, you should be able to see the difference between the white and gray matter, just like the diagram below.

Figure \(\PageIndex{15}\): Showing the difference between the white and gray matter
16. The diagram below will help you understand the difference between the gyri and the sulcus.

Figure \(\PageIndex{16}\): Showing the the difference between the gyri and the sulcus
Sheep brain dissection maybe downloaded at the following site: https://jb004.k12.sd.us/my%20website...P%20BRAIN%20DI SSECTION/SHEEP%20BRAIN%20LAB.htm
LAB 11 EXERCISES \(\PageIndex{1}\):
Sheep Brain Dissection Analysis:
Match the structure to the description
| a | looks like a butt | Arbor Vitae | |
| b | leathery covering over the entire brain | Lateral Ventricle | |
| c | cauliflower, the area toward the back of the brain | Optic Chiasma | |
| d | behind the colliculi, looks like a little nub | Superior Colliculi | |
| e | looks like a "tree" | Dura Mater | |
| f | the rounded part of the brain stem | Cerebellum | |
| g | shaped like an X | Pineal Gland | |
| h | large area under the corpus callosum | Thalamus | |
| i | space for fluid between the corpus callosum and the fornix | Pons | |
| j | contains nerves, connects to the far front of the brain | Olfactory Bulb |