
2: The Microscopic World
- Page ID
- 105478
\( \newcommand{\vecs}[1]{\overset { \scriptstyle \rightharpoonup} {\mathbf{#1}} } \)
\( \newcommand{\vecd}[1]{\overset{-\!-\!\rightharpoonup}{\vphantom{a}\smash {#1}}} \)
\( \newcommand{\dsum}{\displaystyle\sum\limits} \)
\( \newcommand{\dint}{\displaystyle\int\limits} \)
\( \newcommand{\dlim}{\displaystyle\lim\limits} \)
\( \newcommand{\id}{\mathrm{id}}\) \( \newcommand{\Span}{\mathrm{span}}\)
( \newcommand{\kernel}{\mathrm{null}\,}\) \( \newcommand{\range}{\mathrm{range}\,}\)
\( \newcommand{\RealPart}{\mathrm{Re}}\) \( \newcommand{\ImaginaryPart}{\mathrm{Im}}\)
\( \newcommand{\Argument}{\mathrm{Arg}}\) \( \newcommand{\norm}[1]{\| #1 \|}\)
\( \newcommand{\inner}[2]{\langle #1, #2 \rangle}\)
\( \newcommand{\Span}{\mathrm{span}}\)
\( \newcommand{\id}{\mathrm{id}}\)
\( \newcommand{\Span}{\mathrm{span}}\)
\( \newcommand{\kernel}{\mathrm{null}\,}\)
\( \newcommand{\range}{\mathrm{range}\,}\)
\( \newcommand{\RealPart}{\mathrm{Re}}\)
\( \newcommand{\ImaginaryPart}{\mathrm{Im}}\)
\( \newcommand{\Argument}{\mathrm{Arg}}\)
\( \newcommand{\norm}[1]{\| #1 \|}\)
\( \newcommand{\inner}[2]{\langle #1, #2 \rangle}\)
\( \newcommand{\Span}{\mathrm{span}}\) \( \newcommand{\AA}{\unicode[.8,0]{x212B}}\)
\( \newcommand{\vectorA}[1]{\vec{#1}} % arrow\)
\( \newcommand{\vectorAt}[1]{\vec{\text{#1}}} % arrow\)
\( \newcommand{\vectorB}[1]{\overset { \scriptstyle \rightharpoonup} {\mathbf{#1}} } \)
\( \newcommand{\vectorC}[1]{\textbf{#1}} \)
\( \newcommand{\vectorD}[1]{\overrightarrow{#1}} \)
\( \newcommand{\vectorDt}[1]{\overrightarrow{\text{#1}}} \)
\( \newcommand{\vectE}[1]{\overset{-\!-\!\rightharpoonup}{\vphantom{a}\smash{\mathbf {#1}}}} \)
\( \newcommand{\vecs}[1]{\overset { \scriptstyle \rightharpoonup} {\mathbf{#1}} } \)
\(\newcommand{\longvect}{\overrightarrow}\)
\( \newcommand{\vecd}[1]{\overset{-\!-\!\rightharpoonup}{\vphantom{a}\smash {#1}}} \)
\(\newcommand{\avec}{\mathbf a}\) \(\newcommand{\bvec}{\mathbf b}\) \(\newcommand{\cvec}{\mathbf c}\) \(\newcommand{\dvec}{\mathbf d}\) \(\newcommand{\dtil}{\widetilde{\mathbf d}}\) \(\newcommand{\evec}{\mathbf e}\) \(\newcommand{\fvec}{\mathbf f}\) \(\newcommand{\nvec}{\mathbf n}\) \(\newcommand{\pvec}{\mathbf p}\) \(\newcommand{\qvec}{\mathbf q}\) \(\newcommand{\svec}{\mathbf s}\) \(\newcommand{\tvec}{\mathbf t}\) \(\newcommand{\uvec}{\mathbf u}\) \(\newcommand{\vvec}{\mathbf v}\) \(\newcommand{\wvec}{\mathbf w}\) \(\newcommand{\xvec}{\mathbf x}\) \(\newcommand{\yvec}{\mathbf y}\) \(\newcommand{\zvec}{\mathbf z}\) \(\newcommand{\rvec}{\mathbf r}\) \(\newcommand{\mvec}{\mathbf m}\) \(\newcommand{\zerovec}{\mathbf 0}\) \(\newcommand{\onevec}{\mathbf 1}\) \(\newcommand{\real}{\mathbb R}\) \(\newcommand{\twovec}[2]{\left[\begin{array}{r}#1 \\ #2 \end{array}\right]}\) \(\newcommand{\ctwovec}[2]{\left[\begin{array}{c}#1 \\ #2 \end{array}\right]}\) \(\newcommand{\threevec}[3]{\left[\begin{array}{r}#1 \\ #2 \\ #3 \end{array}\right]}\) \(\newcommand{\cthreevec}[3]{\left[\begin{array}{c}#1 \\ #2 \\ #3 \end{array}\right]}\) \(\newcommand{\fourvec}[4]{\left[\begin{array}{r}#1 \\ #2 \\ #3 \\ #4 \end{array}\right]}\) \(\newcommand{\cfourvec}[4]{\left[\begin{array}{c}#1 \\ #2 \\ #3 \\ #4 \end{array}\right]}\) \(\newcommand{\fivevec}[5]{\left[\begin{array}{r}#1 \\ #2 \\ #3 \\ #4 \\ #5 \\ \end{array}\right]}\) \(\newcommand{\cfivevec}[5]{\left[\begin{array}{c}#1 \\ #2 \\ #3 \\ #4 \\ #5 \\ \end{array}\right]}\) \(\newcommand{\mattwo}[4]{\left[\begin{array}{rr}#1 \amp #2 \\ #3 \amp #4 \\ \end{array}\right]}\) \(\newcommand{\laspan}[1]{\text{Span}\{#1\}}\) \(\newcommand{\bcal}{\cal B}\) \(\newcommand{\ccal}{\cal C}\) \(\newcommand{\scal}{\cal S}\) \(\newcommand{\wcal}{\cal W}\) \(\newcommand{\ecal}{\cal E}\) \(\newcommand{\coords}[2]{\left\{#1\right\}_{#2}}\) \(\newcommand{\gray}[1]{\color{gray}{#1}}\) \(\newcommand{\lgray}[1]{\color{lightgray}{#1}}\) \(\newcommand{\rank}{\operatorname{rank}}\) \(\newcommand{\row}{\text{Row}}\) \(\newcommand{\col}{\text{Col}}\) \(\renewcommand{\row}{\text{Row}}\) \(\newcommand{\nul}{\text{Nul}}\) \(\newcommand{\var}{\text{Var}}\) \(\newcommand{\corr}{\text{corr}}\) \(\newcommand{\len}[1]{\left|#1\right|}\) \(\newcommand{\bbar}{\overline{\bvec}}\) \(\newcommand{\bhat}{\widehat{\bvec}}\) \(\newcommand{\bperp}{\bvec^\perp}\) \(\newcommand{\xhat}{\widehat{\xvec}}\) \(\newcommand{\vhat}{\widehat{\vvec}}\) \(\newcommand{\uhat}{\widehat{\uvec}}\) \(\newcommand{\what}{\widehat{\wvec}}\) \(\newcommand{\Sighat}{\widehat{\Sigma}}\) \(\newcommand{\lt}{<}\) \(\newcommand{\gt}{>}\) \(\newcommand{\amp}{&}\) \(\definecolor{fillinmathshade}{gray}{0.9}\)- Understand how a compound light microscope works.
- Identify and describe various components of a compound light microscope.
- Demonstrate proper care and handling of a microscope.
- Focus on a specimen using a compound light microscope.
- Accurately record your microscopic observations.
- Write detailed and accurate accounts of your experiments and observations.
- Recognize the diversity of microbes that exist in and around us.
Introduction
Today's lab will delve into the details of microscopy, including care and use of the microscope, describing microscopic findings, and growing microbes in the environment. In our first activity, we will become familiar with our microscope, including how to focus on a specimen and how to clean and store your microscope. In the second activity, we will discuss how to describe our microscopic findings. In the last activity, we will attempt to culture microbes from our environment, while simultaneously learning the importance of a Bunsen burner in microbiology lab.
ACTIVITY 1: Getting to Know Your Microscope
How do we visualize the microscopic world?
By definition, a microorganism is a living organism too small to be seen with the naked eye. A microscope allows us to visualize the microscopic world that exists within and around us. The naked eye can only visualize objects the measure 100 micrometers (um) or greater. To give you some added perspective, the width of a single strand of hair is roughly 100um. Our unaided eyes cannot easily visualize objects less than this size. Using various forms of microscopy allows us to see objects as small as 0.1 nanometers (nm), which is 0.0001um. Therefore, microscopy allows us to visualize human and plant cells, as well as bacterial cells, mitochondria, viruses, proteins, lipids, atoms, and more!

Types of Microscopy
Brightfield microscopy: AKA: the compound light microscope. Light is transmitted through the specimen to produce a dark image of the specimen on a bright background.
Darkfield microscopy: light is reflected off the specimen to produce a bright image of the specimen on a dark background. Darkfield microscopy provides improved detail (or resolution) over brightfield microscopy.
Phase-Contrast microscopy: changes in light intensity caused by light passing through the specimen translate to differences in light intensity in the image. The specimen appears to have varying light and dark regions.

How does a compound light microscope work?
Light travels from a light source that is located below the stage of the microscope. The light passes through a condenser lens which focuses light on your specimen. Lenses in the binoculars and objectives magnifies the specimen producing an enlarged picture of your specimen.
Microscope Parts
- Ocular lens (eye pieces)- this is one of the three lenses in this microscope that typically includes a 10x magnification. Both eyes should be used to look through the binoculars.
- Diopter adjustment- this piece allows you to compensate for differences between your two eyes. It tends to be located on the binoculars or ocular lenses.
- Nosepiece Turret- the nose piece houses all of the objectives. When changing between objectives, you should always use the nose piece, NOT the actual objectives.
- Stage clip- allows you to secure your slide to the stage.
- Aperture (iris diaphragm)- controls the angle and size of light that reaches the specimen (associated with the condenser).
- Diaphragm- controls the amount of light that reaches the specimen. This is adjusted as you move between objectives.
- Condenser- focuses light on the specimen.
- Light source- the source of light used to illuminate the specimen.
- Head (body)- carries optical components.
- Arm- used to carry the microscope.
- Mechanical stage- the surface on which your slide rests. This stage can move in the X, Y, an Z planes.
- Coarse focus (adjustment)- used to focus on the specimen ONLY when using the 4x or scanning objective. The coarse focus knob moves through the specimen in the Z plane in large increments, allowing you to find the specimen easily at 4x. However, at higher magnifications, moving in the Z plane in such large increments causes you to lose sight of your specimen, or even worse, break the slide or objective at higher magnifications. Remember to ONLY use the coarse focus with the 4x objective.
- Fine focus (adjustment)- used to for focusing on the sample once the specimen is in view. The fine focus knob moves through the specimen in the Z plane in smaller increments, allowing you to easily scan through your specimen without losing sight of it.
- Stage controls- moves the stage in the X and Y directions.
- Base- supports the microscope and houses the light source.
- Brightness adjustment- adjusts the brightness of the light source.
- Light switch- turns the light source on and off.
- Note
The image below does not match your microscope perfectly, you will be responsible for knowing the parts of your microscope on the lab practical.

Objectives and Magnification
- 4x or scanning objective- lowest magnification, best for scanning around the specimen when you first start to focus on your specimen, or for use with large specimens, like fungi.
- 10x or low power objective- the next objective above 4x is the 10x objective.
- 40x or High dry objective- the next objective above 10x is the 40x objective. This objective is called the high dry objective because it is used dry or without any oil, which is used for the next objective.
- 100x or oil immersion objective- this is the highest magnification objective and must be used with immersion oil. A drop of oil is placed on the slide and then the 100x objective is moved into place.
What is the limit of resolution?
A measurement of how far apart two points must be in order for the points to still be viewed as separate. Below we see this concept depicted by two purple dots that when fully resolved are separated. However, when the purple dots are just resolved or unresolved, it's difficult to determine if we are really seeing two purple dots or perhaps one large mass.

Similarly, if we look at car headlights on a freeway, we can see our own eye's limit of resolution. The closer vehicle headlights are easy to detect; you can see two separate headlights. However, when we look at the vehicles further away, their headlights appear to be just resolved or unresolved, meaning that our eyes have difficulty resolving the two headlights as being separate. Note that even when we magnify the image, we still cannot visualize the headlights as being separate. So how can we improve the resolution?
Using oil to increase light capture and improve resolution
The oil prevents light from being lost as it travels through your specimen. This is because the oil scatters light in a similar manner to the glass slide that the specimen is on, which helps to direct the light to the objective, creating a more clear image.

Practice worksheet (this is not an assignment)
Can you label all the parts of the microscope?

Total Magnification
What is total magnification?
Your compound microscope is a 3 lens system that consists of the binoculars, objectives, and condenser lenses. Each of the objectives have their own magnification (4x, 10x, 40x, 100x), but your binoculars are also magnified by 10x. As a result, your total magnification is always going to be the objective lens magnification multiplied by 10 (the objective magnification multiplied by the binocular magnification). For example, if you are looking at a specimen using the 100x oil immersion objective, the total magnification is actually 1000x when we include the magnification of the binoculars. Some microscopes have different binocular lenses and, therefore, different magnifications. However, for the purpose of this class, we will also assume the binocular magnification is 10x.
The magnification is = ____________________ multiplied by _____________________
| Ocular | Objective | Total Magnification |
| 10x | 4x | |
| 10x | 10x | |
| 10x | 40x | |
| 10x | 100x |
How to Use Your Microscope
FOCUSING:
1. Use one of the pre-made, gram-stained, bacterial slides.
2. Make sure the condenser is all the way up and the iris diaphragm is all the way open, letting the maximum amount of light to contact your slide.
3. ALWAYS start at 4X, stage lowered, focus with coarse focus knob first.
4. Once in focus move to 10X and focus using the fine focus knob.
5. Once in focus move to 40X and focus using the fine focus knob.
6. Move objectives half-way between 40X and 100X, add 1 drop of oil.
7. MAKE SURE THE 40X DOES NOT TOUCH THE OIL!
8. Move to 100x and SLOWLY focus with the fine focus knob If you do not see your image clearly, DO NOT go back to the 40X and try to refocus.

CLEANING A MICROSCOPE:
1. Lower stage.
2. Remove slide, turn the power off. 
3. Wipe oil from all surfaces and 100X with lens paper.
4. With the second piece of lens paper, moistened with alcohol, wipe all surfaces. Never use Kimwipes to clean microscope.
5. Wipe surfaces with a new dry piece of lens paper.
6. Return to the lowest lens (4x).
Once you are ready, invite the instructor over for your first skill tests.
SKILL TEST #1: FOCUSING ON A SPECIMEN
Under the supervision of the instructor or lab technician, bring your slide into focus under 100X. You can use your notes, books, etc. but you CAN NOT get help from other students.
SKILL TEST #2: CLEANING YOUR MICROSCOPE
Under the supervision of the instructor or lab technician, clean your microscope. You can use your notes, books, etc. but you CAN NOT get help from other students.
ACTIVITY 2: Describing Your Microscopic Observations
Without any microbiology experience, it can be quite difficult to determine what you see in your microscope binoculars. It's helpful to first consider what characteristics of a microorganism we can describe:
 Color: Most biological specimens are colorless or transparent, making it difficult to detect and observe the specimen. Stains and dyes can be used to enhance detection of biological specimens. Numerous methods can be employed ot improve visualization of a specimen, including various staining procedures which we will discuss in a future lab. For now, simply record the color of your specimen.
 - Shape: Microorganisms are vastly diverse in terms of shape. Despite this diversity, identifying the shape is an important first step in identification. Bacterial microorganisms may com in the following shapes:
- Spheres (cocci, singular coccus)
- Rods (bacilli, singular bacillus)
- Spirals (spirilla, singular spirillum)
- Curved rods (vibrios)
- Short rods (coccobacilli)
- Flexible spirals (spirochetes)
- Note that these shapes are specifically used to describe bacteria. As you will soon see, eukaryotic microorganisms do not adhere to prokaryotic shapes.
- Arrangement: Shapes can be further arranged or grouped, and such information can be helpful in identification. Some bacterial arrangements include:
- Diplo- two cells found together
- Staphylo- grape-like clusters of cells
- Strepto- a chain of cells
- Note that shape and arrangement are typically combined to form a single description, for example, grape-like clusters of cocci are described as staphylococci.
- Size: In this course, we will mostly describe the size of microbes in a relative way, as not all microscopes contain the appropriate equipment for measuring our observations. For example, most eukaryotic microorganisms are much larger than prokaryotic microbes, therefore, they can be seen at the lower magnifications of 4x and 10x. Prokaryotic microbes are significantly smaller and must be visualized using the 40x and 100x objectives.
- Quantity: The quantity of microorganisms in a given specimen can be incredibly useful in diagnostic settings where a certain number of microbes/volume of specimen is required for diagnosis of infection. For example, if a patient presents with symptoms of a urinary tract infection, the doctor may use the number of colony forming units (CFU) per mL of urine plated to diagnose the patient. This method includes culturing the patient urine specimen on growth medium and quantifying the number of colonies formed. We will discuss this method in a later lecture. For now, it is important to understand the significance of quantification in diagnosis and observation.
- Unique Structures: Many microorganisms contain unique cellular structures which further contribute to identification and, coincidentally, the microbes ability to infect the host. Some microbes have special motility structures which aid in attachment and infection. Others are enclosed ny a thick sugar coat which improves their ability to evade the host's defenses. Microbes may also be observed in a resting state, which results in the formation of uniquely hardy cells that can be observed microscopically (endospores!). Unique structures will be discussed in a later lab, however, for now it is important to take not of any structures you observe.
Let's test our skills and learn about a not-so-fun microbe:
Giardia lamblia is a single-celled eukaryotic parasitic organism. The flagellated form of the parasite colonizes and reproduces in the small intestine, causing giardiasis. Giardia trophozoites absorb their nutrients from the lumen of the small intestine and are anaerobes (do not use oxygen). Human infection occurs via ingestion of water contaminated with the dormant cyst form of the parasite or through fecal-oral contamination. The cyst form is very hardy and can survive for weeks to months in cold water, and are resistant to chlorination. Giardia infects humans but is also one of the most common parasites infecting cats, dogs, cattle, sheep, and birds. The life cycle begins with a cyst being excreted in the feces of an infected individual. A distinguishing characteristic of the cyst is four nuclei. Once ingested by a host, the trophozoite emerges from the cyst. This is the active stage of the parasite capable of feeding and movement. After the feeding stage, the trophozoite undergoes asexual replication through longitudinal binary fission. The resulting trophozoites and cysts then pass through the digestive system in the feces. While the trophozoites may be found in the feces, only the cysts are capable of surviving outside of the host.
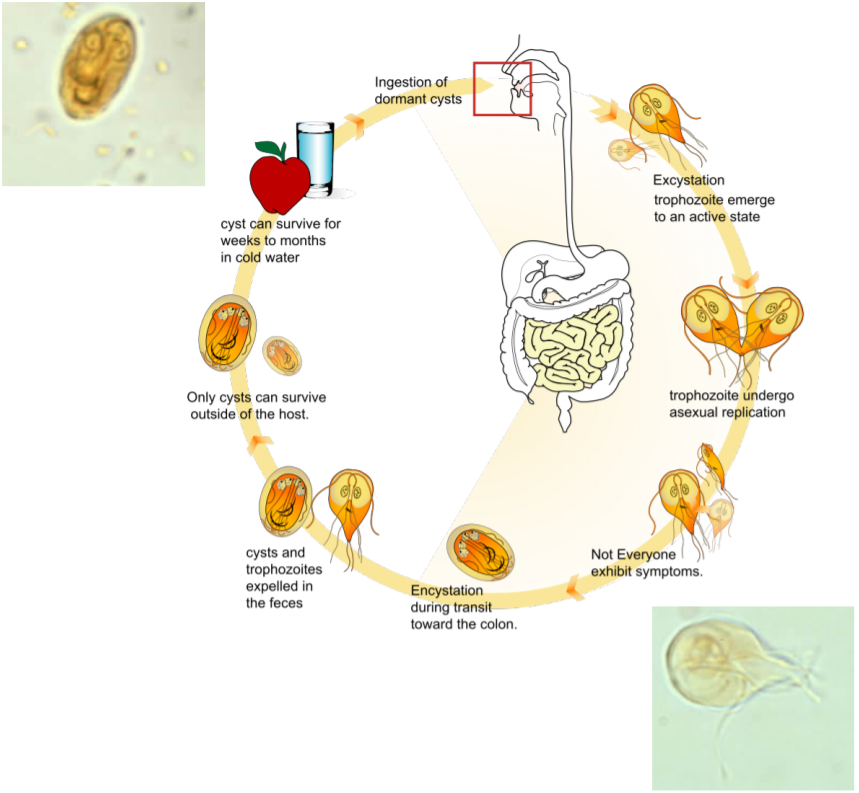
>>>Take a look at the Giardia cyst and trophozoite demonstration slides and describe your microscopic findings.
ACTIVITY 3: Microbes in the Environment (to be performed in groups of 2-4 students)
Microbes can grow pretty much anywhere! Your lab bench top (despite frequent disinfecting), your cell phone, the air you breathe, and even you are covered in microbes. This is why we spend a whole lab learning aseptic technique (stay tuned!). For today, let's learn about the importance of working under a flame.
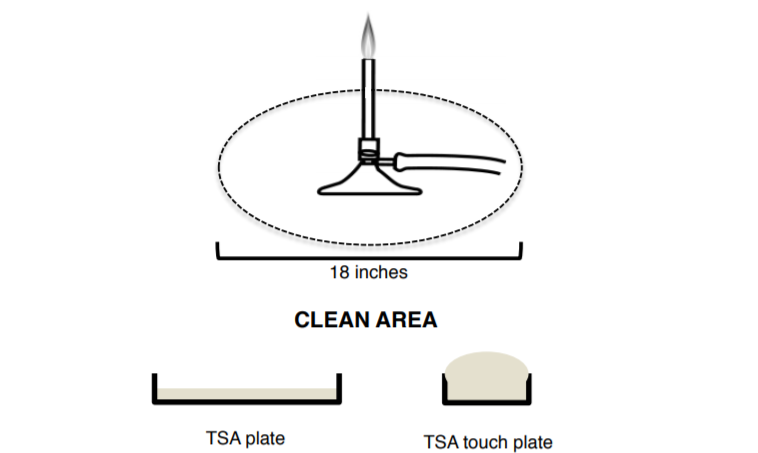
Why does working under a flame reduce contamination?
The flame produces air convection currents which ultimately cause an updraft as warm air rises up and away from the flame. This updraft drives microorganisms and other particulate matter upward and away from the region beneath the flame, creating a somewhat sterile field (see figure below). While working with a Bunsen burner, it is important to bring all necessary reagents in close proximity (within 18 inches) to the flame and to move slowly, so as to not disrupt the air currents. Additionally, the flame of the Bunsen burner is used to sterilize instruments, including inoculation loops and the opening of culture tubes.
Lab Procedure:
Let's test how well the flame actually works to reduce microbial contamination. In this lab, we will also use a sterile swab to culture microbes in our environment as a positive control for microbial growth and to underscore the pervasiveness of microorganisms in our world. Let's begin!
1. Label 5 TSA plates.
2. Place plate #1 within 6 inches of Bunsen burner open for 2 min.
3. Place plate #2 FAR away from Bunsen burner open for 2 min.
4. Place plate #3 FAR away from Bunsen burner open for 10 min.
5. Place plate #4 FAR away from Bunsen burner open for 30 min.
6. Take plate #5 and use a wet swab (use the sterile liquid media to wet) to swab something (your partner, outside, your nose, be creative).
7. Put all your plates in the 37°C incubator, make sure your plates are agar side up.
Note: We will only be using TSA plates, not TSA touch plates.
Trypticase soy agar (TSA)
Trypticase soy agar (TSA) is a growth medium for the culturing of bacteria. It is one of the most common general-purpose media used in microbiology labs. TSA provides enough nutrients to allow for a wide variety of microorganisms to grow and is used for storage (4°C), enumeration (counting), isolation of pure cultures, or just general culturing. TSA contains enzymatic digests of casein and soybean meal, which provides amino acids and other nitrogenous substances, making it a nutritious medium for a variety of organisms. Glucose is the energy source. Sodium chloride maintains the osmotic equilibrium, while dipotassium phosphate acts as a buffer to maintain pH. Agar is used as a gelling agent.
Sometimes the medium is supplemented with blood to facilitate the growth of more fastidious bacteria or antimicrobial agents (antibiotics) to permit the selection of various microbial groups. TSA is frequently the base media of other agar plate types. For example, blood agar plates (BAP) are made by enriching TSA plates with defibrinated sheep blood, while chocolate agar is made through additional cooking of BAP.
HOW TO LABEL SAMPLES:
In microbiology, it is important to properly label the media plates, broths, or slants PRIOR to inoculation with different microorganisms to avoid contamination.
Label your samples with a SHARPIE with the following information:
1. Your name or initials or group name
2. Date
3. Medium type
4. Organism name or abbreviation
5. Miscellaneous info (antibiotic, time point, etc.)
Activity 3: Proper Record Keeping
Reproducibility
The ability to reproduce your results is at the forefront of science and medicine. When a patient is prescribed a certain treatment plan, there is an expected outcome based on previous results. This outcome can only really be expected if we know exactly what that treatment plan is. Let's discuss some good and bad descriptions of experimental procedures:
Bad: I put some bacteria on a slide and rubbed it in some water.
Good: A sterile inoculation loop was used to transfer a small scraping (roughly one tenth of a colony) of bacteria from growth agar to a clean microscope slide. The inoculation loop was re-sterilized and then used to transfer one loopful of sterile water to the slide containing bacteria. The loop was then used to mix the bacteria and water into a dime-sized smear.
Authenticity
It is important that you are ALWAYS honest about your experiments and observations. Even if you make a mistake, it is important to document it in your records. Many great scientists made pivotal advances in microbiology because of a simple mistake that they accurately documented in their records! Even if an experimental or clinical outcome is completely incorrect, you must state the outcome honestly.
Objectivity
As a scientist, you never want to mislead your audience. You want to give the facts, with little to no interpretation. Interpretation, while pivotal, is subjective and open for debate. On the contrary, an objective description is difficult to refute. Let's take a look at some subjective and objective statements.
Bad: The bacteria were Gram-negative rods.
Good: The specimen appeared rod-shaped and pink in appearance.
Bad: There were many round, colored colonies on the plate.
Good: There were approximately 123 colonies on the plate. They appeared to be round and yellow in appearance. Colony size was not measured.
Again, the point is to give the objective facts, not the interpretation of the outcome. The interpretation or conclusion of your findings will be a completely separate part of your experimental observations.
A Special Note on Fabrication
While the actual definition of fabrication is merely to manufacture or invent something, the word has a very different meaning among the scientific community. As a microbiologist in this class, fabrication would mean any intentional misrepresentation of data. This would include, but is not limited to:
- Making up the data or outcome of an experiment without actually running the experiment.
- Changing the data to better fit the expected outcome or hypothesis.
- Using the same exact data from one experiment in another experiment.
In this course, fabrication will only harm you and your grade (and your future career). However, scientific fabrication has the potential to negatively impact the entire world. Consider the completely fabricated research that lead to the anti-vaccine movement. Many people will not get vaccinated this year and, as a result, many more people will die from vaccine-preventable illnesses. There is nothing to gain from telling lies in science, except suffering.
For more information on fabrication and scientific misconduct, visit the following links:
On Being a Scientist: A Guide to Responsible Conduct in Research