
2.1: Skeletal System and Human Body Ratio Worksheet
- Page ID
- 25213
Skeletal Anthropology
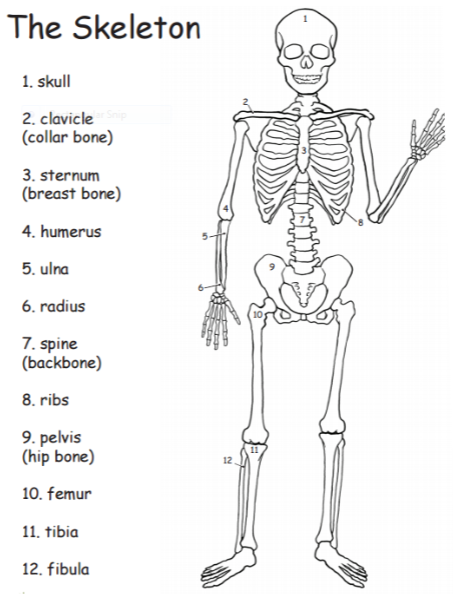
The skeletal system gives shape to the body. Without the skeletal system, the body will look like a paper kit without a rigid frame. The bones themselves support the weight of the body, and their organization protects vital organs. Therefore, examining the skeletal structure of a body can provide information regarding the growth rate, gender, and height of a person.
Proportion
Flip through your textbook, watch a nature documentary, spend any length of time outdoors and you are bound to recognize the many patterns that define nature. If you look closely enough, a universal value appears, Phi (the golden number = 1.618) is a proportion found in many areas of the natural world. The human body is no exception: there is an inherent symmetry with many of the bones exhibiting a proportional relationship of 1:1.618. The mathematics of the human body is modeled in Leonardo Da Vinci's Vitruvian Man, a diagram of a man with outstretched arms fitting precisely into a square.
Age of a Skeleton
As the human body grows and matures, bones become thicker and larger. Some bones fuse together in a process known as “ossification,” which can occur at an estimated 800 locations in the body. The timing of ossification events varies among bones, thus providing a guide to revealing age. For example, the tibia plate seals around age 16 or 17 in girls and around 18 or 19 in boys. The last bone to finish growing is the collar bone, which ossifies at roughly age 25. In addition to bone length, ossification and rate of degeneration (in the case of the elderly), analysis of teeth can also provide telling information about remains.
Gender
When determining gender in a skeleton, the examination of the pelvis, with the focus on the pubic arch and width can be useful. Broad angles (usually greater than 90°), supporting an overall rectangular shape while maintaining a large and round pelvic inlet is indicative of females. Form follows function and these anatomical differences are critical to enabling childbirth. Males on the other hand, typically exhibit an acute (less than 90°) arch, overall external triangular shape with a heart-shaped (narrowing) inlet.
The skull also contains multiple markers that can be used to determine sex. For example, the orbitals (eye sockets) are squared in males, while in females they are more rounded. Cheekbones, brow ridges, and the jawline are more pronounced in males5.
Height
Determining the height of a skeleton involves reassembling the skeleton and measuring the length of significant bones. Understanding the relationships among bones can allow height estimates when faced with an incomplete set of remains. The longer the bone, the more accurate the estimate will be. Thus, the femur is measured first. While variations (based on gender and ethnicity) exist, the overall height of the body is roughly three times the length of the femur. To account for missing tissue and muscle, it is a general practice to add 2.5 inches (for females) or 4 inches (for males) onto the bone length. For instance, a male femur measured at 1.5 feet (18 inches), would be estimated at 24 inches, resulting in an inferred height of 6 feet (24 x 3 = 72 inches).
Part 1: Recognizing Body Ratios
- Estimate the measurements of different parts of your body and record them in the “estimate” column below. **NOTE: we are trying to gauge the accuracy of your spatial awareness.
- Use a tape measure or ruler to determine the actual measurements of the same body parts and record this data set under the “actual” column. You may need a partner to assist.
- Examine these measurements for patterns and relationships between each pair of measurements.
- Use the actual measurements to complete the list below. The value for each item listed in the left column is equal to “1”. The answer given for the first item is “2”, because the circumference of the neck is twice the circumference of the wrist (or a ratio of 1 to 2).
|
ITEM |
Estimate (cm) |
Actual (cm) |
|
Total height |
||
|
Arm span (tip to tip, with arms spread out) |
||
|
Length of the head (chin to the top of the head) |
||
|
Length of nose |
||
|
Fingertip to the second joint of the pointer finger |
||
|
Width of the eye (corner to corner) |
||
|
Width of the head (ear to ear) |
||
|
Distance between eyes (inside corner to inside corner) |
||
|
Distance from bottom of the nose to the outside corner of the eye |
||
|
Length of ear |
||
|
Length of foot |
||
|
Length of the face (hairline to chin) |
||
|
Length of the hand (wrist to fingertips) |
||
|
Waist circumference (the distance around) |
||
|
Neck circumference |
||
|
Wrist circumference |
|
Neck circumference |
= ______2______ |
Wrist circumference |
|
Total height |
= _____________ |
Length of the head |
|
Total height |
= _____________ |
Arm span |
|
Length of the nose |
= _____________ |
Fingertip to the second joint of the pointer finger |
|
Width of the head |
= _____________ |
Width of the eye |
|
Length of the face |
= _____________ |
Length of the hand |
|
Width of the eye |
= _____________ |
Distance between the eyes |
|
Length of the ear |
= _____________ |
Distance from the nose to the eye |
|
Length of the foot |
= _____________ |
Length of the face |
|
Waist circumference |
= _____________ |
Neck circumference |
Part 2: Analysis and Identification of Bones
1. Each lab station includes a “bone box” of skeletal remains. Working as a team, identify as many of the bones as possible (by shading those pieces) in the corresponding assembled body.
2. How many bones (total) did your group identify? __________
3. What can you determine from the bones? Provide your answer and 2 lines of evidence.
a. Age Estimation?
b. Gender?
c. Estimated height of the individual?