
15.5: Laboratory Activities and Assignment
- Page ID
- 53747

Laboratory Activities and Assignment
Part 1: Review of Cranial Nerves
1. Provide the name and number of the cranial nerves involved in each of the following activities, sensations or disorders.
a. Rotating the head
b. Smelling coffee
c. Elevating the eyelids; pupillary constriction
d. Slowing the heart; swallowing
e. Involved in Bell’s palsy (facial paralysis); crying
f. Chewing food; feeling a toothache
g. Listening to music; seasickness
h. Secretion of saliva; tasting well-seasoned food
i. Involved in “rolling” the eyes (three nerves; give numbers)
j. Swallowing; speaking (motor only)
k. Seeing the notes during lecture
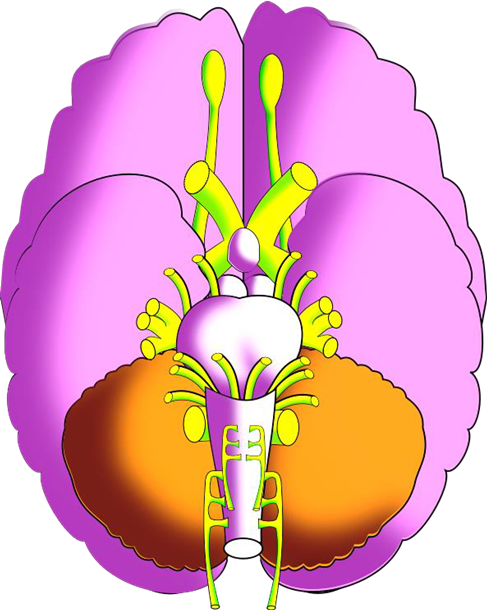
2. Label the number and name for ALL of the cranial nerves (left and right) on this inferior view of the brain.
Part 2: Review of Spinal Nerves
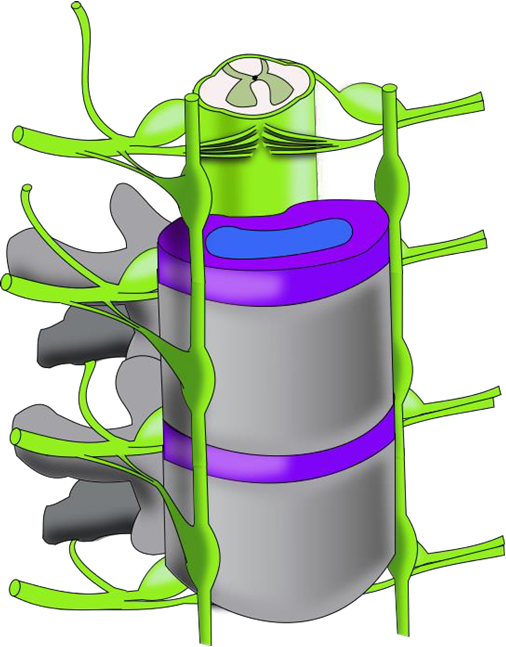
1. Label the following structures on the diagram below.
|
|
|
2. Match the following nerves to their nerve plexuses (give the nerve plexus each nerve arises from).
a. _______________________ sciatic nerve
b. _______________________ phrenic nerve
c. _______________________ axillary nerve
d. _______________________ radial nerve
e. _______________________ femoral nerve
f. _______________________ pudendal nerve
g. _______________________ ansa cervicalis nerve
h. _______________________ musculocutaneous nerve
i. _______________________ inferior gluteal nerve
j. _______________________ obturator nerve
k. _______________________ superior gluteal
l. _______________________ pectoral nerve
m. _______________________ greater auricular nerve
n. _______________________ common fibular nerve
o. _______________________ median nerve
p. _______________________ genitofemoral nerve
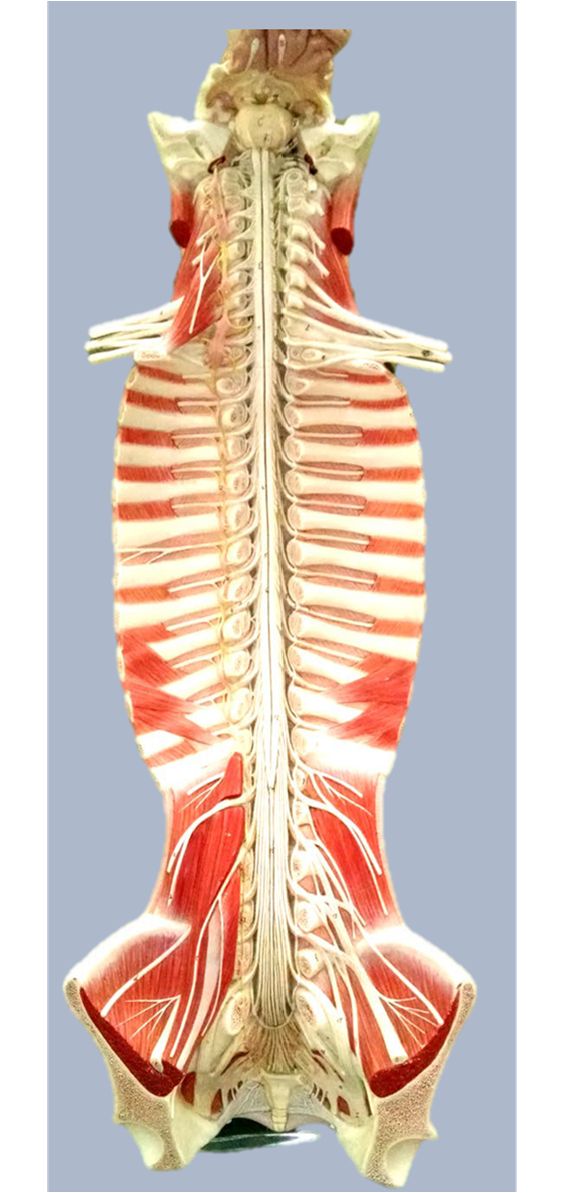
3. Label EACH of the spinal nerves (C1 – S5) on the image of an anatomical model below. Also, label the items listed below.
|
|
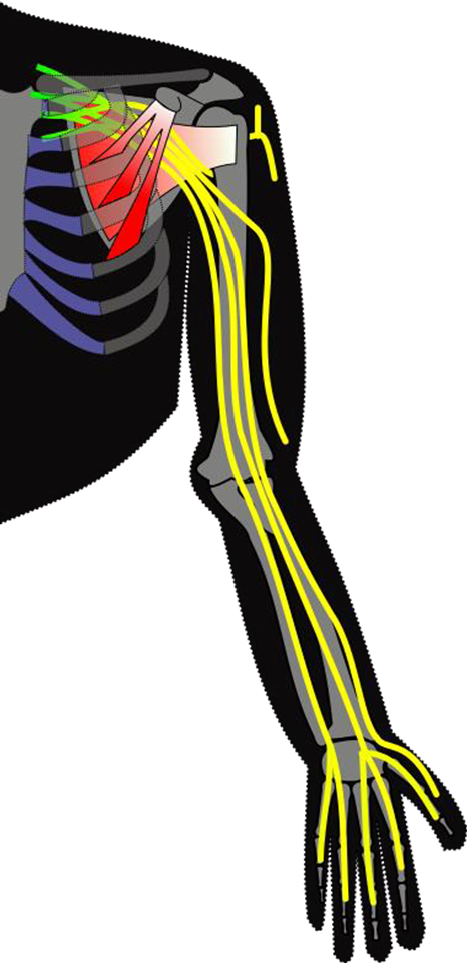
4. Label the following nerves of the upper limb on the diagram below.
|
|
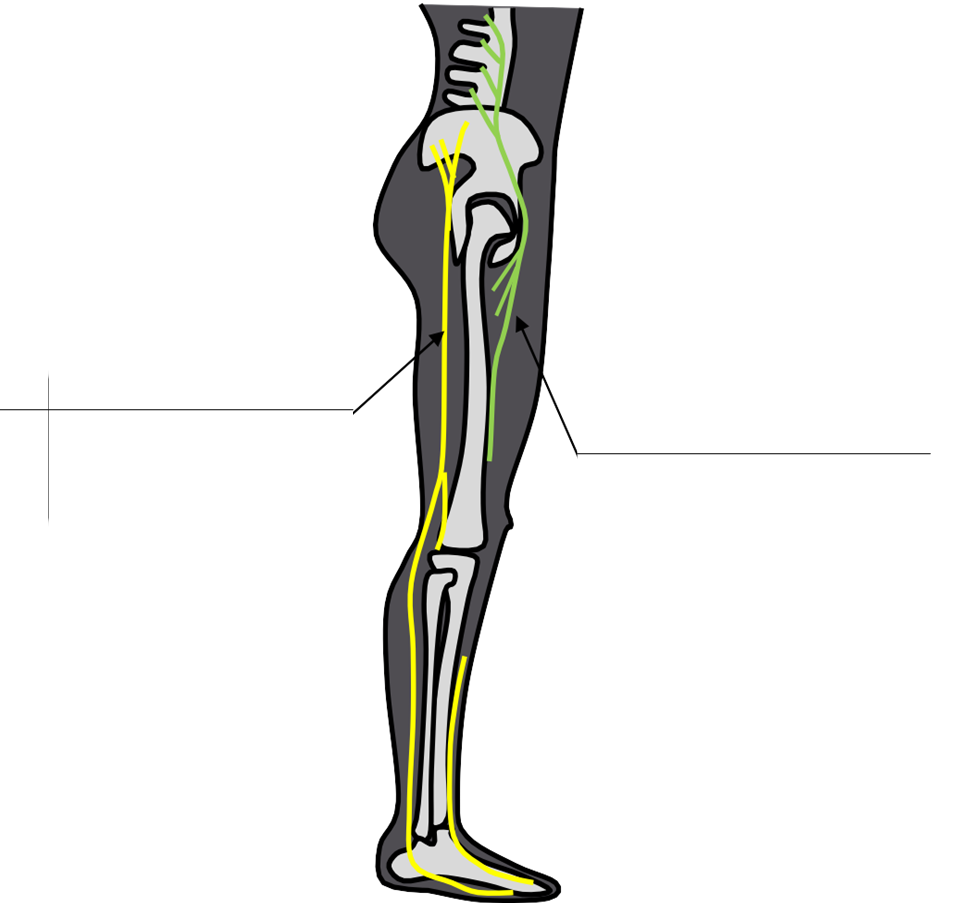
5. Label the following nerves on the lower limb diagram below.
- femoral nerve
- sciatic nerve
Part 3: Laboratory Activity Plotting Cranial and Spinal Nerve Pathways
In this activity, you will work in small groups of 3-5 and use string or twine to model the pathways of nerves on human skeleton models and thus are able to better learn the origins, pathways, and innervation points of these nerves.
Materials Required
- Human skeleton models (life-size models are best, but smaller ones would work too; click here to see the model used by the author of this activity)
- Human brain model (one that fits into the skull of the skeleton; click here to see the model used by the author of this activity)
- Human eyeball model (one that fits into the orbital socket of the skeleton: click here to see the model used by the author of this activity)
- String / rope / twine – try to find a product that does not fray or unwind easily
- Tape (masking or lab tape is best)
- Measuring tape / ruler
- Scissors
- Envelopes
Instructor Preparation

Above: Completed set of six nerves used in this lesson.
For the first time through this lesson, you will need to make the six “nerves” from the string. Each group of students will need one set of six nerves, so you will need to repeat the following process for however many groups you will have. Depending on how carefully students use the nerves, you may need to make new ones every time, or fix them as needed.
- First you will need to make the nerves using the string. Table 2 (page 4) lists the lengths of string and number of spinal nerve attachment points to be used for the nerves emerging from nerve plexuses.
- To make a nerve, cut the required length of string from Table 2 (page 4), and then attach the number of spinal nerve attachment points to one end using tape. NOTE: These lengths are approximate and work well for the specific model of skeleton that I used to develop this lesson. If you have a different-sized model, you will want to adjust the lengths of your nerves as needed.
- Each spinal nerve attachment point can be a 3 to 4” piece of string (pieces of pipe cleaners can be used as well and may be more effective). The spinal nerve attachment points will be taped or otherwise attached to the spinal nerves that emerge from the skeleton model (or onto the neighboring vertebrae if the model does not have spinal nerves), so these are the parts that will be subjected to the most damage from students. Figure 1 shows examples of the completed set of six nerves. As described in the Teaching Discussion section, the instructor can choose to use different colored strings to represent different nerves or other materials (pipe cleaners, Velcro-backed adhesive, Bendaroo, etc) to make the nerve attachment points.
- Place one set of six nerves into an envelope. Each group completing the lesson will be given one envelope.
- Repeat steps 2 to 4 for however many groups you have in your class.
Plotting Nerve Pathways-Details for the preparation of the six nerves used in this lesson.
|
Nerve |
Length of String (Inches) |
Number of Spinal Nerve Attachment Points |
|---|---|---|
|
optic (C.N. II) |
4 |
N/A |
|
vagus (C.N. X) |
15 |
N/A |
|
phrenic |
15 |
3 |
|
ulnar |
30 |
2 |
|
obturator |
18 |
3 |
|
tibial |
40 |
5 |
Activity Instructions
Getting Started
- In your lab envelope you have many pieces of yellow mason line – these will be used to model the pathways that nerves travel through the body. PLEASE be careful with them, as the ends fray easily and other groups will need to use them!
- There are six total nerves; two cranial and four major nerves that are parts of the nerve plexuses of the body. Some of the nerves have more than one ending – these will represent attachment points to spinal nerves. Those that have multiple endings thus are spinal nerves, and those with a single ending are cranial nerves. It is up to you to figure out which nerve to use for the following exercises. Examine their lengths and number of endings to figure out which is which.
- NOTE: this model will not be completely accurate, as we are not modeling the nerve plexuses; rather the nerves will attach directly to the spinal nerves. Also remember that each nerve is paired – there is a left and right of each nerve. You are only going to model the left or the right, not both.
- Spread your six nerves out on your lab bench and compare their lengths and number of spinal nerve attachment points. Can you tell which ones are cranial nerves and which ones are spinal nerves?
Optic Nerve (C.N. II)
1. Take the brain from the torso and identify the origination point of the optic nerve.
2. Identify the optic nerve from the envelope of nerves and tape one end to the attachment point on the brain.
Where does the optic nerve originate from the brain? ____________
3. Remove the skullcap from the human skeleton skull model, and identify the foramen that the optic nerve passes through.
What foramen does the optic nerve pass through? _______________
4. Carefully place the brain in the cranial fossa and thread the cranial nerve through its foramen.
5. Remove the left eye from the torso and carefully place it in the left orbital socket of the skull. The optic nerve is now “attached” to the eye!
Vagus nerve (C.N. X)
1. Remove the brain from the skull and identify the origination point of the vagus nerve. (leave the optic nerve attached!)
Where does the vagus nerve originate from the brain? ____________
2. Identify the vagus nerve from the envelope of nerves and tape one end to the attachment point on the brain.
3. In the skull model, identify the foramen that the vagus nerve passes through.
What foramen does the vagus nerve pass through? _______________
4. Carefully place the brain in the cranial fossa and thread the cranial nerve and vagus nerve through their foramina.
5. Thread the vagus nerve to the approximate location where it would innervate the heart.
Show your instructor your optic and vagus nerves before moving on. Do not remove the nerves until the end of the lesson.
Instructor Initials: _______
Phrenic nerve
1. Identify the phrenic nerve from the envelope of nerves.
Which spinal nerves make up the phrenic nerve? __________________
What plexus does the phrenic nerve originate from? _______________
2. On the human skeleton model, identify the spinal nerves that make up the phrenic nerve.
3. Tape the ends of the phrenic nerve to its appropriate spinal nerves.
4. Thread the phrenic nerve from its attachment points at the spinal nerves to its most distal point – use tape to help keep it in place.
Ulnar nerve
1. Identify the ulnar nerve from the envelope of nerves.
Which spinal nerves make up the ulnar nerve? ____________________
What plexus does the ulnar nerve originate from? _______________
2. On the human skeleton model, identify the spinal nerves that make up the ulnar nerve.
3. Tape the ends of the ulnar nerve to its appropriate spinal nerves.
4. Thread the ulnar nerve from its attachment points at the spinal nerves to its most distal point – use tape to help keep it in place.
Show your instructor your phrenic and ulnar nerves before moving on. Do not remove the nerves until the end of the lesson.
Instructor Initials: _______
Obturator nerve
1. Identify the obturator nerve from the envelope of nerves.
Which spinal nerves make up the obturator nerve? _________________
What plexus does the obturator nerve originate from? _______________
2. On the human skeleton model, identify the spinal nerves that make up the obturator nerve.
3. Tape the ends of the obturator nerve to its appropriate spinal nerves.
4. Thread the obturator nerve from its attachment points at the spinal nerves to its most distal point – use tape to help keep it in place.
Tibial nerve
1. Identify the tibial nerve from the envelope of nerves.
Which spinal nerves make up the tibial nerve? __________________
What plexus does the tibial nerve originate from? ________________
2. On the human skeleton model, identify the spinal nerves that make up the tibial nerve.
3. Tape the ends of the tibial nerve to its appropriate spinal nerves.
4. Thread the tibial nerve from its attachment points at the spinal nerves to its most distal point – use tape to help keep it in place.
Show your instructor your obturator and tibial nerves before moving on. Take a photo of your completed skeleton model before removing your nerves. Instructor Initials: _______
Part 4: Plotting Cranial and Spinal Nerve Pathways Post-Activity Questions
Answer the following questions about the nerves of the body:
1. Describe the path that the vagus nerve takes through the body, including its origination point, the foramen it passes through, and what structures it innervates.
2. What type(s) of rami make up nerve plexuses?
3. What muscle(s) does the phrenic nerve innervate? What plexus does the phrenic nerve originate from?
4. What plexus does the obturator nerve originate from? What spinal nerves contribute to it? What muscle groups does it innervate? What cutaneous regions does it innervate?
5. Describe the path of the tibial nerve through the body, including what spinal nerves contribute to it, what plexus it originates from, how it passes through the body (using correct anatomical relationships) and
6. Take a photo of your completed skeleton model and submit it to your instructor with your answers.
Attributions
Part 1: Review of Cranial Nerves
- "Anatomy and Physiology Lab Homework" by Laird C Sheldahl is licensed under CC BY-SA 4.0
- "Human Anatomy Lab Manual" by Malgosia Wilk-Blaszczak, Mavs Open Press, University of Texas at Arlington is licensed under CC BY 4.0
Part 2: Review of Spinal Nerves
- "Anatomy and Physiology Lab Homework" by Laird C Sheldahl is licensed under CC BY-SA 4.0