
8.5.3: Cervical Vertebrae
- Page ID
- 53926

\( \newcommand{\vecs}[1]{\overset { \scriptstyle \rightharpoonup} {\mathbf{#1}} } \)
\( \newcommand{\vecd}[1]{\overset{-\!-\!\rightharpoonup}{\vphantom{a}\smash {#1}}} \)
\( \newcommand{\id}{\mathrm{id}}\) \( \newcommand{\Span}{\mathrm{span}}\)
( \newcommand{\kernel}{\mathrm{null}\,}\) \( \newcommand{\range}{\mathrm{range}\,}\)
\( \newcommand{\RealPart}{\mathrm{Re}}\) \( \newcommand{\ImaginaryPart}{\mathrm{Im}}\)
\( \newcommand{\Argument}{\mathrm{Arg}}\) \( \newcommand{\norm}[1]{\| #1 \|}\)
\( \newcommand{\inner}[2]{\langle #1, #2 \rangle}\)
\( \newcommand{\Span}{\mathrm{span}}\)
\( \newcommand{\id}{\mathrm{id}}\)
\( \newcommand{\Span}{\mathrm{span}}\)
\( \newcommand{\kernel}{\mathrm{null}\,}\)
\( \newcommand{\range}{\mathrm{range}\,}\)
\( \newcommand{\RealPart}{\mathrm{Re}}\)
\( \newcommand{\ImaginaryPart}{\mathrm{Im}}\)
\( \newcommand{\Argument}{\mathrm{Arg}}\)
\( \newcommand{\norm}[1]{\| #1 \|}\)
\( \newcommand{\inner}[2]{\langle #1, #2 \rangle}\)
\( \newcommand{\Span}{\mathrm{span}}\) \( \newcommand{\AA}{\unicode[.8,0]{x212B}}\)
\( \newcommand{\vectorA}[1]{\vec{#1}} % arrow\)
\( \newcommand{\vectorAt}[1]{\vec{\text{#1}}} % arrow\)
\( \newcommand{\vectorB}[1]{\overset { \scriptstyle \rightharpoonup} {\mathbf{#1}} } \)
\( \newcommand{\vectorC}[1]{\textbf{#1}} \)
\( \newcommand{\vectorD}[1]{\overrightarrow{#1}} \)
\( \newcommand{\vectorDt}[1]{\overrightarrow{\text{#1}}} \)
\( \newcommand{\vectE}[1]{\overset{-\!-\!\rightharpoonup}{\vphantom{a}\smash{\mathbf {#1}}}} \)
\( \newcommand{\vecs}[1]{\overset { \scriptstyle \rightharpoonup} {\mathbf{#1}} } \)
\( \newcommand{\vecd}[1]{\overset{-\!-\!\rightharpoonup}{\vphantom{a}\smash {#1}}} \)
\(\newcommand{\avec}{\mathbf a}\) \(\newcommand{\bvec}{\mathbf b}\) \(\newcommand{\cvec}{\mathbf c}\) \(\newcommand{\dvec}{\mathbf d}\) \(\newcommand{\dtil}{\widetilde{\mathbf d}}\) \(\newcommand{\evec}{\mathbf e}\) \(\newcommand{\fvec}{\mathbf f}\) \(\newcommand{\nvec}{\mathbf n}\) \(\newcommand{\pvec}{\mathbf p}\) \(\newcommand{\qvec}{\mathbf q}\) \(\newcommand{\svec}{\mathbf s}\) \(\newcommand{\tvec}{\mathbf t}\) \(\newcommand{\uvec}{\mathbf u}\) \(\newcommand{\vvec}{\mathbf v}\) \(\newcommand{\wvec}{\mathbf w}\) \(\newcommand{\xvec}{\mathbf x}\) \(\newcommand{\yvec}{\mathbf y}\) \(\newcommand{\zvec}{\mathbf z}\) \(\newcommand{\rvec}{\mathbf r}\) \(\newcommand{\mvec}{\mathbf m}\) \(\newcommand{\zerovec}{\mathbf 0}\) \(\newcommand{\onevec}{\mathbf 1}\) \(\newcommand{\real}{\mathbb R}\) \(\newcommand{\twovec}[2]{\left[\begin{array}{r}#1 \\ #2 \end{array}\right]}\) \(\newcommand{\ctwovec}[2]{\left[\begin{array}{c}#1 \\ #2 \end{array}\right]}\) \(\newcommand{\threevec}[3]{\left[\begin{array}{r}#1 \\ #2 \\ #3 \end{array}\right]}\) \(\newcommand{\cthreevec}[3]{\left[\begin{array}{c}#1 \\ #2 \\ #3 \end{array}\right]}\) \(\newcommand{\fourvec}[4]{\left[\begin{array}{r}#1 \\ #2 \\ #3 \\ #4 \end{array}\right]}\) \(\newcommand{\cfourvec}[4]{\left[\begin{array}{c}#1 \\ #2 \\ #3 \\ #4 \end{array}\right]}\) \(\newcommand{\fivevec}[5]{\left[\begin{array}{r}#1 \\ #2 \\ #3 \\ #4 \\ #5 \\ \end{array}\right]}\) \(\newcommand{\cfivevec}[5]{\left[\begin{array}{c}#1 \\ #2 \\ #3 \\ #4 \\ #5 \\ \end{array}\right]}\) \(\newcommand{\mattwo}[4]{\left[\begin{array}{rr}#1 \amp #2 \\ #3 \amp #4 \\ \end{array}\right]}\) \(\newcommand{\laspan}[1]{\text{Span}\{#1\}}\) \(\newcommand{\bcal}{\cal B}\) \(\newcommand{\ccal}{\cal C}\) \(\newcommand{\scal}{\cal S}\) \(\newcommand{\wcal}{\cal W}\) \(\newcommand{\ecal}{\cal E}\) \(\newcommand{\coords}[2]{\left\{#1\right\}_{#2}}\) \(\newcommand{\gray}[1]{\color{gray}{#1}}\) \(\newcommand{\lgray}[1]{\color{lightgray}{#1}}\) \(\newcommand{\rank}{\operatorname{rank}}\) \(\newcommand{\row}{\text{Row}}\) \(\newcommand{\col}{\text{Col}}\) \(\renewcommand{\row}{\text{Row}}\) \(\newcommand{\nul}{\text{Nul}}\) \(\newcommand{\var}{\text{Var}}\) \(\newcommand{\corr}{\text{corr}}\) \(\newcommand{\len}[1]{\left|#1\right|}\) \(\newcommand{\bbar}{\overline{\bvec}}\) \(\newcommand{\bhat}{\widehat{\bvec}}\) \(\newcommand{\bperp}{\bvec^\perp}\) \(\newcommand{\xhat}{\widehat{\xvec}}\) \(\newcommand{\vhat}{\widehat{\vvec}}\) \(\newcommand{\uhat}{\widehat{\uvec}}\) \(\newcommand{\what}{\widehat{\wvec}}\) \(\newcommand{\Sighat}{\widehat{\Sigma}}\) \(\newcommand{\lt}{<}\) \(\newcommand{\gt}{>}\) \(\newcommand{\amp}{&}\) \(\definecolor{fillinmathshade}{gray}{0.9}\)Cervical Vertebrae

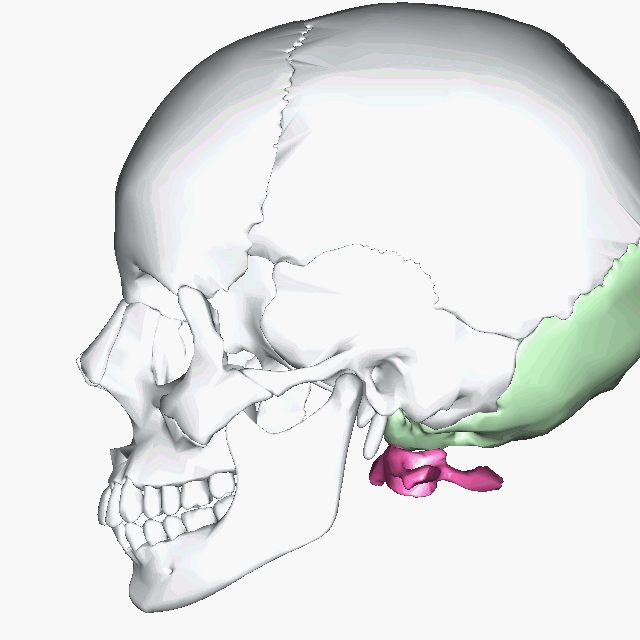
Above: Lateral view of the skull with the occipital bone (and its occipital condyles) colored green and the first cervical vertebra or C1 (articulates with the occipital condyles) colored pink.
There are seven cervical vertebrae (C1 through C7). The skull articulates with C1 via the occipital condyles. The structures of C1 and C2 are distinctive and are covered below. All of the cervical vertebrae are smaller in size compared to thoracic and lumbar vertebrae. The cervical vertebrae are easily distinguished from thoracic and lumbar vertebrae not only by their size, but also because they have foramina in their transverse processes whereas the other vertebrae do not (with the exception of C2). These transverse foramina serve as passages for paired vertebral arteries (right and left) traveling to the head. Additionally, cervical vertebrae are roughly triangle-shaped and C3 through C6 have spinous processes that have two branches (bifurcated). C7 however, has an unbranched spinous process that is so prominent that it can easily be observed and felt through the skin (called vertebra prominens).
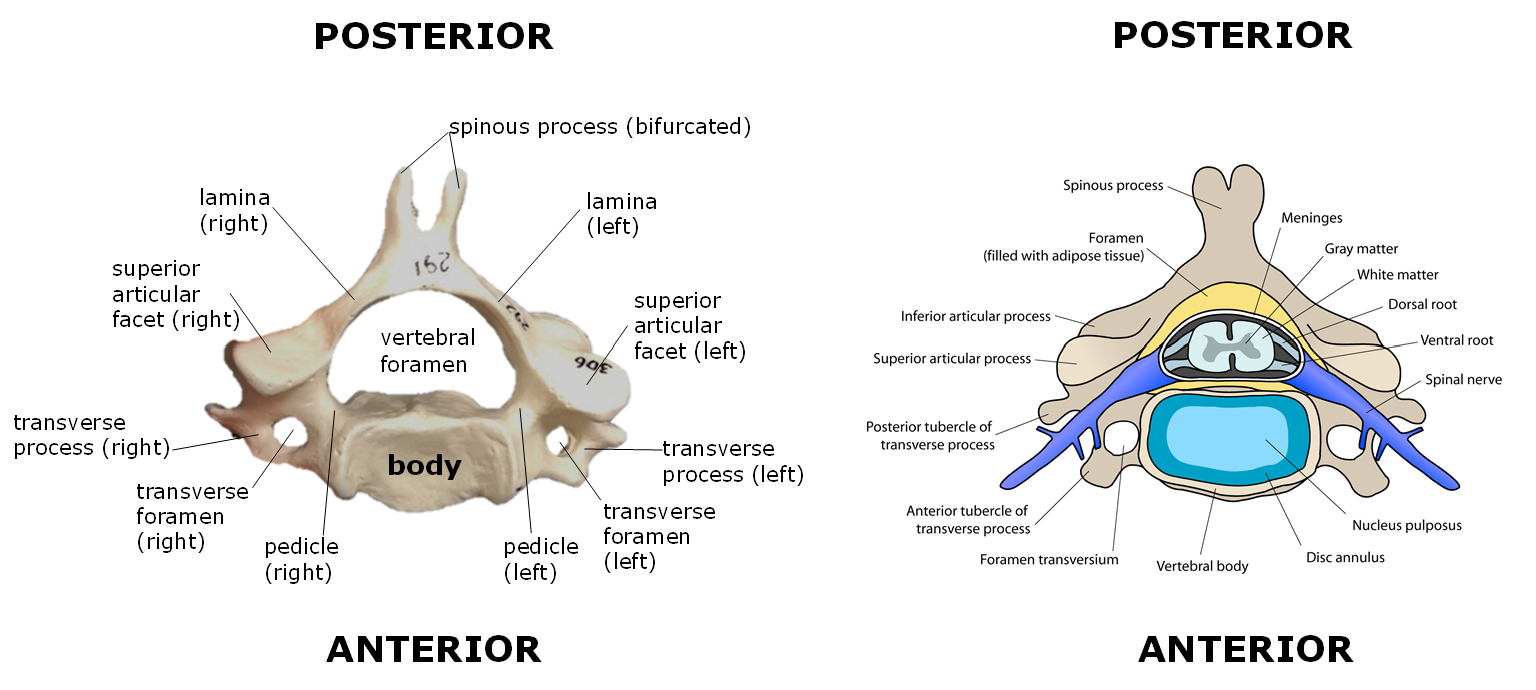
Above: A cervical vertebra, superior view. (Top) Anatomical model of a cervical vertebra. (Bottom) Illustration of a cervical vertebra showing the locations of the spinal cord in the vertebral foramen, spinal nerves, meninges surrounding the spinal cord, and intervertebral disc separating the bodies of articulating vertebrae.
C1 Atlas
The first two cervical vertebrae have alternate names to C1 and C2. C1 is also called the atlas. In Greek mythology, Atlas was a titan who held the entire world on his shoulders. As the first vertebra in the column, atlas in a sense holds up the skull (similar in shape to Atlas holding up the world). The superior articular condyles form a joint (articulation) with the two occipital condyles of the occipital bone of the skull. It is this joint between the skull and C1 that enables an individual to nod their head "yes." Unlike the other vertebrae, C1 has no body and instead of a spinous process, atlas has a small posterior tubercle.
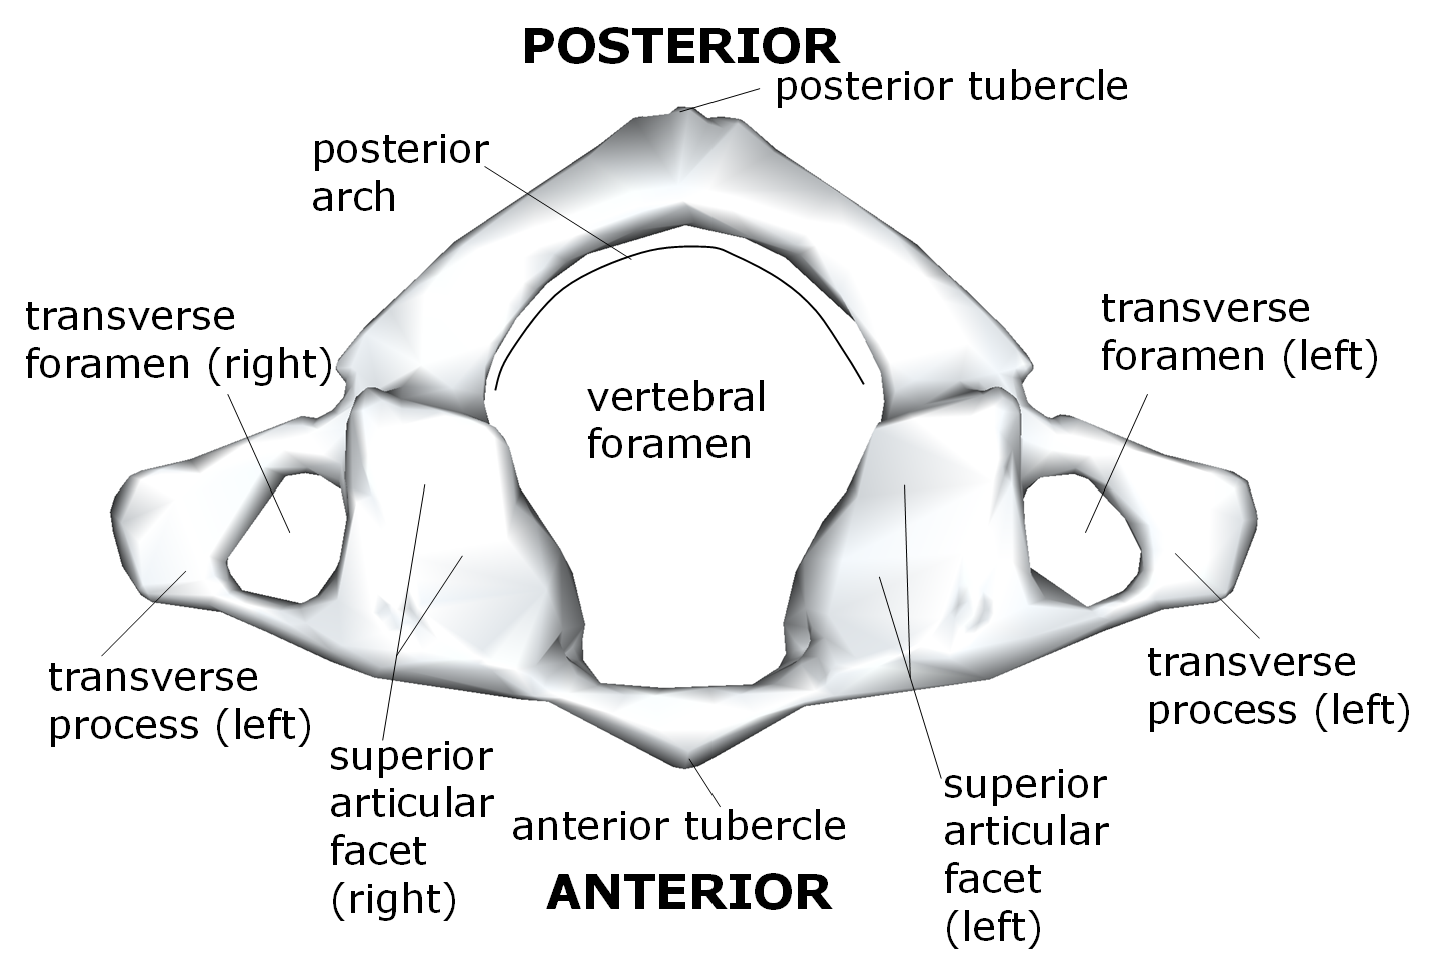
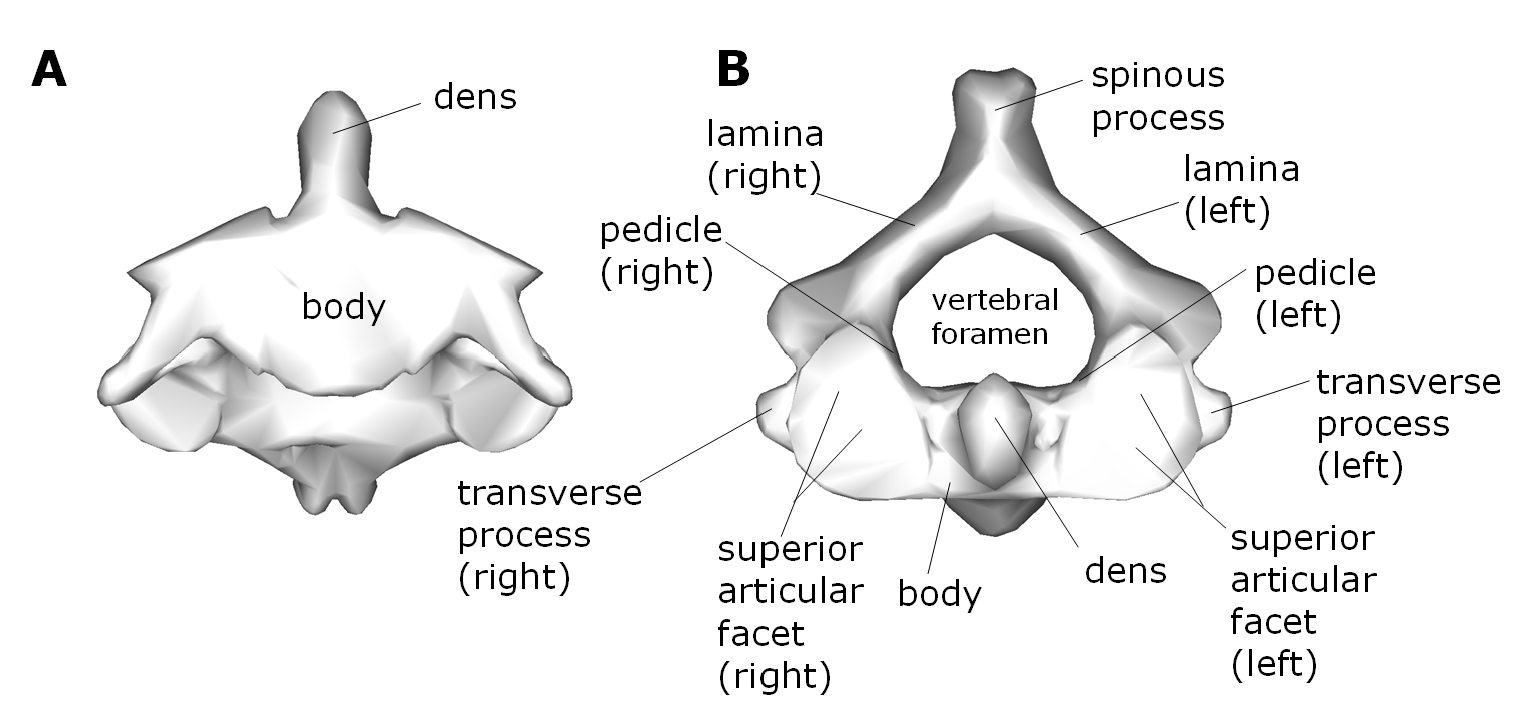
Above: C1, also known as atlas with a superior view.
C2 Axis
C2 is also called axis. Axis allows both the skull and the atlas to rotate, so the head can be turned from side to side by neck muscles. The axis, or C2 vertebra, also has a bulbous vertical process not found in any of the other vertebrae called the dens and it is what allows the axis vertebra (C1) above it to rotate. This rotation made possible with the C1-C2 articulation enables individuals to move their head side to side to shake their head "no."

Above: C2, also known as axis with (A) an anterior view and (B) a posterior view.
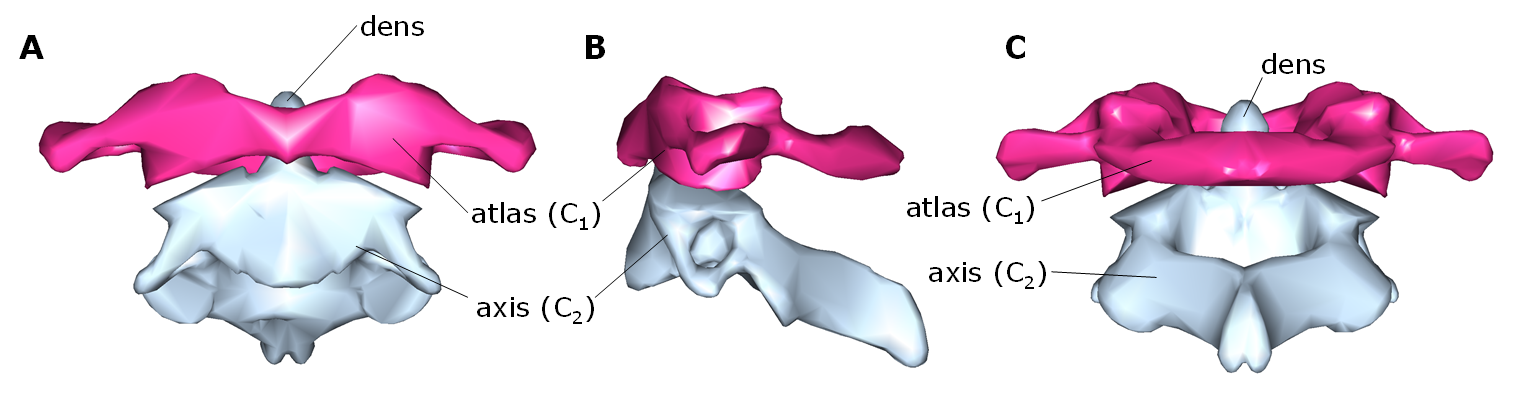
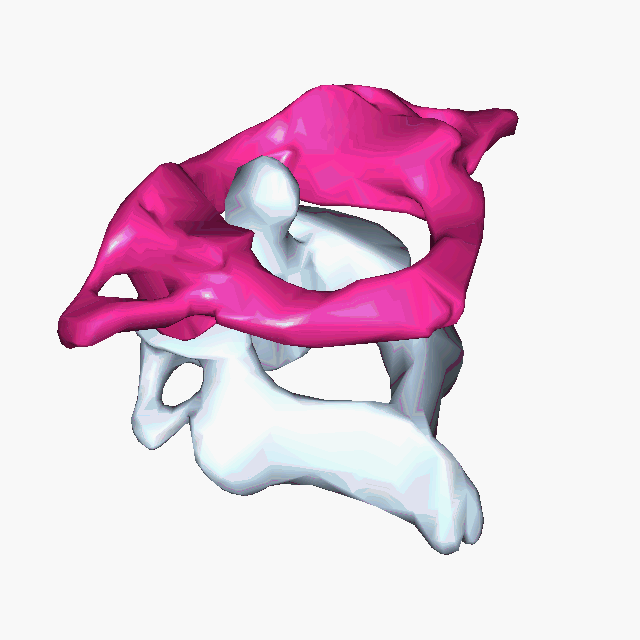
Above: Articulation of atlas (C1) and axis (C2). Atlas is shown in pink and axis is light blue. (A) Anterior view of atlas and axis, (B) lateral view of the left side of atlas and axis, and (C) posterior view of atlas and axis.
Attributions (All Vertebral Column Sections)
- "Anatomy 204L: Laboratory Manual (Second Edition)" by Ethan Snow, University of North Dakota is licensed under CC BY-NC 4.0
- "Anatomy and Physiology" by J. Gordon Betts et al., OpenStax is licensed under CC BY 4.0
- "BIOL 250 Human Anatomy Lab Manual SU 19" by Yancy Aquino, Skyline College is licensed under CC BY-NC-SA 4.0
- "BodyParts3D/Anatomography" by The Database Center for Life Science is licensed under CC BY-SA 2.1
- "Cervical vertebra english.png" by user:debivort is licensed under CC BY-SA 3.0
- "Sacrum - animation02.gif" by BodyParts3D is made by DBCLS is licensed under CC BY-SA 2.1