
Lab 15 Cardiorespiratory System Anatomy-Part 2: Arteries and Veins
- Page ID
- 59160
\( \newcommand{\vecs}[1]{\overset { \scriptstyle \rightharpoonup} {\mathbf{#1}} } \)
\( \newcommand{\vecd}[1]{\overset{-\!-\!\rightharpoonup}{\vphantom{a}\smash {#1}}} \)
\( \newcommand{\id}{\mathrm{id}}\) \( \newcommand{\Span}{\mathrm{span}}\)
( \newcommand{\kernel}{\mathrm{null}\,}\) \( \newcommand{\range}{\mathrm{range}\,}\)
\( \newcommand{\RealPart}{\mathrm{Re}}\) \( \newcommand{\ImaginaryPart}{\mathrm{Im}}\)
\( \newcommand{\Argument}{\mathrm{Arg}}\) \( \newcommand{\norm}[1]{\| #1 \|}\)
\( \newcommand{\inner}[2]{\langle #1, #2 \rangle}\)
\( \newcommand{\Span}{\mathrm{span}}\)
\( \newcommand{\id}{\mathrm{id}}\)
\( \newcommand{\Span}{\mathrm{span}}\)
\( \newcommand{\kernel}{\mathrm{null}\,}\)
\( \newcommand{\range}{\mathrm{range}\,}\)
\( \newcommand{\RealPart}{\mathrm{Re}}\)
\( \newcommand{\ImaginaryPart}{\mathrm{Im}}\)
\( \newcommand{\Argument}{\mathrm{Arg}}\)
\( \newcommand{\norm}[1]{\| #1 \|}\)
\( \newcommand{\inner}[2]{\langle #1, #2 \rangle}\)
\( \newcommand{\Span}{\mathrm{span}}\) \( \newcommand{\AA}{\unicode[.8,0]{x212B}}\)
\( \newcommand{\vectorA}[1]{\vec{#1}} % arrow\)
\( \newcommand{\vectorAt}[1]{\vec{\text{#1}}} % arrow\)
\( \newcommand{\vectorB}[1]{\overset { \scriptstyle \rightharpoonup} {\mathbf{#1}} } \)
\( \newcommand{\vectorC}[1]{\textbf{#1}} \)
\( \newcommand{\vectorD}[1]{\overrightarrow{#1}} \)
\( \newcommand{\vectorDt}[1]{\overrightarrow{\text{#1}}} \)
\( \newcommand{\vectE}[1]{\overset{-\!-\!\rightharpoonup}{\vphantom{a}\smash{\mathbf {#1}}}} \)
\( \newcommand{\vecs}[1]{\overset { \scriptstyle \rightharpoonup} {\mathbf{#1}} } \)
\( \newcommand{\vecd}[1]{\overset{-\!-\!\rightharpoonup}{\vphantom{a}\smash {#1}}} \)
\(\newcommand{\avec}{\mathbf a}\) \(\newcommand{\bvec}{\mathbf b}\) \(\newcommand{\cvec}{\mathbf c}\) \(\newcommand{\dvec}{\mathbf d}\) \(\newcommand{\dtil}{\widetilde{\mathbf d}}\) \(\newcommand{\evec}{\mathbf e}\) \(\newcommand{\fvec}{\mathbf f}\) \(\newcommand{\nvec}{\mathbf n}\) \(\newcommand{\pvec}{\mathbf p}\) \(\newcommand{\qvec}{\mathbf q}\) \(\newcommand{\svec}{\mathbf s}\) \(\newcommand{\tvec}{\mathbf t}\) \(\newcommand{\uvec}{\mathbf u}\) \(\newcommand{\vvec}{\mathbf v}\) \(\newcommand{\wvec}{\mathbf w}\) \(\newcommand{\xvec}{\mathbf x}\) \(\newcommand{\yvec}{\mathbf y}\) \(\newcommand{\zvec}{\mathbf z}\) \(\newcommand{\rvec}{\mathbf r}\) \(\newcommand{\mvec}{\mathbf m}\) \(\newcommand{\zerovec}{\mathbf 0}\) \(\newcommand{\onevec}{\mathbf 1}\) \(\newcommand{\real}{\mathbb R}\) \(\newcommand{\twovec}[2]{\left[\begin{array}{r}#1 \\ #2 \end{array}\right]}\) \(\newcommand{\ctwovec}[2]{\left[\begin{array}{c}#1 \\ #2 \end{array}\right]}\) \(\newcommand{\threevec}[3]{\left[\begin{array}{r}#1 \\ #2 \\ #3 \end{array}\right]}\) \(\newcommand{\cthreevec}[3]{\left[\begin{array}{c}#1 \\ #2 \\ #3 \end{array}\right]}\) \(\newcommand{\fourvec}[4]{\left[\begin{array}{r}#1 \\ #2 \\ #3 \\ #4 \end{array}\right]}\) \(\newcommand{\cfourvec}[4]{\left[\begin{array}{c}#1 \\ #2 \\ #3 \\ #4 \end{array}\right]}\) \(\newcommand{\fivevec}[5]{\left[\begin{array}{r}#1 \\ #2 \\ #3 \\ #4 \\ #5 \\ \end{array}\right]}\) \(\newcommand{\cfivevec}[5]{\left[\begin{array}{c}#1 \\ #2 \\ #3 \\ #4 \\ #5 \\ \end{array}\right]}\) \(\newcommand{\mattwo}[4]{\left[\begin{array}{rr}#1 \amp #2 \\ #3 \amp #4 \\ \end{array}\right]}\) \(\newcommand{\laspan}[1]{\text{Span}\{#1\}}\) \(\newcommand{\bcal}{\cal B}\) \(\newcommand{\ccal}{\cal C}\) \(\newcommand{\scal}{\cal S}\) \(\newcommand{\wcal}{\cal W}\) \(\newcommand{\ecal}{\cal E}\) \(\newcommand{\coords}[2]{\left\{#1\right\}_{#2}}\) \(\newcommand{\gray}[1]{\color{gray}{#1}}\) \(\newcommand{\lgray}[1]{\color{lightgray}{#1}}\) \(\newcommand{\rank}{\operatorname{rank}}\) \(\newcommand{\row}{\text{Row}}\) \(\newcommand{\col}{\text{Col}}\) \(\renewcommand{\row}{\text{Row}}\) \(\newcommand{\nul}{\text{Nul}}\) \(\newcommand{\var}{\text{Var}}\) \(\newcommand{\corr}{\text{corr}}\) \(\newcommand{\len}[1]{\left|#1\right|}\) \(\newcommand{\bbar}{\overline{\bvec}}\) \(\newcommand{\bhat}{\widehat{\bvec}}\) \(\newcommand{\bperp}{\bvec^\perp}\) \(\newcommand{\xhat}{\widehat{\xvec}}\) \(\newcommand{\vhat}{\widehat{\vvec}}\) \(\newcommand{\uhat}{\widehat{\uvec}}\) \(\newcommand{\what}{\widehat{\wvec}}\) \(\newcommand{\Sighat}{\widehat{\Sigma}}\) \(\newcommand{\lt}{<}\) \(\newcommand{\gt}{>}\) \(\newcommand{\amp}{&}\) \(\definecolor{fillinmathshade}{gray}{0.9}\)Objectives:
At the end of this lab, you will be able to…
- Correctly identify and locate the major arteries and veins of the extremities
- Correctly identify and locate the major arteries and veins of the head, neck and thorax.
- Correctly locate peripheral pulse points for determining heart rates and blood pressures.
Pre-Lab Exercise:
After reading through the lab activities prior to lab, complete the following before you start your lab
1. The pulse points in the upper extremity are found on the following arteries: .
2. The pulse points in the lower extremity are found on the following arteries: .
3. When taking a peripheral pulse, you should never use your .
4. Color the images for use as a reference for identifying the models and dissected specimens
Materials:
- Torso Model
- Cardiovascular Models
- Stickers
- Felt Pens
- Colored Pencils
Blood Vessels (Arteries, Veins and Capillaries)
The cardiovascular vessels function as closed tubular network to propel a viscous fluid, blood, throughout the body via a combination of positive and negative propulsive pressures in the arteries and veins, respectively. Movement of blood within the vessels is based on the principle of bulk flow (where all materials within a solution will move as one unit), through two distinct closed loops (pulmonary and systemic). Where the pulmonary loop involves the exchange of materials at the lungs with the environment and the systemic loop involves exchange of materials with the tissues and cells of the body. The flow of blood through the heart flows atrium to ventricle with systemic flow of the blood moving from left ventricle to right atrium while pulmonary flow of blood is moving from right ventricle to left atrium. When we discuss the vessels as being arteries (blood moving away from the heart) and veins (blood moving back to the heart) between these vessels are elaborate networks of smaller vessels contained in the tissues and organs of the bodies, arterioles and venuoles, that are linked with even more elaborate networks of even smaller vessels, capillaries. While gases and materials easily diffuse from the blood the surrounding tissues, within the tissues of the lumen there is very poor exchange. This leads to the development of a cyanotic hue (blue color) of the vessels and gives the misconception that blood may be blue, when in fact blood is red.
The artery and vein are lumen organs comprised of three major tissue layers that function to provide the pressures necessary to move fluid throughout the vessels. These tissues are identified as tunicas and are named based on the relationship of the tissue to the lumen center. With tunica interna (intima) being the closest to the lumen and tunica externa (adventitia) being the furthest and between the two extremes the tunica media. The amount of tunicas and tissues within each tunica will vary based on the type of vessel (artery, arteriole, venuoles, vein or capillary). Each tunica is comprised of different types of tissue that indicate the function that the layer has to the overall function of the vessel. Tunica intima is principally comprised of endothelial tissue, squamous epithelium, running continuously from the endothelial tissue of the endocardium of the heart. Within the artery the tunica intima will have the same folded (ridged) structures that we find in all organs that change their internal volume that allows the artery to change its diameter as the volume of fluid moving through the lumen changes. While the intima of the vein is relatively smooth indicating that the volume of fluid within the lumen remains relatively stable. Surrounding the intima is normally a layer of elastic connective tissue that is continuous with basal membrane to the endothelium of the intima. It is the intima and the elastic connective tissue surrounding it limit the rate of movement of materials from the blood into the tissues of the lumen. Superficial to the elastic tissue is the tunica media, larger in the artery than the vein and larger in the muscular artery than the elastic artery. This is a smooth muscle and connective tissue layer that displays the greatest variation among all of the vessels and serves to actively regulate the diameter of lumen, primarily in the arteries. The outer most, tunica adventitia, consists of elastic and collagen fibers and serves to regulate the overall diameter that the vessel can have, regulating the compliance, and anchors the vessels to surrounding tissues.
Activity 1: Arteries and Veins of the Upper and Lower Extremities
Procedures:
1. Obtain models, stickers, felt pens
2. Write names of vessels of the upper extremity that you are responsible for knowing and identifying on the stickers
Brachial Artery, Basilic Vein, Cephalic Vein, Subclavian Artery, Subclavian Vein, Antecubital Vein, Radial Artery, Ulnar Artery, Radial Vein, Ulnar Vein, Femoral Artery, Femoral Vein, Greater Saphenous Vein, Small Saphenous Vein, Posterior Tibial Artery, Dorsal Pedal Arch (Pedal Artery)
3. Select a “team leader” and use the colored images and reference materials to take turns labeling the model
a. As structures are labeled, indicate if it can be used to obtain a peripheral pulse or not.
4. Have your instructor check your progress and move to activity two.
|
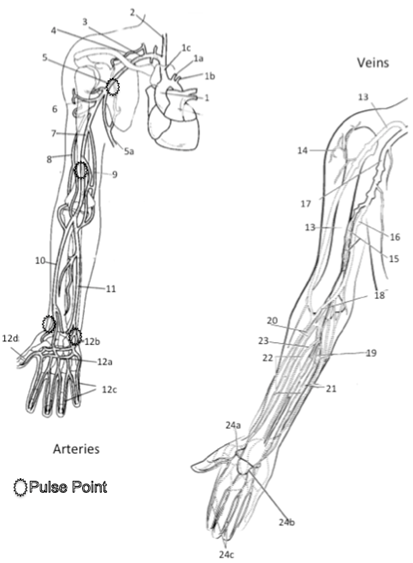
Major Arteries and Veins of the Upper Extremity 1 Aorta 1a Left Common Carotid Artery* 1b Left Subclavian Artery 1c Right Brachiocephalic Artery (Trunk) 2 Right Common Carotid Artery* 3 Right Subclavian Artery 4 Artery to Supraspinatus 5 Axillary Artery* 5a Lateral Thoracic Artery 6 Humeral Circumflex Artery 7 Brachial Artery* 8 Deep Brachial Artery 9 Nutrient Artery to Humerus 10 Radial Artery* 11 Ulnar Artery* 12a Deep Palmar Arch Artery 12b Superficial Palmar Arch Artery 12c Digital Artery 12d Principia Polis Artery 13 Cephalic Vein 14 Deltoid Vein 15 Brachial Vein 16 Basilic Vein 17 Axillary Vein 18 Antecubital Vein 19 Medial Median Antebrachial Vein 20 Radial Vein 21Ulnar Vein 22 Middle Median Antebrachial Vein 23 Lateral Median Antebrachial Vein 24a Deep Venal Ach 24b Superficial Dorsal Venal Arch 24c Digital Veins Color each structure, tissue or organ with a different color to assist with identification
|
|
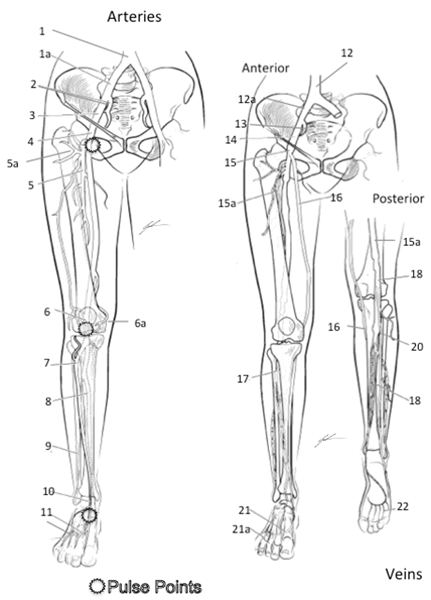
Major Arteries and Veins of the Lower Extremity 1 Common Iliac Artery 2 Internal Iliac Artery 3 External Iliac Artery 4 Femoral Artery* 5 Deep Femoral Artery 5a Femoral Circumflex Artery (to head of Femur) 6 Popliteal Artery* (on posterior side) 6a Geniculate Artery 7 Anterior Tibial Artery 8 Posterior Tibial Artery* 9 Peroneal Artery 10 Dorsalis Pedis Artery* 11 Dorsal Metatarsal Artery 12 Inferior Vena Cava 12a Common Iliac Vein 13 Internal Iliac Vein 14 External Iliac Vein 15 Femoral Vein 15a Deep Femoral Vein 16 Great Saphenous 17 Anterior Tibial 18 Popliteal 19 Smaller Saphenous 20 Posterior Tibial 21 Dorsal Venal Arch 21a Digital Veins 22 Plantar Venal Arch
Color each structure, tissue or organ with a different color to assist with identification |
Activity 2: Major Arteries and Veins of the Head, Neck and Thorax
Procedures:
1. Obtain models, stickers, felt pens
2. Write names of arteries and veins that you are responsible for knowing and identifying on the stickers
Aorta, Vena Cava, Common Carotid, Internal Jugular, External Jugular, Renal Artery, Renal Vein, Hepatic Portal Vein
|
Arteries and Veins of the Neck, Abdomen and Thorax 1 Aorta 1a Aortic Arch 1b Coronary Arteries 1c Brachiocephalic Artery (Trunk) 2a Left Common Carotid Artery* 2b Right Common Carotid Arter 2c Internal Carotid Artery 2d External Carotid* 3a Left Subclavian Artery 3b Right Subclavian Artery 4 Intercostal Arteries 5 Celiac Trunk 5a Left Gastric Artery 5b Splenic Artery 5c Hepatic Artery 6 Renal Artery 7 Gonadal Artery 8a Superior Mesenteric Artery 8b Inferior Mesenteric Artery 9 Common Iliac Artery 9a Internal Iliac Artery 9b External Iliac Artery 10 Superior Vena Cava 11a Right Brachiocephalic Vein 11b Left Brachiocephalic Vein 12a Internal Jugular Vein 12b External Jugular Vein 13a Hemiazygos Vein 13b Azygos Vein 14 Intercostal Veins 15 Inferior Vena Cava 16 Hepatic Portal Vein 16a Hepatic Vein 17 Splenic Vein 18a Gastric Vein 18b Gastroepiploic Vein 19 Renal Vein 20 Gonadal Vein 21a Superior Mesenteric Vein 21b Inferior Mesenteric Vein 21c Colonic Vein 22 Common Iliac Vein 22a External Iliac Vein Color each structure, tissue or organ with a different color to assist with identification |

3. Select a “team leader” and use the colored images and reference materials to take turns labeling the model
a. As structures are labeled, indicate if the artery can be used of a peripheral pulse or not.
4. Have your instructor check your progress and move to activity three.
Activity 3: Determining Peripheral Pulse Points
Procedures:
1. Using the reference image for pulse points, find 5 different pulse points on yourself
2. Palpating the Radial artery, determine your pulse rate using a 15-second count
1. Set a timer for 15-seconds and hold the stopwatch/timer in your left hand
2. Find and press onto the left Radial artery with your index and middle finger of the right hand
3. Once you have found the pulse, use your left hand to start the stopwatch timer for 15-seconds and begin counting each pulse until the timer stops
4. Once the timer stops record the count
5. Multiple by 4
6. Pulse Rate= beats/min
Activity 4: Blood Typing and Transfusion
Blood cells are examined based on the ABO system used to identify blood types. The idea of the ABO system is used to reference the presence or absence of distinct antigens on the erythrocyte. Which is very valuable method of identification for antigen compatibility necessary for medical transfusions. The ABO blood type system is developed to identify which antigen version you have, or do not have, and the associated antibody. The associated antibody is to the erythrocyte antigen that you are lacking, and incorrect transfusion of blood type can lead to agglutination reactions between the antigen and the antibody. The establishment of the blood types comes from the research of Karl Landsteiner that revolved around issues of immune reactions of donors of blood transfusions to the donated blood. In which, Landsteiner established a system of four major blood types (A, B, AB, and O) based on the premise that individuals of various blood types exhibit distinct antigen markers (A or B) that will interact with antibody proteins (IgM) for that distinct antigen (anti-A or anti-B). From this line of research, it was surmised that individuals for a distinct blood type would have the antigen for that blood type and an antibody for opposite blood type, table 1. What is interesting is that the genetics of the blood types and human evolution have led to population demographics based on blood types, Table 2.
Table 1. The summary of ABO Blood Type Groups based on presence of antigens and circulating antibodies.
|
Blood Type |
Antigen |
Circulating Antibody |
|
A |
A antigen |
Anti-B |
|
B |
B antigen |
Anti-A |
|
AB |
A and B antigens |
NONE |
|
O |
Non-A antigen, Non-B antigen |
Anti-A and Anti-B |
Table 2. Summary of blood type percentages within the population of the United States and by demographic group. Source American Red Cross, 2018.
|
Blood Type |
Entire Population |
Caucasian |
African American |
Hispanic |
Asian |
|
O+ |
37.4% |
37% |
47% |
53% |
39% |
|
O- |
6.6% |
8% |
4% |
4% |
1% |
|
A+ |
35.7% |
33% |
24% |
29% |
27% |
|
A- |
6.3% |
7% |
2% |
2% |
0.5% |
|
B+ |
8.5% |
9% |
18% |
9% |
25% |
|
B- |
1.5% |
2% |
1% |
1% |
0.4% |
|
AB+ |
3.4% |
3% |
4% |
2% |
7% |
|
AB- |
.6% |
1% |
0.3% |
0.2% |
0.1% |
Knowing the antigen and circulating antibody for an individual is essential for transfusions and emergency, or operative, care. Based on the antigen and circulating antibody, safe transfusions can only occur when there is a non-binding match between the individual’s circulating antibody and the blood that is transfused. As such, a person with type AB blood is able to receive blood for any other person, while type O blood is able to donate to every person.
There is a secondary antigen marker that was discovered following the work of Landsteiner that led to the establishment of the Rh-factor in blood typing. The Rh antigen is a relatively weak antigen marker and will seldom induce an immune response that is seen with other erythrocyte antigens. Unlike the major blood types with only three distinct antigen markers, there have been over 49 distinct antigen markers of the Rh factor. The indication of presence, or absence, of one Rh factor none to induce a stronger antibody match on blood gives the us the blood typing designation of “+” (presence) or “-“ (absence) of this antigen, the D antigen.
Given the three major antigen markers and one strong Rh factor, we are able to develop a table of blood transfusion compatibility that is used when collecting and distributing donated blood to individuals, table 3. From this table, we are able to determine the likelihood of mismatch immune reactions due to blood type incompatibility. Another issue of incompatibility that can arise is the Rh incompatibility between a pregnant female and the fetus, erythroblastosis fetalis. An issue that occurs when an Rh- female is pregnant with an Rh+ fetus leading to immune sensitivity to the D antigen and production of anti-D IgM. Subsequent pregnancies with Rh+ fetuses can lead to immune reactions and necessitates treatment to sequester the pregnant female’s immune response.
Table 3. Summary of compatibility of blood types between donor and recipient. Note that N indicates mismatch and possible immune response, while C indicates no mismatch and compatible blood type
|
Donor’s Blood Type |
|||||||||
|
Recipient’s |
O+ |
O- |
A+ |
A- |
B+ |
B- |
AB+ |
AB- |
|
|
O+ |
C |
C |
N |
N |
N |
N |
N |
N |
|
|
O- |
N |
C |
N |
N |
N |
N |
N |
N |
|
|
A+ |
C |
C |
C |
C |
N |
N |
N |
N |
|
|
A- |
N |
C |
N |
C |
N |
N |
N |
N |
|
|
B+ |
C |
C |
N |
N |
C |
C |
N |
N |
|
|
B- |
N |
C |
N |
N |
N |
C |
N |
N |
|
|
AB+ |
C |
C |
C |
C |
C |
C |
C |
C |
|
|
AB- |
N |
C |
N |
C |
N |
C |
N |
C |
|
Understanding of the blood types and blood compatibility is essential to modern health care. This lab will examine the responses of your own blood to the three distinct antibody proteins (anti-A, anti-B and anti-D) that will thus allow you to determine your own blood type.
Materials and Methods:
Materials
- Paper towel
- Blood Test Card
- Lancet
- Alcohol Swab
- Release Form
- Anti-sera (anti-A, anti-B, anti-D)
- Toothpicks
- Band-Aid
Methods
1. Obtain release form from instructor and consent to participation in the study
2. Obtain lancet, alcohol swab, blood card, toothpicks from designated area
3. Place lancet, toothpicks and blood card on paper towel at your lab station
4. Glove your dominant hand with disposable medical examination glove
5. Scrub tip of middle or ring fingertip on non-dominant hand with the alcohol swab
6. Remove the sterile lancet from its wrapper and firmly press onto the freshly cleaned fingertip about 1 cm from the distal edge of the digit.
7. Gently squeeze the sides of the finger that was just lanced forcing a small droplet of blood to the surface, place the droplet of blood coming to the surface on to the most left region marked “BLOOD” on the Blood Test Card.
8. Repeat step 6 for the remaining two “BLOOD” regions on the Blood Test Card.
9. Clean finger with alcohol swab and place Band-Aid over the lanced region of the fingertip.
10. Place bloody materials into the biohazard bag and the lancet into the sharps container
11. Place a drop of anti-A into ring indicated as “anti-A” and a drop of anti-B into the ring indicated “anti-B”.
12. Following the anti-A and anti-B, place a drop of anti-Rh into the ring indicated as “anti-D”
13. Using the coloring matching toothpick mix the blood droplet with the anti-sera droplet, stirring the two droplets until the mixture covers both circles in each region of the blood card.
14. Dispose of toothpicks into the biohazard bag
15. Gently rock the Blood Test Card in gloved hand for 1-minute (be careful not to mix blood from different regions of the card), allowing the blood and the anti-sera to continue to interact.
16. Tilt the card slightly allowing the blood and anti-sera to drain towards one side (but kept in the appropriate regions of the card) and examine appearance of mixture (compare to reference image and summary in table 4).
a. If granular film as developed within the mixture, agglutination has occurred and serves as indication for having that type of antigen on your erythrocytes.
b. If a uniform film, with no granulations occur, appears then there is no agglutination and therefore that antigen is not present on your erythrocytes.
c. Record results in data table
Table 4. Agglutination responses based on blood type
|
Blood Type |
Anti-A Reaction |
Anti-B Reaction |
Anti-Rh Reaction |
|
O+ |
No reaction |
No Reaction |
Agglutination |
|
O- |
No reaction |
No reaction |
No reaction |
|
A+ |
Agglutination |
No reaction |
Agglutination |
|
A- |
Agglutination |
No reaction |
No reaction |
|
B+ |
No reaction |
Agglutination |
Agglutination |
|
B- |
No reaction |
Agglutination |
No reaction |
|
AB+ |
Agglutination |
Agglutination |
Agglutination |
|
AB- |
Agglutination |
Agglutination |
No reaction |
17. Wait 4-minutes and repeat step 16 for reading the Rh only (as the reaction can take up to 5-minutes)
a. Record results in data table
18. Tabulate your blood type in group data table (use the Google Doc link) and compare your group’s results to the population norms for your group.
Results
Agglutination in:
Anti-A:
Anti-B:
Anti-Rh:
Blood Type:
Within your group discuss which blood type could you always transfuse? What happened if the wrong type was used? Why would it be important to know your blood type or a patient's blood type?