
5: Biochemistry and Macromolecules
- Page ID
- 138330
\( \newcommand{\vecs}[1]{\overset { \scriptstyle \rightharpoonup} {\mathbf{#1}} } \)
\( \newcommand{\vecd}[1]{\overset{-\!-\!\rightharpoonup}{\vphantom{a}\smash {#1}}} \)
\( \newcommand{\dsum}{\displaystyle\sum\limits} \)
\( \newcommand{\dint}{\displaystyle\int\limits} \)
\( \newcommand{\dlim}{\displaystyle\lim\limits} \)
\( \newcommand{\id}{\mathrm{id}}\) \( \newcommand{\Span}{\mathrm{span}}\)
( \newcommand{\kernel}{\mathrm{null}\,}\) \( \newcommand{\range}{\mathrm{range}\,}\)
\( \newcommand{\RealPart}{\mathrm{Re}}\) \( \newcommand{\ImaginaryPart}{\mathrm{Im}}\)
\( \newcommand{\Argument}{\mathrm{Arg}}\) \( \newcommand{\norm}[1]{\| #1 \|}\)
\( \newcommand{\inner}[2]{\langle #1, #2 \rangle}\)
\( \newcommand{\Span}{\mathrm{span}}\)
\( \newcommand{\id}{\mathrm{id}}\)
\( \newcommand{\Span}{\mathrm{span}}\)
\( \newcommand{\kernel}{\mathrm{null}\,}\)
\( \newcommand{\range}{\mathrm{range}\,}\)
\( \newcommand{\RealPart}{\mathrm{Re}}\)
\( \newcommand{\ImaginaryPart}{\mathrm{Im}}\)
\( \newcommand{\Argument}{\mathrm{Arg}}\)
\( \newcommand{\norm}[1]{\| #1 \|}\)
\( \newcommand{\inner}[2]{\langle #1, #2 \rangle}\)
\( \newcommand{\Span}{\mathrm{span}}\) \( \newcommand{\AA}{\unicode[.8,0]{x212B}}\)
\( \newcommand{\vectorA}[1]{\vec{#1}} % arrow\)
\( \newcommand{\vectorAt}[1]{\vec{\text{#1}}} % arrow\)
\( \newcommand{\vectorB}[1]{\overset { \scriptstyle \rightharpoonup} {\mathbf{#1}} } \)
\( \newcommand{\vectorC}[1]{\textbf{#1}} \)
\( \newcommand{\vectorD}[1]{\overrightarrow{#1}} \)
\( \newcommand{\vectorDt}[1]{\overrightarrow{\text{#1}}} \)
\( \newcommand{\vectE}[1]{\overset{-\!-\!\rightharpoonup}{\vphantom{a}\smash{\mathbf {#1}}}} \)
\( \newcommand{\vecs}[1]{\overset { \scriptstyle \rightharpoonup} {\mathbf{#1}} } \)
\(\newcommand{\longvect}{\overrightarrow}\)
\( \newcommand{\vecd}[1]{\overset{-\!-\!\rightharpoonup}{\vphantom{a}\smash {#1}}} \)
\(\newcommand{\avec}{\mathbf a}\) \(\newcommand{\bvec}{\mathbf b}\) \(\newcommand{\cvec}{\mathbf c}\) \(\newcommand{\dvec}{\mathbf d}\) \(\newcommand{\dtil}{\widetilde{\mathbf d}}\) \(\newcommand{\evec}{\mathbf e}\) \(\newcommand{\fvec}{\mathbf f}\) \(\newcommand{\nvec}{\mathbf n}\) \(\newcommand{\pvec}{\mathbf p}\) \(\newcommand{\qvec}{\mathbf q}\) \(\newcommand{\svec}{\mathbf s}\) \(\newcommand{\tvec}{\mathbf t}\) \(\newcommand{\uvec}{\mathbf u}\) \(\newcommand{\vvec}{\mathbf v}\) \(\newcommand{\wvec}{\mathbf w}\) \(\newcommand{\xvec}{\mathbf x}\) \(\newcommand{\yvec}{\mathbf y}\) \(\newcommand{\zvec}{\mathbf z}\) \(\newcommand{\rvec}{\mathbf r}\) \(\newcommand{\mvec}{\mathbf m}\) \(\newcommand{\zerovec}{\mathbf 0}\) \(\newcommand{\onevec}{\mathbf 1}\) \(\newcommand{\real}{\mathbb R}\) \(\newcommand{\twovec}[2]{\left[\begin{array}{r}#1 \\ #2 \end{array}\right]}\) \(\newcommand{\ctwovec}[2]{\left[\begin{array}{c}#1 \\ #2 \end{array}\right]}\) \(\newcommand{\threevec}[3]{\left[\begin{array}{r}#1 \\ #2 \\ #3 \end{array}\right]}\) \(\newcommand{\cthreevec}[3]{\left[\begin{array}{c}#1 \\ #2 \\ #3 \end{array}\right]}\) \(\newcommand{\fourvec}[4]{\left[\begin{array}{r}#1 \\ #2 \\ #3 \\ #4 \end{array}\right]}\) \(\newcommand{\cfourvec}[4]{\left[\begin{array}{c}#1 \\ #2 \\ #3 \\ #4 \end{array}\right]}\) \(\newcommand{\fivevec}[5]{\left[\begin{array}{r}#1 \\ #2 \\ #3 \\ #4 \\ #5 \\ \end{array}\right]}\) \(\newcommand{\cfivevec}[5]{\left[\begin{array}{c}#1 \\ #2 \\ #3 \\ #4 \\ #5 \\ \end{array}\right]}\) \(\newcommand{\mattwo}[4]{\left[\begin{array}{rr}#1 \amp #2 \\ #3 \amp #4 \\ \end{array}\right]}\) \(\newcommand{\laspan}[1]{\text{Span}\{#1\}}\) \(\newcommand{\bcal}{\cal B}\) \(\newcommand{\ccal}{\cal C}\) \(\newcommand{\scal}{\cal S}\) \(\newcommand{\wcal}{\cal W}\) \(\newcommand{\ecal}{\cal E}\) \(\newcommand{\coords}[2]{\left\{#1\right\}_{#2}}\) \(\newcommand{\gray}[1]{\color{gray}{#1}}\) \(\newcommand{\lgray}[1]{\color{lightgray}{#1}}\) \(\newcommand{\rank}{\operatorname{rank}}\) \(\newcommand{\row}{\text{Row}}\) \(\newcommand{\col}{\text{Col}}\) \(\renewcommand{\row}{\text{Row}}\) \(\newcommand{\nul}{\text{Nul}}\) \(\newcommand{\var}{\text{Var}}\) \(\newcommand{\corr}{\text{corr}}\) \(\newcommand{\len}[1]{\left|#1\right|}\) \(\newcommand{\bbar}{\overline{\bvec}}\) \(\newcommand{\bhat}{\widehat{\bvec}}\) \(\newcommand{\bperp}{\bvec^\perp}\) \(\newcommand{\xhat}{\widehat{\xvec}}\) \(\newcommand{\vhat}{\widehat{\vvec}}\) \(\newcommand{\uhat}{\widehat{\uvec}}\) \(\newcommand{\what}{\widehat{\wvec}}\) \(\newcommand{\Sighat}{\widehat{\Sigma}}\) \(\newcommand{\lt}{<}\) \(\newcommand{\gt}{>}\) \(\newcommand{\amp}{&}\) \(\definecolor{fillinmathshade}{gray}{0.9}\)In this experiment, you will test common food items for the presence of each of the major macromolecules.
At the completion of this lab, students will be able to:
Content:
- Define macromolecule, carbohydrate, monosaccharide, disaccharide, polysaccharide, lipid, protein, and amino acid
- Describe the basic structures of carbohydrates, lipids, and proteins
- Recognize and correctly analyze positive and negative tests for carbohydrates, lipids, and proteins
- Test substances to determine the presence of biologically important molecules
Physical Skills:
- Use serological and micropipettes accurately
Scientific Communication Skills:
- Design a controlled experiment
Introduction
Biochemistry is the study of all of the chemicals and chemical processes that occur in living organisms. Although there are virtually thousands of chemicals in a living cell, the vast majority of these chemicals are organic, or carbon-based, molecules termed macromolecules. Macromolecules can be divided into four main groups: carbohydrates (sugars), proteins (amino acids), lipids (fats, oils, sterols, phospholipids, and waxes), and nucleic acids (DNA and RNA). Most macromolecules consist of smaller units (monomers) that can be covalently bonded together to create larger molecules (polymers). Although all of these organic molecules are, for the most part, composed of the same elements (carbon, hydrogen, and oxygen), they all have distinctly different chemical and physical properties. The unique properties of any class of organic compounds can be attributed to its “functional groups”.
A functional group is part of a larger molecule; it is composed of an atom or a group of atoms that have a characteristic chemical behavior. A functional group can be as simple as a carbon-carbon double bond which occurs in many lipids such as those that make up the cell membrane, or as complicated as a carboxylic acid (a carbon double bonded to a single oxygen and single bonded to an OH group). The OH group itself is a functional group, it is an alcohol and is often referred to as a hydroxyl group. See Figure 4 for the structures of these molecules.

Figure 1: Composition of Organic Compounds. Carbohydrates are built from the monosaccharide glucose attached by glycosidic bonds to make a polysaccharide. Proteins are made by connecting amino acids together with peptide bonds. Lipids can have many structures, one of which is a phospholipid that has a polar head and hydrophobic fatty acid tails. Nucleic acids (DNA and RNA) are assembled from individual nucleotides attached by phosphodiester bonds.
In these experiments, you will learn how to identify lipids, carbohydrates, and proteins using various test reagents that recognize the unique functional groups (or lack of functional groups) on these three different types of organic compounds.
Nutrient and Growth Requirements for Bacteria
In our research project for the semester, we will grow bacteria In the lab. Bacteria grow on solid petri plates which serve as their food source. These petri plates contain mixes of essential nutrients suspended in water with a solidifying agent (agar or gelatin) added to the nutrients to make it solid.
Media ingredients range from dehydrated extracts of plant, animal, or fungal material to synthetically derived compounds. Each type of media contains different nutrients. Over the years, microbiologists have developed standard media mixtures.
Additionally, other physical parameters such as light exposure, temperature, and tonicity can drastically affect the composition of microbes that grow on plates. The composition and concentration of ions and molecules in a bacterium’s environment not only influence their nutrition but also the overall stability of their cells. A medium with inadequate electrolytes may represent a hypotonic environment that will cause cells to swell up and burst. Conversely, a hypertonic medium with an excessively high concentration of solutes may cause cells to shrivel and die. Similarly, many bacteria cannot survive outside a relatively narrow pH range.
In our experiment today, we will be analyzing a few different types of media to determine the types of nutrients and macromolecules present in the bacterial growth media. As a comparison, we will use some human foods for controls.
Protocols
Carbohydrates function as the primary source of energy for living organisms and also serve to provide structural support. Remember, the monomer of a carbohydrate is a monosaccharide which consists of a single sugar molecule, while a polysaccharide consists of many sugar molecules covalently linked together. Some common monosaccharides include glucose, fructose, and galactose. Some common polysaccharides are starch and glycogen, which are used for carbohydrate storage in plant and animal cells, respectively. Additionally, cellulose and chitin are polysaccharides used for structural support in plant and animal cells.
The test reagents or chemicals used to identify carbohydrates are Benedict’s reagent (recognizes monosaccharides) and Lugol’s reagent (recognizes the polysaccharide starch). Benedict’s reagent reacts with hydroxyl groups (-OH) of glucose and fructose. In the presence of heat, Benedict's reagent reacts with the OH group on monosaccharides and causes a color change.
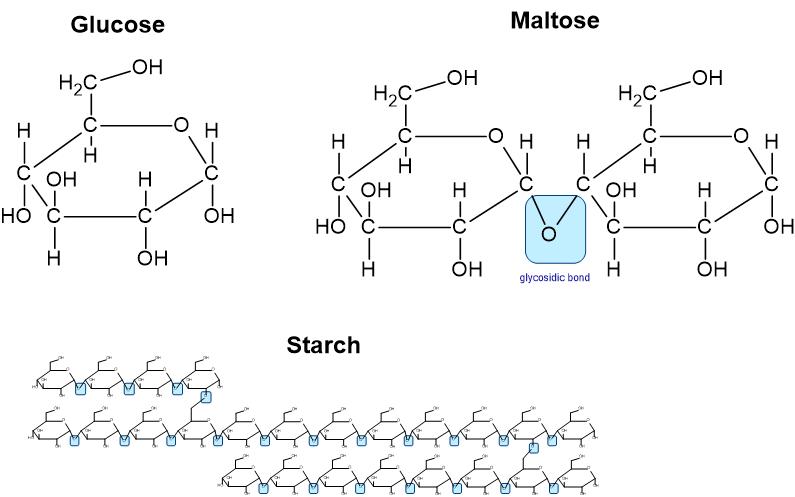
Figure 2: Molecular structure of the carbohydrates used in this experiment
The color results for the Benedict’s Test are the following:
| Color | Meaning |
|---|---|
| Blue | no monosaccharides |
| Green/Brown | some monosaccharides |
| Yellow/Red | large amounts of monosaccharides |
In contrast to Benedict’s solution, Lugol’s solution does not recognize a specific functional group, but rather, it binds to the three-dimensional helical structure of starch that forms when the glucose molecules are assembled into a single polysaccharide.
| Color | Meaning |
|---|---|
| Brownish yellow | no starch |
| Dark blue / black | starch present |
- glass test tubes
- Benedicts Reagent
- Iodine
- pipettes and tips
- water bath and hot plate
- agar plates
- soil sample
- knife or scalpel
- food samples
Protocol 1A: Benedicts Test for Monosaccharides
- Fill a 100ml beaker about half full with tap water, place on the hot plate and let it come to a boil. Once it comes to a boil reduce the heat and let simmer.
- Number the test tubes 1B -10B (B is for Benedict’s)
- Label each agar plate clearly with the type of media present in the plate. All of the media can look similar, so be sure that you can tell one from the next.
- Using a knife or scalpel, slice each plate into 6 slices.
- Arrange test tubes 1B-10B in the front row of your test tube rack. These will be tested with Benedict’s.
- For each test tube add 1 ml of the sample to be tested or one slice of the agar plate. You should select these samples based on the ones provided. Ensure that you have included a negative control, a positive control, each of the agar plates, the soil and 2-3 samples that interest you.
- Record your sample selections on your lab handout.
- Place 2ml of Benedict’s solution in the appropriate test tubes. Place in the simmering water for 3-5 minutes and then remove.
-
Record the colors before and after on your lab handout
-
Protocol 1B: Lugols Test for Starch (you'll do this at home)
- Place 10 samples on a plate or other surface (I don't recommend paper).
- Take a photo of these samples and record their appearance
- Add one drop of the Lugol's Iodine reagent to each samples (heating is not necessary!)
- Take another photo.
- Record the colors and results on your lab handout.
Proteins consist of long chains of monomers called amino acids that are linked to one another by covalent bonds termed peptide bonds. There are twenty types of amino acids used to manufacture proteins. All of the amino acids are exactly the same with the exception of the “R” group, or side chain, that is attached to the central carbon. Therefore, it is the R-group that distinguishes one amino acid from another (Figure 3).
Figure 3: Proteins are formed by connecting two amino acids by a peptide bond using a dehydration synthesis reaction. From OpenStax Biology 2e
The R-group can be as simple as a single hydrogen atom (H, as is the case with glycine) or a very large organic subunit (as is the case with tryptophan). Polypeptide chains are folded into very specific 3D structures that allow the resulting protein to perform specific functions. One example of a protein is an enzymes which is important for the running of chemical reactions in living organisms.
In this experiment, you will use the Biuret reagent to detect the presence of proteins. This reagent works due to the binding of the copper in the reagent to the amino group (–NH2) of the protein.
| Color | Meaning |
|---|---|
| Blue / no color change | no protein |
| Lilac | protein present |
- glass test tubes
- NAOH
- Buiret's Reagent
- pipettes and tips
- agar plates
- soil sample
- knife or scalpel
- food samples
Protocol 2: Buiret's Test for Protein
- Number the test tubes 1P-10P with a Sharpie.
- For each test tube add 4.5 ml of the sample to be tested or two slices of the agar plate. As you select your samples, ensure that you have included a negative control, a positive control, each of the agar plates, the soil and 2-3 samples that interest you. Besides the agar and the soil, I recommend testing different samples from the earlier Benedict’s and Lugols, but this is your choice.
- Record your sample selections on your lab handout.
- Carefully add 3ml of sodium hydroxide (NaOH) to each of the tubes and mix.
- Add 150 µl of 1% copper sulfate solution (CuSO4 ) to each of the tubes and carefully mix.
- The change in color from clear to a pale violet indicates the presence of proteins.
- Record the colors and results on your lab handout.
Protocol 3: Biochemical Tests to Identify Lipids
Lipids are the only macromolecule that does not form true polymers. Although lipid molecules do not form covalent bonds with one another, they do tend to group together as they are all hydrophobic, or water-fearing. Figure 4 shows the formation of a triglyceride, a simple fat containing three hydrophobic fatty acid tails and a glycerol backbone. Lipids serve a variety of functions for living organisms, including energy storage (fats and oils), controlling growth and development (sterols), and serving as a major component of cell membranes (phospholipids).
Figure 4: Structure and formation of a triglyceride (aka fat). From OpenStax Biology 2e
This experiment involves the detection of lipids. In contrast to amino acids and carbohydrates, lipids contain relatively few, if any, oxygen atoms and are therefore non-polar (hydrophobic) molecules. In this part of the experiment, we will use the Sudan III assay to detect the presence of lipids. Because lipids are non-polar molecules, they are insoluble in water. One of the simplest tests for lipids is to determine whether they leave a grease spot on a piece of uncoated paper, such as a grocery bag or lab filter paper. A test commonly used to identify fats in microscopic samples is Sudan III. Both the Sudan III indicator and the lipids are hydrophobic and will bind together when placed in a hydrophilic environment (water).
| Color | Meaning |
|---|---|
| No Color Change | no lipids |
| Faint orange | some lipids present |
| Bright orange | lots of lipids present |
- filter paper
- Sudan III
- dH2O
- pipettes and tips
- food samples
Protocol 2: Sudan III's Test for Lipids
- Obtain a piece of filter paper and place in the large side of the disposable Petri dish.
- Using a pencil and a penny, make 6 equally spaced circles each about ½ inch from the edge as shown in Figure 5.
- Label each circle with a letter.
- Spread a thin layer of the correct substance in each of the spaces provided (wipe off any excess sample). If you are pipetting, 10uL is probably a good amount. Set aside and let dry for 10-15 minutes. I recommend testing only food samples here, the agar pieces do not adhere to the filter paper very well.
- Place some Sudan III solution in the Petri dish (fill the bottom). Add the filter paper, sample side down in the Sudan III and allow to soak for 3 minutes.
- Rinse the filter paper in the same Petri dish with distilled water and allow to dry for at least one minute before evaluation.
- Record the colors and results on your lab handout.

Figure 5: Sample layout for Sudan III test. The larger circle is the filter paper and the smaller labeled circles are for each of the 6 test samples.
Video of Biochemistry Lab Background