
2: Microscopes
- Page ID
- 10618

\( \newcommand{\vecs}[1]{\overset { \scriptstyle \rightharpoonup} {\mathbf{#1}} } \)
\( \newcommand{\vecd}[1]{\overset{-\!-\!\rightharpoonup}{\vphantom{a}\smash {#1}}} \)
\( \newcommand{\dsum}{\displaystyle\sum\limits} \)
\( \newcommand{\dint}{\displaystyle\int\limits} \)
\( \newcommand{\dlim}{\displaystyle\lim\limits} \)
\( \newcommand{\id}{\mathrm{id}}\) \( \newcommand{\Span}{\mathrm{span}}\)
( \newcommand{\kernel}{\mathrm{null}\,}\) \( \newcommand{\range}{\mathrm{range}\,}\)
\( \newcommand{\RealPart}{\mathrm{Re}}\) \( \newcommand{\ImaginaryPart}{\mathrm{Im}}\)
\( \newcommand{\Argument}{\mathrm{Arg}}\) \( \newcommand{\norm}[1]{\| #1 \|}\)
\( \newcommand{\inner}[2]{\langle #1, #2 \rangle}\)
\( \newcommand{\Span}{\mathrm{span}}\)
\( \newcommand{\id}{\mathrm{id}}\)
\( \newcommand{\Span}{\mathrm{span}}\)
\( \newcommand{\kernel}{\mathrm{null}\,}\)
\( \newcommand{\range}{\mathrm{range}\,}\)
\( \newcommand{\RealPart}{\mathrm{Re}}\)
\( \newcommand{\ImaginaryPart}{\mathrm{Im}}\)
\( \newcommand{\Argument}{\mathrm{Arg}}\)
\( \newcommand{\norm}[1]{\| #1 \|}\)
\( \newcommand{\inner}[2]{\langle #1, #2 \rangle}\)
\( \newcommand{\Span}{\mathrm{span}}\) \( \newcommand{\AA}{\unicode[.8,0]{x212B}}\)
\( \newcommand{\vectorA}[1]{\vec{#1}} % arrow\)
\( \newcommand{\vectorAt}[1]{\vec{\text{#1}}} % arrow\)
\( \newcommand{\vectorB}[1]{\overset { \scriptstyle \rightharpoonup} {\mathbf{#1}} } \)
\( \newcommand{\vectorC}[1]{\textbf{#1}} \)
\( \newcommand{\vectorD}[1]{\overrightarrow{#1}} \)
\( \newcommand{\vectorDt}[1]{\overrightarrow{\text{#1}}} \)
\( \newcommand{\vectE}[1]{\overset{-\!-\!\rightharpoonup}{\vphantom{a}\smash{\mathbf {#1}}}} \)
\( \newcommand{\vecs}[1]{\overset { \scriptstyle \rightharpoonup} {\mathbf{#1}} } \)
\(\newcommand{\longvect}{\overrightarrow}\)
\( \newcommand{\vecd}[1]{\overset{-\!-\!\rightharpoonup}{\vphantom{a}\smash {#1}}} \)
\(\newcommand{\avec}{\mathbf a}\) \(\newcommand{\bvec}{\mathbf b}\) \(\newcommand{\cvec}{\mathbf c}\) \(\newcommand{\dvec}{\mathbf d}\) \(\newcommand{\dtil}{\widetilde{\mathbf d}}\) \(\newcommand{\evec}{\mathbf e}\) \(\newcommand{\fvec}{\mathbf f}\) \(\newcommand{\nvec}{\mathbf n}\) \(\newcommand{\pvec}{\mathbf p}\) \(\newcommand{\qvec}{\mathbf q}\) \(\newcommand{\svec}{\mathbf s}\) \(\newcommand{\tvec}{\mathbf t}\) \(\newcommand{\uvec}{\mathbf u}\) \(\newcommand{\vvec}{\mathbf v}\) \(\newcommand{\wvec}{\mathbf w}\) \(\newcommand{\xvec}{\mathbf x}\) \(\newcommand{\yvec}{\mathbf y}\) \(\newcommand{\zvec}{\mathbf z}\) \(\newcommand{\rvec}{\mathbf r}\) \(\newcommand{\mvec}{\mathbf m}\) \(\newcommand{\zerovec}{\mathbf 0}\) \(\newcommand{\onevec}{\mathbf 1}\) \(\newcommand{\real}{\mathbb R}\) \(\newcommand{\twovec}[2]{\left[\begin{array}{r}#1 \\ #2 \end{array}\right]}\) \(\newcommand{\ctwovec}[2]{\left[\begin{array}{c}#1 \\ #2 \end{array}\right]}\) \(\newcommand{\threevec}[3]{\left[\begin{array}{r}#1 \\ #2 \\ #3 \end{array}\right]}\) \(\newcommand{\cthreevec}[3]{\left[\begin{array}{c}#1 \\ #2 \\ #3 \end{array}\right]}\) \(\newcommand{\fourvec}[4]{\left[\begin{array}{r}#1 \\ #2 \\ #3 \\ #4 \end{array}\right]}\) \(\newcommand{\cfourvec}[4]{\left[\begin{array}{c}#1 \\ #2 \\ #3 \\ #4 \end{array}\right]}\) \(\newcommand{\fivevec}[5]{\left[\begin{array}{r}#1 \\ #2 \\ #3 \\ #4 \\ #5 \\ \end{array}\right]}\) \(\newcommand{\cfivevec}[5]{\left[\begin{array}{c}#1 \\ #2 \\ #3 \\ #4 \\ #5 \\ \end{array}\right]}\) \(\newcommand{\mattwo}[4]{\left[\begin{array}{rr}#1 \amp #2 \\ #3 \amp #4 \\ \end{array}\right]}\) \(\newcommand{\laspan}[1]{\text{Span}\{#1\}}\) \(\newcommand{\bcal}{\cal B}\) \(\newcommand{\ccal}{\cal C}\) \(\newcommand{\scal}{\cal S}\) \(\newcommand{\wcal}{\cal W}\) \(\newcommand{\ecal}{\cal E}\) \(\newcommand{\coords}[2]{\left\{#1\right\}_{#2}}\) \(\newcommand{\gray}[1]{\color{gray}{#1}}\) \(\newcommand{\lgray}[1]{\color{lightgray}{#1}}\) \(\newcommand{\rank}{\operatorname{rank}}\) \(\newcommand{\row}{\text{Row}}\) \(\newcommand{\col}{\text{Col}}\) \(\renewcommand{\row}{\text{Row}}\) \(\newcommand{\nul}{\text{Nul}}\) \(\newcommand{\var}{\text{Var}}\) \(\newcommand{\corr}{\text{corr}}\) \(\newcommand{\len}[1]{\left|#1\right|}\) \(\newcommand{\bbar}{\overline{\bvec}}\) \(\newcommand{\bhat}{\widehat{\bvec}}\) \(\newcommand{\bperp}{\bvec^\perp}\) \(\newcommand{\xhat}{\widehat{\xvec}}\) \(\newcommand{\vhat}{\widehat{\vvec}}\) \(\newcommand{\uhat}{\widehat{\uvec}}\) \(\newcommand{\what}{\widehat{\wvec}}\) \(\newcommand{\Sighat}{\widehat{\Sigma}}\) \(\newcommand{\lt}{<}\) \(\newcommand{\gt}{>}\) \(\newcommand{\amp}{&}\) \(\definecolor{fillinmathshade}{gray}{0.9}\)You have probably figured out that microbes (AKA microorganisms) are pretty small, right? Yeah, well, size isn’t everything. But numbers, that is something. If you were to take one gram of soil and start counting the microbes in it at a rate of 1 microbe/second, it would take you over 33 years to complete your counting. Then most of you would be in your 50s and having a mid-life crisis, so let’s not go there…but the small size of microbes certainly has made it difficult to study them, particularly in the beginning. (If you want a visual idea of scale, check out the Cell Size and Scale tool, which allows you to zoom in from a coffee bean to a carbon atom. Be sure to pay careful attention to the microbes in between!)
O.k., if you want to see something really, really, really small, who ya gonna call? Not GhostbustersTM, that’s for sure. I would try someone with a microscope. (Microscope Man? Maybe not.) Now I will admit, with the advent of molecular biology there’s a lot of microbiology nowadays that happens without a microscope. But if you want to actually visualize microbes, you’ll need the ability to magnify – you’ll need a microscope of some type. And, since “seeing is believing,” it was the visualization of microbes that got people interested in them in the first place.
Microscopy in the 1600s
It is believed that Robert Hooke was one of the first scientists to actually observe microbes, in 1665. His illustrations and observations from a variety of objects viewed under a microscope were published in the book Micrographia. Hooke used a compound microscope, meaning it contained two sets of lenses for magnification: the ocular lens next to the eye and the objective lens, next to the specimen or object. The magnification of a compound microscope is a product of the ocular lens magnification and the objective lens magnification. Thus a microscope with an ocular magnification of 10x and an objective magnification of 50x would have a total magnification of 500x. You can see a drawing of Hooke’s microscope.
Antonie van Leeuwenhoek, often called the “Father of Microbiology,” wasn’t a scientist by profession. He was a cloth merchant from Holland who was believed to be inspired by Mr. Hooke’s work, probably with the original intention of examining textiles to determine quality. Very quickly van Leeuwenhoek started examining just about everything under the microscope and we know this because he kept detailed notes about both his samples and his observations. Van Leeuwenhoek was using what is called a simple microscope, a microscope with just a single lens. Essentially, it is a magnifying glass. But the lenses that he produced were of such high quality that he is given credit for the discovery of single-celled life forms. You can learn more about van Leeuwenhoek’s observations.
Modern Microscopy: Light Microscopes
Let us face it, a modern microscope is a pretty technical tool, even one of the cheaper versions. If you want to understand the limitations of a light microscope you have to understand concepts like resolution, wavelength, and numerical aperture, where their relationship to one another is summed up by the Abbé equation:
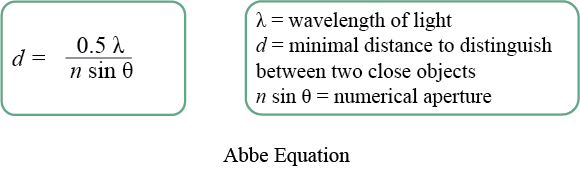
In microscopy the definition of resolution is typically the ability of a lens to distinguish two objects that are close together. So, in the Abbé equation d becomes the minimal distance where two objects next to one another can be resolved or distinguished as individual objects. Resolution is dependent upon the wavelengthof illumination being used, where a shorter wavelength will result in a smaller d. Lastly, we have the effect of the numerical aperture, which is a function of the objective lens and its ability to gather light. The numerical aperture value is actually defined by two components: n, which is the refractive index of the medium the lens is working in, and sin θ, which is a measurement of the cone of light that enters the objective. A lens can typically work in two media: air, with a refractive index of 1.00, or oil, with a refractive index of 1.25. Oil will allow more of the light to be collected, by directing more of the light rays into the objective lens. The maximum total magnification for a microscope using visual light for illumination is around 1500X, where the microscope might have 15x oculars and a 100x oil immersion objective. The highest resolution possible is around 0.2 μm. If objects or cells are closer together than this, they can’t be distinguished as separate entities.
Here’s a nice description from Nikon, including an interactive tutorial on numerical aperture and image resolution. And then there are so many microscopes, so little time! The type that you need depends upon the specific type of microbes that you want to visualize.
For light microscopes there are six different types of microscopes, all using light as the source of illumination: bright-field microscope, dark-field microscope, phase contrast microscope, differential interference contrast (DIC), fluorescence microscope, and confocal scanning laser microscope (CSLM). Let us look at the details of each type:
Bright-field Microscope
The bright-field microscope is your standard microscope that you could purchase for your niece or nephew at any toy store. Here is a website on the basic parts of a bright-field compound microscope, in case you are not enrolled in the general microbiology lab. The specimen is illuminated by a light source at the base of the microscope and then initially magnified by the objective lens, before being magnified again by the ocular lens. Remember that the total magnification achieved is a product of the magnification of both lenses.
The specimen is typically visualized because of differences in contrast between the specimen itself and its surrounding environment. But that does not apply to unstained bacteria, which have very little contrast with their environment, unless the cells are naturally pigmented. That is why staining (see section below) is such an important concept in microscopy. A bright-field microscope will work reasonably well to view the larger eukaryotic microbes (i.e. protozoa, algae) without stain, but unstained bacteria will be almost invisible. Stained bacteria will appear dark against a bright background (ah, I knew that there was a reason for the term “bright-field.”)

Bright-Field Microscope
Dark-field Microscope
The dark-field microscope is really just a slightly modified bright-field microscope. In fact, you could make this modification to the microscope you have at home! It makes use of what is known as a dark-field stop, an opaque disk that blocks light directly underneath the specimen so that light reaches it from the sides. The result is that only light that has been reflected or refracted by the specimen will be collected by the objective lens, resulting in cells that appear bright against a dark background (thus the term “dark-field.” Yes, it’s all making sense now). This allows for observation of living, unstained cells which is particularly nice if you want to observe motility or eukaryotic organelles.
Phase Contrast Microscope
The phase-contrast microscope is also a modified bright-field microscope, although the modifications are getting more complex, as well as more expensive. This microscope also uses an opaque ring or annular stop, but this one has a transparent ring that only releases light in a hollow cone. The principle of this microscope gets back to the idea of refractive index and the fact that cells have a different refractive index than their surroundings, resulting in light that differs slightly in phase. The difference is amplified by a phase ring found in a special phase objective. The phase differences can be translated into differences in brightness, resulting in a dark image amidst a bright background. This allows for the observation of living, unstained cells, once again useful to observe motility or eukaryotic organelles.

Phase Contrast Microscope Mechanics.
Differential Interference Contrast (DIC) Microscope
The differential interference contrast microscope operates on much the same principle as the phase-contrast microscope, by taking advantage of the differences in refractive index of a specimen and its surroundings. But it uses polarized light that is then split into two beams by a prism. One beam of light passes through the specimen, the other passes through the surrounding area. When the beams are combined via a second prism they “interfere” with one another, due to being out of phase. The resulting images have an almost 3D effect, useful for observing living, unstained cells.

Differential Contrast Microscope Mechanism.
Fluorescence Microscope
A fluorescence microscope utilizes light that has been emitted from a specimen, rather than passing through it. A mercury-arc lamp is used to generate an intense beam of light that is filtered to produce a specific wavelength of light directed at the specimen by use of dichromatic mirror, which reflects short wavelengths and transmits longer wavelengths. Naturally fluorescent organisms will absorb the short-wavelengths and emit fluorescent light with a longer wavelength that will pass through the dichromatic mirror and can be visualized. There are a variety of microbes with natural fluorescence but there are certainly far more organisms that lack this quality. Visualization of the latter organisms depends upon the use of fluorochromes, fluorescent dyes that bind to specific cell components. The fluorochromes can also be attached to antibodies, to highlight specific structures or areas of the cell, or even different organisms.

Fluorescence Microscope. By Masur (Own work) [GFDL, CC-BY-SA-3.0 or CC BY-SA 2.5-2.0-1.0], via Wikimedia Commons
Fluorescence Microscope Mechanism.
Confocal Scanning Laser Microscope (CSLM)
In order to understand how a confocal scanning laser microscope works, it is helpful to understand how a fluorescence microscope works, so hopefully you already read the previous section. A CSLM uses a laser for illumination, due to the high intensity. The light is directed at dichromatic mirrors that move, “scanning” the specimen. The longer wavelengths emitted by the fluorescently stained specimen pass back through the mirrors, through a pinhole, and are measured by a detector. The pinhole serves to conjugate the focal point of the lens (ah, that’s where the term confocal came from!), which means it allows for complete focus of a given point. Since the entire specimen is scanned in the x-z planes (all three axes), the information acquired by the detector can be compiled by a computer to create a single 3D image entirely in focus. This is a particularly useful tool for viewing complex structures such as biofilms.

Confocal Scanning Laser Microscope Mechanism.
Staining
Most of the microbes, particularly unicellular microbes, would not be apparent without the help of staining. It helps to make something so small a bit easier to see, by providing contrast between the microorganism and its background. A simple stain makes use of a single dye, either to stain the cells directly (direct stain) or to stain the background surrounding the cells (negative stain). From this a researcher can gather basic information about a cell’s size, morphology (shape), and cell arrangement.
There are also more complex stains, known as differential stains, that combine stains to allow for differentiation of organisms based on their characteristics. The Gram stain, developed in 1884, is the most common differential stain used in microbiology, where bacterial cells are separated based on their cell wall type: gram positive bacteria which stain purple and gram negative bacteria which stain pink. Some bacteria have a specialized cell wall that must be stained with the acid-fast stain, where acid-fast bacteria stain red and non-acid-fast bacteria stain blue. Other differential stains target specific bacterial structures, such as endospores, capsules, and flagella, to be talked about later.
Even More Modern Microscopy: Electron Microscopes
Light microscopes are great if you are observing eukaryotic microbes and they might work for observing bacteria and archaea, but they are not going to work at all to observe viruses. Remember that the limit of resolution for a light microscope is 0.2 μm or 200 nm and most viruses are smaller than that. So, we need something more powerful. Enter the electron microscopes, which replace light with electrons for visualization. Since electrons have a wavelength of 1.23 nm (as opposed to the 530 nm wavelength of blue-green light), resolution increases to around 0.5 nm, with magnifications over 150,000x. The drawback of using electrons is that they must be contained in a vacuum, eliminating the possibility of working with live cells. There is also some concern that the extensive sample preparation might distort the specimen’s characteristics or cause artifacts to form.
There are two different types of electron microscope, the transmission electron microscope (TEM) and the scanning electron microscope (SEM):
Transmission Electron Microscope (TEM)
The transmission electron microscope utilizes an electron beam directed at the specimen with the use of electromagnets. Dense areas scatter the electrons, resulting in a dark area on the image, while electrons can pass (or “transmit”) through the less dense areas, resulting in a brighter section. The image is generated on a fluorescent screen and can then be captured.
Since the electrons are easily scattered by extremely thick specimens, samples must be sliced down to 20-100 nm in thickness, typically by being embedded in some type of plastic and then being cut with a diamond knife into extremely thin sections. The resulting pictures represent one slice or plane of the specimen.

Transmission Electron Microscope.

Transmission Electron Microscope. By kallerna (Own work) [Public domain], via Wikimedia Commons
Scanning Electron Microscope (SEM)
The scanning electron microscope also utilizes an electron beam but the image is formed from secondary electrons that were released from the surface of the specimen and then collected by a detector. More electrons are released from raised areas of the specimen, while less secondary electrons will be collected from sunken areas. In addition, the electron beam is scanned over the specimen surface, producing a 3D image of the external features.
If you want to see some beautiful TEM and SEM photomicrographs, check out Dennis Kunkel’s site. Most have been colorized, but they are quite stunning. On the other end of the spectrum, here are pictures taken with the Intel Play QX3, a plastic microscope for children. Be careful, you could get lost in this website. But it is great to see what an inexpensive microscope can produce in the hands of someone who knows what they’re doing! These pictures are stunning as well.

Scanning Electron Microscope Mechanism.
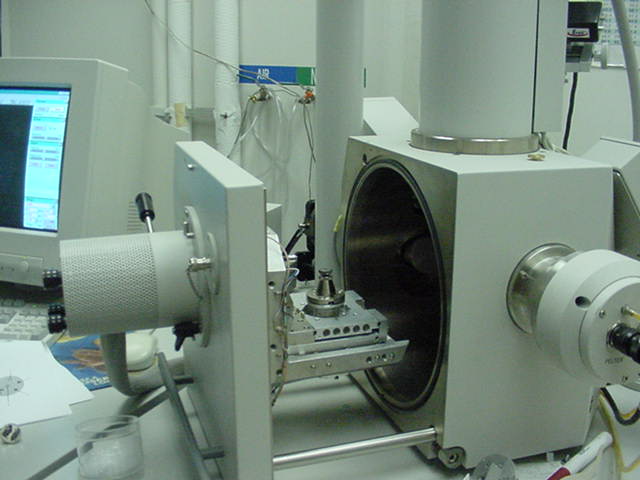
Scanning Electron Microscope. By en:User:Olaboy [CC BY-SA 2.5], Via Wikipedia Commons
21st Century Microscopy: Scanning Probe Microscopes
As technology has advanced, even more powerful microscopes have been invented, ones that can even allow for visualization at the atomic level. These microscopes can be used in microbiology but more often they are used in other fields, to allow visualization of chemicals, metals, magnetic samples, and nanoparticles, wherever the 0.1 nm resolution and 100,000,000x magnification might be needed.
The scanning probe microscopes are thus named because they move some type of probe over a specimen’s surface in the x-z planes, allowing computers to generate an extremely detailed 3D image of the specimen. Resolution is so high because the probe size is much smaller than the wavelength of either visible light or electrons. Both microscopes can be used to study objects in liquid, allowing for the examination of biological molecules. There are two different types of scanning probe microscopes, the scanning tunneling microscope (STM) and the atomic force microscope (AFM):
Scanning Tunneling Microscope (STM)
The scanning tunneling microscope has an extremely sharp probe, 1 atom thick, that maintains a constant voltage with the specimen surface allowing electrons to travel between them. This tunneling current is maintained by raising and lowering the probe to sustain a constant height above the sample. The resulting motion is tracked by a computer, which generates the final image.

Scanning Tunneling Microscope Mechanism.
Atomic Force Microscope (AFM)
The atomic force microscope was developed as an alternative to the STM, for use with samples that do not conduct electricity well. The microscope utilizes a cantilever with an extremely sharp probe tip that maintains a constant height above the specimen, typically by direct contact with the sample. Movement of the cantilever to maintain this contact deflects a laser beam, translating into an image of the object. Once again, computers are used to generate the image.

Atomic Force Microscope Mechanism.
Key Words
magnification, Robert Hooke, compound microscope, ocular lens, objective lens, total magnification, van Leeuwenhoek, simple microscope, Abbé equation, resolution, wavelength, numerical aperture, refractive index, oil immersion objective, light microscope, bright-field microscope, dark-field microscope, phase contrast microscope, differential interference contrast (DIC) microscope, fluorescence microscope, fluorochrome, confocal scanning laser microscope (CSLM), simple stain, direct stain, negative stain, differential stain, Gram stain, acid-fast stain, electron microscope (EM), transmission electron microscope (TEM), scanning electron microscope (SEM), scanning probe microscopes, scanning tunneling microscopes (STM), atomic force microscope (AFM).
Essential Questions/Objectives
- What roles did Hooke and van Leeuwenhoek play in the development of microscopy? How did their contributions differ?
- How do magnification & resolution differ? How is total magnification determined?
- How does the Abbé equation explain the resolution of a microscope? What components impact resolution? What is the function of immersion oil?
- Know the main uses and understand the principle mechanics of the following light microscopes: brightfield, dark-field, phase contrast, fluorescence, and differential interference contrast.
- How does the confocal scanning laser microscope work to form a 3 dimensional image? How does it improve resolution compared to other light microscopes?
- How is staining used in microscopy? What are the general categories of stains and how are they used?
- What are the advantages and problems with electron microscopes? What are the effective magnification, resolution and main uses of electron microscopes?
- How does the TEM differ from the SEM in terms of function and final product?
- How do scanning probe microscopes work and what do they allow us to see? Why are they useful for studying biological molecules? What is the difference in the scanning tunneling and the atomic force microscope?
Exploratory Questions (OPTIONAL)
- How have microscopes improved our understanding of microbes? What are the limitations of microscopes and the information that we get from them?