
2.3: Session 3
- Page ID
- 25820
\( \newcommand{\vecs}[1]{\overset { \scriptstyle \rightharpoonup} {\mathbf{#1}} } \)
\( \newcommand{\vecd}[1]{\overset{-\!-\!\rightharpoonup}{\vphantom{a}\smash {#1}}} \)
\( \newcommand{\dsum}{\displaystyle\sum\limits} \)
\( \newcommand{\dint}{\displaystyle\int\limits} \)
\( \newcommand{\dlim}{\displaystyle\lim\limits} \)
\( \newcommand{\id}{\mathrm{id}}\) \( \newcommand{\Span}{\mathrm{span}}\)
( \newcommand{\kernel}{\mathrm{null}\,}\) \( \newcommand{\range}{\mathrm{range}\,}\)
\( \newcommand{\RealPart}{\mathrm{Re}}\) \( \newcommand{\ImaginaryPart}{\mathrm{Im}}\)
\( \newcommand{\Argument}{\mathrm{Arg}}\) \( \newcommand{\norm}[1]{\| #1 \|}\)
\( \newcommand{\inner}[2]{\langle #1, #2 \rangle}\)
\( \newcommand{\Span}{\mathrm{span}}\)
\( \newcommand{\id}{\mathrm{id}}\)
\( \newcommand{\Span}{\mathrm{span}}\)
\( \newcommand{\kernel}{\mathrm{null}\,}\)
\( \newcommand{\range}{\mathrm{range}\,}\)
\( \newcommand{\RealPart}{\mathrm{Re}}\)
\( \newcommand{\ImaginaryPart}{\mathrm{Im}}\)
\( \newcommand{\Argument}{\mathrm{Arg}}\)
\( \newcommand{\norm}[1]{\| #1 \|}\)
\( \newcommand{\inner}[2]{\langle #1, #2 \rangle}\)
\( \newcommand{\Span}{\mathrm{span}}\) \( \newcommand{\AA}{\unicode[.8,0]{x212B}}\)
\( \newcommand{\vectorA}[1]{\vec{#1}} % arrow\)
\( \newcommand{\vectorAt}[1]{\vec{\text{#1}}} % arrow\)
\( \newcommand{\vectorB}[1]{\overset { \scriptstyle \rightharpoonup} {\mathbf{#1}} } \)
\( \newcommand{\vectorC}[1]{\textbf{#1}} \)
\( \newcommand{\vectorD}[1]{\overrightarrow{#1}} \)
\( \newcommand{\vectorDt}[1]{\overrightarrow{\text{#1}}} \)
\( \newcommand{\vectE}[1]{\overset{-\!-\!\rightharpoonup}{\vphantom{a}\smash{\mathbf {#1}}}} \)
\( \newcommand{\vecs}[1]{\overset { \scriptstyle \rightharpoonup} {\mathbf{#1}} } \)
\(\newcommand{\longvect}{\overrightarrow}\)
\( \newcommand{\vecd}[1]{\overset{-\!-\!\rightharpoonup}{\vphantom{a}\smash {#1}}} \)
\(\newcommand{\avec}{\mathbf a}\) \(\newcommand{\bvec}{\mathbf b}\) \(\newcommand{\cvec}{\mathbf c}\) \(\newcommand{\dvec}{\mathbf d}\) \(\newcommand{\dtil}{\widetilde{\mathbf d}}\) \(\newcommand{\evec}{\mathbf e}\) \(\newcommand{\fvec}{\mathbf f}\) \(\newcommand{\nvec}{\mathbf n}\) \(\newcommand{\pvec}{\mathbf p}\) \(\newcommand{\qvec}{\mathbf q}\) \(\newcommand{\svec}{\mathbf s}\) \(\newcommand{\tvec}{\mathbf t}\) \(\newcommand{\uvec}{\mathbf u}\) \(\newcommand{\vvec}{\mathbf v}\) \(\newcommand{\wvec}{\mathbf w}\) \(\newcommand{\xvec}{\mathbf x}\) \(\newcommand{\yvec}{\mathbf y}\) \(\newcommand{\zvec}{\mathbf z}\) \(\newcommand{\rvec}{\mathbf r}\) \(\newcommand{\mvec}{\mathbf m}\) \(\newcommand{\zerovec}{\mathbf 0}\) \(\newcommand{\onevec}{\mathbf 1}\) \(\newcommand{\real}{\mathbb R}\) \(\newcommand{\twovec}[2]{\left[\begin{array}{r}#1 \\ #2 \end{array}\right]}\) \(\newcommand{\ctwovec}[2]{\left[\begin{array}{c}#1 \\ #2 \end{array}\right]}\) \(\newcommand{\threevec}[3]{\left[\begin{array}{r}#1 \\ #2 \\ #3 \end{array}\right]}\) \(\newcommand{\cthreevec}[3]{\left[\begin{array}{c}#1 \\ #2 \\ #3 \end{array}\right]}\) \(\newcommand{\fourvec}[4]{\left[\begin{array}{r}#1 \\ #2 \\ #3 \\ #4 \end{array}\right]}\) \(\newcommand{\cfourvec}[4]{\left[\begin{array}{c}#1 \\ #2 \\ #3 \\ #4 \end{array}\right]}\) \(\newcommand{\fivevec}[5]{\left[\begin{array}{r}#1 \\ #2 \\ #3 \\ #4 \\ #5 \\ \end{array}\right]}\) \(\newcommand{\cfivevec}[5]{\left[\begin{array}{c}#1 \\ #2 \\ #3 \\ #4 \\ #5 \\ \end{array}\right]}\) \(\newcommand{\mattwo}[4]{\left[\begin{array}{rr}#1 \amp #2 \\ #3 \amp #4 \\ \end{array}\right]}\) \(\newcommand{\laspan}[1]{\text{Span}\{#1\}}\) \(\newcommand{\bcal}{\cal B}\) \(\newcommand{\ccal}{\cal C}\) \(\newcommand{\scal}{\cal S}\) \(\newcommand{\wcal}{\cal W}\) \(\newcommand{\ecal}{\cal E}\) \(\newcommand{\coords}[2]{\left\{#1\right\}_{#2}}\) \(\newcommand{\gray}[1]{\color{gray}{#1}}\) \(\newcommand{\lgray}[1]{\color{lightgray}{#1}}\) \(\newcommand{\rank}{\operatorname{rank}}\) \(\newcommand{\row}{\text{Row}}\) \(\newcommand{\col}{\text{Col}}\) \(\renewcommand{\row}{\text{Row}}\) \(\newcommand{\nul}{\text{Nul}}\) \(\newcommand{\var}{\text{Var}}\) \(\newcommand{\corr}{\text{corr}}\) \(\newcommand{\len}[1]{\left|#1\right|}\) \(\newcommand{\bbar}{\overline{\bvec}}\) \(\newcommand{\bhat}{\widehat{\bvec}}\) \(\newcommand{\bperp}{\bvec^\perp}\) \(\newcommand{\xhat}{\widehat{\xvec}}\) \(\newcommand{\vhat}{\widehat{\vvec}}\) \(\newcommand{\uhat}{\widehat{\uvec}}\) \(\newcommand{\what}{\widehat{\wvec}}\) \(\newcommand{\Sighat}{\widehat{\Sigma}}\) \(\newcommand{\lt}{<}\) \(\newcommand{\gt}{>}\) \(\newcommand{\amp}{&}\) \(\definecolor{fillinmathshade}{gray}{0.9}\)During sessions 3 and 4 you will verify that the plasmid DNA you isolated contains a construct of the expected size for the Abl kinase domain. You will then design primers for subsequent site-directed mutagenesis. In preparation for purifying the H396P Abl kinase domain, you will prepare all the necessary buffers for the lysis and purification. In session 4, you will also prepare a standard curve for future protein quantification.
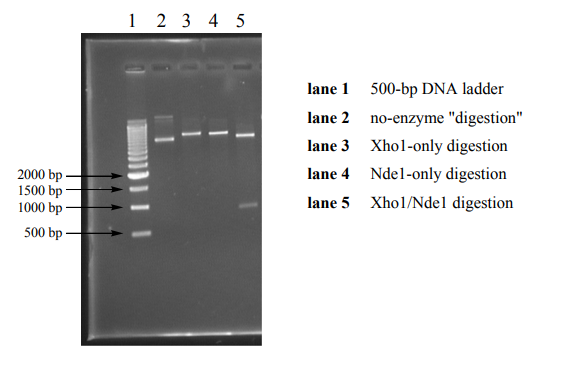
Restriction enzymes (RE’s) are enzymes that selectively cleave double stranded DNA based on recognition of specific, short DNA sequences called recognition sites. In DNA engineering, restriction enzymes are used to cut open plasmids for the ligation of a complementarily-cut DNA insert into the plasmid for protein expression. In Session 2, you isolated a DNA plasmid (the pET-28a vector) containing an insert encoding residues 229-511 of the Abl kinase domain. Since the gene encoding the Abl kinase domain is positioned in the pET-28a vector between Xho1 and an Nde1 recognition sites, treatment of the plasmid with those two restriction enzymes should result in excision of the ABL insert. Today you will excise the insert by digestion of the isolated plamid DNA with Xho1 and Nde and check the size of the digestion products on an agarose gel to confirm that your vector and insert are the expected size in base pairs (bp). As denoted in the vector map, the pET28a vector (minus the segment between the Nde1 and Xho1 sites) is 5,289 bp, and the ABL insert should be 849 bp. As experimental controls, you will simultaneously prepare a no-enzyme “mock” digest and digests containing only one of the two restriction enzymes required to excise the ABL insert. By gel analysis of the four reactions, you will expect to see a band for the no-enzyme “mock” reaction at approximately 6,138 bp (consistent with the size of the insert plus vector. The oneenzyme reactions should linearize the plasmid DNA without excising any segment. Since coiled plasmid DNA travels further by electrophoresis than equivalent linearized DNA, these reactions should result in bands with an apparent size slightly larger than the uncut plasmid. A sample gel is provided below.
1.) DNA digestion with Xho1 and Nde1 restriction enzymes
Set up analytical-scale digests of your plasmid DNA using 1 μg of DNA and final reaction volumes of 20 μL each. In each of four sterile 0.65 mL tubes, add the following components in the order listed, where x = the volume of miniprep elution added (in μL) to give 1 μg of DNA:
| no enzyme | Xho1 only | Ndel only | Xho1/Ndel | |
| Sterile Water | 17.8 – x μL | 17.3 – x μL | 17.3 – x μL | 16.8 – x μL |
| RE 10X Buffer D | 2 μL | 2 μL | 2 μL | 2 μL |
| BSA, 10 μg/ μL | 0.2 μL | 0.2 μL | 0.2 μL | 0.2 μL |
| Plasmid DNA, 1 μg | x μL | x μL | x μL | x μL |
| Mix by pipetting, then add: Xho1, 10 units/ μL | 0 μL | 0.5 μL | 0 μL | 0.5 μL |
| Mix by pipetting, then add: Nde1, 10 units/ μL | 0 μL | 0 μL | 0.5 μL | 0.5 μL |
| Final volume | 20 μL | 20 μL | 20 μL | 20 μL |
Mix the reactions gently by pipetting, close the tubes, and centrifuge for several seconds in a bench-top microcentrifuge. Incubate the digestions for 1 hour in the 37 ºC incubator. Meanwhile, prepare an agarose gel (described below) to analyze the digested DNA by electrophoresis. When the digestions are complete, remove the tubes from the incubator and add 4 μL of 6X nucleic acid loading buffer to each of the reactions.
DNA electrophoresis enables size-based DNA separation. Due to the negatively charged phosphate backbone of DNA, DNA molecules migrate from the negatively-charged to the positively-charged end of the gel. The smaller molecule travel faster than the larger molecules. The size (in bp) of each separated DNA fragment is determined by comparison to a DNA ladder that has a band at given intervals of bp. Here we will use a 500 bp ladder that includes bands of DNA that are 500 bp, 1000 bp, 1500 bp, 2000 bp, and so on. Depending on the size of the DNA fragments you wish to analyze, more of less agarose can be incorporated into a DNA gel. The higher the percentage of agarose, the smaller the effective range of separation will be. For analyzing the 849-bp insert and the 6.1 kb Abl-containing vector, you will prepare a 1.2% (w/v) agarose gel.
2.) Preparation of a DNA 1.2 % agarose gel
Set up the gel box as demonstrated by the TA. Insert the gel comb at the negativelycharged (black) end of the box. In a 200-mL Erlenmeyer flask, weigh out 1.2 g agarose and add 100 mL of 1X Tris acetate electrophoresis (TAE) buffer. To prepare the 1X buffer, dilute 10 mL of 10X TAE (provided by your TA) with 90 mL of DI water. Dissolve the agarose by heating the flask in a microwave on medium heat until the solution just boils. Prior to microwaving, plug the top of the flask with a paper towel to help prevent boiling over. All of the agarose solid should be dissolved and the solution should be clear. Cool the solution to approximately 60 ºC (cool enough to hold the flask comfortably), and pour the solution into a prepared gel box. Allow the gel to set for approximately 30 minutes before loading. The colorless gel solution will have a bluish tint when the gel has solidified.
Once the gel has solidified, carefully remove the comb by pulling strait upwards. Pour 1X TAE into the gel box so that it just covers the gel. Using a gel-loading tip that fits the 20-μL pipette, load 3 μL of 500-bp DNA ladder and 10 μL of each of your four DNA digestion samples. Remember, DNA will migrate toward the positive (red) electrode. Loading the samples at the wrong end will cause the samples to run off the gel! Place the top on the DNA gel box and run the gel at 100 Volts for 1 hour.
Once the gel running is complete, carefully remove the gel from the box and place it in a small plastic container, such as the top of a gel-tip box. Stain the gel with approximately 0.5 μg/ mL ethidium bromide (EtBr) solution for 10 minutes by agitating on a gel rocker. EtBr is a fluorescent DNA intercalating agent, which means it inserts itself between DNA bases. Intercalated EtBr fluoresces under UV light with an intensity that is approximately 20 fold brighter than EtBr that is not DNA-associated. This fluorescence increase results from the exclusion of water molecules (a common fluorescence quencher) associated with EtBr in solution. As an intercalating agent, it is not surprising that EtBr is highly mutagenic and a suspected carcinogen and terratogen. While EtBr is less dangerous in solution than in the powder form, you should always wear nitrile gloves (not latex) and use extreme caution when handling any EtBr solution. Any gloves, paper towels, etc. that touch EtBr solutions should be discarded as solid EtBr hazardous waste.
After incubation, dispose of the EtBr solution in the designated waste container. Rinse the gel with water. Place the gel on the DNA transilluminator for visualization of your bands, using appropriate UV shielding. Take a picture of your gel with the Polaroid camera box for your lab report. Once you have a clear picture, discard the gel in the designated solid EtBr waste container.
To enable studies on additional point mutations found in the BCR-ABL gene of Gleevecresistant cancer patients, you will introduce a point mutation in the wt DNA that you isolated and verified. Your resulting mutant DNA may be used in future iterations of the course for expression and use in kinase assays (as we are doing this year with the H396P mutant). Mutant DNA can be made from the wt DNA using site-directed mutagenesis. From the list of identified mutations in Appendix B3, select a mutant that interests you. While your DNA gel is running, you should begin designing primers to create the desired mutant DNA. Primer proposals should be written in the form of the proposal worksheet in Appendix C2 and turned in to your TA at the beginning of Session 4.
Overview of DNA Mutagenesis
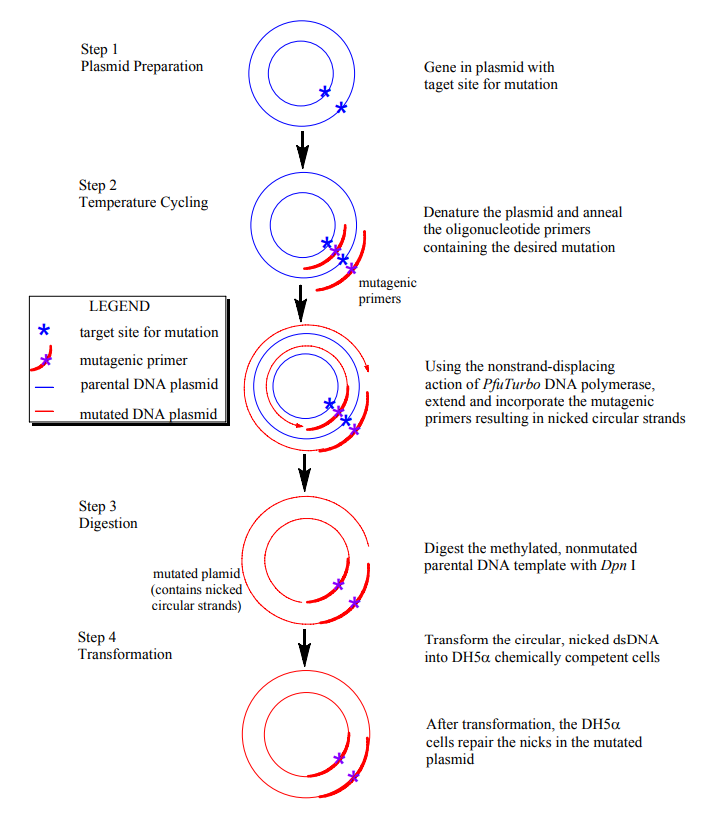
Figure 1. Overview of QuikChange site-directed mutagenesis. Modified from Figure 1 of the QuikChange mutagensis handbook (http://www.stratagene.com/manuals/200518.pdf).
You will use the QuikChange® (http://www.stratagene.com/manuals/200518.pdf) site-directed mutagenesis method to create your desired point mutation in the wt plasmid DNA that you have previously isolated by miniprep and analyzed by Xho1/Nde1 digestion. This mutagenesis method relies on a high-fidelity DNA polymerase and mutant oligonucleotide primers, which you will design and that include the base pair substitution of interest. A DNA polymerase is an enzyme that catalyzes the polymerization of polymerase through temperature cycling. Specifically, the plasmid is denatured and the primers containing the desired mutation are annealed to the complementary strand. The polymerase then uses the plasmid DNA as a template to extend the primers, resulting in a mutated plasmid with staggered nicks (breaks in the DNA where there are no connecting nucleotides against a strand of template DNA to make a new complimentary strand of DNA. The polymerase chain reaction (PCR) utilizes thermostable DNA polymerases, which enable the high temperature denaturation of DNA plamids to create singlestranded templates without simultaneously denaturing the polymerase enzyme. In the standard mutagenesis procedure (Figure 1), the mutant primers are extended by the phosphodiester bond between nucleotides). In order to remove the wt template DNA from the PCR product mixture, the mixture is then treated with Dpn I endonuclease, an enzyme that specifically digests methylated and hemimethylated DNA. Since DNA isolated from most E. coli strands is methylated, treatment of the PCR product mixture with Dpn 1 selectively digests the parent template DNA, leaving only mutant DNA assembled in vitro. The nicked vector DNA (containing the desired mutation) is then transformed into DH5α cells. The cell machinery repairs the nicked DNA, and the repaired mutant plasmid can be isolated by miniprep.
3.) Design of forward and reverse mutant oligonucleotide primers
You will design two primers, each 25-45 nucleotides in length, which are the reverse complement (A to T and C to G) of each other and incorporate your desired mutation. The following guidelines are from the Quikchange® instruction manual and should be adhered to exactly for successful mutagenesis.
- The designed mutation should be in the middle of each primer with 10-15 bases of correct sequence on both sides.
- Both mutagenic primers must contain the desired mutation and anneal to the same sequence on opposite strands of the plasmid.
- Primers should be between 25 and 45 bases in length, with a melting temperature (Tm) greater than or equal to 78 ºC. Use the formula below to estimate the Tm of your proposed primers:
- Tm = 81.5 + 0.41(%GC) – 675/N - % mismatch where, N is the primer length in bases and the values for %GC and % mismatch are in whole numbers.
- If possible, the primers should have a minimum GC content of 40% and should terminate in one or more C or G bases.
- Primers must be purified by either fast polynucleotide liquid chromatography (FPLC) or polyacrylamide gel electrophoresis (PAGE). Failure to purify the primers results in a significant decrease in mutation efficiency. This purification can be performed by the primer synthesis facility and should be selected on the order form.
(See section C1 of the appendix for an example of primer design)