1.12: Nervous Physiology Testing Reactions
- Page ID
- 59152
\( \newcommand{\vecs}[1]{\overset { \scriptstyle \rightharpoonup} {\mathbf{#1}} } \)
\( \newcommand{\vecd}[1]{\overset{-\!-\!\rightharpoonup}{\vphantom{a}\smash {#1}}} \)
\( \newcommand{\dsum}{\displaystyle\sum\limits} \)
\( \newcommand{\dint}{\displaystyle\int\limits} \)
\( \newcommand{\dlim}{\displaystyle\lim\limits} \)
\( \newcommand{\id}{\mathrm{id}}\) \( \newcommand{\Span}{\mathrm{span}}\)
( \newcommand{\kernel}{\mathrm{null}\,}\) \( \newcommand{\range}{\mathrm{range}\,}\)
\( \newcommand{\RealPart}{\mathrm{Re}}\) \( \newcommand{\ImaginaryPart}{\mathrm{Im}}\)
\( \newcommand{\Argument}{\mathrm{Arg}}\) \( \newcommand{\norm}[1]{\| #1 \|}\)
\( \newcommand{\inner}[2]{\langle #1, #2 \rangle}\)
\( \newcommand{\Span}{\mathrm{span}}\)
\( \newcommand{\id}{\mathrm{id}}\)
\( \newcommand{\Span}{\mathrm{span}}\)
\( \newcommand{\kernel}{\mathrm{null}\,}\)
\( \newcommand{\range}{\mathrm{range}\,}\)
\( \newcommand{\RealPart}{\mathrm{Re}}\)
\( \newcommand{\ImaginaryPart}{\mathrm{Im}}\)
\( \newcommand{\Argument}{\mathrm{Arg}}\)
\( \newcommand{\norm}[1]{\| #1 \|}\)
\( \newcommand{\inner}[2]{\langle #1, #2 \rangle}\)
\( \newcommand{\Span}{\mathrm{span}}\) \( \newcommand{\AA}{\unicode[.8,0]{x212B}}\)
\( \newcommand{\vectorA}[1]{\vec{#1}} % arrow\)
\( \newcommand{\vectorAt}[1]{\vec{\text{#1}}} % arrow\)
\( \newcommand{\vectorB}[1]{\overset { \scriptstyle \rightharpoonup} {\mathbf{#1}} } \)
\( \newcommand{\vectorC}[1]{\textbf{#1}} \)
\( \newcommand{\vectorD}[1]{\overrightarrow{#1}} \)
\( \newcommand{\vectorDt}[1]{\overrightarrow{\text{#1}}} \)
\( \newcommand{\vectE}[1]{\overset{-\!-\!\rightharpoonup}{\vphantom{a}\smash{\mathbf {#1}}}} \)
\( \newcommand{\vecs}[1]{\overset { \scriptstyle \rightharpoonup} {\mathbf{#1}} } \)
\(\newcommand{\longvect}{\overrightarrow}\)
\( \newcommand{\vecd}[1]{\overset{-\!-\!\rightharpoonup}{\vphantom{a}\smash {#1}}} \)
\(\newcommand{\avec}{\mathbf a}\) \(\newcommand{\bvec}{\mathbf b}\) \(\newcommand{\cvec}{\mathbf c}\) \(\newcommand{\dvec}{\mathbf d}\) \(\newcommand{\dtil}{\widetilde{\mathbf d}}\) \(\newcommand{\evec}{\mathbf e}\) \(\newcommand{\fvec}{\mathbf f}\) \(\newcommand{\nvec}{\mathbf n}\) \(\newcommand{\pvec}{\mathbf p}\) \(\newcommand{\qvec}{\mathbf q}\) \(\newcommand{\svec}{\mathbf s}\) \(\newcommand{\tvec}{\mathbf t}\) \(\newcommand{\uvec}{\mathbf u}\) \(\newcommand{\vvec}{\mathbf v}\) \(\newcommand{\wvec}{\mathbf w}\) \(\newcommand{\xvec}{\mathbf x}\) \(\newcommand{\yvec}{\mathbf y}\) \(\newcommand{\zvec}{\mathbf z}\) \(\newcommand{\rvec}{\mathbf r}\) \(\newcommand{\mvec}{\mathbf m}\) \(\newcommand{\zerovec}{\mathbf 0}\) \(\newcommand{\onevec}{\mathbf 1}\) \(\newcommand{\real}{\mathbb R}\) \(\newcommand{\twovec}[2]{\left[\begin{array}{r}#1 \\ #2 \end{array}\right]}\) \(\newcommand{\ctwovec}[2]{\left[\begin{array}{c}#1 \\ #2 \end{array}\right]}\) \(\newcommand{\threevec}[3]{\left[\begin{array}{r}#1 \\ #2 \\ #3 \end{array}\right]}\) \(\newcommand{\cthreevec}[3]{\left[\begin{array}{c}#1 \\ #2 \\ #3 \end{array}\right]}\) \(\newcommand{\fourvec}[4]{\left[\begin{array}{r}#1 \\ #2 \\ #3 \\ #4 \end{array}\right]}\) \(\newcommand{\cfourvec}[4]{\left[\begin{array}{c}#1 \\ #2 \\ #3 \\ #4 \end{array}\right]}\) \(\newcommand{\fivevec}[5]{\left[\begin{array}{r}#1 \\ #2 \\ #3 \\ #4 \\ #5 \\ \end{array}\right]}\) \(\newcommand{\cfivevec}[5]{\left[\begin{array}{c}#1 \\ #2 \\ #3 \\ #4 \\ #5 \\ \end{array}\right]}\) \(\newcommand{\mattwo}[4]{\left[\begin{array}{rr}#1 \amp #2 \\ #3 \amp #4 \\ \end{array}\right]}\) \(\newcommand{\laspan}[1]{\text{Span}\{#1\}}\) \(\newcommand{\bcal}{\cal B}\) \(\newcommand{\ccal}{\cal C}\) \(\newcommand{\scal}{\cal S}\) \(\newcommand{\wcal}{\cal W}\) \(\newcommand{\ecal}{\cal E}\) \(\newcommand{\coords}[2]{\left\{#1\right\}_{#2}}\) \(\newcommand{\gray}[1]{\color{gray}{#1}}\) \(\newcommand{\lgray}[1]{\color{lightgray}{#1}}\) \(\newcommand{\rank}{\operatorname{rank}}\) \(\newcommand{\row}{\text{Row}}\) \(\newcommand{\col}{\text{Col}}\) \(\renewcommand{\row}{\text{Row}}\) \(\newcommand{\nul}{\text{Nul}}\) \(\newcommand{\var}{\text{Var}}\) \(\newcommand{\corr}{\text{corr}}\) \(\newcommand{\len}[1]{\left|#1\right|}\) \(\newcommand{\bbar}{\overline{\bvec}}\) \(\newcommand{\bhat}{\widehat{\bvec}}\) \(\newcommand{\bperp}{\bvec^\perp}\) \(\newcommand{\xhat}{\widehat{\xvec}}\) \(\newcommand{\vhat}{\widehat{\vvec}}\) \(\newcommand{\uhat}{\widehat{\uvec}}\) \(\newcommand{\what}{\widehat{\wvec}}\) \(\newcommand{\Sighat}{\widehat{\Sigma}}\) \(\newcommand{\lt}{<}\) \(\newcommand{\gt}{>}\) \(\newcommand{\amp}{&}\) \(\definecolor{fillinmathshade}{gray}{0.9}\)Objectives:
At the end of this lab, you will be able to…
1) Differentiate between a reflex and reaction
2) Explain the impact that anticipation and learning has on the rate of reactions
3) Compare the differences within and between individuals based on the patterning of external stimulus leading to the reaction response.
Introduction
Reactions are an important to everyday activities. They are a reflexive behavior that we use to protect ourselves. Where we are able to use one of our senses to initiate a response to a stimulus, even without having to think about what that response will be. Because the time required for most of reactions and reflexes to occur are very short, less than one second, we use the typical measure of millisecond (msec) as opposed to using the whole second. As the numbers will always be thousandths of a whole second and whole numbers are much easier to deal with than decimals or fractions.
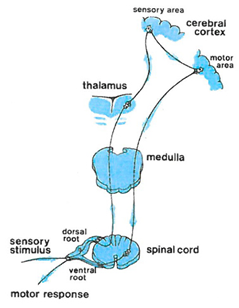
Figure 1. Pathway for a reaction response to a stimulus, note the interplay between cortical structures and the afferent and efferent pathways. |
But what makes reactions different from reflexes? Reflexes are unconscious, involuntary and unintentional response to a stimulus on a receptor. While, a reaction is a deliberate conscious response to a specific stimulus that is voluntary and intentional. We can test our reflexes through use of a reflex hammer on specific tendons throughout the body. To perform this reflex test, the tester strikes the hammer on a specific spot within the tendon. The reflex response may be measured on a subjective grading scale to determine the tone of the muscle. We cannot learn how to control the response to test, the reflex just happens. This is different from the concept of reactions and testing of reactions.
While the reaction is a reflex, it is unlike the muscle tendon reflex as they are specific purposeful actions made in response to a specific stimulus. Since reactions being both cognitive and purposeful, we are able to learn how to react and thus anticipate the appropriate response. The ability to modify and modulate reactions occurs because reactions involve input from our primary motor cortex through a prolonged reflex loop. Where to speed up the response, the primary motor cortex can actually send opposing signals to the agonist and antagonist muscles of the desired movement and upon the initiation of the reaction will stop the opposing signals and allow for the coordinated actions within the reflex, see figure 1. The more often we utilize the reaction pathway, the more we can modify the speed of reaction to any given stimulus and in doing so can be seen to have “faster reactions” relative to a novice in the activity or to what we were able to react to prior to learning the appropriate response.
Reactions become very important to our successful performances in many activities we perform daily, whether it be playing a musical instrument, dancing, playing sports or doing athletic things, playing video games, or even just driving a car. The more often we are exposed to a situation; reactions to that stimulus tend to occur more quickly than when first exposed to the situation. There are different activities that can improve our reaction skills, all of which depend on the signal used to initiate the reaction, including noises (like a starting gun at a race), objects flying at you (like catching a ball before you get hit by it), or falling to the floor (like catching the plate before it hits the floor and your mom or dad gets upset). Because of what they do to our physiology, stimulants that we consume can alter the speed that reactions form to a stimulus and will make a person appear to react much faster than if they were to react to the same stimulus when sober.
When testing reactions, we normally measure it through reaction time to respond to a stimulus through movement of limb (hand, finger, foot). It is important to remember that limb dominance and habitual utilization can influence the responses seen. As the more often we use a limb or pattern of motion, the more “ingrained” the motion becomes while the less often we use the limb or pattern of motion the more likely we are to over-exaggerate the response, as we are not certain as to the pattern for response. The over-exaggeration can be seen with the person responding prior to the stimulus or generating too large of a response than what the habitually utilized the limb would produce. Additionally, the speed by which neurons function can slow and the reduction in the speed of neuron activity can slow our reactions. This reduction in conduction speed and longer reaction time can lead to the same over-exaggeration that is seen from the non-habitually used limb and with progressive aging can lead to overall slower movements for the person so that they can ensure their ability to react to a stimulus appropriately.
The purpose of the experiment here is to test reactions to visual signals where we will examine the differences that exist between dominant (habitually used) and non-dominant (not habitually used) hands. Further we will look at differences that may exist between genders (male or female), habitual use of playing video games, acute exposure to a stimulant, and age of the volunteer.
Hypothesis:
Materials and Methods:
- Meterstick
- Stopwatch
Methods:
Part 1: Testing with the meter-stick
I. Choose slip of paper to indicate order of testing Anticipation or No Anticipation
II. Based on slip of paper indicate order that you will test reactions
Test #1:
Test #2:
Testing with no anticipation:
1. Determine who will be tested first.
2. Have the person being the test subject to sit on a chair and place the dominant arm on the table so that the hand is off the table, but the rest of the arm is on the table. Have them turn their hand so that the thumb is facing up (toward the ceiling) and the fingers are facing forward.
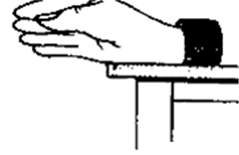
Positioning of the hand of the test subject. |
3. Have the person acting as the tester, stand and face the person being tested with the meter-stick being held vertically, turn the meter-stick so that the numbers face the thumb side of the hand.
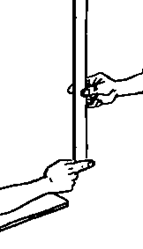
Positioning of the meter-stick for testing reaction time. |
4. In that position, have the subject pinch their index finger and thumb together so that they are touching the meter-stick.
5. Have the person relax their pinch so that the meter-stick is free and being held by the tester in the air between the subject's thumb and index finger, but not touching either one of the fingers.
6. Align the zero mark of the meter-stick with the top of the subject’s fingers. Ask the subject if they are ready. And tell them that once they see the meter-stick drop try to catch the meter-stick between their index finger and thumb.
7. Without warning, release the ruler and let it drop and have the subject catch it as quickly as possible as soon as they see it fall.
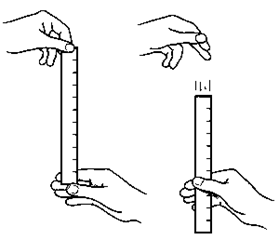
Process used for testing of reaction times by catching the falling meter-stick. |
8. Record in centimeters the distance the ruler fell, by reading the distance at the top of the subject’s finger in the correct results table.
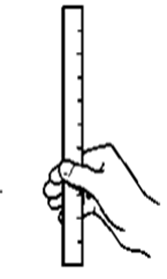
Identification for where to read the mark for distance that meter-stick fell prior to being caught. |
9. Repeat steps 6-9 for a total of 5 times. Following the fifth trial, switch partner roles.
10. Repeat steps 3-10 for the next partner and then for the other (non-dominant) arm of each partner.
Testing with anticipation: This time after asking them if they are ready, you will give them a countdown to the drop of the meter-stick.
11. Have the person being the test subject to sit on a chair and place the dominant arm on the table so that the hand is off the table, but the rest of the arm is on the table. Have them turn their hand so that the thumb is facing up (toward the ceiling) and the fingers are facing forward.
12. Have the person acting as the tester, stand and face the person being tested with the meter-stick being held vertically, turn the meter-stick so that the numbers face the thumb side of the hand.
13. In that position, have the subject pinch their index finger and thumb together so that they are touching the meter-stick.
14. Have the person relax their pinch so that the meter-stick is free and being held by the tester in the air between the subject's thumb and index finger, but not touching either one of the fingers.
15. Align the zero mark of the meter-stick with the top of the subject’s fingers. Ask the subject if they are ready. And tell them that once they see the meter-stick drop try to catch the meter-stick between their index finger and thumb.
16. Countdown from 5 to 1, and on “1” release the ruler, let it drop and have the subject catch it as quickly as possible as soon as they see it fall.
17. Record in centimeters the distance the ruler fell, by reading the distance at the top of the subject’s finger.
18. Repeat for a total of 5 times. Following the fifth trial, switch partner roles.
19. Repeat steps 14-18 for the next partner and then for the other (non-dominant) arm of each partner.
Table 1. Conversion of average time (msec) for reaction based on the distance that the meter-stick fell prior to be caught.
|
Distance (cm) |
Time (msec) |
Distance (cm) |
Time (msec) |
Distance (cm) |
Time (msec) |
Distance (cm) |
Time (msec) |
|
1 |
45 |
26 |
230 |
51 |
323 |
76 |
394 |
|
2 |
64 |
27 |
235 |
52 |
326 |
77 |
396 |
|
3 |
78 |
28 |
239 |
53 |
329 |
78 |
399 |
|
4 |
90 |
29 |
243 |
54 |
332 |
79 |
402 |
|
5 |
100 |
30 |
247 |
55 |
335 |
80 |
404 |
|
6 |
111 |
31 |
252 |
56 |
338 |
81 |
407 |
|
7 |
120 |
32 |
256 |
57 |
341 |
82 |
409 |
|
8 |
128 |
33 |
260 |
58 |
344 |
83 |
412 |
|
9 |
136 |
34 |
263 |
59 |
347 |
84 |
414 |
|
10 |
143 |
35 |
267 |
60 |
350 |
85 |
416 |
|
11 |
150 |
36 |
271 |
61 |
353 |
86 |
419 |
|
12 |
156 |
37 |
275 |
62 |
356 |
87 |
421 |
|
13 |
163 |
38 |
278 |
63 |
359 |
88 |
424 |
|
14 |
169 |
39 |
282 |
64 |
361 |
89 |
426 |
|
15 |
175 |
40 |
286 |
65 |
364 |
90 |
429 |
|
16 |
181 |
41 |
289 |
66 |
367 |
91 |
431 |
|
17 |
186 |
42 |
293 |
67 |
370 |
92 |
433 |
|
18 |
192 |
43 |
296 |
68 |
373 |
93 |
436 |
|
19 |
197 |
44 |
300 |
69 |
375 |
94 |
438 |
|
20 |
202 |
45 |
303 |
70 |
378 |
95 |
440 |
|
21 |
207 |
46 |
306 |
71 |
381 |
96 |
443 |
|
22 |
212 |
47 |
310 |
72 |
383 |
97 |
445 |
|
23 |
217 |
48 |
313 |
73 |
386 |
98 |
447 |
|
24 |
221 |
49 |
316 |
74 |
389 |
99 |
449 |
|
25 |
226 |
50 |
319 |
75 |
391 |
100 |
452 |
Part 2: Reaction to the Stopwatch
I. Select paper to indicate order of testing: Dominant/Non-dominant
II. Record Testing Order: 1st 2nd
1. Using the same order for testing of partner as in Part 1 get the stopwatch
2. Tester will explain that the test subject will click start and try to stop the timer as close to 1.00 seconds as possible. The only times that will be officially recorded will be times after 1.00 seconds (meaning 0.99 second does not get recorded as an official trail but as an No Score)
3. Demonstrate the test to the test subject by holding the stopwatch in dominant hand so that thumb is able to press the “Start/Stop” button. Click “Start/Stop” and once “1.00” is seen on the stop watch hit “Start/Stop” and write down the numbers that follow the decimal (such that 1.20 on the stop watch becomes 200 milliseconds (msec) on the data table).
4. Reset the stopwatch and hand the stopwatch to the test subject
5. Have test subject assume the test position with the 1st hand
6. Give countdown “3..2..1..Go!” and have the test subject press “Start/Stop” and then stop the timer by pressing “Start/Stop” as close to 1.00 second as possible.
7. After the test subject has stopped the timer, collect the stopwatch and record the time in table 4, reset and pass the stopwatch back to the test subject and repeat steps 4-6 for 5 total trials.
8. Repeat the stopwatch test for the opposite hand
9. Switch partners and repeat the entire stopwatch test
Upload data to the Google Document data table for completion of the lab report
Subject Demographics:
Age:
Gender:
Did you consume a stimulant within 1-hour of testing reactions? YES / NO
Average Hours per week you play video games:
Do you play a sport that forces you to quickly react to the ball? YES / NO
Results:
Table 2. Distance that the meter-stick fell for each of the trials, with no anticipation, and the time to react for the dominant hand and non-dominant hand
|
Dominant Hand |
Non-Dominant Hand |
||||
|
Trial # |
Distance (cm) |
Time (msec) |
Trial # |
Distance (cm) |
Time (msec) |
|
1 |
1 |
||||
|
2 |
2 |
||||
|
3 |
3 |
||||
|
4 |
4 |
||||
|
5 |
5 |
||||
|
Average |
Average |
||||
Table 3. Distance that the meter-stick fell for each of the trials, with anticipation, and the time to react for the dominant and non-dominant hand.
|
Dominant |
Non-Dominant |
||||
|
Trial # |
Distance (cm) |
Time (msec) |
Trial # |
Distance (cm) |
Time (msec) |
|
1 |
1 |
||||
|
2 |
2 |
||||
|
3 |
3 |
||||
|
4 |
4 |
||||
|
5 |
5 |
||||
|
Average |
Average |
||||
Table 4. Time (msec) past 1.00 second to stop the stopwatch as a measure of reaction for the dominant and non-dominant hand.
|
Dominant Hand |
Non-Dominant Hand |
||
|
Trial # |
Time (msec) |
Trial # |
Time (msec) |
|
1 |
1 |
||
|
2 |
2 |
||
|
3 |
3 |
||
|
4 |
4 |
||
|
5 |
5 |
||
|
Average |
Average |
||
Based on your hypothesis produce the appropriate graph to show the relationship between your testing factor (x-axis) and reaction times (y-axis).
Discussion: In 1-2 well formatted paragraphs, discuss your results based on your understanding of reactions and the relationship of data to supporting or refuting your specific hypothesis (Use the following think about questions don’t answer these as individual questions but use them to guide your analysis: What is seen in the differences in reaction times between individuals? What is seen between group members based on demographics? What is a plausible rationale for such differences? What happens to reaction times as the person progresses from the first to last test for each condition? Why did certain types of individuals have different reaction times versus other types of individuals? How do the findings relate to the principles of reactions?)

