
Microscopy
- Page ID
- 2850
\( \newcommand{\vecs}[1]{\overset { \scriptstyle \rightharpoonup} {\mathbf{#1}} } \)
\( \newcommand{\vecd}[1]{\overset{-\!-\!\rightharpoonup}{\vphantom{a}\smash {#1}}} \)
\( \newcommand{\dsum}{\displaystyle\sum\limits} \)
\( \newcommand{\dint}{\displaystyle\int\limits} \)
\( \newcommand{\dlim}{\displaystyle\lim\limits} \)
\( \newcommand{\id}{\mathrm{id}}\) \( \newcommand{\Span}{\mathrm{span}}\)
( \newcommand{\kernel}{\mathrm{null}\,}\) \( \newcommand{\range}{\mathrm{range}\,}\)
\( \newcommand{\RealPart}{\mathrm{Re}}\) \( \newcommand{\ImaginaryPart}{\mathrm{Im}}\)
\( \newcommand{\Argument}{\mathrm{Arg}}\) \( \newcommand{\norm}[1]{\| #1 \|}\)
\( \newcommand{\inner}[2]{\langle #1, #2 \rangle}\)
\( \newcommand{\Span}{\mathrm{span}}\)
\( \newcommand{\id}{\mathrm{id}}\)
\( \newcommand{\Span}{\mathrm{span}}\)
\( \newcommand{\kernel}{\mathrm{null}\,}\)
\( \newcommand{\range}{\mathrm{range}\,}\)
\( \newcommand{\RealPart}{\mathrm{Re}}\)
\( \newcommand{\ImaginaryPart}{\mathrm{Im}}\)
\( \newcommand{\Argument}{\mathrm{Arg}}\)
\( \newcommand{\norm}[1]{\| #1 \|}\)
\( \newcommand{\inner}[2]{\langle #1, #2 \rangle}\)
\( \newcommand{\Span}{\mathrm{span}}\) \( \newcommand{\AA}{\unicode[.8,0]{x212B}}\)
\( \newcommand{\vectorA}[1]{\vec{#1}} % arrow\)
\( \newcommand{\vectorAt}[1]{\vec{\text{#1}}} % arrow\)
\( \newcommand{\vectorB}[1]{\overset { \scriptstyle \rightharpoonup} {\mathbf{#1}} } \)
\( \newcommand{\vectorC}[1]{\textbf{#1}} \)
\( \newcommand{\vectorD}[1]{\overrightarrow{#1}} \)
\( \newcommand{\vectorDt}[1]{\overrightarrow{\text{#1}}} \)
\( \newcommand{\vectE}[1]{\overset{-\!-\!\rightharpoonup}{\vphantom{a}\smash{\mathbf {#1}}}} \)
\( \newcommand{\vecs}[1]{\overset { \scriptstyle \rightharpoonup} {\mathbf{#1}} } \)
\(\newcommand{\longvect}{\overrightarrow}\)
\( \newcommand{\vecd}[1]{\overset{-\!-\!\rightharpoonup}{\vphantom{a}\smash {#1}}} \)
\(\newcommand{\avec}{\mathbf a}\) \(\newcommand{\bvec}{\mathbf b}\) \(\newcommand{\cvec}{\mathbf c}\) \(\newcommand{\dvec}{\mathbf d}\) \(\newcommand{\dtil}{\widetilde{\mathbf d}}\) \(\newcommand{\evec}{\mathbf e}\) \(\newcommand{\fvec}{\mathbf f}\) \(\newcommand{\nvec}{\mathbf n}\) \(\newcommand{\pvec}{\mathbf p}\) \(\newcommand{\qvec}{\mathbf q}\) \(\newcommand{\svec}{\mathbf s}\) \(\newcommand{\tvec}{\mathbf t}\) \(\newcommand{\uvec}{\mathbf u}\) \(\newcommand{\vvec}{\mathbf v}\) \(\newcommand{\wvec}{\mathbf w}\) \(\newcommand{\xvec}{\mathbf x}\) \(\newcommand{\yvec}{\mathbf y}\) \(\newcommand{\zvec}{\mathbf z}\) \(\newcommand{\rvec}{\mathbf r}\) \(\newcommand{\mvec}{\mathbf m}\) \(\newcommand{\zerovec}{\mathbf 0}\) \(\newcommand{\onevec}{\mathbf 1}\) \(\newcommand{\real}{\mathbb R}\) \(\newcommand{\twovec}[2]{\left[\begin{array}{r}#1 \\ #2 \end{array}\right]}\) \(\newcommand{\ctwovec}[2]{\left[\begin{array}{c}#1 \\ #2 \end{array}\right]}\) \(\newcommand{\threevec}[3]{\left[\begin{array}{r}#1 \\ #2 \\ #3 \end{array}\right]}\) \(\newcommand{\cthreevec}[3]{\left[\begin{array}{c}#1 \\ #2 \\ #3 \end{array}\right]}\) \(\newcommand{\fourvec}[4]{\left[\begin{array}{r}#1 \\ #2 \\ #3 \\ #4 \end{array}\right]}\) \(\newcommand{\cfourvec}[4]{\left[\begin{array}{c}#1 \\ #2 \\ #3 \\ #4 \end{array}\right]}\) \(\newcommand{\fivevec}[5]{\left[\begin{array}{r}#1 \\ #2 \\ #3 \\ #4 \\ #5 \\ \end{array}\right]}\) \(\newcommand{\cfivevec}[5]{\left[\begin{array}{c}#1 \\ #2 \\ #3 \\ #4 \\ #5 \\ \end{array}\right]}\) \(\newcommand{\mattwo}[4]{\left[\begin{array}{rr}#1 \amp #2 \\ #3 \amp #4 \\ \end{array}\right]}\) \(\newcommand{\laspan}[1]{\text{Span}\{#1\}}\) \(\newcommand{\bcal}{\cal B}\) \(\newcommand{\ccal}{\cal C}\) \(\newcommand{\scal}{\cal S}\) \(\newcommand{\wcal}{\cal W}\) \(\newcommand{\ecal}{\cal E}\) \(\newcommand{\coords}[2]{\left\{#1\right\}_{#2}}\) \(\newcommand{\gray}[1]{\color{gray}{#1}}\) \(\newcommand{\lgray}[1]{\color{lightgray}{#1}}\) \(\newcommand{\rank}{\operatorname{rank}}\) \(\newcommand{\row}{\text{Row}}\) \(\newcommand{\col}{\text{Col}}\) \(\renewcommand{\row}{\text{Row}}\) \(\newcommand{\nul}{\text{Nul}}\) \(\newcommand{\var}{\text{Var}}\) \(\newcommand{\corr}{\text{corr}}\) \(\newcommand{\len}[1]{\left|#1\right|}\) \(\newcommand{\bbar}{\overline{\bvec}}\) \(\newcommand{\bhat}{\widehat{\bvec}}\) \(\newcommand{\bperp}{\bvec^\perp}\) \(\newcommand{\xhat}{\widehat{\xvec}}\) \(\newcommand{\vhat}{\widehat{\vvec}}\) \(\newcommand{\uhat}{\widehat{\uvec}}\) \(\newcommand{\what}{\widehat{\wvec}}\) \(\newcommand{\Sighat}{\widehat{\Sigma}}\) \(\newcommand{\lt}{<}\) \(\newcommand{\gt}{>}\) \(\newcommand{\amp}{&}\) \(\definecolor{fillinmathshade}{gray}{0.9}\)Introduction
Microscopes are useful for viewing objects that are too small to see clearly without magnification. This exercise is designed to familiarize students with the use of a compound light microscope and a binocular dissecting microscope.
Before using the microscope, read the document on microscope care using the link below.
http://faculty.clintoncc.suny.edu/faculty/Mike.Lawliss/LabRefandOrient/Microsccope.htm
Compound Light Microscope
The compound light microscope uses two sets of lenses to magnify the object. Illumination is provided by a light source on the base of the microscope. The magnification typically ranges from approximately 40 X to 1,000 X. They can be used with objects that range in size from about 100 nm to 2 mm.
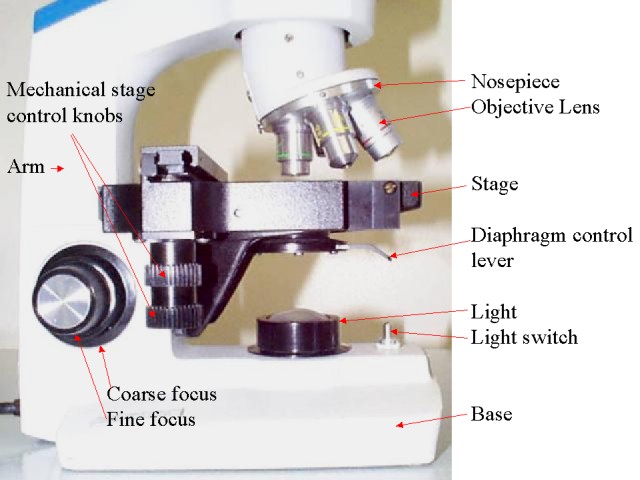
Parts of the Light Microscope
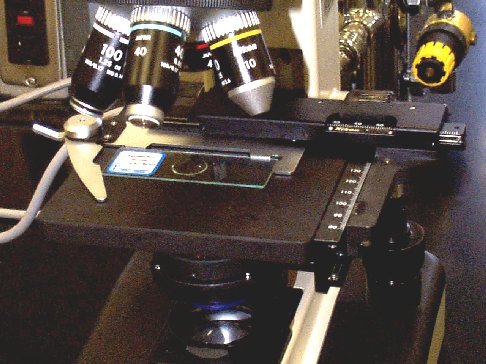
The stage is a platform that holds the slide containing the specimen to be viewed. A mechanical stage (see the photographs below) has a mechanism for moving the slide.
A light microscope must have a light source. This is usually a light bulb located beneath the stage.
A condenser is located directly underneath the stage. It contains lenses that focus light on the specimen so that a cone of light is produced emerging from the specimen. The width of the cone can be changed by adjusting the diaphragm. The best contrast and resolution are achieved by adjusting the width of the cone so that it matches the width of the objective lens. When properly adjusted, the numerical aperture of the condenser matches the numerical aperture of the objective lens.
The body tube contains an ocular lens (eyepiece) and a nosepiece with several objective lenses. Each objective lens is used for a different magnification and is moved into place by rotating the nosepiece. The image is brought into focus by adjusting the coarse and fine focus knobs.
 |
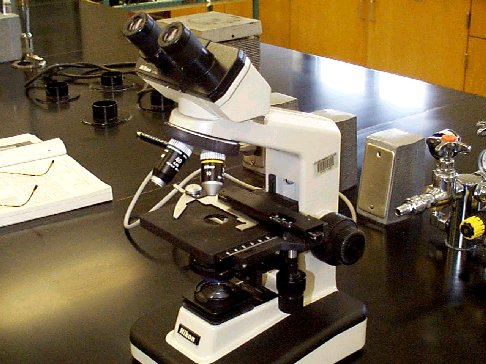
Click on the photographs to view enlargements. |

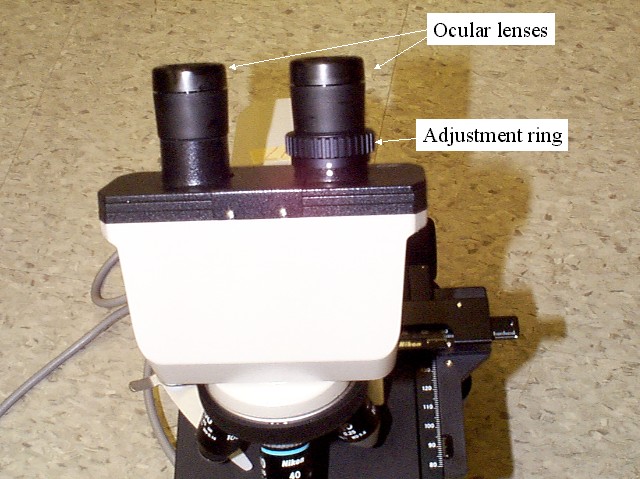
Binocular microscopes (below) have two eyepieces; monocular microscopes (above) have one. The distance between the two ocular lenses of a binocular microscope can be adjusted to fit the distance between your eyes.
Other optical devices such as binocular telescopes and field glasses also have two ocular lenses that adjust in a manner similar to the microscope. Binocular lenses can be adjusted individually, making it unnecessary for many people to need their glasses when using them. If you wear glasses and are unfamiliar with adjusting binocular lenses to correct for your own eyes, see the section titled "Adjusting the Ocular Lenses" below.
 |
Click on the photographs to view enlargements. |
Theory
Compound light microscopes contain two lens systems, an objective and an ocular. The total magnification of an image is calculated by multiplying the magnification of the ocular by the magnification of the objective. The microscopes we will use each have a 10X ocular lens and four different objective lenses listed in the table below.
| Objective | Magnification | Total Magnification |
| Scanning | 4 X | 40 X |
| Low Power | 10 X | 100 X |
| High Power | 40 X or 43 X | 400 X or 430 X |
| Oil Immersion | 100 X | 1000 X |
Light bends when it passes from glass to air or from air to glass because air and glass have different refractive indices. The bending of light as it passes through the glass slide to the air and then to the glass lens decreases the resolving power. At high magnification (1000X) it can prevent a clear image from being viewed. This decrease in resolution can be prevented by putting immersion oil between the slide and the lens because immersion has the same refractive index as glass.
The condenser also increases the resolving power of the microscope. When using the oil-immersion lens, the condenser (located beneath the stage) should be raised to a position very close to the stage for maximum resolution.
Using the Microscope
The link below may be helpful before using the microscope.
http://www.udel.edu/biology/ketcham/microscope/
CAUTION - Never use cloth or paper products (paper towels, tissue paper, etc.) to clean the lenses. They will scratch the coating and decrease the resolving power of the lens. Use only lens paper.
Switch the microscope to the lowest magnification or raise the objectives from the stage before inserting a slide. This will prevent the objective lens from being accidentally scratched by the slide.
Place the slide to be viewed on the stage and center the specimen over the opening.
Begin with either the scanning lens or the low power objective lens.
Raise the stage (or lower the lens) all the way so that the slide is as close as possible to the objective lens.
Use the coarse adjustment know to slowly raise the lens from the stage while viewing the image. Fine focusing is not needed when using the lowest magnification (scanning or 4X objective). If you are using any of the other objectives, it will be necessary to use the fine focus after using the coarse focus.
Ideally, the condenser should be adjusted so that the cone of light emerging from the specimen fills the objective lens. It should not be wider than or narrower than the opening of the objective. When properly adjusted, maximum contrast and resolution are produced.
Raise the condenser to its highest position. While viewing through the microscope, lower it until the upper glass surface of the condenser glass becomes visible. It may be necessary to move the image on the slide so that it does not block the view. If you plan to continue viewing using this lens, the condenser should be moved slightly so that it is not visible. At higher magnifications, it will not be visible due to the narrower depth of field.
The iris diaphragm should be adjusted to produce the best contrast and resolution. This may change the brightness of the image but the overall brightness of the image should be adjusted using the adjustment on the light source. The diaphragm adjustment should only be used to improve contrast and resolution.
To Increase the Magnification
The microscopes are parfocal, meaning that after you adjust the focus, the image will remain approximately in focus if you change the magnification.
Center the object before switching to a higher power objective. This will help you find the object after switching the objective.
Switch to the next highest power. It will be necessary to center the image again. The image should be approximately in focus but it will be necessary to use the fine focus. The coarse focus should not be needed after switching objectives.
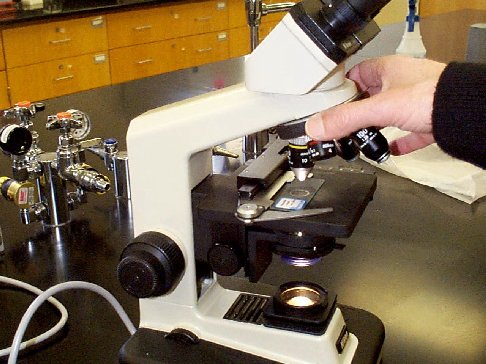 Left: The nosepiece is rotated to change the objective lens.
The diaphragm should be adjusted each time the objective lens is changed.
Adjust the brightness by adjusting the light source.
This procedure is repeated each time you switch to a higher magnification.
Oil Immersion
The 100 X objective (1,000X total magnification) requires that a drop of immersion oil be placed between the slide and the lens.
After focusing the specimen under high power (400X or 430X, see above), rotate the high power objective out of the way and place a drop of immersion oil on the slide. Rotate the oil immersion objective into place so that it touches the oil.
Adjust the fine focus, and iris diaphragm as previously described.
After viewing with oil, the lens must be cleaned with fluid designated for this purpose. Remember, use lens paper only. Never use cloth, paper towels, or other paper products on coated optics.
Laboratory Exercise - Practice Using the Microscope
- If you are working with partners on this exercise, be sure that everybody in your group uses the microscope.
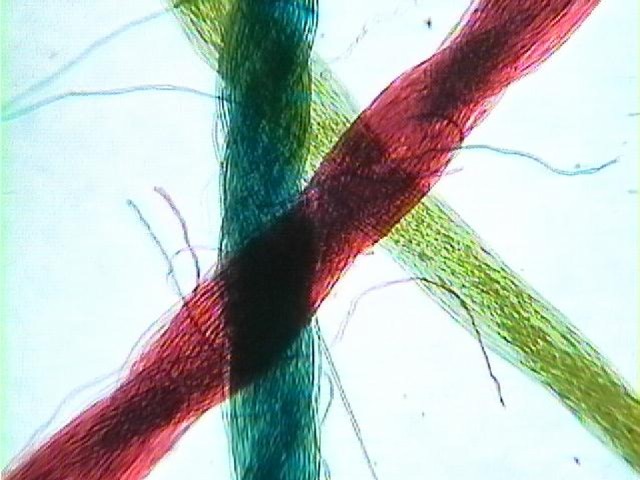
- Obtain a slide of colored threads and view them under the scanning and low power. Use the focusing procedure described above.
1) Can you tell which thread is above the other?
View the threads under high power (400X or 430X). Use the fine focus to focus to determine the order of the threads from top to bottom. As you rotate the fine focus, different strands will go out of focus while others will become more sharply focused. This procedure will therefore enable you to determine the order of the threads.
2) Are all of the threads in focus at the same time?
3) What is the order (from top to bottom)?
"Depth of field" refers to the thickness of the plane of focus. With a large depth of field, all of the threads can be in focused at the same time. With a smaller or narrower depth of field, only one thread or a part of one thread can be focused, everything else will be out of focus. In order to view the other threads, you must focus downward to view the ones underneath and upward to view the ones that are above.
4) What happens to the depth of field when you increase to a higher magnification (increases, decreases, or remains the same)?
5) Explain how the slide with threads could be used to answer the question above.
 |
Click on the photographs to view an enlargements. |
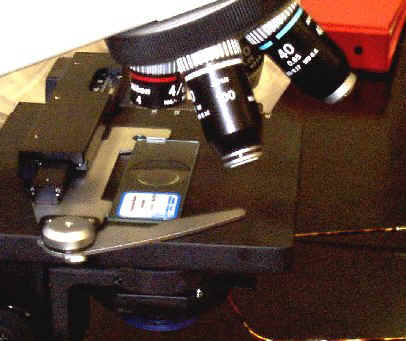
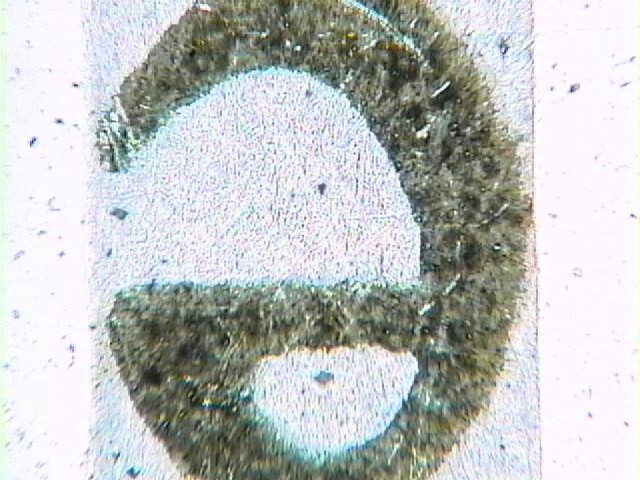
- Obtain a slide of the letter e and view it under the scanning objective. Move the slide to the left.
6) What way did the image move when the slide was moved to the left?
7) How does the orientation of the image compare to the image on the slide?
Paramecium
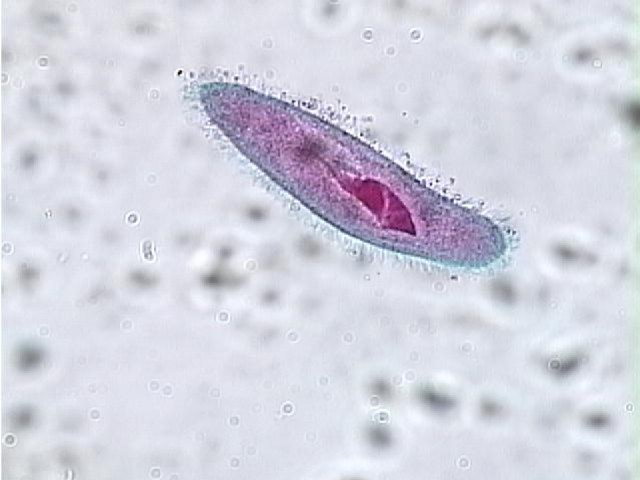
- Obtain a prepared slide of paramecium and view it using the scanning lens (40X). After the light and focus are adjusted, center a paramecium and increase the magnification to 100X. Next, adjust the lighting, use the fine focus, and then center the paramecium. Increase the magnification to 400X and then adjust the light and adjust the fine focus.
- The procedure described above (adjust the light, adjust the focus, center the specimen, increase the magnification) should be used whenever you are trying to view a small specimen that is difficult to find.
8) Draw the cell. Label the cilia and the oral groove.
Below: Paramecium.
 |
Determining the Size of a Specimen
It is useful to know the size of the field of view so that you can estimate the size of objects. If the field of view is 2 mm and an object is about one half that big, then the object length is \(\mathrm{? \times 2\: mm = 1\: mm}\).
We can measure the diameter of the field of view under low power using a ruler. You cannot use a ruler under high power because it is too big.
Example #1
Suppose you measure the low-power field of view with a ruler and it is 2 mm.
If high power is 10X more magnification than the low power, the field of view will be 1/10 as big. The field of view under high power will be \(\mathrm{2\: mm \times \dfrac{1}{10} = 0.2\: mm}\).
Example #2
Suppose that the low power diameter (LPD) is 2.5 mm (2500 um).
LPM (low power magnification) = 100X (10X objective and 10X eyepiece)
HPM = 400X (40X objective)
What is the HPD? In other words, if 100X is 2500um wide, how wide is 400X?
Answer: It is 1/4 as wide. \(\mathrm{= 2500 \times \dfrac{100}{400}}\)
Your Microscope
- Place a small transparent ruler on top of the slide movement mechanism on the stage of your microscope as shown below. Use the ruler to measure the diameter of the field of view using the scanning (4X) objective.
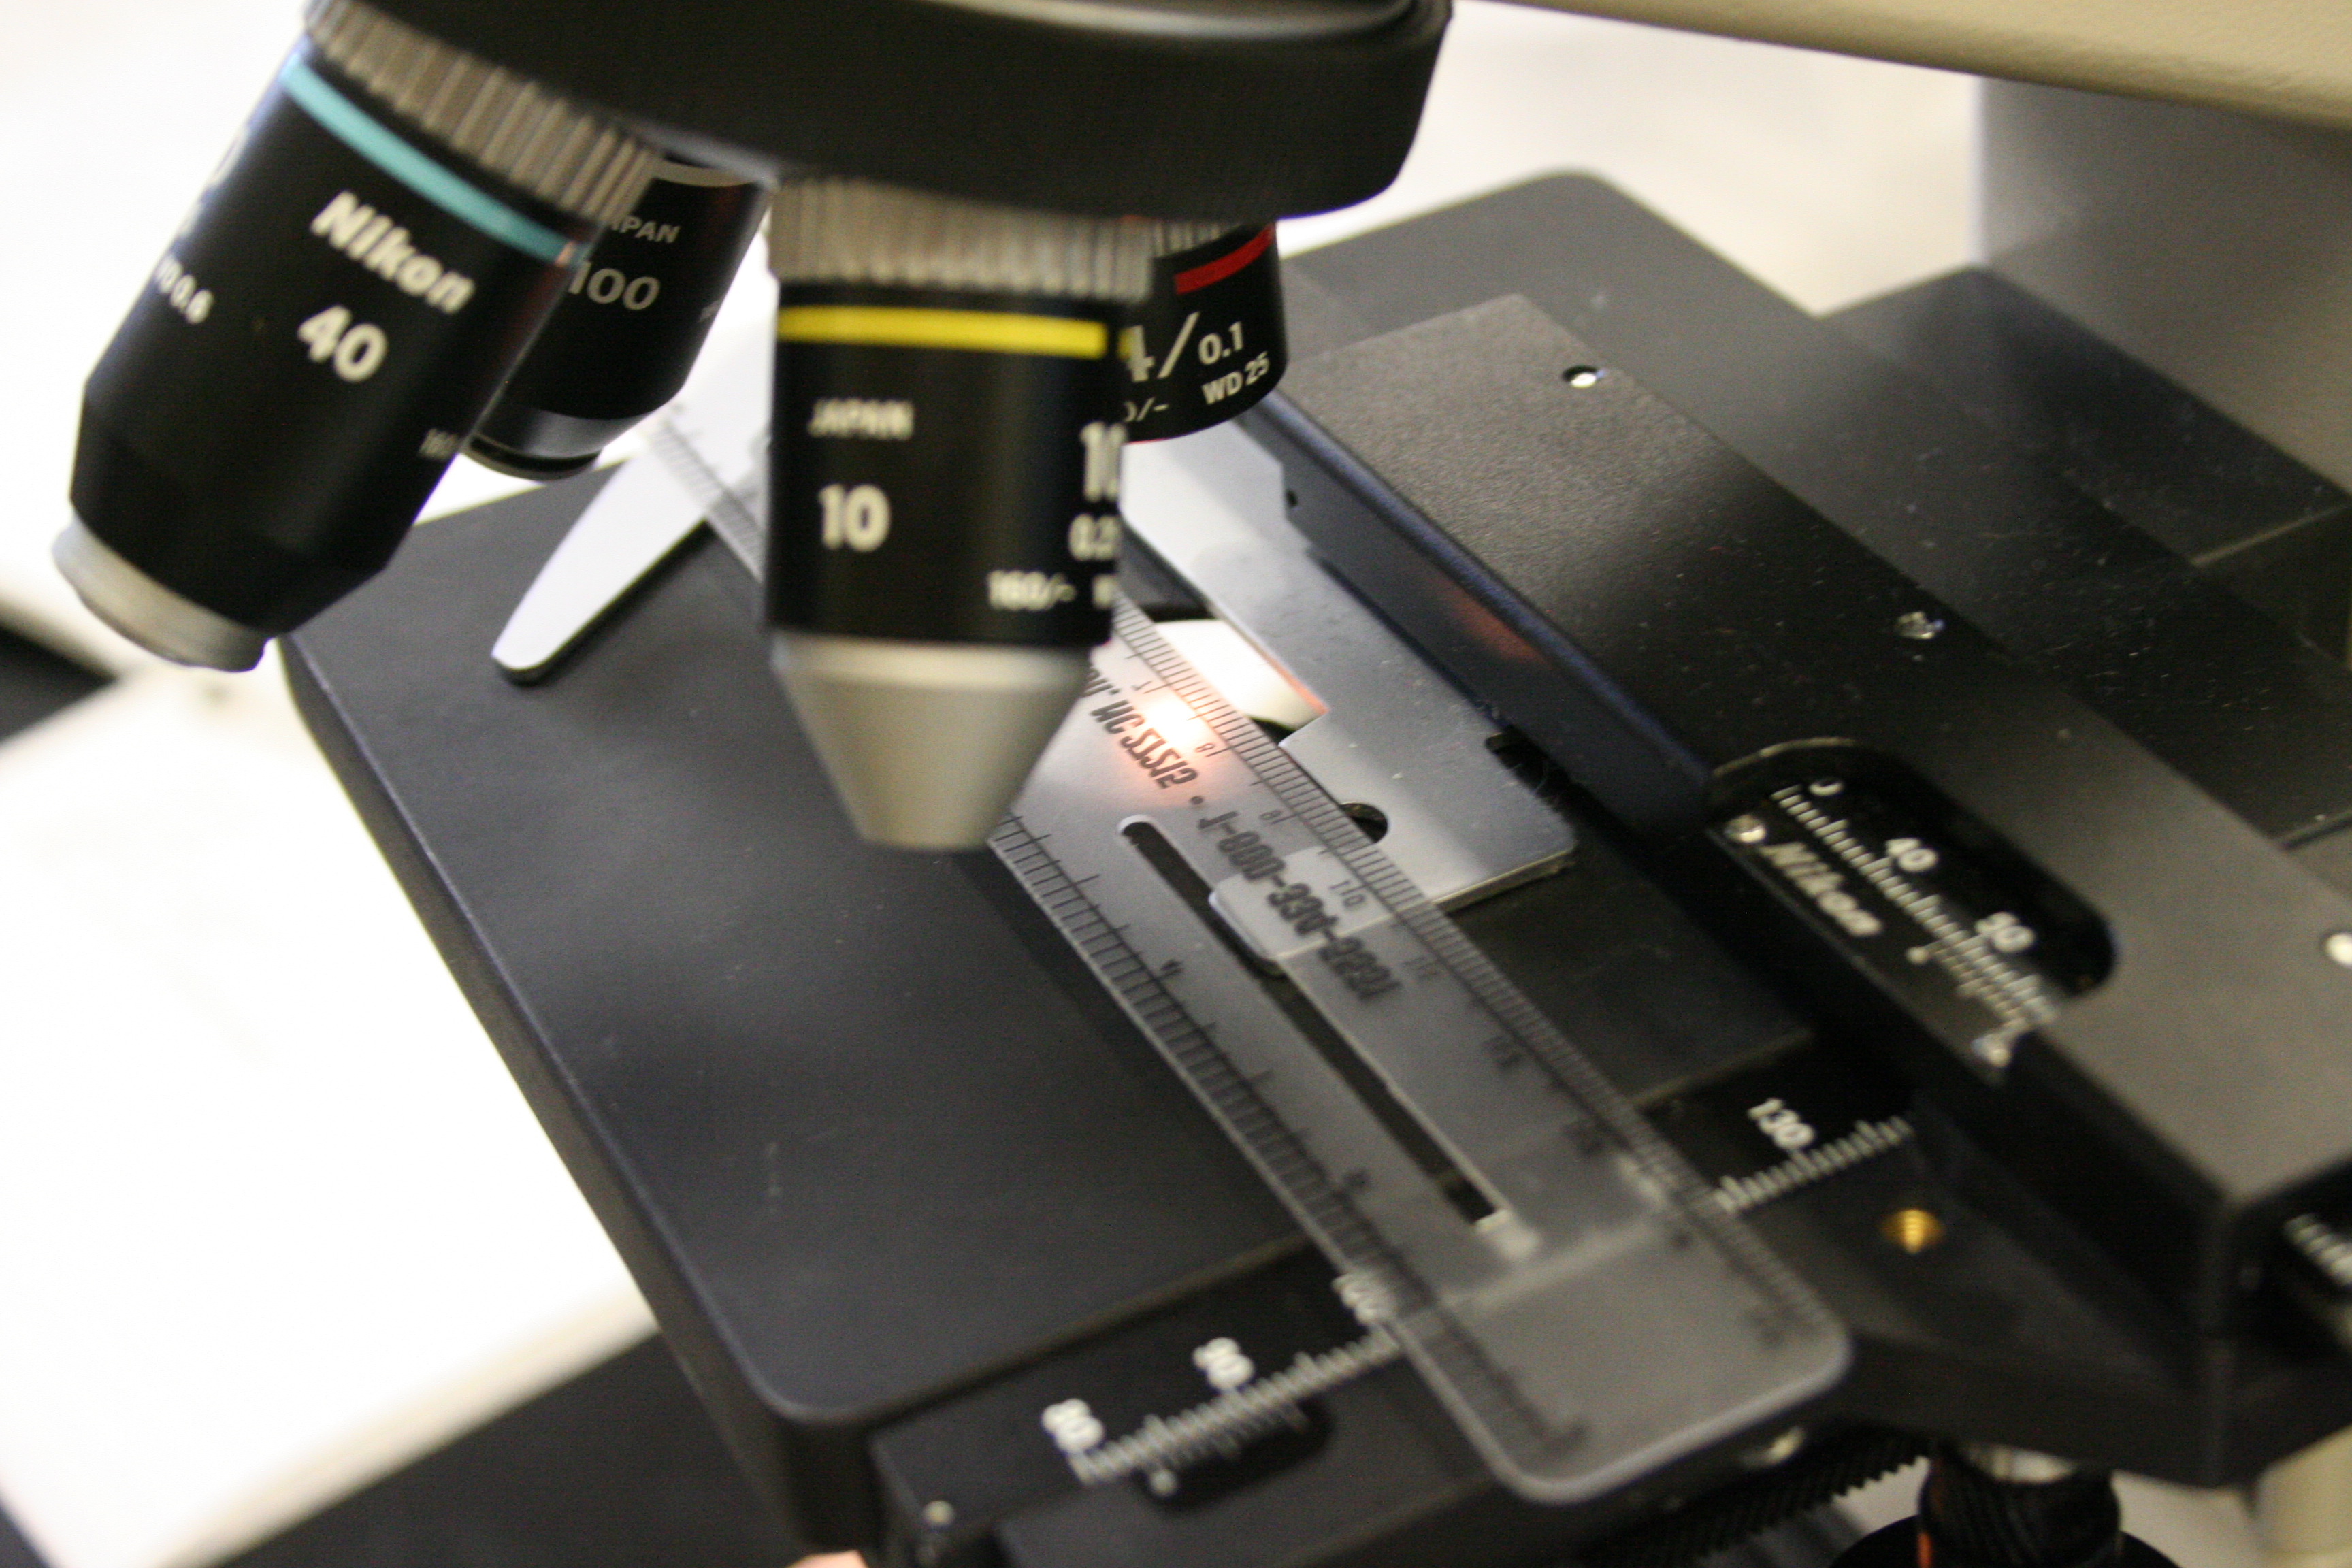
9) Record the diameter in millimeters.
10) Convert this number to micrometers.
11) Record the total magnification when using the scanning objective.
12) Record the total magnification when using the high power objective.
13) Calculate the diameter of the field of view under high power by using the formula below. Show your calculations in your notebook and be sure to include units where appropriate.
Making Wet Mounts
Wet mounts are useful for viewing living biological material.
When making wet mounts, place the specimen on a slide and then add a drop of water or stain. Stain is often used to make the specimen more visible.
 |
Place a cover slip at an angle so that it touches the drop. Slowly lower the raised end of the cover slip. The diagram below shows that as the cover slip is lowered, the drop of liquid moves to the right.

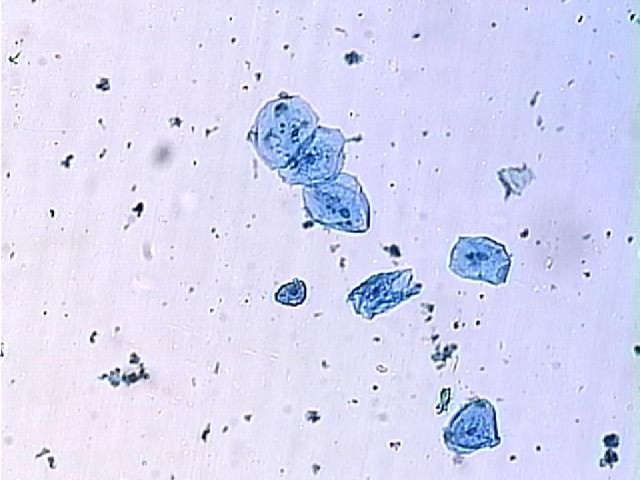
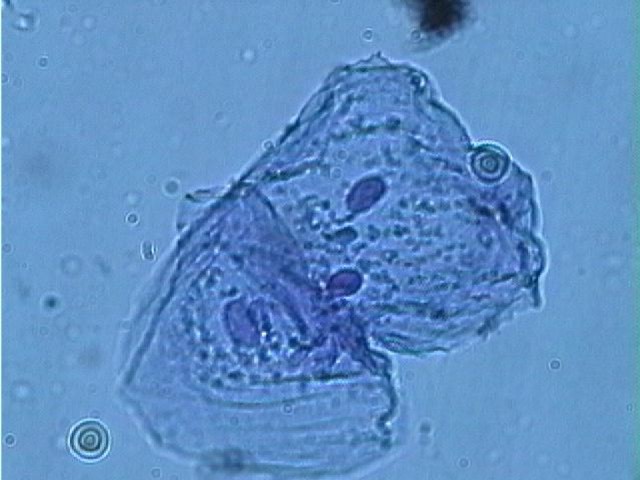
Cheek Cells
- Scrape the inside of your cheek with a toothpick and rub it on a dry slide.
- Add one drop of methylene blue to stain the cells. This will make them easier to see.
- Place a cover slip on the slide as described above and observe the cells under low power then high power.
14) Draw a cell under high power.
Below: Cheek cells 100X and 400X.
 |
 |
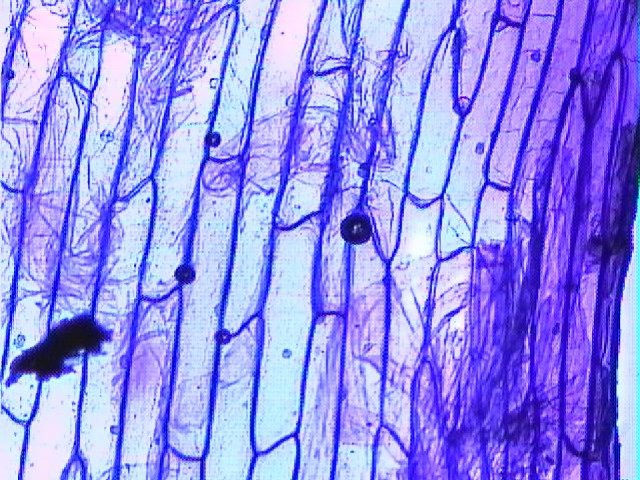
Size of Onion Cells
- Prepare a wet mount of fresh onion and stain it with methylene blue. Try to get the thinnest piece that you can; it should be thinner than paper. It might help if you take a thicker piece and bend it until it snaps into two pieces. After it snaps, there is usually a very thin connection remaining between the two pieces. This thin connecting layer can be peeled off and placed on a microscope slide for viewing. After you view this slide and answer the questions below, set the slide aside for use later in the laboratory period.
15) Draw several onion cells as they appear under high power.
16) Estimate the length of a typical onion cell in micrometers (um). This can be done by using the diameter of the field under high power calculated earlier. The following is an example; your numbers will probably be different. Suppose that a typical cell is approximately 1/3 the diameter of the field of view and the field of view is 450 um, then the cell is 450 um/3 = 150 um. Show the numbers that you plugged into the formula.
Below: Onion cells.
 |
Adjusting the Ocular Lenses
Binocular microscopes and stereomicroscopes have one ocular lens that is adjustable (see photograph below). This enables you to adjust the viewing for your eyes so that you do not need to wear your glasses. Remove your glasses before doing the procedure below.
To adjust these lenses, first, cover the adjustable lens (or your eye) so that you cannot see the image through it. Next, focus the microscope the way you normally would so that a sharp image is produced through the ocular lens. Cover this lens (or eye) and view the image through the other (adjustable) ocular. Turn the ocular lens but not the focus knob and adjust so that the image is sharp.
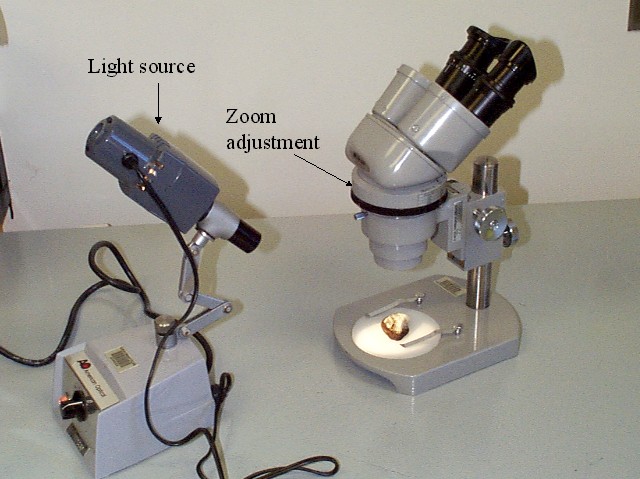
Binocular Dissecting Microscope (Stereomicroscope)
Binocular dissecting microscopes are useful for viewing material that is too large to be viewed by compound light microscopes. The magnification of these microscopes typically ranges from 8X to 40X.
Dissecting microscopes (Stereomicroscopes) have two ocular lenses and produce a three-dimensional image. If you wear glasses and are unfamiliar with adjusting the ocular lenses of optical equipment to suit your eyes, see the section titled "Adjusting the Ocular Lenses" below.
There are several kinds of binocular dissecting microscopes available in the laboratory room. The microscope shown below contains a zoom adjustment. By rotating the adjustment, the magnification changes from 8X to 40X. The microscope requires a separate light source (shown).
Both microscopes shown below have zoom magnification adjustments. The scope on the left ranges from 20X to 40X and the one on the right ranges from 10X to 45X.
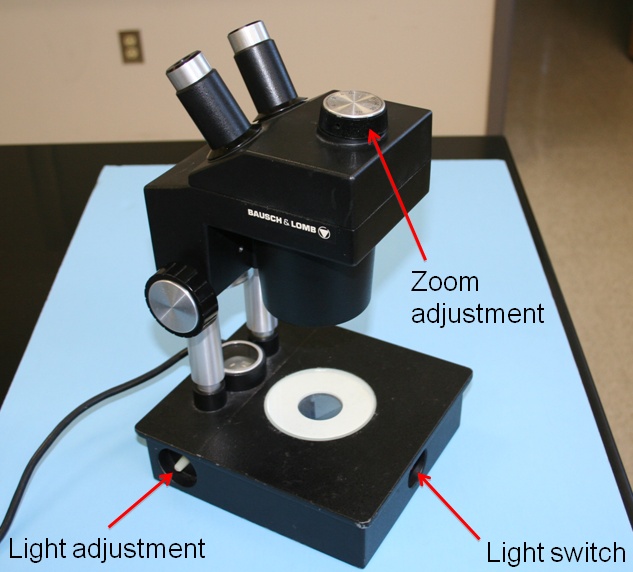
The microscope shown below has a light source built in. The light adjustment knob (see photograph) enables the specimen to be illuminated from above, from below or from both above and below at the same time. The zoom adjustment has the total magnification written on the knob.
Practice Using the Dissecting Microscope
- Obtain a dissecting microscope. If your dissecting microscope does not have a lamp, you will need to also obtain a separate microscope lamp.
View a plant leaf using the dissecting microscope by placing the entire leaf under the scope. It is not necessary to prepare a slide.
The leaf will probably look best if illumination is provided from below.
17) Draw the leaf and write the total magnification on your drawings.
- View a clam shell using the dissecting microscope. The shell is opaque, so it must be illuminated from above.
18) Draw the shell and write the total magnification on your drawings.