
1.3: Designing Primers for Site-Directed Mutagenesis
- Page ID
- 18920

3.1 Learning Objectives
During the next two labs you will learn the basics of site-directed mutagenesis: you will design primers for the mutants you designed earlier and perform PCR amplification to make that mutant. In this handout you will review the basics of primer design while in the next handout you will learn about PCR amplification in practice.
3.2 Mini Project Flowchart
The bolded box in the flowchart below highlights the role of the current experiment in the mini project.

3.3 What is PCR? What are polymerases?
Before we begin we need to review a few definitions commonly used when we talk about site-directed mutagenesis. Site-directed mutagenesis means that we change, insert or delete a few nucleotides within the amino acid or nucleotide sequence. In other words we change relatively few, 4-5, nucleotides or amino acids in a macromolecule. Site-directed mutagenesis became significantly easier with the emergence of PCR amplification. PCR amplification means that we synthesize (make) many copies of our DNA of interest (the coding region for a protein or nucleic acid) with the help of a polymerase and a programmable machine, called the PCR machine. Polymerases are enzymes that synthesize nucleic acids using a nucleic acid template. For example a DNA polymerase is an enzyme that makes DNA using a DNA template. The sequence of the newly synthesized DNA will be complementary to that of the template. If the template sequence is AGGC the newly synthesized DNA will be TCCG. DNA polymerases are unable to initiate DNA synthesis on their own; they need a short nucleic acid, the primer. The primer is a short DNA or RNA sequence that is complementary to the template and is used to initiate DNA synthesis. The PCR machine can precisely cycle through temperature changes to accommodate the needs of DNA synthesis. For example the PCR machine can change the temperature from 95 °C to 68 °C precisely within a few seconds. You will learn more about the temperature changes necessary to accommodate PCR amplification and the mechanism of polymerization during the next lecture.
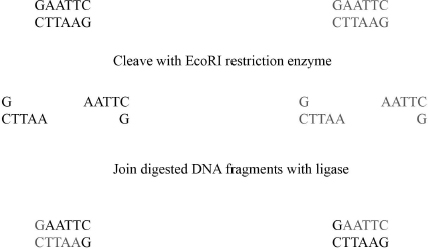
Following PCR amplification, the amplified DNA is digested using restriction endonucleases and ligated into a cloning vector. Restriction endonucleases are enzymes that cut DNA at a given sequence. For instance the restriction endonuclease EcoRI cuts the DNA strand every time the GAATCC sequence appears in the genome. Ligation means that we connect two separate nucleic acids with a covalent bond; we simply paste them together. Cloning vectors or plasmids are circular DNAs that can be replicated by the bacterial or eukaryotic host independent of replicating their own genome. This means, they allow scientists to use a bacteria or eukaryotic cell to make large amounts of the DNA that code for the protein or nucleic acid of interest. In addition, cloning vectors have features that allow easy insertion and removal of the desired DNA sequence. Bacterial cloning vectors also have a selective marker (antibiotic resistance gene). Using selective medium this marker only allow propagation of host cells that contain the cloning vector.
3.4 PCR Amplification of a Desired DNA Segment Of The Genome (Conventional Cloning)
When the project starts the first thing to do is to amplify the DNA of interest from the genome. In this section you will learn how to do that. Afterwards, you will learn how to perform site-directed mutagenesis using the Quickchange kit. Imagine you want to amplify the DNA segment below. You will need two primers: one is complementary to the beginning while the other is complementary to the end of the sequence. The primer that is complementary to the beginning of the double-stranded DNA (dsDNA) sequence is the top primer whereas the primer that is complementary to the end of the sequence is the bottom primer. Notice that the top primer anneals against the bottom DNA strand and the bottom primer anneals against the top DNA strand.
During the first cycle of PCR amplification you do NOT get the desired DNA segment. Instead, you get two DNAs: one of them starts at the beginning of our desired sequence, and the other ends with the desired DNA sequence. Both sequences extend beyond the DNA of interest (Fig. 3.1).
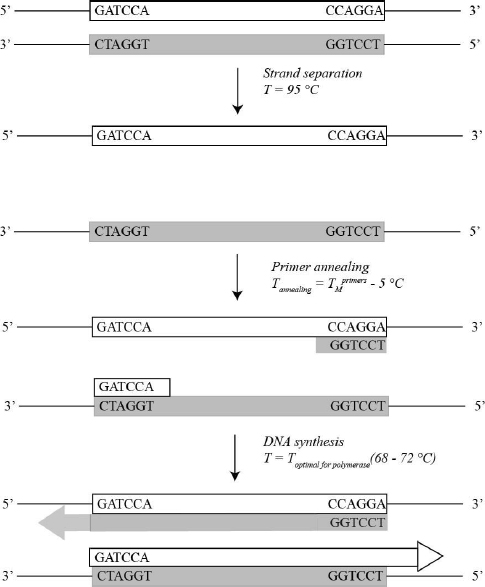
During the second cycle of PCR amplification you finally get the product you want. The primers are more likely to anneal to the amplified DNAs than to the original template, because you have more of the amplified DNA than of the template. As a result the desired product is synthesized.

Notice that with each cycle the number of DNA sequences double. Thus after n cycles you have 2n of the desired DNA sequence. Since PCR leads to significant amplification of the desired DNA, it is often called a chain reaction.
Once the DNA of interest is amplified many times, the next step is to place the desired DNA into a cloning vector. This procedure is called cutting and pasting and includes several steps. First, the cloning vector and the amplified DNA are digested with a pair of restriction enzymes. Second, the cloning vector is purified using an agarose gel. Third, the cloning vector is treated with the enzyme phosphatase to prevent it from religating without the amplified DNA. Fourth, the cloning vector and the amplified DNA is ligated together using the enzyme DNA ligase and transformed into cells. Not surprisingly, these steps lead to significant loss of reagents and time (Fig. 3.3).
3.5 Quickchange Site-Directed Mutagenesis
In this section you will learn about Quickchange site-directed mutagenesis and how it differs from conventional PCR mutagenesis. Foremost, Quickchange site-directed mutagenesis does NOT require digestion with a conventional restriction endonuclease or ligation thereby reducing the time required for mutagenesis from a week to a few days. Quickchange has several restrictions. (1) Only a few nucleotides can be modified at a time. This indicates, it cannot be used to amplify a DNA sequence from the genome. (2) Quickchange provides less significant amplification of the target DNA sequence than conventional PCR. Therefore, extra care should to be taken to ensure that significant amount of mutated DNA is produced.
Let us walk through the steps of Quickchange mutagenesis (Fig 3.4)
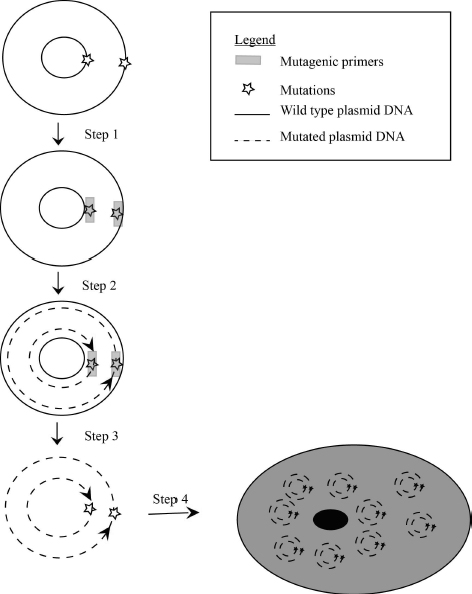
Step 1: The primers in Quickchange land at the same spot in the cloning vector. One binds to the top the other binds to the bottom strand of the double-stranded DNA. Since the polymerase replicates the entire plasmid starting from the site of mutation the target DNA sequence has to be already inserted into a cloning vector (requires circular DNA). This method cannot be used to change DNA sequence on the chromosome.
Step 2: PCR amplification makes many copies of both the top and the bottom DNA strand of the cloning vector containing the mutated DNA. Quickchange mutagenesis therefore synthesizes many copies of the entire plasmid not only the DNA of interest. Note that the synthesized DNA is nicked (not a full circle), this means it cannot serve as template for further PCR cycles resulting in a less significant amplification of the target sequence. Therefore, removal of the template DNA is necessary (step 3) to ensure that significant numbers of cells that harbor the mutated DNA are produced in Step 4.
Step 3: After PCR amplification the reaction mixture is treated with a unique restriction endonuclease DpnI. DpnI digests the template plasmid (the one that does not contain mutations) leaving only cloning vectors containing your mutants. The DpnI enzyme achieves this task by digesting any nucleic acid with methylated adenosine base. Nucleic acids generated with PCR do not have methylated bases; therefore they are left intact by DpnI. No purification, phosphatase treatment or ligation is necessary after DpnI treatment, thereby reducing the time and reagent needed for mutagenesis.
Step 4: The mutated cloning vector is placed into E. coli bacteria for further studies (transformation).
An outline of each step is shown Fig 3.4.
A comparison of Quickchange and conventional PCR is shown in the table below:
| Conventional | Quickchange | |
| Primers | Complementary to beginning and end of desired sequence | Primers land at the same spot on the cloning vector |
| Amplification | Amplifies DNA between primers | Amplifies entire plasmid |
| Purpose | Site-directed mutagenesis, amplification of desired DNA from genome | Site-directed mutagenesis: only changes a few nucleotides |
| Time | 4-5 days | 1-2 days |
| Caveat | Slow, primer design is more complex | Only the template DNA serves as template thus it is required at a higher concentration and need to be removed prior to inserting the DNA into cells |
PROCEDURES
Mutagenic primer design is illustrated below.
Primer design example:
- Suppose that you want to mutate the highlighted G to a C:
TgtaaagttttctagggttccgcatGtcaattgacatggactgtccgagagaaaacacatacgcgtaa
atagaagcgcgtatgcacacggagggaaaaaagcccgggagag. - Both primers must contain the desired mutation. The top primer anneals to the bottom DNA strand of the double stranded cloning vector. Therefore the top primer sequence will be the same, as the original sequence except it will have a C instead of a G at the appropriate spot.
- Primers should be between 25-45 nucleotides in length with a melting temperature of Tm=78 °C. Melting temperature should be calculated using the equation below where N is the length of the primer and values of GC content should be rounded to whole numbers.
Tm = 81.5 + 0.41*(%GC) – 675/N - % of mismatch when bases are changed
Tm = 81.5 + 0.41*(%GC) – 675/N when bases are inserted or deleted - The desired mutation should be in the middle of the primer sequence with 10-15 nucleotides flanking the mutation.
- Primers should have a GC content of at least 40%.
Mutagenic primer sequences that fulfill the requirements above for the sample sequence are ctagggttccgcatCtcaattgacatggac (top) and gtccatgtcaattgaGatgcggaaccctag (bottom). Primer sequences are always written in the 5’ to 3’ direction this means the top and bottom primers are reverse complements of each other. In other words that they have complementary sequences and inverse chain direction to accommodate Watson-Crick pairings, but the sequence is written in the 5’ to 3’ direction.
Notes to the instructor
The experiment in Chapter 3 designs primers to alter the sequence of the Bacillus subtilis tetracycline sensor RNA ykkCD. The same protocol with minimal modifications could be used to perform site-directed mutagenesis on any nucleic acid. Two students per computer work well to maximize peer interaction while still making sure that each student has a chance to intellectually contribute to the assignments. Tablets or smart phones may also be used to complete each task thus this experiment may be used as an assignment in a lecture course. Students should be warned that primer design is an iterative process therefore several sequences have to be tried before a primer with the required GC content and TM is found. Excel may be used to calculate TM values using the equation provided. Usage of primer design programs is not recommended, because they do all the work for the students and eliminate all the educational value of this assignment.
Prelab Questions for Primer Design Lab
Define the following terms.
- Cloning vector or plasmid.

- DNA polymerase.
- PCR amplification.
- What are the pros and cons of Quickchange site-directed mutagenesis?
- How do you calculate primer melting temperature for Quickchange mutagenesis? Outline the equation and define each term.
Introduction to Primer Design
Lab Report Outline and Point Distribution
- Several sentences defining the goal/purpose of this experiment (3 pts.).
- Brief description of the Quickchange mutagenesis procedure. Highlight the advantages of Quickchange over “traditional” mutagenesis (6 pts.).
- Give your mutated primer sequence (both top and bottom) (4 pts.).
- Report both the percentage of GC content and the TM value (4 pts.).
- Explain how GC content relates to the TM of the primer. How does the TM relate to the success of your cloning experiment (8 pts.)?
- Explain why you chose this specific sequence for your primer. (What were you aiming for when you optimized your primer sequences?) (2 pts.).
- How optimal is your primer? Briefly explain (3 pts.).
- BLAST worksheet (30 pts.).