
21.7: Laboratory Activities and Assignment
- Page ID
- 53836

Laboratory Activities and Assignment
Part 1: Review of the Urinary System
1. On the diagram below, label the following structures:
|
|
|
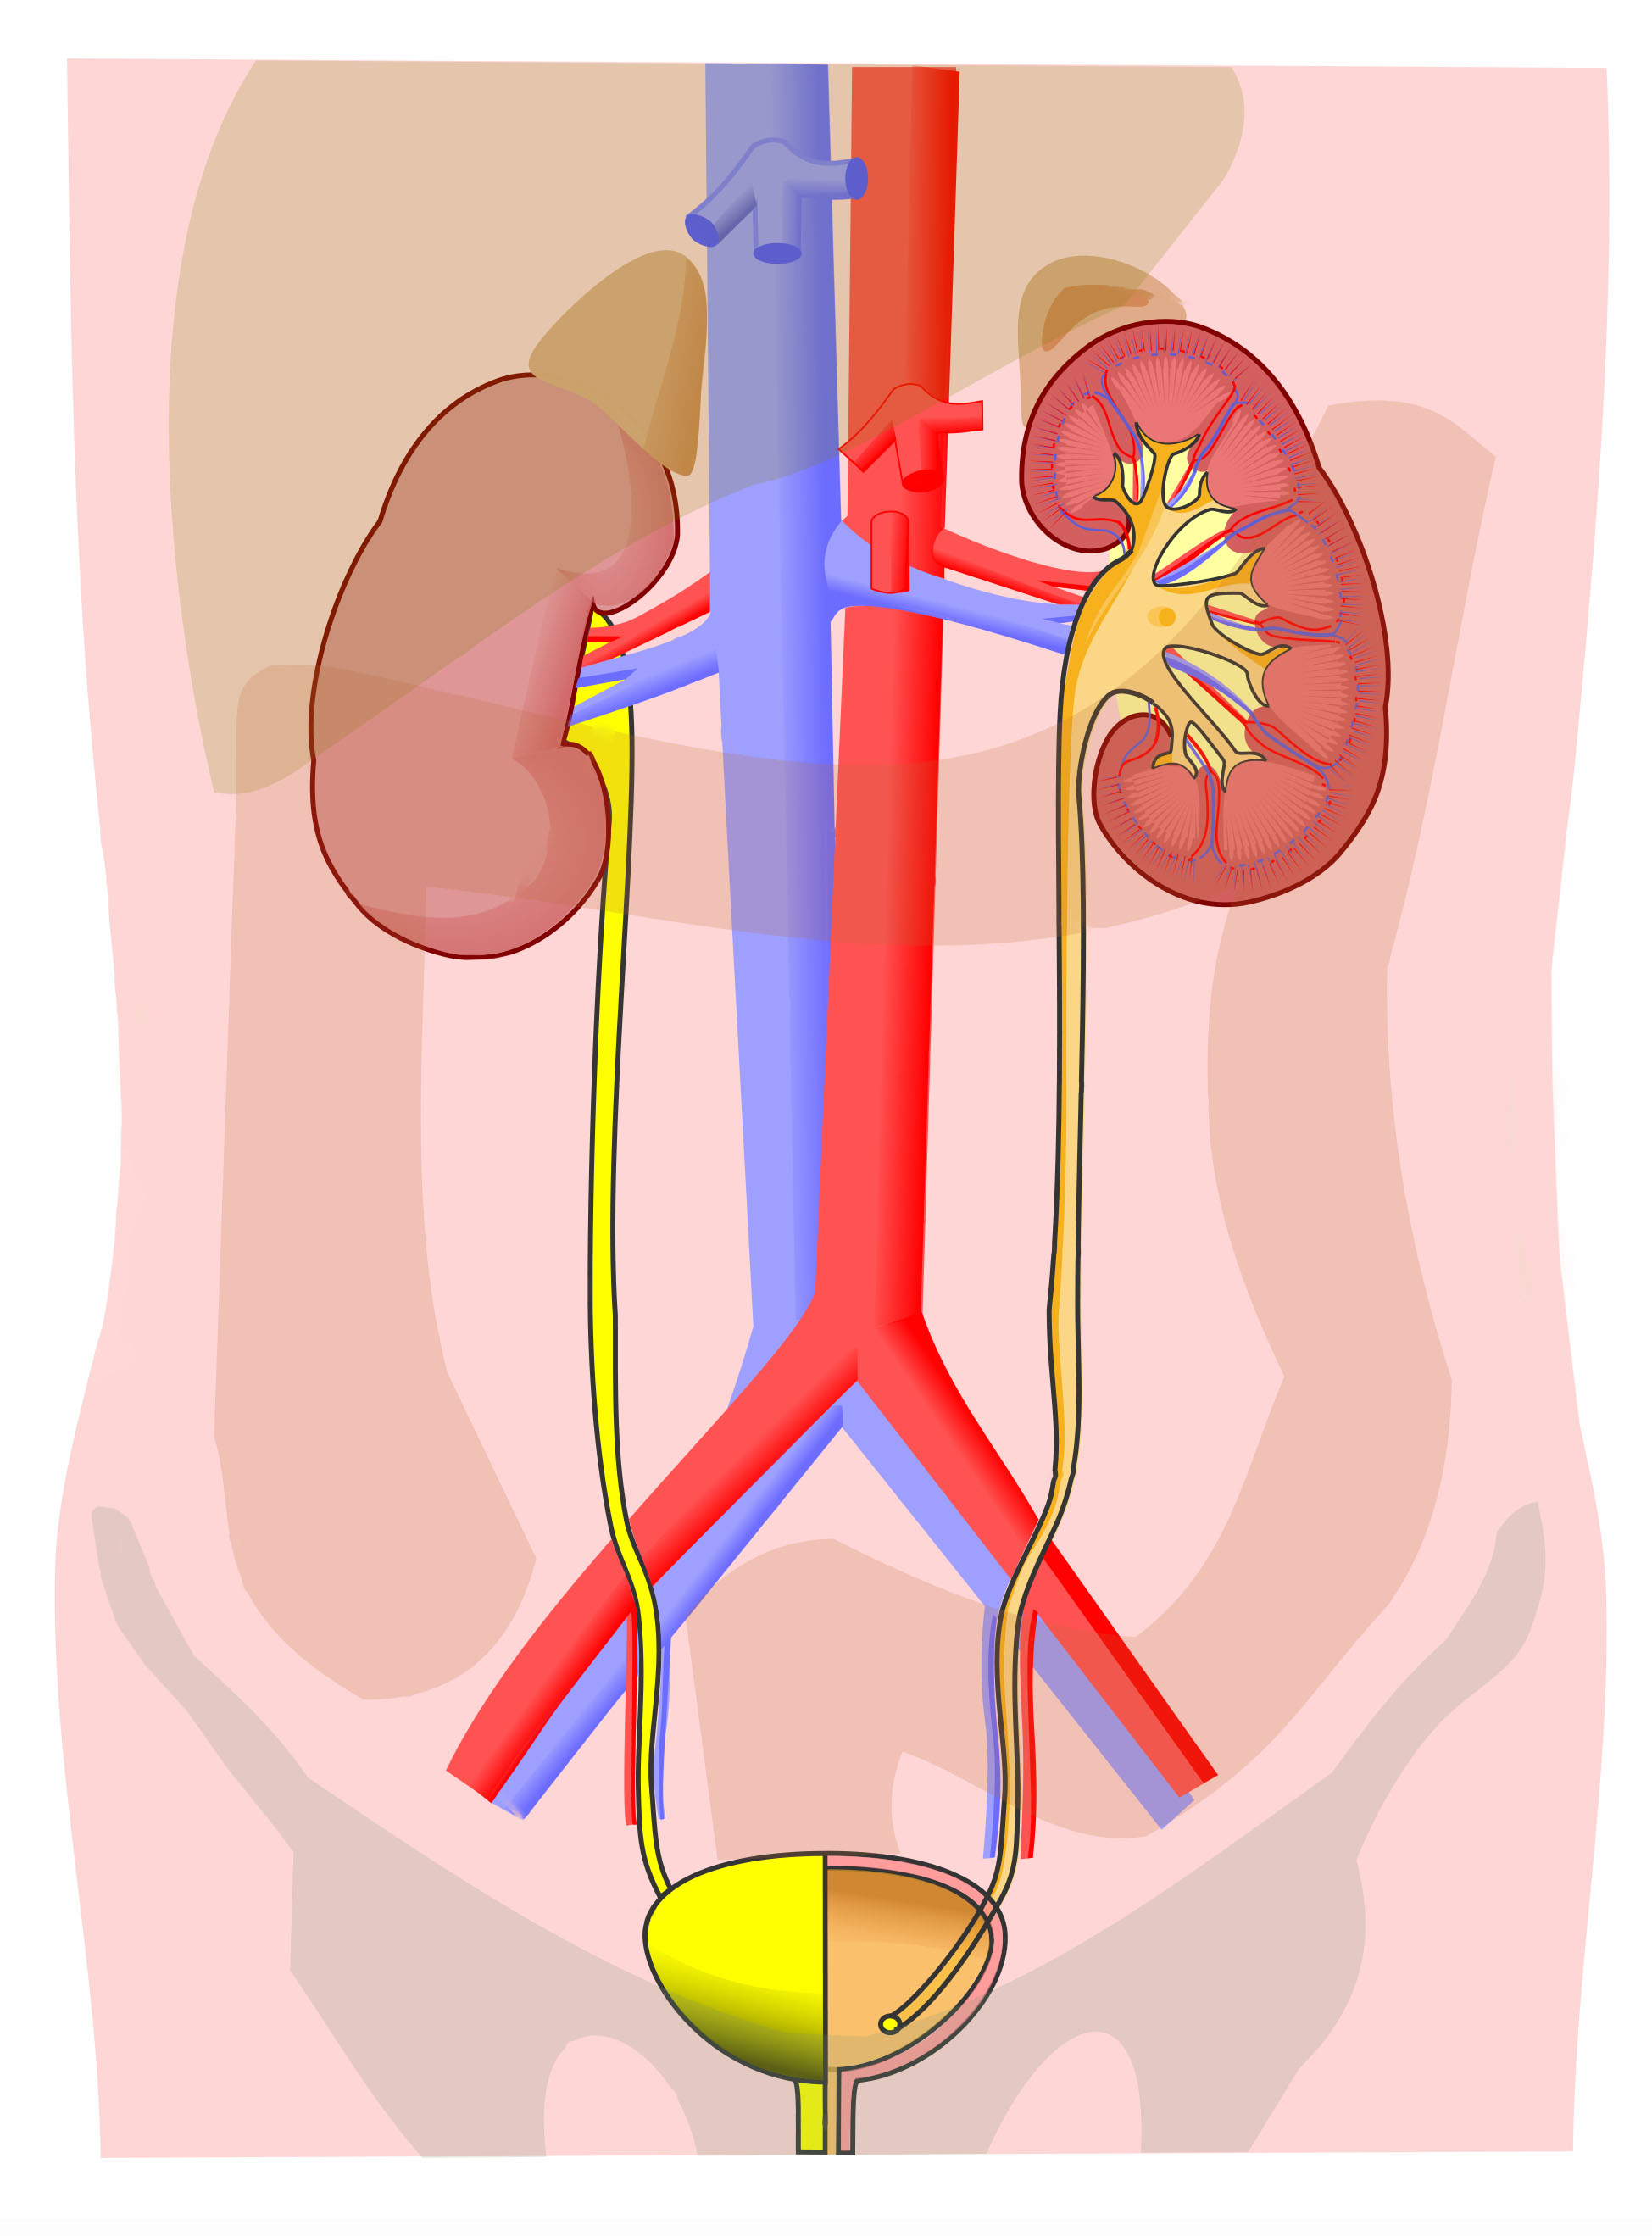
2. On the diagram below, match the numbers on the diagram with the following structures (not all numbers will be used):
|
____ fibrous capsule ____ hilum ____ location of adrenal gland (not shown) ____ major calyx ____ minor calyx |
____ nephrons ____ papilla ____ pyramid ____ renal artery |
____ renal column ____ renal pelvis ____ renal vein ____ ureter |

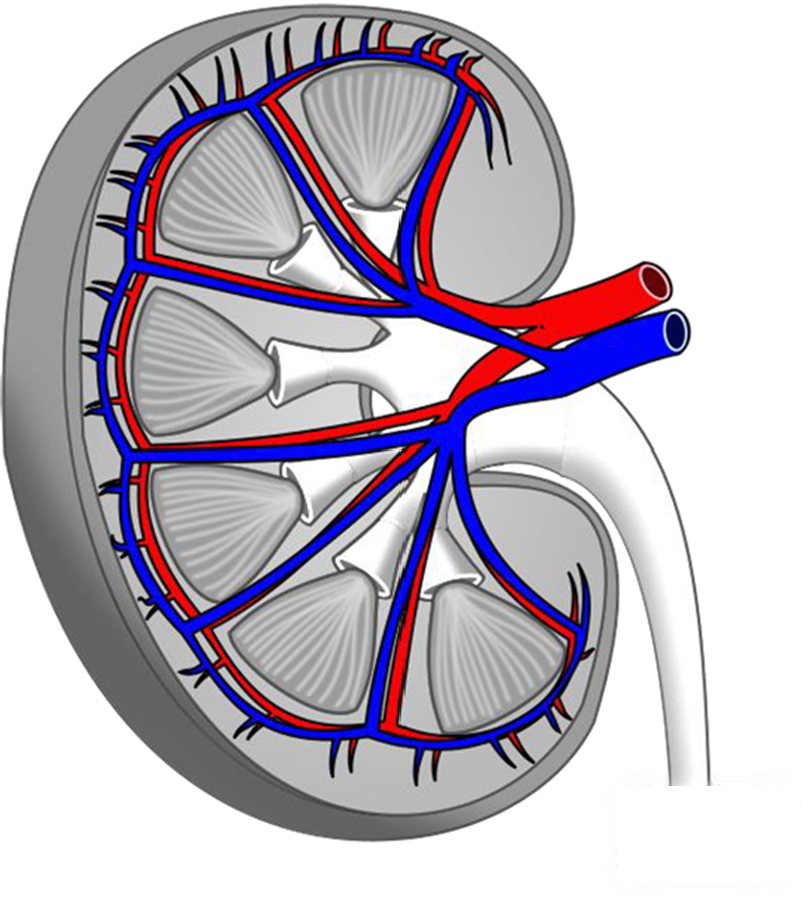
3. On the diagram below, label the following structures:
|
|
|
4. On the diagram below, label the following structures:
|
|
|
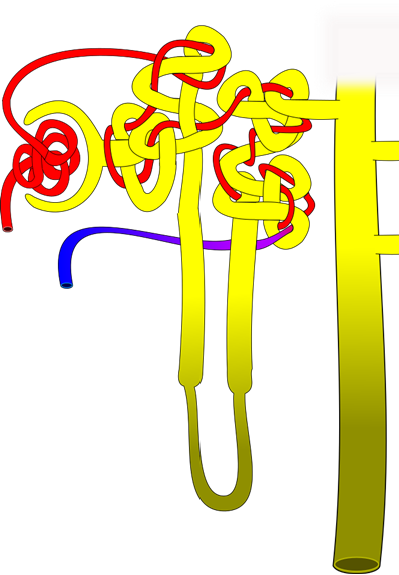
5. On the diagram below, number the path of filtrate through the nephron, beginning with the location where it is created (#1) and follow its path as it becomes urine and is transported toward the ureter (you will have 6-8 steps total, depending on how you label the figure).

6. On the diagram below, number the path of blood through the nephron, beginning with the blood vessel bringing blood to the nephron (#1) and follow its path until it exits the nephron and moves back toward the heart (you should have 6 steps total and include cortical radiate blood vessels).

7. On the diagram below, label the following structures:
|
|
|

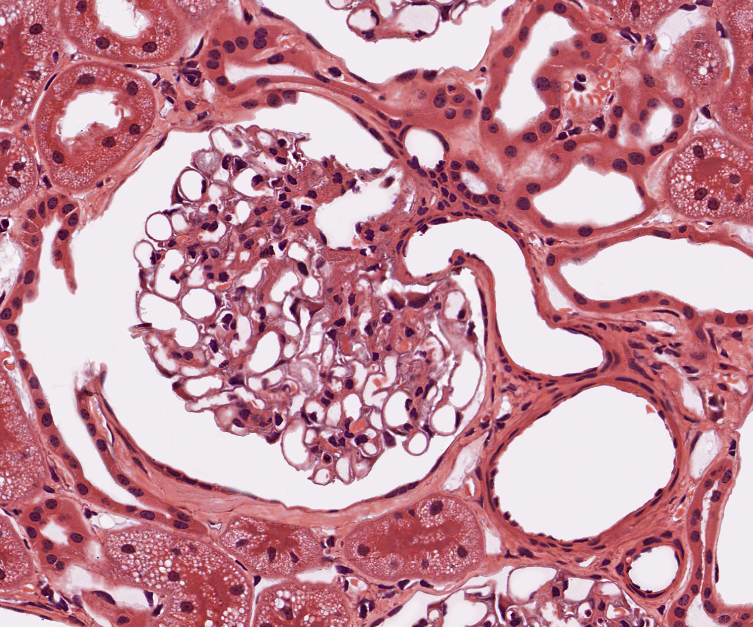
8. On the microscopic image of cortical tissue of the kidney, label the following structures:
|
|
|
9. On the diagram below, label the following structures:
|
|
|
Part 2: Histology of the Urinary System
Kidney
Make one illustration at a low magnification and another at a higher magnification to view structures of the nephron.
Label the tissue with: cortex, medulla, renal column, pyramid, glomerulus, Bowman's capsule, Bowman's space, parietal layer, podocytes, afferent arteriole, efferent arteriole, macula densa, juxtaglomerular cells (if possible), proximal convoluted tubule, distal convoluted tubule, simple cuboidal epithelium lining kidney tubules

Ureter
Label the tissue with: lumen, transitional epithelium, connective tissue, muscularis externa, adventitia
Urinary Bladder
Label the tissue with: lumen, transitional epithelium, lamina propria, muscularis externa, adventitia/serosa
Part 3: Sheep Kidney Dissection

Above: Sheep kidney.
- Collect a dissection tray, scalpel, scissors, probes, and gloves.
- Obtain a preserved cow eye and place it on your dissection tray.
- Identify the renal hilum. What three prominent structures enter/exit the kidney at the renal hilum? ______________, _______________, & _________________
- Carefully slide the scalpel from the lateral aspect of the kidney to the medial aspect of the kidney to create a frontal section of the kidney, separating anterior and posterior. DO NOT make sawing motions with the scalpel. If the scalpel is sharp enough for the dissection, it should slide across the tissue without sawing.
- Identify the following structures on your dissected kidney. Illustration and label the dissected kidney in the space below. Alternatively you can take a photo and label the photo of your dissected kidney.
|
|
|
Part 4: Urinary System Laboratory Activites
Labeling Models
- Use the anatomical models provided to your group in your group.
- As a group, identify the structures listed below.
- Write each of the following structures on masking tape or labeling tape (with correct spelling) and stick onto the model to label each structure.
|
|
|
4. Ask your instructor to verify the labeling is correct.
Instructor Signature Confirming Correct Labeling: ___________________
5. Take a photo of your anatomical model for future reference for studying.
Filtrate Path and Blood Flow Path through Kidney
1. As a group, determine the route of filtrate/urine through the various ducts of the kidney on an anatomical model, originating at the glomerulus and ending with the urethra. Be sure to identify where along that path each of the structures on the vocabulary list are located.
2. Write sequential numbers on masking tape or labeling tape to show the sequence of filtrate/urine movement and attach to an anatomical model.
3. As a group, on an anatomical model, determine the course of blood through the blood vessels from the heart, to the kidney, through the kidney, and back to the heart.
4. Using a different color tape or a different color marker than step 2, write sequential numbers on masking tape or labeling tape and adhere to an anatomical model to show the sequence of blood flow from the heart, into and through the kidney, and back to the heart.
5. Ask your instructor to verify the labeling is correct.
Instructor Signature Confirming Correct Labeling: ___________________
6. Take a photo of your anatomical model for future reference for studying.
Attributions
Part 1: Review of the Urinary System
- "Anatomy and Physiology Lab Homework" by Laird C Sheldahl is licensed under CC BY-SA 4.0
- "Digital Histology" by Department of Anatomy and Neurobiology and the Office of Faculty Affairs, Virginia Commonwealth University School of Medicine and the ALT Lab at Virginia Commonwealth University is licensed under CC BY 4.0
- "KidneyStructures PioM.svg" by Piotr Michał Jaworski is licensed under CC BY-SA 3.0
- "Urinary System Large Unlabeled.jpg" by Andrewmeyerson is licensed under CC BY-SA 3.0
Part 2: Histology of the Urinary System
- "BIOL 250 Human Anatomy Lab Manual SU 19" by Yancy Aquino, Skyline College is licensed under CC BY-NC-SA 4.0
Part 3: Sheep Kidney Dissection
- "Human Anatomy Lab Manual" by Malgosia Wilk-Blaszczak, Mavs Open Press, University of Texas at Arlington is licensed under CC BY 4.0
Part 4: Urinary System Laboratory Activities
- "Human Anatomy Lab Manual" by Malgosia Wilk-Blaszczak, Mavs Open Press, University of Texas at Arlington is licensed under CC BY 4.0
- "Kidney of lamb 6.jpg" by Jurfeld is licensed under CC BY 4.0